

概述
我们知道在ListView中可以直接设置分割线属性,但在RecyclerView中是无法直接设置分割线的,需要我们自定义ItemDecoration。
ItemDecoration顾名思义条目装饰器,那它是如何装饰的呢。ItemDecoration中主要有3个方法:
getItemOffsets获取item的偏移量onDraw在item下绘制onDrawOver在item上绘制
onDraw和onDrawOver以及item的关系可以以下图表示
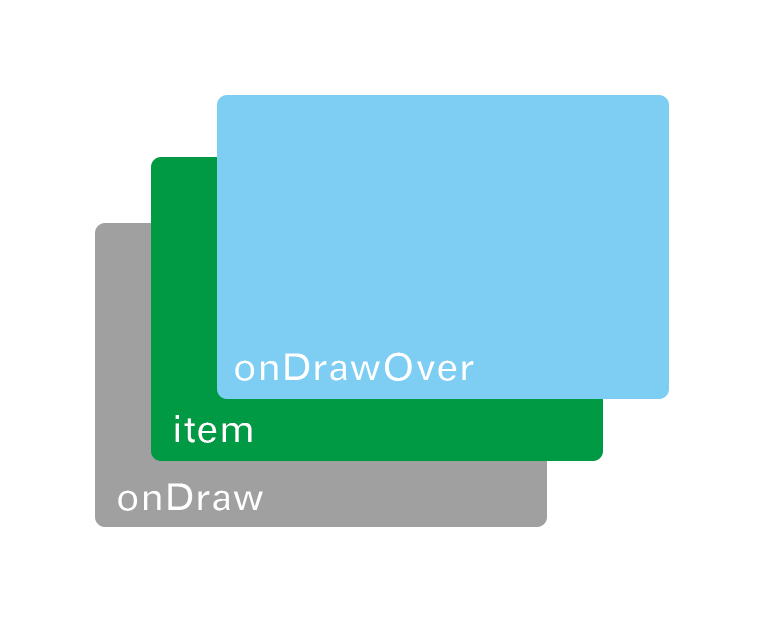
getItemOffsets类似于padding或margin值,相当于在item的周边空出一块区域出来用来显示onDraw的内容
好了,了解了基本概念之后,我们先来画分割线
绘制分割线
首先我们在item的下边或右边预留出一定的区域
@Override
public void getItemOffsets(@NonNull Rect outRect, @NonNull View view, @NonNull RecyclerView parent, @NonNull RecyclerView.State state) {
    super.getItemOffsets(outRect, view, parent, state);
    if (mOrientation == RecyclerView.HORIZONTAL) {
        outRect.right = mDrawable.getIntrinsicWidth();
    } else {
        outRect.bottom = mDrawable.getIntrinsicHeight();
    }
}
mDrawable是需要显示的分割线样式,这里我们先判断RecycleView的方向,如果是水平的,需要画垂直分割线,则在右边偏移出Drawable的宽度,如果是垂直的,需要画水平分割线,则在下边偏移出Drawable的高度,之后我们开始画分割线
@Override
public void onDraw(@NonNull Canvas c, @NonNull RecyclerView parent, @NonNull RecyclerView.State state) {
    super.onDraw(c, parent, state);
    if (mOrientation == RecyclerView.HORIZONTAL) {
        drawVertical(c, parent);
    } else {
        drawHorizontal(c, parent);
    }
}
还是先判断方向,再画相应的线,我们看drawHorizontal
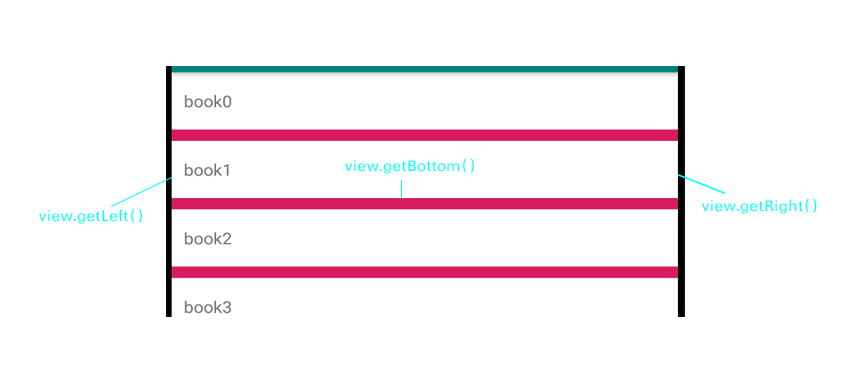
private void drawHorizontal(@NonNull Canvas canvas, @NonNull RecyclerView parent) {
    int count = parent.getChildCount();
    for (int i = 0; i < count; i++) {
        View view = parent.getChildAt(i);
        mDrawable.setBounds(view.getLeft(), view.getBottom(), view.getRight(),
                view.getBottom() + mDrawable.getIntrinsicHeight());
        mDrawable.draw(canvas);
    }
}
这里遍历获取到每一个itemView,再根据itemView的边界确定drawabel的绘制区域,有关边界的获取可以参考下图
注:这里为了方便计算没有计算padding和margin的情况,具体根据业务需求添加
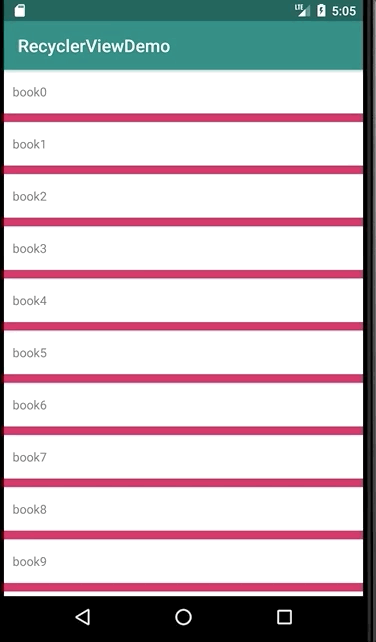
效果图
粘性标签
实现了分割线之后,我们就可以实现标签,原理基本是一样的,只是标签需要显示在item层上,所以需要在onDrawOver绘制。这里我通过回调去获取组信息
public interface GroupCallBack {
    Group getGroupByPosition(int position);
}
其中Group实体类包括组号、标题和是否是组内第一项
public class Group {

    private int groupId;
    private String groupTitle;
    private boolean groupFirst;
    ...
}
当item是组内第一项时,即需要绘制标签时,相应的偏移标签的高度
@Override
public void getItemOffsets(@NonNull Rect outRect, @NonNull View view, @NonNull RecyclerView parent, @NonNull RecyclerView.State state) {
    super.getItemOffsets(outRect, view, parent, state);
    if (mCallBack != null) {
        Group group = mCallBack.getGroupByPosition(parent.getChildAdapterPosition(view));
        if (group.isGroupFirst()) {
            outRect.top = mHeaderHeight;
        } else {
            outRect.top = mDividerHeight;
        }
    }
}
绘制区域确定完之后,就开始绘制标签了,首先先想想需要绘制粘性标签的几个地方:
- 只要是组内第一项的顶部都需要绘制标签
- 顶部悬浮的标签
第一种情况好理解,根据当前item是组内第一项的位置绘制标签,第二种情况由当前界面显示的第一项item来维护绘制。示意图大致如下图:
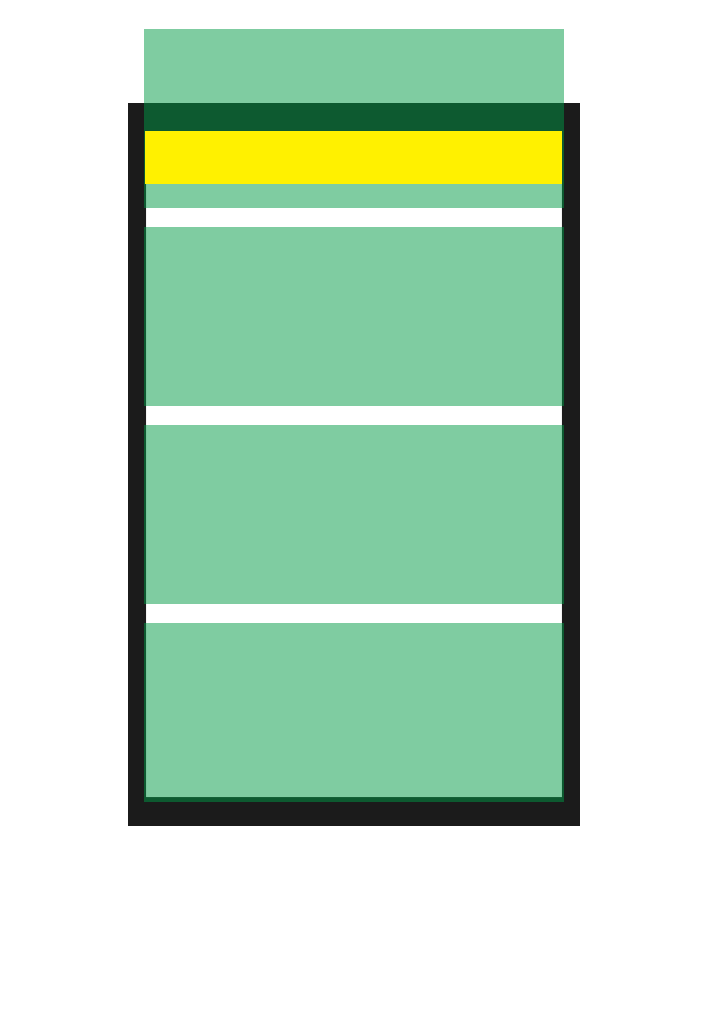
绿色的代表每一个item,黄色的代表标签,当item是可见的第一项时,绘制标签区域,区域顶部是从RecycleView的top开始
@Override
public void onDrawOver(@NonNull Canvas c, @NonNull RecyclerView parent, @NonNull RecyclerView.State state) {
    super.onDrawOver(c, parent, state);
    if (mCallBack != null) {
        int childCount = parent.getChildCount();
        for (int i = 0; i < childCount; i++) {
            View childView = parent.getChildAt(i);
            int left = parent.getPaddingLeft();
            int right = parent.getRight() - parent.getPaddingRight();
            Group group = mCallBack.getGroupByPosition(parent.getChildAdapterPosition(childView));
            if (i != 0) {
                //非显示的第一项,正常画header
                int bottom = childView.getTop();
                if (group.isGroupFirst()) {
                    int top = childView.getTop() - mHeaderHeight;
                    drawHeader(c, new Rect(left, top, right, bottom), group.getGroupTitle());
                }
            } else {
                //显示的第一项,必须画header,顶部从parent的顶部开始
                int top = parent.getPaddingTop();
                int bottom = top + mHeaderHeight;
                drawHeader(c, new Rect(left, top, right, bottom), group.getGroupTitle());
            }
        }
    }
}
注:parent.getChildAt(0)获取到的是当前显示的第一个item,非数据源中的第一项。而parent.getChildAdapterPosition(childView)获取到的是这个childView在数据源中的位置
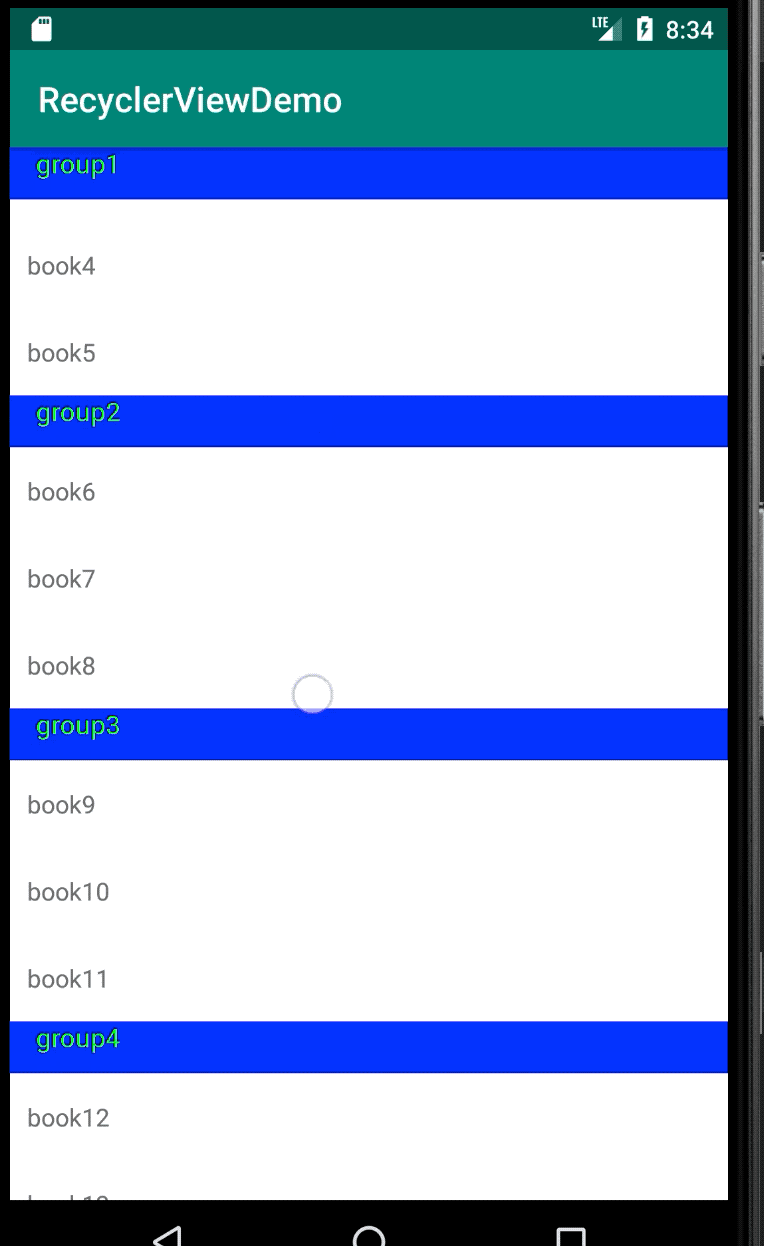
效果图:

这里还有两个问题:
- 标签在更替的时候上一个标签不是被顶上去的而是类似于覆盖的效果,这是因为我们在画顶部标签的时候一直是以Recycler的Top值作为标签的区域top值的,那我们什么时候需要标签被顶上去,很容易想到的时候是当界面显示的第一个item是group组中最后一个元素时,且该item的可见高度小于标签高度时,标签需要跟随item一起向上移动。代码如下
@Override
public void onDrawOver(@NonNull Canvas c, @NonNull RecyclerView parent, @NonNull RecyclerView.State state) {
    super.onDrawOver(c, parent, state);
    if (mCallBack != null) {
        int childCount = parent.getChildCount();
        for (int i = 0; i < childCount; i++) {
            View childView = parent.getChildAt(i);
            int left = parent.getPaddingLeft();
            int right = parent.getRight() - parent.getPaddingRight();
            Group group = mCallBack.getGroupByPosition(parent.getChildAdapterPosition(childView));
            if (i != 0) {
                //非显示的第一项,正常画header
                int bottom = childView.getTop();
                if (group.isGroupFirst()) {
                    int top = childView.getTop() - mHeaderHeight;
                    drawHeader(c, new Rect(left, top, right, bottom), group.getGroupTitle());
                }
            } else {
                //显示的第一项,必须画header
                boolean isLastView = false;
                if (childCount > 2) {
                    //这里通过判断下一个item是否是组内第一项来确定当前item是否是最后一个item
                    Group nextGroup = mCallBack.getGroupByPosition(parent.getChildAdapterPosition(childView) + 1);
                    isLastView = nextGroup.isGroupFirst();
                }
                int top = parent.getPaddingTop();
                //预期绘制的bottom值
                int bottom = top + mHeaderHeight;
                //当该项是组内最后一个item时,且预期绘制的bottom值大于该item的bottom值,标签随item一起移动
                if (isLastView && bottom > childView.getBottom()) {
                    top = childView.getBottom() - mHeaderHeight;
                    bottom = childView.getBottom();
                }
                drawHeader(c, new Rect(left, top, right, bottom), group.getGroupTitle());
                drawHeader(c, new Rect(left, top, right, bottom), group.getGroupTitle());
            }
        }
    }
}
效果图:
参考链接:
Android RecyclerView之粘性头部+点击事件
RecyclerView探索之通过ItemDecoration实现StickyHeader效果
RecyclerView之ItemDecoration
RecyclerView之ItemDecoration由浅入深
