深度学习入门(二)训练并使用 Keras 模型

2,788 阅读5分钟

本文将介绍在上一节建立的图片数据集里 ,使用 Keras 训练一个 CNN 模型,并使用这个模型

1. Keras 简介

Keras: 基于 Python 的深度学习库

001.png

Keras 是一个用 Python 编写的高级神经网络 API,它能够以 TensorFlowCNTK, 或者 Theano 作为后端运行。Keras 的开发重点是支持快速的实验。*能够以最小的时延把你的想法转换为实验结果,是做好研究的关键。

  • Keras 优先考虑开发人员的经验
  • Keras 被工业界和学术界广泛采用
  • Keras 可以轻松将模型转化为产品
  • Keras 支持多个后端引擎,不会将你锁定到一个生态系统中
  • Keras 的发展得到深度学习生态系统中的关键公司的支持。Keras 的开发主要由谷歌支持,Keras API 以 tf.keras 的形式包装在 TensorFlow 中。此外,微软维护着 Keras 的 CNTK 后端。亚马逊 AWS 正在开发 MXNet 支持。其他提供支持的公司包括 NVIDIA、优步、苹果(通过 CoreML)等

2. 我们已有的数据集如下所示

009.jpg

我们将基于这个数据集训练一个 CNN 模型,用来识别这几个分类的图片,并使识别准确率达到97%以上

3. 我们的 CNN 和 Keras 工程目录结构如下所示:

├── dataset
│   ├── bulbasaur
│   ├── charmander
│   ├── mewtwo
│   ├── pikachu
│   └── squirtle
├── examples
│   ├── bulbasaur_001.jpeg
│   ├── bulbasaur_002.jpeg
│   ├── charmander_001.jpeg
│   ├── charmander_002.jpg
│   ├── mewtwo_001.jpg
│   ├── mewtwo_002.jpg
│   ├── pikachu_001.jpg
│   ├── pikachu_002.jpg
│   ├── squirtle_001.jpg
│   └── squirtle_002.jpg
├── pokedex
│   ├── pokedex
│   ├── pokedex.xcodeproj
│   ├── pokedexTests
│   └── pokedexUITests
├── pyimagesearch
│   ├── __pycache__
│   ├── __init__.py
│   └── smallervggnet.py
├── classify.py
├── coremlconverter.py
├── lb.pickle
├── plot.png
├── pokedex.mlmodel
├── pokedex.model
├── search_bing_api.py
└── train.py

我们有四个目录:

  1. dataset 目录,存放着我们下载的五个分好类的图片,每个子目录的名称代表该子目录下图片的所属分类,将在模型训练时当作图片的标签。
  2. examples 目录,存放着我们用来测试模型的图片
  3. pyimagesearch 目录,存放着我们的 SmallerVGGNet 模型类,我们将在这篇文章里完成
  4. pokedex 目录,存放着 iOS App 项目,我们将在下一篇文章中完成

在根目录下还有 8 个文件

  1. plot.png : 我们的训练/验证准确度和损失图,将在运行后生成。
  2. lb.pickle:我们的 LabelBinarizer 序列化的文件,包含标签索引和标签名字的对应查找的机制
  3. pokedex.model:这是我们序列化后保存的 Keras Convolutional Neural Network 模型文件
  4. train.py:我们使用这个脚本训练Keras CNN 模型,画出训练精度/损失图表, 序列化 Keras CNN 模型和标签,并保存到磁盘
  5. classify.py:我们的测试脚本
  6. pokedex.model:运行 训练脚本生成的 Keras CNN 模型
  7. coremlconverter.py:模型转换脚本,运行这个脚本将 Keras CNN 模型转换为 Core ML 模型
  8. pokedex.mlmodel:运行 coremlconverter.py 生成的 Core ML 模型。我们将在后面的文章中使用

4. 创建SmallerVGGNet模型,结构如下所示

002.png

点击查看完整的模型结构

创建 smallervggnet.py 脚本,保存到 pyimagesearch 目录,插入以下代码

# import the necessary packages
from keras.models import Sequential
from keras.layers.normalization import BatchNormalization
from keras.layers.convolutional import Conv2D
from keras.layers.convolutional import MaxPooling2D
from keras.layers.core import Activation
from keras.layers.core import Flatten
from keras.layers.core import Dropout
from keras.layers.core import Dense
from keras import backend as K

class SmallerVGGNet:
	@staticmethod
	def build(width, height, depth, classes):
		# initialize the model along with the input shape to be
		# "channels last" and the channels dimension itself
		model = Sequential()
		inputShape = (height, width, depth)
		chanDim = -1

		# if we are using "channels first", update the input shape
		# and channels dimension
		if K.image_data_format() == "channels_first":
			inputShape = (depth, height, width)
			chanDim = 1

					# CONV => RELU => POOL
		model.add(Conv2D(32, (3, 3), padding="same",
			input_shape=inputShape))
		model.add(Activation("relu"))
		model.add(BatchNormalization(axis=chanDim))
		model.add(MaxPooling2D(pool_size=(3, 3)))
		model.add(Dropout(0.25))

				# (CONV => RELU) * 2 => POOL
		model.add(Conv2D(128, (3, 3), padding="same"))
		model.add(Activation("relu"))
		model.add(BatchNormalization(axis=chanDim))
		model.add(Conv2D(128, (3, 3), padding="same"))
		model.add(Activation("relu"))
		model.add(BatchNormalization(axis=chanDim))
		model.add(MaxPooling2D(pool_size=(2, 2)))
		model.add(Dropout(0.25))

		# first (and only) set of FC => RELU layers
		model.add(Flatten())
		model.add(Dense(1024))
		model.add(Activation("relu"))
		model.add(BatchNormalization())
		model.add(Dropout(0.5))

		# softmax classifier
		model.add(Dense(classes))
		model.add(Activation("softmax"))

		# return the constructed network architecture
		return model

新建 __init__.py 脚本,保存到 pyimagesearch 目录下,这样 Python 可以将这个目录识别为一个模块,我们将在训练脚本中通过模块的方式使用我们写好的 SmallerVGGNet 类。

5. 实现我们的 Keras CNN 训练脚本

新建 train.py 脚本,并插入以下代码

# set the matplotlib backend so figures can be saved in the background
import matplotlib
matplotlib.use("Agg")

# import the necessary packages
from keras.preprocessing.image import ImageDataGenerator
from keras.optimizers import Adam
from keras.preprocessing.image import img_to_array
from sklearn.preprocessing import LabelBinarizer
from sklearn.model_selection import train_test_split
from pyimagesearch.smallervggnet import SmallerVGGNet
import matplotlib.pyplot as plt
from imutils import paths
import numpy as np
import argparse
import random
import pickle
import cv2
import os

# construct the argument parse and parse the arguments
ap = argparse.ArgumentParser()
ap.add_argument("-d", "--dataset", required=True,
	help="path to input dataset (i.e., directory of images)")
ap.add_argument("-m", "--model", required=True,
	help="path to output model")
ap.add_argument("-l", "--labelbin", required=True,
	help="path to output label binarizer")
ap.add_argument("-p", "--plot", type=str, default="plot.png",
	help="path to output accuracy/loss plot")
args = vars(ap.parse_args())

# initialize the number of epochs to train for, initial learning rate,
# batch size, and image dimensions
EPOCHS = 100
INIT_LR = 1e-3
BS = 32
IMAGE_DIMS = (96, 96, 3)

# initialize the data and labels
data = []
labels = []

# grab the image paths and randomly shuffle them
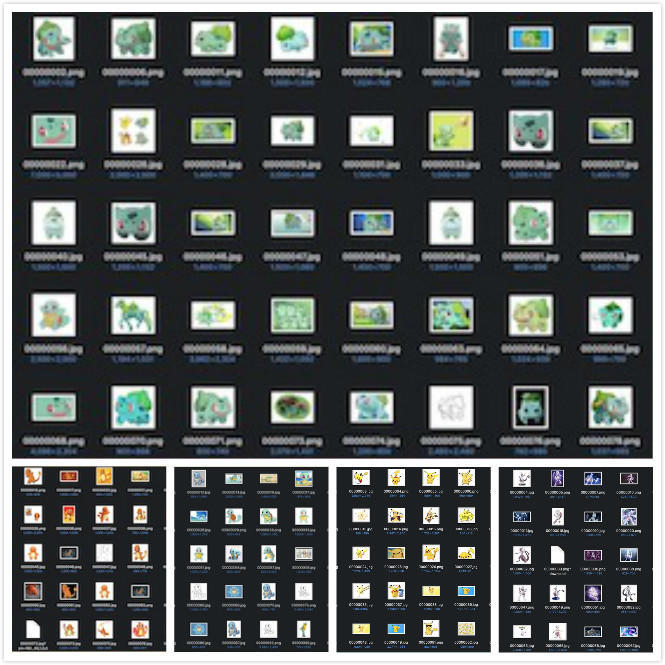
print("[INFO] loading images...")
imagePaths = sorted(list(paths.list_images(args["dataset"])))
random.seed(42)
random.shuffle(imagePaths)

# loop over the input images
for imagePath in imagePaths:
	# load the image, pre-process it, and store it in the data list
	image = cv2.imread(imagePath)
	image = cv2.resize(image, (IMAGE_DIMS[1], IMAGE_DIMS[0]))
	image = img_to_array(image)
	data.append(image)

	# extract the class label from the image path and update the
	# labels list
	label = imagePath.split(os.path.sep)[-2]
	labels.append(label)

# scale the raw pixel intensities to the range [0, 1]
data = np.array(data, dtype="float") / 255.0
labels = np.array(labels)
print("[INFO] data matrix: {:.2f}MB".format(
	data.nbytes / (1024 * 1000.0)))

# binarize the labels
lb = LabelBinarizer()
labels = lb.fit_transform(labels)

# partition the data into training and testing splits using 80% of
# the data for training and the remaining 20% for testing
(trainX, testX, trainY, testY) = train_test_split(data,
	labels, test_size=0.2, random_state=42)

# construct the image generator for data augmentation
aug = ImageDataGenerator(rotation_range=25, width_shift_range=0.1,
	height_shift_range=0.1, shear_range=0.2, zoom_range=0.2,
	horizontal_flip=True, fill_mode="nearest")

# initialize the model
print("[INFO] compiling model...")
model = SmallerVGGNet.build(width=IMAGE_DIMS[1], height=IMAGE_DIMS[0],
	depth=IMAGE_DIMS[2], classes=len(lb.classes_))
opt = Adam(lr=INIT_LR, decay=INIT_LR / EPOCHS)
model.compile(loss="categorical_crossentropy", optimizer=opt,
	metrics=["accuracy"])

# train the network
print("[INFO] training network...")
H = model.fit_generator(
	aug.flow(trainX, trainY, batch_size=BS),
	validation_data=(testX, testY),
	steps_per_epoch=len(trainX) // BS,
	epochs=EPOCHS, verbose=1)

# save the model to disk
print("[INFO] serializing network...")
model.save(args["model"])

# save the label binarizer to disk
print("[INFO] serializing label binarizer...")
f = open(args["labelbin"], "wb")
f.write(pickle.dumps(lb))
f.close()

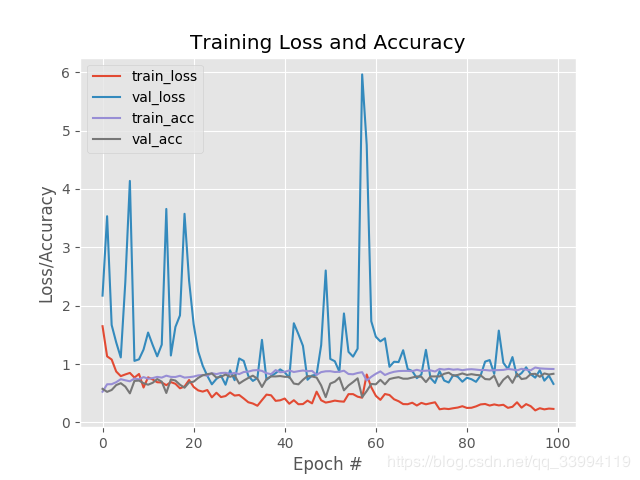
# plot the training loss and accuracy
plt.style.use("ggplot")
plt.figure()
N = EPOCHS
plt.plot(np.arange(0, N), H.history["loss"], label="train_loss")
plt.plot(np.arange(0, N), H.history["val_loss"], label="val_loss")
plt.plot(np.arange(0, N), H.history["acc"], label="train_acc")
plt.plot(np.arange(0, N), H.history["val_acc"], label="val_acc")
plt.title("Training Loss and Accuracy")
plt.xlabel("Epoch #")
plt.ylabel("Loss/Accuracy")
plt.legend(loc="upper left")
plt.savefig(args["plot"])

6. 训练 Keras CNN 模型

在终端运行以下命令

$python train.py --dataset dataset --model pokedex.model --labelbin lb.pickle
Using TensorFlow backend.
[INFO] loading images...
libpng warning: iCCP: known incorrect sRGB profile

....

[INFO] data matrix: 165.67MB
[INFO] compiling model...

Epoch 1/100
19/19 [==============================] - 26s 1s/step - loss: 2.0648 - acc: 0.5099 - val_loss: 1.5347 - val_acc: 0.6818
Epoch 2/100
19/19 [==============================] - 22s 1s/step - loss: 1.2485 - acc: 0.6371 - val_loss: 0.9233 - val_acc: 0.7662
Epoch 3/100
19/19 [==============================] - 24s 1s/step - loss: 1.1295 - acc: 0.6336 - val_loss: 1.3024 - val_acc: 0.7013
Epoch 4/100
19/19 [==============================] - 23s 1s/step - loss: 1.0230 - acc: 0.6530 - val_loss: 1.1989 - val_acc: 0.6688
Epoch 5/100
19/19 [==============================] - 23s 1s/step - loss: 0.9785 - acc: 0.6683 - val_loss: 1.0938 - val_acc: 0.6818
Epoch 6/100
19/19 [==============================] - 22s 1s/step - loss: 0.9792 - acc: 0.6979 - val_loss: 1.1388 - val_acc: 0.7143
Epoch 7/100
19/19 [==============================] - 22s 1s/step - loss: 0.9480 - acc: 0.6963 - val_loss: 0.9233 - val_acc: 0.7468
Epoch 8/100
 4/19 [=====>........................] - ETA: 17s - loss: 0.6971 - acc: 0.7500

...

[INFO] serializing network...
[INFO] serializing label binarizer...

在MacBook Pro 上,完成训练大约需要耗时半小时,最后在主目录下生成pokedex.model,lb.pickle,plot.png 这三个文件。plot.png 如下所示

image

我们可以看到训练精度和验证精度约 97%

7. 编写测试脚本

现在我们有一个训练好的模型里,我们将使用这个模型来分类未包含在训练数据集和测试数据里面的图片,来测试这个模型的准确度。新建一个Pyhon脚本文件,命名为 classify.py,插入以下代码

# import the necessary packages
from keras.preprocessing.image import img_to_array
from keras.models import load_model
import numpy as np
import argparse
import imutils
import pickle
import cv2
import os

# construct the argument parse and parse the arguments
ap = argparse.ArgumentParser()
ap.add_argument("-m", "--model", required=True,
	help="path to trained model model")
ap.add_argument("-l", "--labelbin", required=True,
	help="path to label binarizer")
ap.add_argument("-i", "--image", required=True,
	help="path to input image")
args = vars(ap.parse_args())

# load the image
image = cv2.imread(args["image"])
output = image.copy()

# pre-process the image for classification
image = cv2.resize(image, (96, 96))
image = image.astype("float") / 255.0
image = img_to_array(image)
image = np.expand_dims(image, axis=0)

# load the trained convolutional neural network and the label
# binarizer
print("[INFO] loading network...")
model = load_model(args["model"])
lb = pickle.loads(open(args["labelbin"], "rb").read())

# classify the input image
print("[INFO] classifying image...")
proba = model.predict(image)[0]
idx = np.argmax(proba)
label = lb.classes_[idx]

# we'll mark our prediction as "correct" of the input image filename
# contains the predicted label text (obviously this makes the
# assumption that you have named your testing image files this way)
filename = args["image"][args["image"].rfind(os.path.sep) + 1:]
correct = "correct" if filename.rfind(label) != -1 else "incorrect"

# build the label and draw the label on the image
label = "{}: {:.2f}% ({})".format(label, proba[idx] * 100, correct)
output = imutils.resize(output, width=400)
cv2.putText(output, label, (10, 25),  cv2.FONT_HERSHEY_SIMPLEX,
	0.7, (0, 255, 0), 2)

# show the output image
print("[INFO] {}".format(label))
cv2.imshow("Output", output)
cv2.waitKey(0)

8. 使用我们的 Keras CNN 模型进行图片分类

​测试 pikachu 图片

$ python classify.py --model pokedex.model --labelbin lb.pickle --image examples/pikachu_001.jpg 
Using TensorFlow backend.
[INFO] loading network...
[INFO] classifying image...
[INFO] pikachu: 100.00% (correct)

004.jpg

​测试 charmander 图片

$ python classify.py --model pokedex.model --labelbin lb.pickle --image examples/pikachu_001.jpg 
Using TensorFlow backend.
[INFO] loading network...
[INFO] classifying image...
[INFO] charmander: 99.66% (correct)

005.jpg

9. 小结

我们使用 Keras 训练好了一个CNN模型,只使用1000 张左右的图片,测试精度达到约 97%!为了更好的识别宠物小精灵,需要增加图片分类数目和每个分类下的图片数量。

扫码关注公众号,回复"训练代码",可以获取这次 Keras CNN 模型训练的代码

0010.jpg