

要求:了解文件流、sqlite
文件流
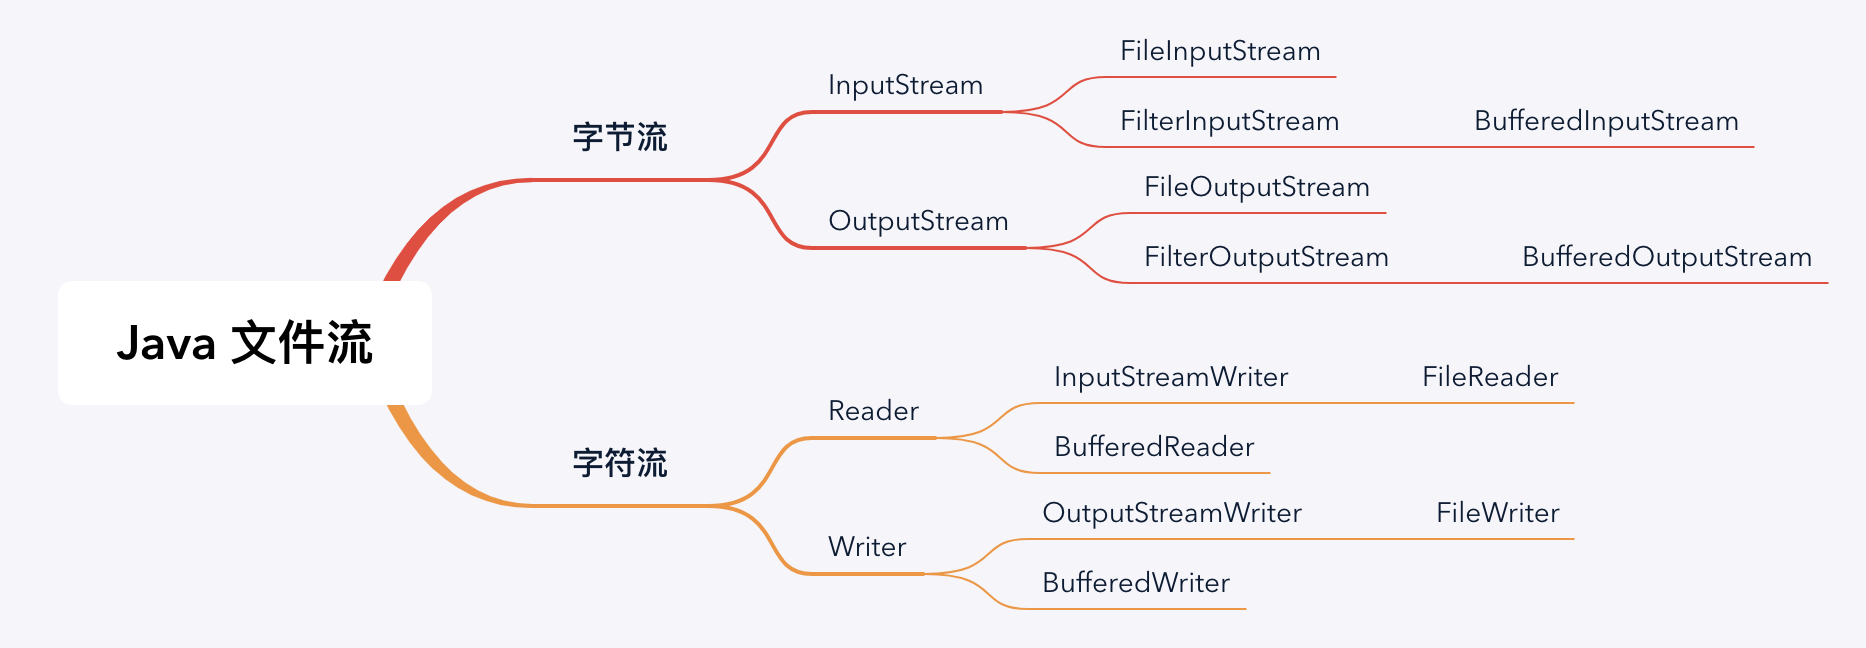
在 Java 中读写文件的 IO 流分为两大类字节流和字符流,字节流的基类为 InputStream、OutputStream,字节流的基类为 Reader、Writer,下面来分别学一下。
IO 流的使用一般分为 3 步
- 创建文件对象
- 用流装载文件
- 开始读写操作
字节流读写:
public static void readFileByByte(String readFilePath, String writeFilePath) {
    File readFile = new File(readFilePath);
    File writeFile = new File(writeFilePath);
    InputStream inputStream = null;
    OutputStream outputStream = null;
    try {
        // InputStream 的一种实现,如果要实现缓存区,就换成 BufferedInputStream 实现
        inputStream = new FileInputStream(readFile);
        // OutputStream 的一种实现,如果要实现缓存区,就换成 BufferedOutputStream 实现
        outputStream = new FileOutputStream(writeFile);
        int tmp;
        while ((tmp = inputStream.read()) != -1) {
            outputStream.write(tmp);
        }
    } catch (IOException e) {
        e.printStackTrace();
    } finally {
        close(inputStream);
        close(outputStream);
    }
}
字符流读写:
public static void readFileByCharacter(String readFilePath, String writeFilePath) {
    File readFile = new File(readFilePath);
    File writeFile = new File(writeFilePath);
    FileReader reader = null;
    FileWriter writer = null;
    try {
        reader = new FileReader(readFile);
        writer = new FileWriter(writeFile);
        int tmp;
        while ((tmp = reader.read()) != 1) {
            writer.write(tmp);
        }
    } catch (IOException e) {
        e.printStackTrace();
    } finally {
        close(reader);
        close(writer);
    }
}
字符流按行读写
public static void readFileByCharacterOfLine(String readFilePath, String writeFilePath) {
    File readFile = new File(readFilePath);
    File writeFile = new File(writeFilePath);
    BufferedReader bufferedReader = null;
    BufferedWriter bufferedWriter = null;
    try {
        bufferedReader = new BufferedReader(new FileReader(readFile));
        bufferedWriter = new BufferedWriter(new FileWriter(writeFile));
        String tmp;
        // 按行读取
        while ((tmp = bufferedReader.readLine()) != null) {
            bufferedWriter.write(tmp + "\n");
        }
    } catch (IOException e) {
        e.printStackTrace();
    } finally {
        close(bufferedReader);
        close(bufferedWriter);
    }
}
Java 序列化
使用方式很简单,实现 Serializable 接口,再使用 ObjectInputStream 进行对象的读写。
序列化 ID 问题
序列化 ID 在 IDE 下提供了两种生成策略,一个是固定的 1L,一个是随机生成一个不重复的 long 类型数据(实际上是使用 JDK 工具生成),在这里有一个建议,如果没有特殊需求,就是用默认的 1L 就可以,这样可以确保代码一致时反序列化成功。那么随机生成的序列化 ID 有什么作用呢,有些时候,通过改变序列化 ID 可以用来限制某些用户的使用。
静态变量序列化
public class Test implements Serializable {

    private static final long serialVersionUID = 1L;

    public static int staticVar = 5;

    public static void main(String[] args) {
        try {
            //初始时staticVar为5
            ObjectOutputStream out = new ObjectOutputStream(
                    new FileOutputStream("result.obj"));
            out.writeObject(new Test());
            out.close();

            //序列化后修改为10
            Test.staticVar = 10;

            ObjectInputStream oin = new ObjectInputStream(new FileInputStream(
                    "result.obj"));
            Test t = (Test) oin.readObject();
            oin.close();

            //再读取,通过t.staticVar打印新的值
            System.out.println(t.staticVar);

        } catch (FileNotFoundException e) {
            e.printStackTrace();
        } catch (IOException e) {
            e.printStackTrace();
        } catch (ClassNotFoundException e) {
            e.printStackTrace();
        }
    }
}
最后输出结果为 10,因为序列化保存的是对象的状态,静态变量属于类的状态,因此,序列化并不保存静态变量
父类的序列化与 Transient 关键字
情境:一个子类实现了 Serializable 接口,它的父类都没有实现 Serializable 接口,序列化该子类对象,然后反序列化后输出父类定义的某变量的数值,该变量数值与序列化时的数值不同。
敏感字段加密
SQLite
创建
创建数据库需要自己实现「SQLiteOpenHelper」类,并重写 onCreate() 和 onUpgrade() 方法。
public class MyDatabaseHelper extends SQLiteOpenHelper {

    private static final String CREATE_BOOK = "create table Book ("
            + "id integer primary key autoincrement, "
            + "author text, "
            + "price real, "
            + "pages integer, "
            + "name text)";

    private static final String CREATE_CATEGORY = "create table Category ("
            + "id integer primary key autoincrement, "
            + "category_name text, "
            + "category_code integer)";

    private Context mContext;

    public MyDatabaseHelper(Context context, String name,
                            SQLiteDatabase.CursorFactory factory, int version) {
        super(context, name, factory, version);
        mContext = context;
    }

    @Override
    public void onCreate(SQLiteDatabase db) {
        db.execSQL(CREATE_BOOK);
        db.execSQL(CREATE_CATEGORY);
        Toast.makeText(mContext, "Create succeeded", Toast.LENGTH_SHORT).show();
    }

    @Override
    public void onUpgrade(SQLiteDatabase db, int oldVersion, int newVersion) {
        db.execSQL("drop table if exists Book");
        db.execSQL("drop table if exists Category");
        onCreate(db);
    }
}
使用 MyDatabaseHelper 来创建数据库
// 增加 version 号 SQLiteOpenHelper 会执行 onUpgrade 方法
dbHelper = new MyDatabaseHelper(this, "BookStore.db", null, 1);
dbHelper.getWritableDatabase();
插入数据
使用 SQLite 对应的 insert 方法
// 修改表内容的操作,需要通过 getWritableDatabase() 方法获取对象
SQLiteDatabase db = dbHelper.getWritableDatabase();
db.beginTransaction();
ContentValues values = new ContentValues();
values.put("name", "fxxk the Android");
values.put("author", "wendraw");
values.put("pages", 454);
values.put("price", 233);
// 插入第一条数据
db.insert("Book", null, values);
values.clear();
values.put("name", "fxxk the Java");
values.put("author", "wendraw");
values.put("pages", 345);
values.put("price", 88);
// 插入第二条数据
db.insert("Book", null, values);
// 使用 SQL 语法插入第三条数据
db.execSQL("insert into Book (name,author,pages,price) values ('fxxk the Kotlin','Tom',233,23)");
db.setTransactionSuccessful();
可以看到在插入操作中,execSQL 方法会显得非常简洁
删除数据
删除数据的方法除了execSQL还有delete(String table,String whereClause,String[] whereArgs),whereClause是删除条件,whereArgs是删除条件值数组。
SQLiteDatabase db = dbHelper.getWritableDatabase();
                db.beginTransaction();
                // ? 是一个占位符,具体的值取决于下一个参数
                db.delete("Book", "price < ?", new String[]{"100"});
                db.setTransactionSuccessful();
修改数据
修改数据和插入数据很相似,调用的方法除了execSQL还可以是update(String table,ContentValues values,String whereClause, String[] whereArgs)
SQLiteDatabase db = dbHelper.getWritableDatabase();
db.beginTransaction();
ContentValues values = new ContentValues();
values.put("price", 188);
// 更新所有的 name = ?,其中 ? 是一个占位符,最后的值取决于第四个参数
db.update("Book", values, "name = ?", new String[]{"fxxk the Android"});
db.setTransactionSuccessful();
查找数据
查找数据有两个方法,一个是 query
public Cursor query(String table,String[] columns,String selection,String[] selectionArgs,String groupBy,String having,String orderBy,String limit);,
另外一个是 rawQuery
public Cursor rawQuery(String sql, String[] selectionArgs)
rawQuery的写法类似上面的execSQL。
query 中参数的含义是:
- table:表名称
- columns:列名称数组
- selection:条件字句,相当于where
- selectionArgs:条件字句,参数数组
- groupBy:分组列
- having:分组条件
- orderBy:排序列
- limit:分页查询限制
- Cursor:返回值,相当于结果集ResultSet
SQLiteDatabase db = dbHelper.getReadableDatabase();
// 查询 Book 表中所有数据
Cursor cursor = db.query("Book", null, null,
        null, null, null, null);
if (cursor.moveToFirst()) {
    do {
        // 遍历 Cursor 对象,取出数据并打印
        String name = cursor.getString(cursor.getColumnIndex("name"));
        String author = cursor.getString(cursor.getColumnIndex("author"));
        int pages = cursor.getInt(cursor.getColumnIndex("pages"));
        double price = cursor.getDouble(cursor.getColumnIndex("price"));
        Log.d(TAG, "book name is " + name);
        Log.d(TAG, "book author is " + author);
        Log.d(TAG, "book pages is " + pages);
        Log.d(TAG, "book price is " + price);
    } while (cursor.moveToNext());
}
cursor.close();
SQLite 是不是线程安全
如果直接在多线程环境下使用 MyDatabaseHelper 类
 // Thread 1
 Context context = getApplicationContext();
 DatabaseHelper helper = new DatabaseHelper(context);
 SQLiteDatabase database = helper.getWritableDatabase();
 database.insert(…);
 database.close();

 // Thread 2
 Context context = getApplicationContext();
 DatabaseHelper helper = new DatabaseHelper(context);
 SQLiteDatabase database = helper.getWritableDatabase();
 database.insert(…);
 database.close();
将会出现如下错误
android.database.sqlite.SQLiteDatabaseLockedException: database is locked (code 5)
为了解决这个问题,我们准备一个 DatabaseManager 类,用来管理 SQLiteOpenHelper 类。
主要解决两个问题:
- 因为每次创建新的SQLiteOpenHelper对象时,实际上都在建立新的数据库连接。如果您尝试同时从实际的不同连接写入数据库,则会失败。
- 如果只用单例来管理,运行程序会发现如下错误:
这个问题很明显,就是某个线程已经将数据库关闭了,但是另一个还在进行访问。
java.lang.IllegalStateException: attempt to re-open an already-closed object: SQLiteDatabase
所以就在单例的基础上再加上一个字段,用来判断数据库的开、关。
public class DatabaseManager {
    // 一个提供原子操作的类
    private AtomicInteger mOpenCounter = new AtomicInteger();

    private static DatabaseManager instance;
    private static SQLiteOpenHelper mDatabaseHelper;
    private SQLiteDatabase mDatabase;

    public static synchronized void initializeInstance(SQLiteOpenHelper helper) {
        if (instance == null) {
            instance = new DatabaseManager();
            mDatabaseHelper = helper;
        }
    }

    public static synchronized DatabaseManager getInstance() {
        if (instance == null) {
            throw new IllegalStateException(DatabaseManager.class.getSimpleName() +
                    " is not initialized, call initializeInstance(..) method first.");
        }

        return instance;
    }

    public synchronized SQLiteDatabase openDatabase() {
        if(mOpenCounter.incrementAndGet() == 1) {
            // Opening new database
            mDatabase = mDatabaseHelper.getWritableDatabase();
        }
        return mDatabase;
    }

    public synchronized void closeDatabase() {
        if(mOpenCounter.decrementAndGet() == 0) {
            // Closing database
            mDatabase.close();

        }
    }
}
使用方法:
SQLiteDatabase database = DatabaseManager.getInstance().openDatabase();
database.insert(...);
// database.close(); Don't close it directly!
DatabaseManager.getInstance().closeDatabase(); // correct way
