

在介绍Row和Column时,如果子组件超出屏幕范围,则会报溢出错误,如:
Row(
  children: <Widget>[
    Text("xxx"*100)
  ],
);
运行效果如下:

可以看到,右边溢出部分报错,这是因为Row默认只有一行,如果超出屏幕不会折行,我们把超出屏幕显示范围会自动折行的布局称为流式布局。Flutter中通过Wrap和Flow来支持流式布局,将上例中的Row换成Wrap后溢出部分则会自动折行,下面我们分别介绍一下Wrap和Flow。
Wrap
以下是Wrap的定义:
Wrap({
  ...
  this.direction = Axis.horizontal,
  this.alignment = WrapAlignment.start,
  this.spacing = 0.0,
  this.runAlignment = WrapAlignment.start,
  this.runSpacing = 0.0,
  this.crossAxisAlignment = WrapCrossAlignment.start,
  this.textDirection,
  this.verticalDirection = VerticalDirection.down,
  List<Widget> children = const <Widget>[],
})
我们可以看到Wrap的很多属性在Row、Column以及Flex中都有,如direction、crossAxisAlignment、textDirection、verticalDirection、children等,这些属性的意义是相同的,不过需要注意的是,Wrap中的crossAxisAlignment属性和Row、Column以及Flex中的crossAxisAlignment略有差异:
-
取值方式不同;
Wrap中的crossAxisAlignment取值为WrapCrossAlignment.start,而Row、Column以及Flex中的crossAxisAlignment则取值为CrossAxisAlignment.center,前者使用WrapCrossAlignment来取值,而后者使用CrossAxisAlignment来取值。 -
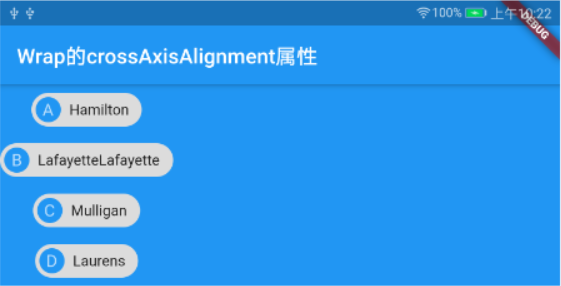
在主轴为垂直方向时,子组件对齐方式略有差异;如在
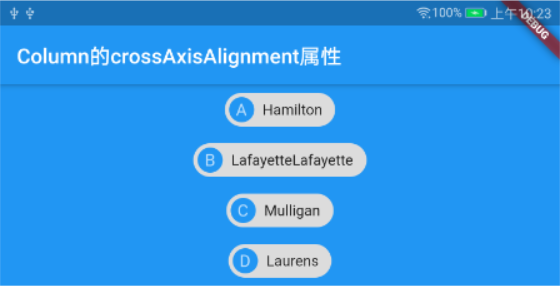
Wrap中crossAxisAlignment值为WrapCrossAlignment.center,且direction为Axis.vertical,同时宽度为屏幕宽度,此时Wrap中的所有子组件都将以最大组件的宽度居中对齐,而Column中的crossAxisAlignment值为CrossAxisAlignment.center,且宽度为屏幕宽度,那么它们当中的所有子组件都将在屏幕中间且以最大组件宽度居中对齐。Wrap的示例代码:ConstrainedBox( constraints: BoxConstraints(minWidth: double.infinity), child: Container( color: Colors.blue, child: Wrap( direction: Axis.vertical, crossAxisAlignment: WrapCrossAlignment.center, children: <Widget>[ Chip( avatar: CircleAvatar(backgroundColor: Colors.blue, child: Text("A"),), label: Text("Hamilton"), ), Chip( avatar: CircleAvatar(backgroundColor: Colors.blue, child: Text("B"),), label: Text("LafayetteLafayette"), ), Chip( avatar: CircleAvatar(backgroundColor: Colors.blue, child: Text("C"),), label: Text("Mulligan"), ), Chip( avatar: CircleAvatar(backgroundColor: Colors.blue, child: Text("D"),), label: Text("Laurens"), ), ], ), ), ),运行效果:
Column的示例代码:ConstrainedBox( constraints: BoxConstraints(minWidth: double.infinity), child: Container( color: Colors.blue, child: Column( mainAxisSize: MainAxisSize.min, crossAxisAlignment: CrossAxisAlignment.center, children: <Widget>[ Chip( avatar: CircleAvatar(backgroundColor: Colors.blue, child: Text("A"),), label: Text("Hamilton"), ), Chip( avatar: CircleAvatar(backgroundColor: Colors.blue, child: Text("B"),), label: Text("LafayetteLafayette"), ), Chip( avatar: CircleAvatar(backgroundColor: Colors.blue, child: Text("C"),), label: Text("Mulligan"), ), Chip( avatar: CircleAvatar(backgroundColor: Colors.blue, child: Text("D"),), label: Text("Laurens"), ), ], ), ), ),运行效果:
除此之外,其它相同属性并无差异,在此就不再一一赘述,读者可以查阅前面介绍的Row和Colum的文章。接下来我们看一下Wrap特有的几个属性:
spacing:主轴方向子组件的间距runSpacing:纵轴方向子组件的间距alignment:主轴方向子组件的对齐方式runAlignment:纵轴方向子组件的对齐方式
示例
Container(
  color: Colors.blue,
  child: Wrap(
    spacing: 20.0,
    runSpacing: 10.0,
    alignment: WrapAlignment.center,
    children: <Widget>[
      Chip(
        avatar: CircleAvatar(backgroundColor: Colors.blue, child: Text("A"),),
        label: Text("Hamilton"),
      ),
      Chip(
        avatar: CircleAvatar(backgroundColor: Colors.blue, child: Text("B"),),
        label: Text("Lafayette"),
      ),
      Chip(
        avatar: CircleAvatar(backgroundColor: Colors.blue, child: Text("C"),),
        label: Text("Mulligan"),
      ),
      Chip(
        avatar: CircleAvatar(backgroundColor: Colors.blue, child: Text("D"),),
        label: Text("Laurens"),
      ),
      Chip(
        avatar: CircleAvatar(backgroundColor: Colors.blue, child: Text("D"),),
        label: Text("Zane"),
      ),
    ],
  ),
),
运行效果如下:
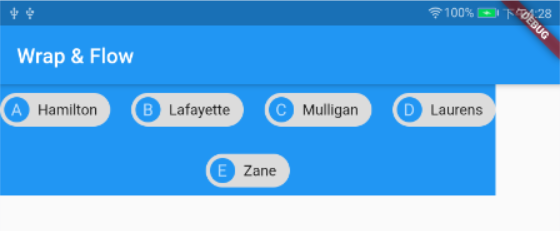
我们可以看出,Wrap的宽度和高度都是自适应的,取决于它所包含的子组件,如果想要设置Wrap的宽度和高度,可以通过ConstrainedBox和SizedBox来强制更改宽度和高度限制,如:
ConstrainedBox(
  constraints: BoxConstraints(minWidth: double.infinity, minHeight: 600.0),
  child: Container(
    color: Colors.blue,
    child: Wrap(
      alignment: WrapAlignment.center,
      runAlignment: WrapAlignment.center,
      children: <Widget>[
        Chip(
          avatar: CircleAvatar(backgroundColor: Colors.blue, child: Text("A"),),
          label: Text("Hamilton"),
        ),
        Chip(
          avatar: CircleAvatar(backgroundColor: Colors.blue, child: Text("B"),),
          label: Text("LafayetteLafayette"),
        ),
        Chip(
          avatar: CircleAvatar(backgroundColor: Colors.blue, child: Text("C"),),
          label: Text("Mulligan"),
        ),
        Chip(
          avatar: CircleAvatar(backgroundColor: Colors.blue, child: Text("D"),),
          label: Text("Laurens"),
        ),
      ],
    ),
  ),
),
Flow
我们一般很少会使用Flow,因为其过于复杂,需要自己实现子组件的位置转换,所以在很多场景下首先要考虑的是Wrap是否满足需求。Flow主要用于一些需要自定义布局策略或性能要求较高(如动画中)的场景。
Flow的优点
- 性能好:
Flow是一个对子组件尺寸以及位置调整非常高效的控件,Flow用转换矩阵在对子组件进行位置调整的时候进行了优化:在Flow定位过后,如果子组件的尺寸或者位置发生了变化,在FlowDelegate中的paintChildren()方法中调用context.paintChild进行重绘,而context.paintChild在重绘时使用了转换矩阵,并没有实际调整组件位置。 - 灵活:由于我们需要自己实现
FlowDelegate中的paintChildren()方法,所以需要计算每一个组件的位置,因此可以自定义布局策略。
Flow的缺点
- 使用复杂(代码实现还是要有点功底的)。
- 不能自适应子组件大小,必须通过指定父容器大小或实现
TestFlowDelegate的getSize返回固定大小。
示例
自定义流式布局:
Flow(
  delegate: TestFlowDelegate(margin: EdgeInsets.all(10.0)),
  children: <Widget>[
    new Container(width: 80.0, height:80.0, color: Colors.red,),
    new Container(width: 80.0, height:80.0, color: Colors.green,),
    new Container(width: 80.0, height:80.0, color: Colors.blue,),
    new Container(width: 80.0, height:80.0,  color: Colors.yellow,),
    new Container(width: 80.0, height:80.0, color: Colors.brown,),
    new Container(width: 80.0, height:80.0,  color: Colors.purple,),
  ],
)
实现TestFlowDelegate:
class TestFlowDelegate extends FlowDelegate {
  EdgeInsets margin = EdgeInsets.zero;
  TestFlowDelegate({this.margin});
  @override
  void paintChildren(FlowPaintingContext context) {
    var x = margin.left;
    var y = margin.top;
    //计算每一个子widget的位置
    for (int i = 0; i < context.childCount; i++) {
      var w = context.getChildSize(i).width + x + margin.right;
      if (w < context.size.width) {
        context.paintChild(i,
            transform: new Matrix4.translationValues(
                x, y, 0.0));
        x = w + margin.left;
      } else {
        x = margin.left;
        y += context.getChildSize(i).height + margin.top + margin.bottom;
        //绘制子widget(有优化)
        context.paintChild(i,
            transform: new Matrix4.translationValues(
                x, y, 0.0));
         x += context.getChildSize(i).width + margin.left + margin.right;
      }
    }
  }

  @override
  getSize(BoxConstraints constraints){
    //指定Flow的大小
    return Size(double.infinity,200.0);
  }

  @override
  bool shouldRepaint(FlowDelegate oldDelegate) {
    return oldDelegate != this;
  }
}
运行效果:
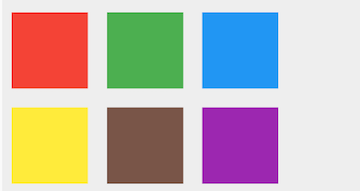
可以看到我们主要的任务就是实现paintChildren()方法,该方法的主要作用是确定每个子组件的位置。由于Flow不能自适应子组件的大小,因此我们通过在getSize()返回中返回一个固定大小来指定Flow的大小。
