

组件化
本篇内容以组件化为主,先来思考一下,组件解析从哪一步开始?是的,应该是从生成vnode阶段开始。当我们组件化进行编程时,我们export导出的其实是一个Xue的options,所以我们获取到的标签,其实就是这个options,看一下下面的例子:
const HelloWorld = {
  // 省略了具体内容
  // ...
}

function Fn(){}

render() {
  return (
    <div>
      {/* 下面这个标签由我们的解析函数解析后,其tag其实就是上面的HelloWorld对象 */}
      <HelloWorld></HelloWorld>
      {/* 函数式组件也是同理,tag为函数Fn */}
      <Fn></Fn>
    </div>
  );
}
了解了解析过程之后,就开始完善我们的代码,首先在解析完JSX代码后,我们会生成VNode,让我们来改一下这一块的逻辑:
class VNode {
  constructor(tagMsg, xm) {
    this.xm = xm;
    this.children = [];
    this.attrs = {};
    this.events = {};
    this.tagType = '';
    // 如果是JSXObj对象,则进行解析
    if(tagMsg instanceof JSXObj) {
      this.tag = tagMsg.tag;
      // 对attrs进行处理,分离出属性和事件
      tagMsg.attrs && Object.entries(tagMsg.attrs).forEach(([key, value]) => {
        if(key.match(/on[A-Z][a-zA-Z]*/)) {
          const eventName = key.substring(2, 3).toLowerCase() + key.substring(3);
          this.events[eventName] = value;
        }
        else this.attrs[key] = value;
      });
      // 判断是否是原生标签
      if(NativeTags.includes(this.tag)) this.tagType = 'native';
      // 上面的内容之前都介绍过,所以跳过,直接看这一块
      // 如果传入的是一个对象,则认为是Xue组件
      else if(typeof this.tag === 'object') {
        // 组件化逻辑
        this.tagType = 'component';
      }
      // 如果是一个函数,则认为是一个函数式组件
      // 函数式组件处理较为简单,只需要重新解析一下函数的返回值即可,并把attrs作为props传入
      // 这里直接return了解析结果,所以当前的this对象实际上是parseJsxObj的返回值
      else if(typeof this.tag === 'function') {
        this.tagType = 'function';
        return parseJsxObj(xm, tagMsg.tag(this.attrs));
      }

    }
    else if(tagMsg === null) {
      this.tag = null;
    }
    // 如果不是,则默认当做文本节点处理,文本节点的tag属性为空字符串
    else {
      this.tag = '';
      this.text = tagMsg;
    }

  }
  // 省略下面的内容...
}
完善了VNode类之后,接下来就是完善Element类:
class Element {
  constructor(vnode, xm) {
    this.xm = xm;
    this.tagType = 'native';
    // 如果为null的话,则不做任何处理
    if(vnode.tag === null) return;
    // 文本节点
    if(vnode.tag === '') {
      // 这句话不能接在return后
      this.el = document.createTextNode(vnode.text);
      return;
    }

    // 处理非文本节点
    if(vnode.tagType === 'native') {
      this.el = document.createElement(vnode.tag);
      // 绑定属性
      Object.entries(vnode.attrs).forEach(([key, value]) => {
        this.setAttribute(key, value);
      });
      // 绑定事件
      Object.keys(vnode.events).forEach(key => {
        // 缓存bind后的函数,用于之后的函数移除
        vnode.events[key] = vnode.events[key].bind(xm);
        this.addEventListener(key, vnode.events[key]);
      });
    }
    // 直接看这里对组件的处理
    // 当tagType类型为组件时
    else if(vnode.tagType === 'component') {
      this.tagType = 'component';
      // 将它的父级vnode作为组件实例的根节点
      vnode.tag.root = vnode.parent && vnode.parent.element.el;
      // 缓存其父组件
      vnode.tag.$parent = xm;
      // 将attrs作为props传入
      vnode.tag.$props = vnode.attrs;
      // vnode.tag就是Xue的options
      const childXM = new Xue(vnode.tag);
      // 重置当前的xm和el为新建子Xue的实例
      this.xm = childXM;
      this.el = childXM.$el;
      // 更新vnode对应的xm
      vnode.updateXM(childXM);

      // 组件init完成后,把组件的Watcher出栈
      Dep.popTarget();
    }

  }
  // 省略下面的内容
  // ...
}
首先,在生成Element实例的时候,当我们遇到component类型的vnode后,肯定要做的事就是new Xue(options),将vnode.tag作为options传入,但是不能直接将options传入,必须得先做一些扩展:
- 将root设为vnode的父节点
- 将attrs作为props传入
通过扩展后,我们就拿到了新的子Xue实例,拿到了新的实例后,我们就得更新当前element的xm和el,同时也需要更新vnode对应的xm,这时候Dep.target指向的是子的Xue的render watcher,所以必须通过Dep.popTarget()弹出子watcher,回到父watcher。下面是watcher类中这两个方法的实现:
// 在init过程中,会有一个把当前watcher入栈的过程
// 把当前Wacther入栈
Dep.pushTarget(xm.$watcher);
xm._callHook.call(xm, 'beforeMount');

// Dep中,入栈出栈相关的代码
let targetList = [];
class Dep {
  static target = null;
  static pushTarget(watcher) {
    targetList.push(watcher);
    Dep.target = watcher;
  }
  static popTarget() {
    targetList.pop();
    const length = targetList.length;
    if(length > 0)
      Dep.target = targetList[length - 1];
  }
  // 以下内容省略
  // ...
}
到现在为止,我们的子组件已经可以渲染出来了,但是目前为止它的props还不是响应式的,所以我们需要为props设置响应式:
export const initState = function() {
  this.$data = this.$options.data() || {};
  this.$methods = this.$options.methods;
  // 保存props值,这样可以直接通过this.props.xxx访问props
  this.props = this.$options.$props || {};

  const dataNames = Object.keys(this.$data);
  const methodNames = Object.keys(this.$methods);

  // 检测是否有重名的data,methods或者props
  const checkedSet = new Set([...dataNames, ...methodNames]);
  if(checkedSet.size < dataNames.length + methodNames.length) return warn('you have same name in data, method');

  // 分别为data,props,methods中的属性代理到this上
  dataNames.forEach(name => proxy(this, '$data', name));
  // propNames.forEach(name => proxy(this, '$props', name));
  methodNames.forEach(name => proxy(this, '$methods', name));

  // 将data设置为响应式
  observe(this.$data);
  // 将props设置为响应式
  observe(this.props);

}
observe的逻辑之前在第一章已经提过了,这里就不再复述了。其实,到了这里,组件化的内容就已经完成了。让我们写个demo看一下
demo
let Child = {
data() {
return {
msg: 'i am test1 in Child:'
}
},
beforeCreate() {
setTimeout(() => {
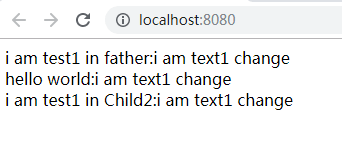
this.msg = 'hello world:'
}, 4000)
},
render() {
return (<div>
{ this.msg }
{ this.props.test }
</div>)
}
};
function Child2(props) {
return (<div>i am test1 in Child2:{ props.test }</div>)
}
let father = new Xue({
root: '#app',
data() {
return {
test1: 'i am text1',
}
},
render() {
return (<div>
<div>
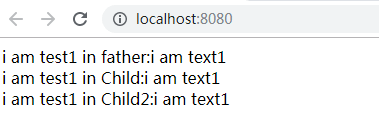
i am test1 in father:{ this.test1 }
</div>
<Child test={ this.test1 }></Child>
<Child2 test={ this.test1 }></Child2>
</div>);
},
mounted() {
setTimeout(() => {
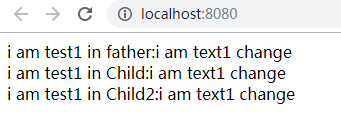
this.test1 = 'i am text1 change';
}, 3000)
}
});
开始的渲染结果是这样的:
3s后:
再过1s后:
写一个简单的路由组件
组件完成后,让我们尝试用我们写好的组件化功能来写一个路由组件,那么我们就需要一个router组件,接下来就是一个router类用来配置options:
export const XueRouterCom = {
  render() {
    // 获取当前路由下的组件
    const Current = this.props.options.getCurrentCom();
    return (
      <div>
        <Current></Current>
      </div>
    );
  }
};
// 这里以hash模式为例
export class XueRouterCls {
  current = null;
  // 刷新当前路由下的组件
  // 采用箭头函数来绑定this,不然在addEventListener后this会指向window
  refresh = () => {
    const currentPath = this.getRoute();
    const currentRoute = this.routes.find(item => item.path === currentPath);
    // 匹配不到时抛出错误
    if(!currentRoute) return warn(`no such route ${ currentPath }, this page's route is ${ this.current.path }`);
    this.current = currentRoute;
  }
  constructor({ routes, type = 'hash' }) {
    this.routes = routes;
    this.type = type;
    // 默认初始化,默认先取第0个路由下,因为下面的refresh方法可能因为不正确的输入导致匹配不到
    this.current = routes[0];
    // 刷新当前路由下的组件
    this.refresh();
    // 监听hashchange
    window.addEventListener('hashchange', this.refresh, false);
  }
  // 获取当前route对象下的组件
  getCurrentCom() {
    return this.current && this.current.component;
  }
  // 获取当前路由
  getRoute() {
    if(this.type === 'hash')
      return location.hash.slice(1);
  }
};
这里其实就是简单的实现了hash模式下的路由,嗯......的确挺简单的,哈哈哈。
demo
完成路由组件后,让我们再写个demo测试一下:
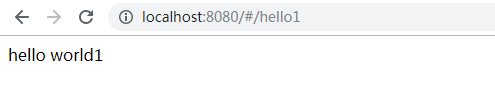
function Child1(props) {
  return (<div>hello world1</div>)
}
function Child2(props) {
  return (<div>hello world2</div>)
}
const router = new XueRouterCls({
  routes: [
    {
      path: '/hello1',
      component: Child1
    },
    {
      path: '/hello2',
      component: Child2
    }
  ]
});
let c = new Xue({
  root: '#app',
  render() {
    return (<div>
      <XueRouterCom options={ router }></XueRouterCom>
    </div>);
  },
});
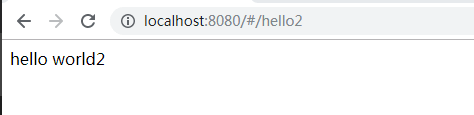
不同路由下显示不同的组件:
目前这一系列打算就先到这里了,因为最近有更高优先级的事情要做,所以这部分内容就先到此为止啦,谢谢大家观看。
github项目地址:点此跳转
第一章:从零开始,采用Vue的思想,开发一个自己的JS框架(一):基本架构的搭建
