

经手的第一个小程序终于“顺利”(加班到早上7点)上线了,这个项目从0到1,经历了差不多一个月的时间。 开发过程中遇到过许多的坑,在查找资料后都得到了 解决,饮水思源,在此把自己的开发经验分享给大家,仅供参考。
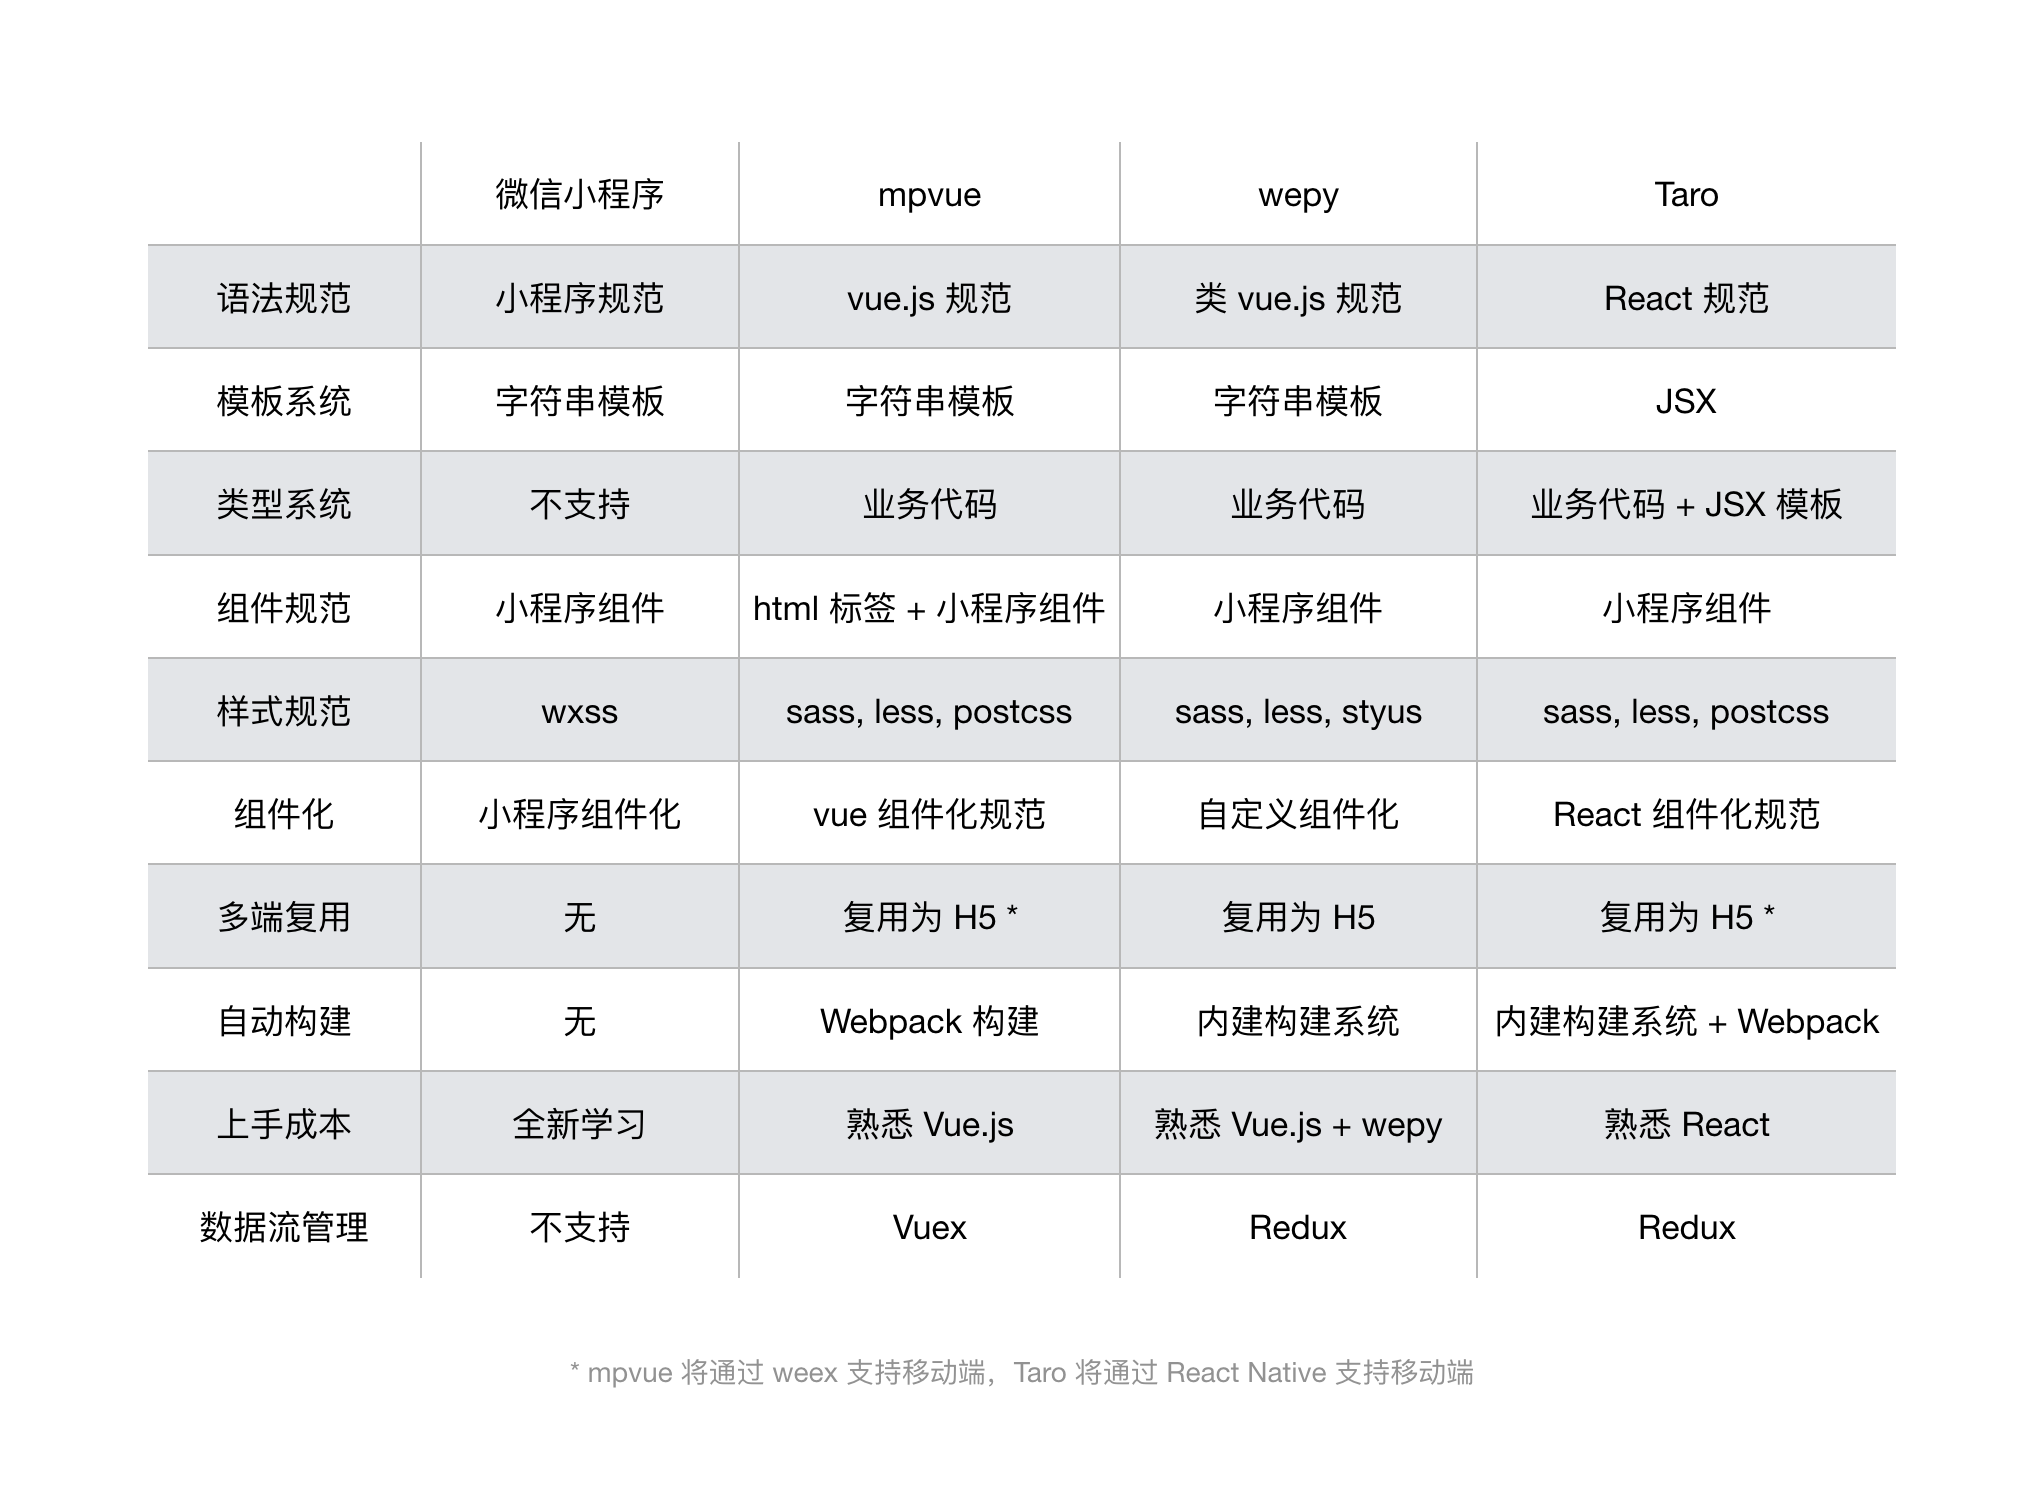
首先是框架的选择,当前小程序流行最广框架有3种 mpvue, Taro, wepy 。产品需求是只有微信的小程序,在做了对比了解后,最终选择了wepy,选择该框架的原因有一下几点:
- 平时习惯用vue开发,所以首先排除了taro。
- mpvue已经有半年没有维护了,wepy维护更新更快些。
- wepy最后的打包文件更小一些。
贴一下了解到的三种框架的对比图
UI框架选择了功能比较齐全Vant
在仔细阅读了小程序的开发文档和wepy的开发文档,并在wepy的社区下载了网友分享的项目做参考,开始了小程序的开发之路。
遇到的一些坑及解决办法
自定义navigationBar
小程序的导航标题文字在ios是居中显示,在android中是居左显示,而且没有返回Home和滚动渐变的效果。
导航组件
<style lang="less">
.nav-wrap {
  position: fixed;
  width: 100%;
  top: 0;
  z-index: 999;
  background: #fff;
}
.nav-wrap-default {
  position: fixed;
  width: 100%;
  top: 0;
  z-index: 999;
  background: transparent;
  .nav-title {
    color: #fff;
  }
}
.nav-title {
  width: 100%;
  height: 100%;
  position: relative;
  top: 0;
  left: 0;
  z-index: 1000;
  text-align: center;
  overflow: hidden;
  text-overflow: ellipsis;
  white-space: nowrap;
  margin: auto;
  font-weight: 700;
  font-size: 18px;
}
.defaultColor {
  color: #fff;
}
.showTitle {
  color: #000;
  background-color: #fff;
  opacity: 1;
}
.backHome.btnBox {
  left: 44px;
  padding-left: 14px;
}
.btnBox {
  position: absolute;
  bottom: 0;
  left: 0;
  box-sizing: border-box;
  padding-top: 13px;
  padding-left: 20px;
  width: 44px;
  height: 44px;
  z-index: 2000;
}
</style>

<template>
  <cover-view
    class="nav-wrap"
    style="height: {{ statusBarHeight + 44 }}px; opacity: {{ opacity }}; line-height: {{ statusBarHeight * 2 + 44 }}px;"
  >
    <!-- 导航栏 中间的标题 滚动才出现的导航 -->
    <cover-view
      wx:if="{{ navbarData.showType == 2 }}"
      class="nav-title"
      style="line-height: {{ statusBarHeight * 2 + 44 }}px;"
    >{{navbarData.title}}</cover-view>
    <!-- 长显的导航 -->
    <cover-view
      wx:if="{{ navbarData.showType == 1 && statusBarHeight }}"
      class="nav-title showTitle"
      style="line-height: {{ statusBarHeight * 2 + 44 }}px; background: #fff;"
    >{{navbarData.title}}</cover-view>
    <!-- home 按钮 -->
    <cover-view
      class="btnBox"
      @tap="backhome"
    >
      <cover-image
        class="toHome"
        src="/imgs/icon_home.png"
        style="width: 18px; height: 18px; top: {{statusBarHeight + 13}}px"
        wx:if="{{hasHome}}"
      ></cover-image>
    </cover-view>
    <!-- 返回 按钮 -->
    <cover-view
      class="btnBox"
      @tap="navback"
    >
      <cover-image
        class="toBack"
        src="/imgs/icon_back.png"
        style="width: 18px; height: 18px; top: {{statusBarHeight + 13}}px"
        wx:if="{{hasBack}}"
      ></cover-image>
    </cover-view>
    <!-- 返回 主页 按钮 -->
    <cover-view
      class="btnBox backHome"
      @tap="backhome"
    >
      <cover-image
        class="toBack"
        src="/imgs/icon_home.png"
        style="width: 18px; height: 18px; top: {{statusBarHeight + 13}}px"
        wx:if="{{hasBack}}"
      ></cover-image>
    </cover-view>
  </cover-view>

  <!-- 自定义 -->
  <cover-view
    class="nav-wrap-default"
    wx:if="{{opacity === 0}}"
    style="height: {{ statusBarHeight + 44 }}px;"
  >
    <cover-view
      wx:if="{{ navbarData.showType == 2 && statusBarHeight }}"
      class="nav-title"
      style="line-height: {{ statusBarHeight * 2 + 44 }}px;"
    >{{navbarData.title}}</cover-view>
  </cover-view>
</template>
<script>
import wepy from 'wepy'
export default class Nav extends wepy.component {
  components = {}
  props = {
    navbarData: {
      type: Object,
      default: {
        title: 'title', // 必传
        showType: 1 // 1是长显无动画, 2是初始透明 滚动变白。必传
      },
      twoWay: true
    }
  }
  data = {
    statusBarHeight: 0,
    navigationBarColor: 255, // 255是白色, 0是黑色
    hasHome: false, // 是否有home 按钮
    hasBack: true, // 是否有返回按钮
    opacity: 0
  }

  methods = {
    // 返回上一页面
    navback () {
      wx.navigateBack()
    },
    // 返回到首页
    backhome () {
      wx.reLaunch({
        url: '/pages/home/index'
      })
    }
  }

  watch = {
  // 滚动渐变
    navbarData (newValue, oldValue) {
      if (newValue.showType === 2) {
        // 滚动设置导航条样式
        let newV = newValue.scrollTop
        let oldV = oldValue.scrollTop
        if (newV > oldV && newV > 100 && this.navigationBarColor === 255) {
          // 上滚
          wx.setNavigationBarColor({
            frontColor: '#000000',
            backgroundColor: '#000000',
            animation: {
              duration: 400,
              timingFunc: 'linear'
            }
          })
          this.navigationBarColor = 0
        } else if (newV < oldV && newV < 150 && this.navigationBarColor === 0) {
          // 下滚
          wx.setNavigationBarColor({
            frontColor: '#ffffff',
            backgroundColor: '#ffffff',
            animation: {
              duration: 400,
              timingFunc: 'linear'
            }
          })
          this.navigationBarColor = 255
        }
        if (newV > 0 && newV <= 150) {
          this.opacity = newV / 150
          this.$apply()
        }
        if (newV === 0 && this.opacity !== 0) {
          this.opacity = 0
          this.$apply()
        }
        if (newV > 150 && this.opacity !== 1) {
          this.opacity = 1
          this.$apply()
        }
      } else {
        this.opacity = 1
      }
    }
  }

  onLoad (opt) {
  // 获取状态条的高度
    if (!wepy.$instance.globalData.statusBarHeight) {
      wx.getSystemInfo({
        success: res => {
          wepy.$instance.globalData.statusBarHeight = res.statusBarHeight
          this.statusBarHeight = wepy.$instance.globalData.statusBarHeight
          this.$apply()
        }
      })
    }
    if (opt && opt.source && opt.source === 1) {
      this.hasHome = true
      this.hasBack = false
    }
    if (this.navbarData.showType === 2) {
      this.opacity = 0
      this.hasBack = false
    }
    if (this.navbarData.showType === 1) {
      this.opacity = 1
    }
    this.statusBarHeight = wepy.$instance.globalData.statusBarHeight
    // 获取状态条是异步函数,做一个延时设置
    let time = setTimeout(() => {
      this.statusBarHeight = wepy.$instance.globalData.statusBarHeight
      this.$apply()
      clearTimeout(time)
    }, 500)
    this.$apply()
  }
}
在页面中调用组件
<template>
<nav :navbarData.sync="navbarData" wx:if="{{navbarData.title}}"></nav>
</template>

<script>
export default class Index extends wepy.page {

    data = {
        navbarData: {
          title: '我是首页',
          showType: 1, // 1是有渐变 2没有渐变
          hasHome: true  // 是否有返回到首页按钮
        },
    }
    onPageScroll (opt) {
        this.navbarData.scrollTop = opt.scrollTop
        this.$apply()
     }

}

</script>
自定义tabbar
详细配置请阅读微信的开发文档-自定义 tabBar
补充一点: 在tab页面,调用修改tabBar中data的方法如下
this.$wxpage.getTabBar().setData({
  currentNumber: 1
})
没有table组件且边框设置成0.5px不兼容
<template>
  <view class="table {{class}}">
    <view class="tableHead">
      <view class="tr">
         <repeat for="{{config}}" item="item">
            <view class="td th" key="index" index="index"><text>{{item.label}}</text></view>
          </repeat>
      </view>

    </view>
    <view class="tableBody">
      <repeat for="{{dataList}}" item="supItem" index="inex" key="index">
        <view class="tr">
          <repeat for="{{config}}" item="subItem" index="inex" key="index">
            <view class="td">{{supItem[subItem.key]}}</view>
          </repeat>
        </view>
      </repeat>
    </view>
  </view>

</template>

<script>
import wepy from 'wepy'
export default class className extends wepy.component {
  props = {
    dataList: {
      type: Array,
      default: []
    },
    config: {
      type: Array,
      default: []
    },
    class: {
      type: String,
      default: ''
    }
  }
  data = {}
}

</script>

<style lang="less">
.table {
  display: table;
  border: 0px solid darkgray;
  border-collapse: collapse;
  border-spacing: 0;
  font-family: 'PingFang-SC-Medium';
  font-size: 14px;
  color: #7E8DA6;
  width: 100%;
}
.tableHead {
  display: table-header-group;
  vertical-align: middle;
  color: #111E36;
  .tr{
    height: 2rem;
  }
}
.tableBody{
    display: table-row-group;
    vertical-align: middle;
    .td {
      font-family: 'PingFang-SC-Regular'!important;
      font-weight: 400!important;
    }
}
.tr {
  display:table-row;
}
.td {
  height: 54px;
  text-align: center;
  line-height: 54px;
  font-family: 'PingFang-SC-Medium';
  font-weight: 700;
  font-size: 14px;
  border: none;
  &::after {
    content: '';
    position: absolute;
    display: block;
    width: 100%;
    height: 1px;
    background: #E6EBF5;
    bottom: 0;
    left: 0;
    transform: scaleY(0.5);
  }
}
.head {
  height: 2rem;
}
.td {
  display: table-cell;
  text-align: center;
  padding: 3px;
  // border: solid 0.5px #C5CAD4;
  position: relative;
}

</style>
图片未加载成功前显示默认图片
用的原生自定义组件
// laze.wxml

<image wx:if='{{ !finishLoadFlag && isShow}}' mode='{{ mode }}' src='{{ defaultImage }}' class='{{ classNames }}'/>
<image wx:if="{{isShow}}" mode='{{ mode }}' class='{{ classNames }} {{ finishLoadFlag ? "" : "before-load" }}' src='{{ originalImage }}' bindload='finishLoad'/>

// laze.js

/**
 * 图片预加载组件
 */
Component({
  lifetimes: {
    attached: function () {
      // 在组件实例进入页面节点树时执行
    },
    detached: function () {
      // 在组件实例被从页面节点树移除时执行
      this.originalImage = ''

      this.finishLoadFlag = false
    }
  },
  // 以下是旧式的定义方式,可以保持对 <2.2.3 版本基础库的兼容
  attached: function () {
    // 在组件实例进入页面节点树时执行
  },
  detached: function () {
    // 在组件实例被从页面节点树移除时执行
  },
  options: {
    styleIsolation: 'apply-shared'
  },
  properties: {
    isShow: {
      type: Boolean,
      value: true
    },
    // 默认图片
    defaultImage: {
      type: String,
      value: '/imgs/common/default.png'
    },
    // 原始图片
    classNames: String,
    originalImage: String,
    // 图片剪裁mode,同Image组件的mode
    mode: String
  },
  data: {
    finishLoadFlag: false
  },
  methods: {
    finishLoad: function (e) {
      this.setData({
        finishLoadFlag: true
      })
    }
  }
})

// laze.json
{
  "component": true
}

// 组件调用

 <image-laze originalImage="{{ url }}" classNames="img"></image-laze>
引入图表库
图表库选用的是uCharts,选取原则体积小,功能全,满足设计要求。
视频有黑边
video组件设置属性 object-fit="fill"
主动停止视频播放
let videoContextPrev = wx.createVideoContext('video' + index)
   videoContextPrev.stop()
欢迎各位留言指正!
如对您的开发起到任何帮助,请记得点赞哟。
