

前言
canvas的绘制系统是基于路径的,即先用代码定义路径(看不见的),再描边或者填充
不过canvas中也有两个立即绘制图形的API:strokeReact()与fillReact()(fillText()与strokeText()也能直接绘制,不过绘制的是文字)
绘制复杂图形的方法都是基于路径的
本文总结了我对canvas路径与绘制实践,主要内容如下
- 路径与子路径概念
- 常用API
- canvas基于路径的绘制步骤
- Demo1:使用两次beginPath(),绘制边颜色不同的直角
- Demo2:不使用beginPath()会发生什么
- Demo3:浏览器自动填充与closePath()
- Demo4:画一个三条边颜色不一样的填充三角形
- 填充路径的“非零环绕规则”
- 结语
- 参考资料
Demo我会放在CodePen之中,可以直接打开调试、预览
路径与子路径概念
在某一时刻,canvas之中只能有一条路径存在,Canvas规范将其称为“当前路径“(current path)。然而,这条路径却可以包含许多子路径(subpath)。而子路径,又是由两个或更多的点组成的。
——《HTML5 Canvas核心技术》
在W3C文档上找到了相关描述:W3C:11 Drawing paths to the canvas
The context always has a current default path. There is only one current path, it is not part of the drawing state. The current path is a path, as described above.
指出current path 即其文档中描述的path
Each object implementing the CanvasPathMethods interface has a path. A path has a list of zero or more subpaths. Each subpath consists of a list of one or more points, connected by straight or curved lines, and a flag indicating whether the subpath is closed or not.
链接在此:W3C:5 Building paths
为了方便描述不易混淆,此文就叫做当前路径
当前路径我用图这样理解👇
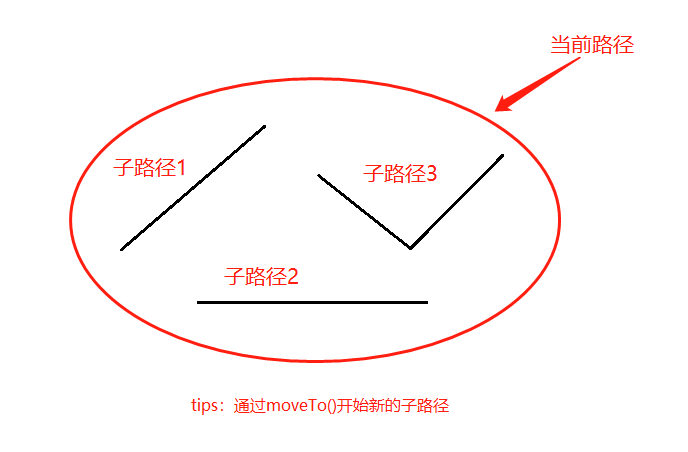
即当前路径 = 子路径3 + 子路径2 + 子路径1
常用API
在知道路径与子路径的概念后我们看看有哪些常用的API
| API或属性 | 说明 |
|---|---|
| beginPath() | starts a new path by emptying the list of sub-paths. |
| closePath() | attempts to add a straight line from the current point to the start of the current sub-path. If the shape has already been closed or has only one point, this function does nothing. |
| stroke() | strokes (outlines) the current or given path with the current stroke style. |
| fill() | fills the current or given path with the current fillStyle. |
| moveTo(x, y) | begins a new sub-path at the point specified by the given (x, y) coordinates. |
| lineTo(x, y) | adds a straight line to the current sub-path by connecting the sub-path's last point to the specified (x, y) coordinates. |
| strokeStyle | specifies the color, gradient, or pattern to use for the strokes (outlines) around shapes. The default is #000 (black). |
| lineWidth | sets the thickness of lines. |
| fillStyle | specifies the color, gradient, or pattern to use inside shapes. The default style is #000 (black). |
API说明来自MDN
因为本文总结的主要是路径与绘制,所以只列举了一些常用的API,更多的API诸如arc(),quadraticCurveTo()等可在MDN:Drawing shapes with canvas
发现
这里要注意的是beginPath()与moveTo()
beginPath()会清空掉原来的子路径,如果不清空,在多次调用stroke()时,后面调用的stroke()会再次绘制原先的子路径
moveTo()会开启新的子路径
canvas基于路径的绘制步骤
- 使用beginPath()开始绘制路径或清空子路径
- 使用lineTo()、moveTo()等API绘制路径
- 根据需要是否使用closePath()闭合路径
- 根据需要使用stroke()或者fill()等
- 根据需要是否使用beginPath()清除当前子路径,开始新的绘制 后面以Demo的形式举例
Demo1:使用两次beginPath(),绘制边颜色不同的角
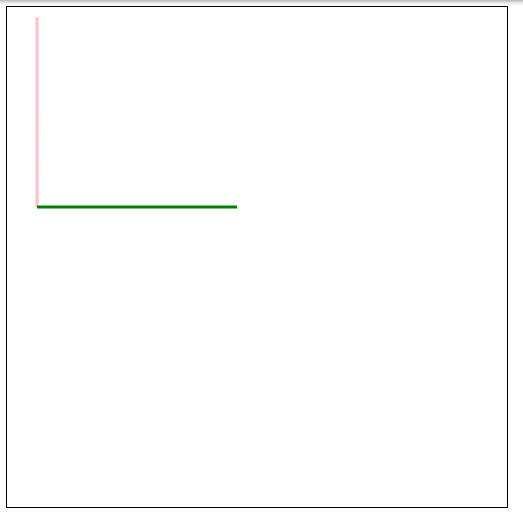
ctx.beginPath();
ctx.strokeStyle = "pink";
ctx.lineWidth = 3;
ctx.moveTo(30, 10); //开始新的子路径
ctx.lineTo(30, 200); //绘制子路径
ctx.stroke();

ctx.beginPath(); //清空子路径
ctx.strokeStyle = "green";
ctx.moveTo(30, 200);//开始新的子路径
ctx.lineTo(230, 200);//绘制子路径
ctx.stroke();
在第二次调用beginPath()时清空了子路径,并开始画绿线。如果不清空子路径会发生什么呢,看Demo2
Demo2:不使用beginPath()会发生什么
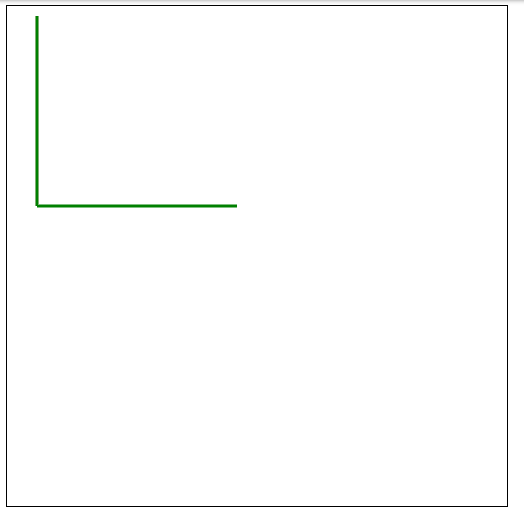
ctx.beginPath();
ctx.strokeStyle = "pink";
ctx.lineWidth = 3;
ctx.moveTo(30, 10);
ctx.lineTo(30, 200); //绘制子路径
ctx.stroke();

//ctx.beginPath();
ctx.strokeStyle = "green";
ctx.moveTo(30, 200);
ctx.lineTo(230, 200);//绘制子路径
ctx.stroke();
可以看到,粉色线不见了,其实是被绿线覆盖了。因为原先的子路径并没有被清除,所以第二次调用stroke()时,图中有两条子路径,故绘制时把原来的粉线覆盖。
到这里大概可以理解路径与子路径及beginPath()的作用了吧
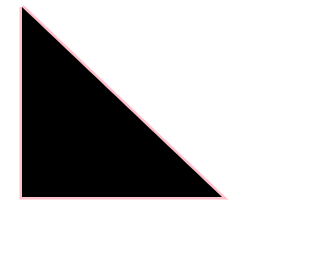
Demo3:浏览器自动填充与closePath()
路径分为封闭路径与开放路径,但是无论是封闭路径还是开放路径都可以进行填充,当填充开放路径时,浏览器会将其当作封闭路径来填充
浏览器自动填充Demo👇:
ctx.beginPath();
ctx.strokeStyle = "pink";
ctx.lineWidth = 5;
ctx.moveTo(30, 10);
ctx.lineTo(30, 200);
ctx.lineTo(230, 200);//绘制子路径
// ctx.closePath();
ctx.stroke();
ctx.fill();
可以看到没有粉色斜边被stroke(),但fill()时浏览器进行了自动填充
如果是closePath()或者手动lineTo()就会有对应的边
ctx.beginPath();
ctx.strokeStyle = "pink";
ctx.lineWidth = 5;
ctx.moveTo(30, 10);
ctx.lineTo(30, 200);
ctx.lineTo(230, 200);//绘制子路径
// ctx.closePath()或者lineTo()
// ctx.closePath()
ctx.lineTo(30,10);
ctx.stroke();
ctx.fill();
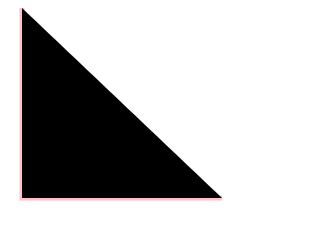
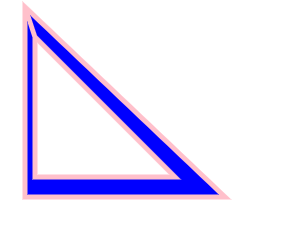
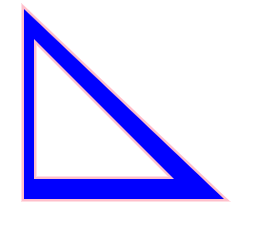
Demo4:画一个三条边颜色不一样的填充三角形
通过上面实践(Demo2),我们发现不能在当前路径中绘制不同颜色的边,同时beginPath()会清空子路径以重置当前路径,所以我们没办法在不覆盖边的情况下一气呵成fill()一个三角形,需要调用四次beginPath()(三次用于画边,一次用于三角形路径并填充;如果在可以覆盖边的情况下,三次beginPath()即可,在一次fill()时绘制边,后面绘制边时进行覆盖)
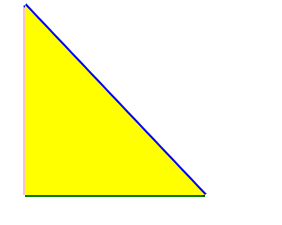
// 画粉边框
ctx.beginPath();
ctx.strokeStyle = "pink";
ctx.moveTo(30, 10);
ctx.lineTo(30, 200);
ctx.stroke();

//画绿边框
ctx.beginPath();
ctx.strokeStyle = "green";
ctx.moveTo(30, 200);
ctx.lineTo(210, 200);//绘制子路径
ctx.stroke();

//画蓝边框
ctx.beginPath();
ctx.strokeStyle = "blue";
ctx.moveTo(210, 200);
ctx.lineTo(30, 10);//绘制子路径
ctx.stroke();

//三角形路径绘制,并填充
ctx.beginPath();
ctx.fillStyle="yellow";
ctx.moveTo(30, 10);//开始一条子路径
ctx.lineTo(30, 200);
ctx.lineTo(210, 200);
ctx.closePath();
ctx.fill();
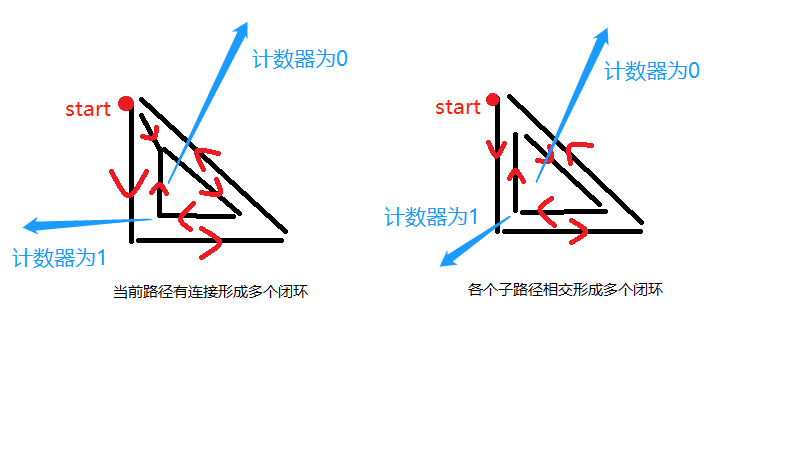
填充路径的“非零环绕规则”
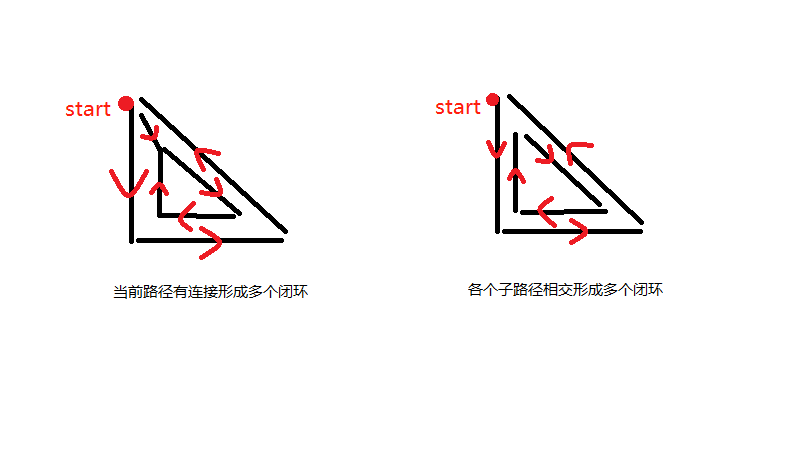
如果当前路径有连接形成多个闭环或者各个子路径相交形成多个闭环,在进行fill()填充时,会使用”非零环绕规则“来判断如何进行填充
以下是”非零环绕规则“的释义
”非零环绕规则“是这么来判断有自我交叉情况的路径的:对于路径中的任意给定区域,从该区域内部画一条足够长的线段,使此线段的终点完全落在路径范围之外。接下来,将计数器初始化为0,然后,每当这条线段与路径上的直线或曲线相交时,就改变计数器的值。如果是与路径的顺时针部分相交,则加1,如果是与路径的逆时针部分相交,则减一。若计数器的最终值不是0,那么此区域就在路径里面,在调用fill()方法时,浏览器就会对其进行填充。如果最终值是0,那么此区域就不在路径内部,浏览器也就不会对其进行填充了 ——《HTML5 Canvas核心技术》
下面举个例子,图自Wikipedia :
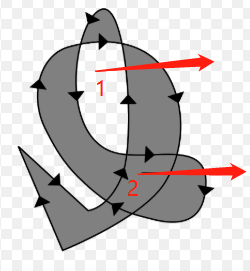
区域1向外画箭头,经过一个逆时针的路径,计数器-1,再经过一个顺时针的路径,计数器+1,最终为0,所以区域1不填充在
区域2向外画箭头,经过一个顺时针的路径,计数器+1,又经过一个顺时针的路径,计数器+1,最终为2,不为0,所以区域2填充最后只要是计数器不为0即可进行填充
拿上面三角形的例子继续举例
CodePen打开
结语
本文通过一些基础的API讲述了路径与绘制,还有其他一些诸如arc()等创造子路径的API可以去MDN查看。
如有不对欢迎交流学习✨
参考资料
HTML5 Canvas path tutorial
MDN:Drawing shapes with canvas
W3C:5 Building paths
W3C:11 Drawing paths to the canvas
