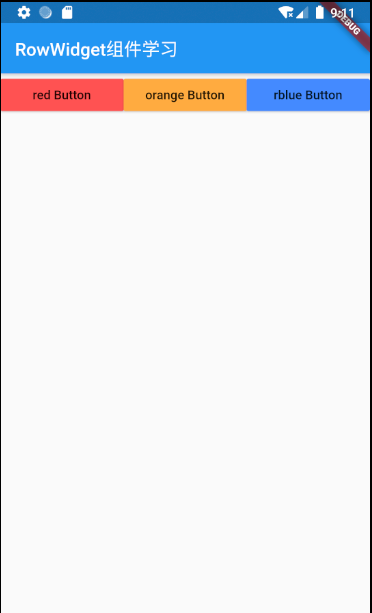
1、基本结构
import 'package:flutter/material.dart';

void main( ) => runApp(MyApp());

class MyApp extends StatelessWidget{
  @override
  Widget build(BuildContext context){
    return MaterialApp(
      title: "flutter第三章学习",
      home:Scaffold(appBar: new AppBar(
        title: new Text('RowWidget组件学习')
      ),
      body: new Row(
        children: <Widget>[
          Expanded(child: new RaisedButton(
            onPressed: (){},
            color: Colors.redAccent,
            child: new Text("red Button"),
          ),) ,
          Expanded(child:new RaisedButton(
            onPressed: (){},
            color: Colors.orangeAccent,
            child: new Text("orange Button"),
          ),),
         Expanded(child:  new RaisedButton(
            onPressed: (){},
            color: Colors.blueAccent,
            child: new Text("rblue Button"),
          ),)/*
           new RaisedButton(
            onPressed: (){},
            color: Colors.redAccent,
            child: new Text("rblue Button"),
          ),
           new RaisedButton(
            onPressed: (){},
            color: Colors.orangeAccent,
            child: new Text("rblue Button"),
          ),
           new RaisedButton(
            onPressed: (){},
            color: Colors.yellowAccent,
            child: new Text("rblue Button"),
          )*/
        ],
      ),
      )
    );
  }
}
2、属性解释
| 1、new Row()基本意思就是在一行里面进行布局 |
3、不灵活水平布局
基本意思就是放上去是什么样就是什么样,不会填充
比如现在我们要制作三个按钮,并让三个按钮同时在一排。我们写下了如下代码,但你会发现效果并不理想。
代码如下:
new Row(
    childred:<Widget>[
        new RaisedButton(
            onPressed: (){},
            color: Colors.redAccent,
            child: new Text("rblue Button"),
          ),
           new RaisedButton(
            onPressed: (){},
            color: Colors.orangeAccent,
            child: new Text("rblue Button"),
          ),
           new RaisedButton(
            onPressed: (){},
            color: Colors.yellowAccent,
            child: new Text("rblue Button"),
          )*/
    ]
)
效果如下:发现并没有填充什么的,达不到预想的效果
灵活水平布局
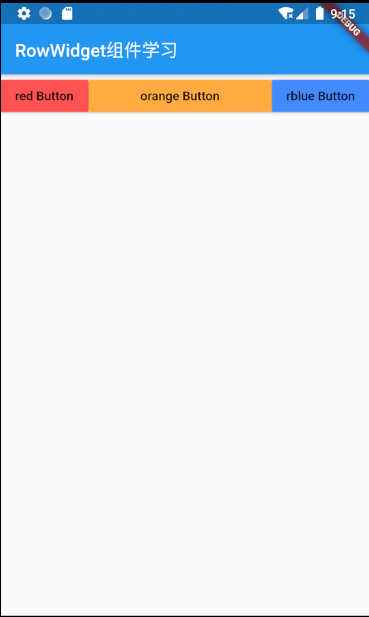
解决上面有空隙的问题,可以使用 Expanded来进行解决,也就是我们说的灵活布局。我们在按钮的外边加入Expanded就可以了代码如下:
new Row(
        children: <Widget>[
          Expanded(child: new RaisedButton(
            onPressed: (){},
            color: Colors.redAccent,
            child: new Text("red Button"),
          ),) ,
          Expanded(child:new RaisedButton(
            onPressed: (){},
            color: Colors.orangeAccent,
            child: new Text("orange Button"),
          ),),
         Expanded(child:  new RaisedButton(
            onPressed: (){},
            color: Colors.blueAccent,
            child: new Text("rblue Button"),
          ),)
    )
效果如下:可以看到一行以内有多少元素都已经平均分了,比较符合需求
灵活和不灵活的混用
如果这时候想让中间的按钮大,而两边的按钮保持真实大小,就可以不灵活和灵活模式进行混用,实现效果。 代码和效果如下:
 body: new Row(
        children: <Widget>[
          new RaisedButton(
            onPressed: (){},
            color: Colors.redAccent,
            child: new Text("red Button"),
          ),
          Expanded(child:new RaisedButton(
            onPressed: (){},
            color: Colors.orangeAccent,
            child: new Text("orange Button"),
          ),),
        new RaisedButton(
            onPressed: (){},
            color: Colors.blueAccent,
            child: new Text("rblue Button"),
          )
效果如下: