JS规则
1.变量的命名有一些限制:只能包含字母,数字,和下划线,还有个特殊的$字符,并且变量名只能以字母,下划线,还有$开头;
2.JS区分大小写
数据类型
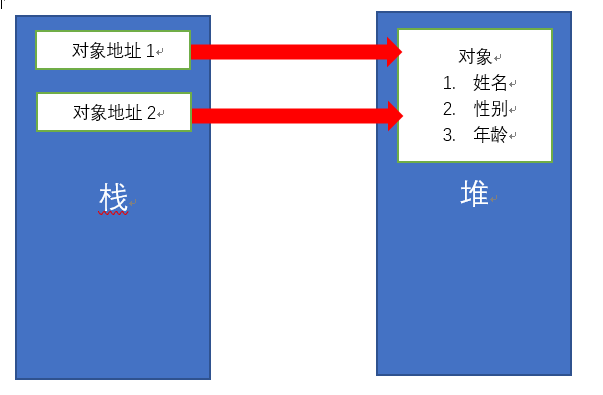
数据类型分为基本数据类型和引用数据类型.
基本数据类型(栈):
1.number
2.String
3.boolean
4.undefined
5.null
引用数据类型(堆)
1.array
2.object
判断数据类型
运用typeof判断数据类型
1.typeof "abc"  => "string"
2.typeof 123  => "number"
3.typeof true  => "boolean"
4.typeof "123"  => "string"
5.typeof undefined => "undefined"
6.typeof null => "object"
7.typeof 函数  => "function"
判断数据和对象
1.console.log(arr instanceof Array);//判断arr是否是Array的一个实例化对象 true false
2.console.log(arr.constructor == Array);//返回arr的构造函数
3.console.log( Array.isArray(arr));
加减乘除
1.字符串拼接
var a='asdasd' ;
var b='asdqwe' ;
console.log(a+b);
a=a+b;
console.log(a);
2.c++ 先参与运算 再++
++c 先++ 再参与运算
3.+号运算 谁在前就先算谁 如果string在前就拼接 如果两个数字在前就先+
4.- * /运算 隐试转化 转换后能运算 就参与运算 ,运算不了会返回 NaN(not a number)
类型转化
1.字符串 转化为boolen型 非空即为真
var str='some string' ;
console.log(!!str);
2.数字 转化为布尔型 非0即为真
var num=1;
console.log(!!num);
3.快速转换为数字类型
var num = '6' ;
num *= 1;
分支判断与循环
1.if else {}
2.三目运算符 console.log( b == 3?"3" :"0" );
3.for
4.while
5.do{}while ();
6.switch (num) {
case 1:
console.log('111' );
case 2:
console.log('222' );
case 5:
console.log('555' );
break ;
case 6:
console.log('666' );
}
函数
1.无参函数
function fn "函数fn" )
}
// 调用
fn();
// 函数 如果不写返回值 默认返回undefined
2.有参函数
function add(a,b){ //形参
return a+b;
}
var x = add(2,3); //实参
add(4,6); //实参
console.log(x);
console.log(add(2,3));
3.
var fn = function 'hahah' )
};
fn();
函数提升与变量提升
1.函数提升
fn1();
fn2(1,2);
function fn1 "函数fn" )
}
function fn2(a,b){
console.log("函数fn" )
}
(var a=function 作用域
1.局部作用域
在函数内定义变量
eg:function fn(a,b){//局部变量
    var y = 100;
    var x = 20;
    console.log(x+y);
}
2.全局作用域
(1)定义变量 不写var 全局变量
(2)在函数外 定义变量
3.!!!!!先找局部作用域定义的变量 再找全局作用域变量
数组
数组方法及属性
数组定义
1.var a = new Array(1,2,3,4,5);
2.var arr = [1,2,3,4,5];
3.var arr2 = new Array(3);
数组方法
1.concat()	连接两个或更多的数组,并返回结果。
2.join()	把数组的所有元素放入一个字符串。元素通过指定的分隔符进行分隔。
3.pop()	删除并返回数组的最后一个元素
4.shift()	删除并返回数组的第一个元素
5.push()	向数组的末尾添加一个或更多元素,并返回新的长度。
6.unshift()	向数组的开头添加一个或更多元素,并返回新的长度。
7.reverse()	颠倒数组中元素的顺序。
8.slice(start,end)	从某个已有的数组返回选定的元素
9.sort()	对数组的元素进行排序
10.splice(index,howmany,1,2,3,4)	删除元素,并向数组添加新元素。
对象
内置对象
1.Array
2.Boolean
3.Date
4.Math
5.Number
6.String
7.RegExp
8.Global
自定义对象
1.
var obj=new Object;
obj.name="shiyu" ;
obj.age=20;
obj.rap =function "唱跳" );
}
console.log(obj);
console.log(obj.name);
obj.rap();
2.
var person1 = {
name:"lisi" ,
age:30,
play:function '打篮球' );
}
}
console.log(person1.name);
person1.play();
3.DOM对象
DATE
Date方法及属性
Date可以直接使用
eg:Date() 返回当日的日期和时间。
常用方法函数
1.getDate() 从 Date 对象返回一个月中的某一天 (1 ~ 31)。
2.getDay() 从 Date 对象返回一周中的某一天 (0 ~ 6)。
3.getMonth() 从 Date 对象返回月份 (0 ~ 11)。
4.setDate() 设置 Date 对象中月的某一天 (1 ~ 31)。
5.setMonth() 设置 Date 对象中月份 (0 ~ 11)。
6.setFullYear() 设置 Date 对象中的年份(四位数字)。
Math
Math方法及属性
常用方法
1.abs(x) 返回数的绝对值。
2.ceil(x) 对数进行上舍入。
3.floor(x) 对数进行下舍入。
4.random() 返回 0 ~ 1 之间的随机数。
5.parseInt() 函数可解析一个字符串,并返回一个整数。(不是Math内方法直接调用)
String
String方法及属性
常用方法
1.str = 'abcdef'
2.charAt(index) 返回在指定位置的字符。
3.concat() 连接字符串。
4.indexOf('a' ) 检索字符串。
5.lastIndexOf() 从后向前搜索字符串。
6.replace() 替换与正则表达式匹配的子串。
7.slice(start,end) 提取字符串的片断,并在新的字符串中返回被提取的部分。
8.split() 把字符串分割为字符串数组。
9.substr(start,length)从起始索引号提取字符串中指定数目的字符。
10.substring(start,end)提取字符串中两个指定的索引号之间的字符
堆内存
1.
var a = "123" ;
var b = a;
a = "456" ;
console.log(a,b);
var arr1 = [1,2,3,4];
var arr2 = arr1;
console.log(arr2);
arr1[0] = 66;
console.log(arr1);
console.log(arr2);
2.
var obj = {
name:'zs' ,
age:20,
father:{
name:'zzz'
}
}
var obj2 = {
name:obj.name,
age:obj.age,
father:obj.father
}
obj.father.name = "zxs" ;
console.log(obj2.father.name);
BOM
*window子对象
1.document 对象
2.frames 对象
3.history 对象
4.location 对象
5.navigator 对象
6.screen 对象
*窗体控制
1.moveBy(x,y)——从当前位置水平移动窗体x个像素,垂直移动窗体y个像素,x为负数,将向左移动窗体,y为负数,将向上移动窗体
2.moveTo(x,y)——移动窗体左上角到相对于屏幕左上角的(x,y)点,当使用负数做为参数时会吧窗体移出屏幕的可视区域
3.resizeBy(w,h)——相对窗体当前的大小,宽度调整w个像素,高度调整h个像素。如果参数为负值,将缩小窗体,反之扩大窗体
4.resizeTo(w,h)——把窗体宽度调整为w个像素,高度调整为h个像素
*窗体滚动轴控制
1.scrollTo(x,y)——在窗体中如果有滚动条,将横向滚动条移动到相对于窗体宽度为x个像素的位置,将纵向滚动条移动到相对于窗体高度为y个像素的位置
2.scrollBy(x,y)—— 如果有滚动条,将横向滚动条移动到相对于当前横向滚动条的x个像素的位置(就是向左移动x像素),将纵向滚动条移动到相对于当前纵向滚动条高度为y个像素的位置(就是向下移动y像素)
*窗体焦点控制
1.focus()—— 使窗体或控件获取焦点
2.blur()——与focus函数相反,使窗体或控件失去焦点
*新建窗体
1.open()——打开(弹出)一个新的窗体 (opener属性——新建窗体中对父窗体的引用,中文"开启者" 的意思)
2.close()——关闭窗体
*History 对象的方法
1.back() 加载 history 列表中的前一个 URL
2.forward() 加载 history 列表中的下一个 URL
3.go(num) 加载 history 列表中的某个具体页面
*Location 对象的属性
1.hash 设置或返回从井号 (
2.host 设置或返回主机名和当前 URL 的端口号
3.hostname 设置或返回当前 URL 的主机名
4.href 设置或返回完整的 URL
5.pathname 设置或返回当前 URL 的路径部分
6.port 设置或返回当前 URL 的端口号
7.protocol 设置或返回当前 URL 的协议
8.search 设置或返回从问号 (?) 开始的 URL(查询部分)
*Navigator 对象的属性(userAgent重点)
1.appCodeName 返回浏览器的代码名
2.appName 返回浏览器的名称
3.appVersion 返回浏览器的平台和版本信息
4.browserLanguage 返回当前浏览器的语言
5.cookieEnabled 返回指明浏览器中是否启用 cookie 的布尔值
6.cpuClass 返回浏览器系统的 CPU 等级
7.onLine 返回指明系统是否处于脱机模式的布尔值
8.platform 返回运行浏览器的操作系统平台
9.systemLanguage 返回 OS 使用的默认语言
10.userAgent 返回由客户机发送服务器的 user-agent 头部的值
11.userLanguage 返回 OS 的自然语言设置
BOM时间等待与时间间隔函数
setTimeout(function(){},0)
时间等待与时间间隔函数中this指向window
************************************************************
1.setTimeout()—— 暂停指定的毫秒数后执行指定的代码
·如果set Timeout(function set Timeout()会在主线程结束后再执行任务队列中的set Timeout();
************************************************************1
2.clearTimeout()——取消指定的set Timeout函数将要执行的代码
3.setInterval()——间隔指定的毫秒数不停地执行指定的代码
4.clearInterval()——取消指定的set Interval函数将要执行的代码
eg:
var timer = set Interval(function 'btn' );
btn.onclick = function set Timeout(function BOM window对话框
1.alert(str)—— 弹出消息对话框(对话框中有一个“确定”按钮)
2.confirm(str)—— 弹出消息对话框(对话框中包含一个“确定”按钮与“取消”按钮)
3.prompt(str,defaultValue)——弹出消息对话框(对话框中包含一个“确定”按钮、“取消”按钮与一个文本输入框),由于各个浏览器实现的不同,若没有第二个参数(文本框中的默认值)时也最好提供一个空字符串(prompt默认输出类型为string)
DOM获取元素
1.通过id 获取dom元素 返回的是DOM元素 找不到返回null
var oDiv = document.getElementById('div1' );
2.通过标签名 获取元素 返回数组 找不到空数组[]
var aLi = document.getElementsByTagName('li' );
3.通过class名 获取元素 返回数组 找不到空数组[]
var aLi = document.getElementsByClassName('aa' );
4.通过Name 获取元素 返回数组 找不到空数组[]
var arr = document.getElementsByName("sex" );
5.接收选择器 返回dom元素 如果有多个之返回第一个
var oDiv = document.querySelector("#div1" );
6.接收选择器 返回dom元素 返回数组 找不到空数组[]
var aLi = document.querySelectorAll("li" );
*********************************************************
2,3,4,6中都需要用循环去初始化每一个数组中对象
选项卡
<style>
*{
margin: 0;
padding: 0;
}
ul{
list-style: none;
}
margin: 100px;
}
overflow: hidden;
}
float : left;
width: 50px;
height: 30px;
background:
border:1px solid
color:
font-size: 14px;
line-height: 30px;
text-align: center;
margin-right:10px;
}
background:
color:
}
width: 300px;
height: 100px;
border:1px solid
}
display: none;
}
display: block;
}
</style>
<body>
<div id="space" >
<ul id="list" >
<li>时事</li>
<li>体育</li>
<li>娱乐</li>
</ul>
<div id="space1" >
<div class="div1 selected" id="first" >
时事1
</div>
<div class="div1" id="second" >
体育1
</div>
<div class="div1" id="third" >
娱乐1
</div>
</div>
</div>
<script>
/*undefined
1.定义变量没有赋值
2.数组越界 返回undefined
3.访问对象下没有的属性
4.函数没有返回值 默认返回undefined
*/
var b = document.getElementById('space' );
var a = document.getElementsByTagName('li' );
var x =document.getElementById('space1' )
var y =x.getElementsByTagName('div' );
for (var i = 0; i < a.length; i++) {
//添加索引
a[i].num = i;
a[i].onclick = function for (var j = 0; j < a.length; j++) {
a[j].className = "" ;y[j].className = "" ;
}
// 点击的li
this.className = "active" ;
y[this.num].className = "selected" ;
}
}
</script>
</body>
轮播图1
<style>
*{
margin: 0;
padding: 0;
}
ul{
list-style: none;
}
width: 750px;
margin:100px auto;
position: relative;
}
display: none;
}
display: block;
}
position: absolute;
right:10px;
bottom: 10px;
}
float : left;
width: 20px;
height: 20px;
background: rgba(0,0,0,0.5);
color:
margin-right:5px;
text-align: center;
line-height: 20px;
border-radius: 5px;
font-size: 14px;
cursor: pointer;
}
background:
}
position: absolute;
left:10px;
bottom: 10px;
}
</style>
<body>
<div id="container" >
<div id="img-box" >
<a href="#" class="selected" >
<img src="img/1.jpg" alt="" >
</a>
<a href="#" >
<img src="img/2.jpg" alt="" >
</a>
<a href="#" >
<img src="img/3.jpg" alt="" >
</a>
<a href="#" >
<img src="img/4.jpg" alt="" >
</a>
<a href="#" >
<img src="img/5.jpg" alt="" >
</a>
</div>
<ul id="btn-box" >
<li class="active" >1</li>
<li>2</li>
<li>3</li>
<li>4</li>
<li>5</li>
</ul>
<ul id="arrow-box" >
<li id="prev" ><</li>
<li id="next" >></li>
</ul>
</div>
<script>
var oContainer = document.getElementById('container' );
var oBtnBox = document.getElementById('btn-box' );
var aBtns = oBtnBox.getElementsByTagName('li' );
var oIngBox = document.getElementById('img-box' );
var aImg = oIngBox.getElementsByTagName('a' );
var oNext = document.getElementById('next' );
var oPrev = document.getElementById('prev' );
// 记录当前显示的索引
var iNow = 0;
for (var i=0; i<aBtns.length; i++){
aBtns[i].idx = i;
aBtns[i].onclick = function function if (iNow == aBtns.length){
iNow = 0;
}
change(iNow)
}
oPrev.onclick = function if (iNow == -1){
iNow = aBtns.length-1;
}
change(iNow);
}
function change(index){
for (var i=0; i<aBtns.length ; i++){
aBtns[i].className = "" ;
aImg[i].className = "" ;
}
aBtns[index].className = "active" ;
aImg[index].className = "selected" ;
}
var timer = set Interval(oNext.onclick,1000);
oContainer.onmouseout = function set Interval(oNext.onclick,1000);
}
oContainer.onmouseover = function 轮播图2
<style>
* {
margin: 0px;
padding: 0px;
}
ul {
list-style: none;
}
height: 291px;
width: 750px;
margin: 100px;
position: relative;
overflow: hidden;
}
height: 291px;
width: 4500px;
position: absolute;
top: 0px;
left: 0px;
/* transition: left 1s linear; */
}
float : left;
}
display: inline-block;
float : left;
}
position: absolute;
bottom: 10px;
left: 10px;
}
height: 20px;
width: 20px;
float : left;
background: rgba(0, 0, 0, 0.4);
text-align: center;
line-height: 20px;
margin-right: 5px;
border-radius: 5px;
font-size: 12px;
color: white;
}
position: absolute;
bottom: 10px;
right: 10px;
}
height: 20px;
width: 20px;
float : left;
text-align: center;
line-height: 20px;
margin-right: 5px;
border-radius: 5px;
font-size: 12px;
background: rgba(0, 0, 0, 0.4);
color: white;
}
background: red;
}
</style>
<body>
<div id="content" >
<div id="picture" >
<a href="#" ><img src="img/1.jpg" alt="" ></a>
<a href="#" ><img src="img/2.jpg" alt="" ></a>
<a href="#" ><img src="img/3.jpg" alt="" ></a>
<a href="#" ><img src="img/4.jpg" alt="" ></a>
<a href="#" ><img src="img/5.jpg" alt="" ></a>
<a href="#" ><img src="img/1.jpg" alt="" ></a>
</div>
<ul id="left" >
<li><</li>
<li>></li>
</ul>
<ul id="right" >
<li class="red1" >1</li>
<li>2</li>
<li>3</li>
<li>4</li>
<li>5</li>
</ul>
</div>
<script>
var a = document.getElementById('right' );
var b = document.getElementById('left' );
var c = document.getElementById('picture' )
var x = a.getElementsByTagName('li' );
var y = b.getElementsByTagName('li' );
var z = c.getElementsByTagName('img' );
var con = document.getElementById('content' );
var sum = 0;
console.log(x.length);
for (var j = 0; j < x.length; j++) {
x[j].num = j;
x[j].onclick = function for (var k = 0; k < y.length; k++) {
y[k].num = k;
y[k].onclick = function if (this.num == 1) {
sum++;
if (sum == z.length) {
// 迅速切换到第一张图
c.style.left = "0px" ;
// 显示索引是1的图片
sum = 1;
}
change(sum);
}
else {
}
}
}
function change(sum) {
for (var i = 0; i < x.length; i++) {
x[i].className = "" ;
}
x[sum == 5 ? 0 : sum].className = "red1" ;
animate(c, {
left: - sum * 750
});
}
</script>
</body>
width height top left
1.oDiv.style.width 只能获取内联样式的属性  "200px"
2.offsetWidth = width+padding+border
3.offsetWidth 只能取值 不能赋值
  offsetHeight 只能取值 不能赋值
  offsetTop 只能取值 不能赋值
  offsetLeft 只能取值 不能赋值
  offsetParent 只能取值 不能赋值
事件列表
一般事件
onclick	        鼠标点击时触发此事件
ondblclick	鼠标双击时触发此事件
onmousedown	按下鼠标时触发此事件
onmouseup	鼠标按下后松开鼠标时触发此事件
onmouseover	当鼠标移动到某对象范围的上方时触发此事件
onmousemove	鼠标移动时触发此事件
onmouseout	当鼠标离开某对象范围时触发此事件
onkeypress	当键盘上的某个键被按下并且释放时触发此事件.
onkeydown	当键盘上某个按键被按下时触发此事件
onkeyup	        当键盘上某个按键被按放开时触发此事件

页面相关事件
onabort	        图片在下载时被用户中断
onbeforeunload	当前页面的内容将要被改变时触发此事件
onerror         出现错误时触发此事件
onload          页面内容完成时触发此事件
onmove          浏览器的窗口被移动时触发此事件
onresize        当浏览器的窗口大小被改变时触发此事件
onscroll        浏览器的滚动条位置发生变化时触发此事件
onstop          浏览器的停止按钮被按下时触发此事件或者正在下载的文件被中断
oncontextmenu   当弹出右键上下文菜单时发生
onunload        当前页面将被改变时触发此事件

表单相关事件
onblur          当前元素失去焦点时触发此事件
onchange        当前元素失去焦点并且元素的内容发生改变而触发此事件
onfocus         当某个元素获得焦点时触发此事件
onreset         当表单中RESET的属性被激发时触发此事件
onsubmit        一个表单被递交时触发此事件
事件
事件分为:事件源 事件处理函数 事件
事件源:谁触发的事件
事件处理函数:响应于某个事件而调用的函数
1.e.onkeyup 某个键盘按键被松开。
2.e.keyCode
对于 keypress 事件,该属性声明了被敲击的键生成的 Unicode 字符码。
对于 keydown 和 keyup 事件,它指定了被敲击的键的虚拟键盘码。
虚拟键盘码可能和使用的键盘的布局相关。
3.e.target 事件源
4.e.currentTarget == this 当前事件源
5.e.clientX 返回当事件被触发时,鼠标指针的水平坐标。
e.clientY 返回当事件被触发时,鼠标指针的垂直坐标。
6.获取事件的兼容性写法 e 标准浏览器 window.event ie浏览器
e = e || window.event;
7.阻止默认行为
e.preventDefault(); //标准浏览器
e.returnValue = false ; //ie浏览器
return false ;//通用
8.事件冒泡
当事件发生后,这个事件就要开始传播(从里到外或者从外向里)。因为事件源本身可能并没有处理事件的能力,即处理事件的函数方法并未绑定在该事件源上。
**消除事件冒泡
(1).阻止事件冒泡 标准浏览器
e.stopPropagation();
(2).阻止事件冒泡 ie浏览器
e.cancelBubble = true ;
9.绑定事件
oDiv1.addEventListener('click' ,function false ); //冒泡或捕获 false 冒泡 true 捕获
oDiv1.addEventListener('click' ,function false );
10.事件流
冒泡 从里向外
捕获 从外向里(ie不支持 )
既有捕获 又有冒泡 先捕获 后冒泡(先从外到里 再从里向外)
11.事件委托
(1)后生成元素的事件绑定问题 (2)绑定的事件少
将事件绑定在父元素身上,点击子元素的时候会发生事件冒泡 触发父元素的点击事件
通过事件源(e.target)判断是否是要绑定事件的子元素 执行相应的处理函数
eg:
<style>
ul{
background:
}
li{
background:
}
</style>
<body>
<button id="btn" >click</button>
<ul id="ul1" >
<li>111</li>
<li>222</li>
<li>333</li>
</ul>
<script>
var oBtn = document.getElementById('btn' );
var oUl = document.getElementById('ul1' );
var aLi = oUl.getElementsByTagName('li' );
oBtn.onclick = function 'li' );
oLi.innerHTML = Math.random();
oUl.appendChild(oLi);
}
oUl.onclick = function (e){
// 判断事件源的标签名 是否是li
if (e.target.tagName == "LI" ){
console.log(e.target.innerHTML);
}
}
</script>
</body>
放大镜
<style>
*{
margin: 0;
padding: 0;
}
width: 400px;
height: 400px;
float : left;
overflow: hidden;
}
position: relative;
}
width: 200px;
height: 200px;
position: absolute;
left:0;
top:0;
background: rgba(255,255,255,0.5);
display: none;
}
display: none;
position: relative;
}
position: absolute;
left:0;
top:0;
}
</style>
<body>
<div id="content" >
<div id="first" >
<img src="img/1.1.jpg" alt="" >
<span id="first-one" ></span>
</div>
<div id="second" >
<img id="picture" src="img/1.2.jpg" alt="" >
</div>
</div>
<script>
var smallpic = document.getElementById('first' );
var space = document.getElementById('first-one' );
var bigpic = document.getElementById('second' );
var bigone = document.getElementById('picture' );
smallpic.onmouseover = function "block" ;
space.style.display = "block" ;
}
smallpic.onmousemove = function (e) {
space.style.top = e.clientY - space.offsetHeight / 2 + "px" ;
space.style.left = e.clientX - space.offsetWidth / 2 + "px" ;
if (space.offsetLeft<0){
space.style.left="0px" ;
}
var maxLeft=smallpic.offsetWidth-space.offsetWidth;
if (space.offsetLeft>=maxLeft){
space.style.left=maxLeft+"px" ;
}
if (space.offsetTop<0){
space.style.top="0px" ;
}
var maxTop=smallpic.offsetHeight-space.offsetHeight;
if (space.offsetTop>=maxTop){
space.style.top=maxTop+"px" ;
}
var smallDisX =smallpic.offsetWidth-space.offsetWidth;
var bigDisX =bigone.offsetWidth-bigpic.offsetWidth;
var xPro =space.offsetLeft/smallDisX;
bigone.style.left=-bigDisX*xPro+"px" ;
}
smallpic.onmouseout = function "none" ;
}
</script>
</body>
鼠标拖拽
<style>
*{
margin: 0;
padding: 0;
}
width: 200px;
height: 200px;
background:
position: absolute;
left:0px;
top:0px;
}
</style>
<body>
<div id="div1" ></div>
<script>
var oDiv = document.getElementById('div1' );
oDiv.onmousedown = function (e){
e = e || window.event;
// 鼠标距离div左侧的位置
var xDis = e.clientX - oDiv.offsetLeft ;
var yDis = e.clientY - oDiv.offsetTop;
console.log(xDis);
document.onmousemove = function (e){
// div随着鼠标
oDiv.style.left = e.clientX - xDis +"px" ;
oDiv.style.top = e.clientY - yDis +"px" ;
// 左边界
if (oDiv.offsetLeft <0 ){
oDiv.style.left = 0;
}
// 上边界
if (oDiv.offsetTop <0 ){
oDiv.style.top = 0;
}
// 右侧最大值
var xMax = document.documentElement.clientWidth - oDiv.offsetWidth;
if (oDiv.offsetLeft > xMax){
oDiv.style.left = xMax +"px" ;
}
// 下最大值
var yMax = document.documentElement.clientHeight - oDiv.offsetHeight;
if (oDiv.offsetTop > yMax){
oDiv.style.top = yMax +"px" ;
}
}
}
oDiv.onmouseup = function 节点
节点类型
节点类型共12种
常用的类型
Node.ELEMENT_NODE (1) -> 元素
Node.ATTRIBUTE_NODE (2) -> 接口
Node.TEXT_NODE (3) -> 文本
Node.COMMENT_NODE (8) -> 注释

节点遍历
1.nextSibling 指向后一个兄弟节点;如果这个节点就是最后一个兄弟节点,那么该值为null ie下一个元素  标准浏览器返回"↵    "
  nextElementSibling ie不支持
2.previousSibling 指向前一个兄弟节点;如果这个节点就是第一个兄弟节点,那么该值为null
  previousElementSibling ie不支持
3.firstChild 指向在childNodes列表中的第一个节点
4.lastChild 指向在childNodes列表中的最后一个节点
5.children 指向在childNodes列表中所有节点
节点操作
1.createElement() 创建节点
2.父元素.appendChild() 插入节点在父元素的内部的后边
3.父元素.removeChild() 移除节点
4.父元素.replaceChild(newnode,oldnode) 替换
5.父元素.insertBefore(newnode,refnode) 在前边插入
6.cloneNode(); //true 深克隆  没有参数 只克隆当前元素
垂直导航菜单
<style>
* {
margin: 0;
padding: 0;
}
width: 200px;
border: 1px solid
}
ul {
list-style: none;
}
h2 {
background:
color:
}
display: none;
}
</style>
<body>
<ul id="container" >
<li>
<h2>管理区</h2>
<ul>
<li>1111</li>
<li>2222</li>
<li>3333</li>
</ul>
</li>
<li>
<h2>交流区</h2>
<ul>
<li>1111</li>
<li>2222</li>
<li>3333</li>
</ul>
</li>
</ul>
<script>
var aH2 = document.getElementsByTagName('h2' );
// var flag = true ; //true 代表隐藏 false 显示
for (var i = 0; i < aH2.length; i++) {
aH2[i].flag = true ;//两种切换 可以通过布尔值 作为标识
aH2[i].onclick = function if (this.flag){ //隐藏
oUl.style.display = "block" ;
}else { //显示
oUl.style.display = "none" ;
}
this.flag = !this.flag;
}
}
function next(elem) {
do {
elem = elem.nextSibling;
} while (elem && elem.nodeType != 1) //如果找到下一个兄弟节点 并且下一个兄弟的不是元素节点 接着循环 null(无效值)
return elem;
}
</script>
</body>
类
1.类的定义:具有相同属性和方法的对象集合
2.创建类 属性写在构造函数中 方法写在原型下
3.类中this指向new出来的实例化对象
eg:
function Person(name,age,weight){
this.name = name;
this.age = age;
this.weight = weight;
}
4.原型:构造函数下 有一个prototype属性 指向原型对象,
写在原型对象下的属性和方法能够被所有实例化对象所共享
eg:Person.prototype.eat = function "chichi...." );
}
this指向
1. 定时器中this -> window
eg:
set Interval(function function function a 'zs' ,
age:20,
say:function "hah" )
}
}
obj.say();
5. this-> new出来的实例化对象
eg:
function Person "zs" ;
}
var p1 = new Person();
改变this指向
1.call 用来改变this指向 第一个参数 this指向,后边依次是参数
eg:fn.call(obj,1,2);
2.apply 用来改变this指向 第一个参数 this指向,后边依次是用方括号括起来的参数
eg:fn.apply(obj,[1,2]);
3.bind 只改变this指向 需要手动调用
eg:fn.bind(obj,1,2)();
实例:
<body>
<ul>
<li>11</li>
<li>22</li>
<li>33</li>
</ul>
<script>
var aLi = document.getElementsByTagName('li' );
for (var i=0; i<aLi.length; i++){
aLi[i].onclick = function set Timeout(function 返回undefined的情况
1.定义变量没有赋值
2.数组越界
3.访问对象下没有的属性
4.函数没有返回值
返回null
getElementById('' )取不到元素 返回null(空对象)