

Redux
由于之前使用react框架,所以对于redux的一些概念会相对熟悉。对于不了解的朋友可以阅读以下文档进行入门redux:
redux主要涉及以下概念:
- Store: 用来保存数据的地方,整个项目只能有一个store,Store中定义了一个非常重要的方法 dispatch(action) 用来发送action ,触发事件的发生.
- State: store对象包含的所有数据.
- Action: state的变化会导致view的变化,用户通过接触view ,使用action发出通知,来更改action。store.dispatch()是view发出action的唯一方法.
- Reducer: 将传入的state处理成新的state,是一个纯函数.
Flutter + Redux
在flutterd当中使用redux,需要引入两个库
import 'package:redux/redux.dart';
import 'package:flutter_redux/flutter_redux.dart';
首先需要创建一个State对象 AppState 类,用于存放我们需要的共享数据,例如本项目中的皮肤颜色themeData。
class AppState {
  ThemeData themeData;
  AppState({this.themeData});
}
接着需要定义Reducer方法 appReducer ,将AppState内的参数和对应的 action 绑定起来,返回新的AppState。
AppState appReducer(AppState state, action) {
  return AppState(
    themeData: themeDataDeducer(state.themeData, action),
  );
}
通过 flutter_redux 的 combineReducers 与 TypedReducer,将 UpdateThemeData 类 和 _updateThemeData 方法绑定起来,最终会返回一个 ThemeData 实例。也就是说:用户每次发出一个 UpdateThemeData ,最终都会触发 _updateThemeData 方法,然后更新 AppState 中的 themeData。
final themeDataDeducer = combineReducers<ThemeData>([
  TypedReducer<ThemeData, UpdateThemeDataAction>(_updateThemeData),
]);

ThemeData _updateThemeData(ThemeData themeData, action) {
  themeData = action.themeData;
  return themeData;
}

class UpdateThemeDataAction {
  final ThemeData themeData;
  UpdateThemeDataAction(this.themeData);
}
接下来可以开始编写我们的页面,对redux进行初始化构建,使用 StoreProvider 应用 store,因为 MaterialApp 也是一个 StatefulWidget ,如下代码所示,还需要利用 StoreBuilder 包裹起来,通过store.state.themeData来获取主题色。
void main() {
  runApp(new ReduxApp());
}

class ReduxApp extends StatelessWidget {
  final store = new Store<AppState>(
    appReducer,
    initialState: new AppState( // 进行主题颜色初始化
        themeData: ThemeData(
      primaryColor: Colors.black,
    )),
  );
  ReduxApp({Key key}) : super(key: key);

  @override
  Widget build(BuildContext context) {
  /// 通过 StoreProvider 应用 store
    return StoreProvider(
        store: store,
        child: StoreBuilder<AppState>(
          builder: (context, store) {
            return MaterialApp(
              theme: store.state.themeData,
              home: Newpage(),
            );
          },
        ));
  }
}
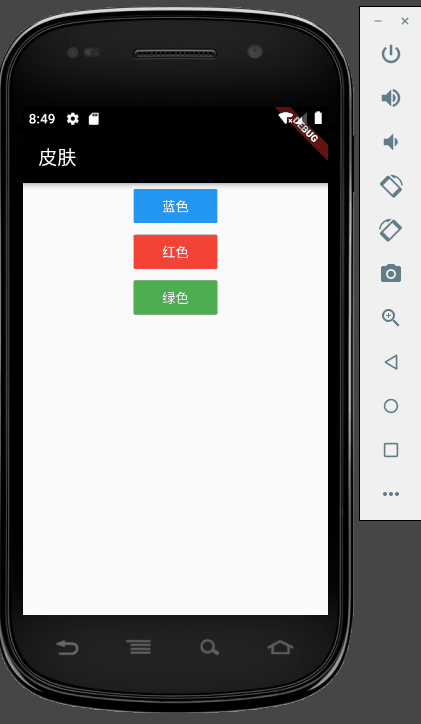
接下来是 Newpage 页面,用来控制颜色的改变,包含三个按钮,蓝色、红色、绿色,使用 ==dispatch== 来触发颜色的改变,这里需要使用 StoreProvider.of(context)来传入上下文
class Newpage extends StatelessWidget {
  TextStyle fontColor = TextStyle(color: Colors.white);
  @override
  Widget build(BuildContext context) {
    return Scaffold(
      appBar: AppBar(title: Text('皮肤')),
      body: Center(
        child: Column(
          children: <Widget>[
            FlatButton(
                child: Text('蓝色', style: fontColor),
                onPressed: () {
                  ThemeData themeData =
                      new ThemeData(primarySwatch: Colors.blue);
                  StoreProvider.of<AppState>(context)
                      .dispatch(new UpdateThemeDataAction(themeData));
                },
                color: Colors.blue),
            FlatButton(
                child: Text('红色', style: fontColor),
                onPressed: () {
                  ThemeData themeData =
                      new ThemeData(primarySwatch: Colors.red);
                  StoreProvider.of<AppState>(context)
                      .dispatch(new UpdateThemeDataAction(themeData));
                },
                color: Colors.red),
            FlatButton(
                child: Text('绿色', style: fontColor),
                onPressed: () {
                  ThemeData themeData =
                      new ThemeData(primarySwatch: Colors.green);
                  StoreProvider.of<AppState>(context)
                      .dispatch(new UpdateThemeDataAction(themeData));
                },
                color: Colors.green),
          ],
        ),
      ),
    );
  }
}
最后的实现效果如下所示
该教程是我接触flutter的第一周写的,今天刚好在看redux的教程,因此写了这样一个小demo,可能有许多地方需要改进,希望各位大佬还请多多指点~
