

1, 简单阀值
threshold(src, thresh, maxval, type, dst=None)
对图像简单的二值化处理
| 参数 | 含义 |
|---|---|
| src | 输入图像 |
| thresh | 阀值 |
| maxval | 取值 |
| type | 类型 |
| dst |
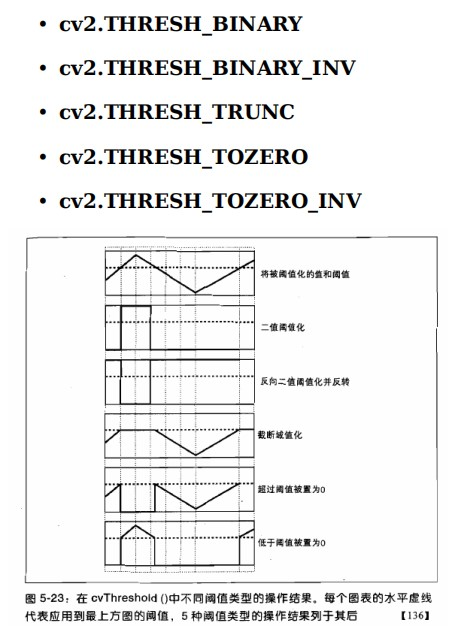
type
# coding:utf-8

import cv2
import numpy as np


def show(img):
    # cv2.namedWindow('aa', cv2.WINDOW_NORMAL)
    cv2.imshow('aa', img)
    cv2.waitKey(0)
    cv2.destroyAllWindows()

if __name__ == '__main__':
    # 一次从(左上,左下,右下,右上) 取点
    img = cv2.imread('./001_720x1080.jpg', cv2.IMREAD_GRAYSCALE)
    ret, thresh1 = cv2.threshold(img, 200, 255, cv2.THRESH_BINARY)
    show(thresh1)
2, 自适应阀值
adaptiveThreshold(src, maxValue, adaptiveMethod, thresholdType, blockSize, C, dst=None)
自适应二值化
| 参数 | 含义 |
|---|---|
| src | 输入图像 |
| maxValue | 满足阀值的取值 |
| adaptiveMethod | 计算阀值的方法 |
| thresholdType | 类型 |
| blockSize | 邻域大小(用来计算阀值的区域大小) |
| C | 它就是一个常数, 阀值就等于的平均值或者加权平均值减去这个常数。 |
| dst |
adaptiveMethod
| 取值 | 含义 |
|---|---|
| ADPTIVE_THRESH_MEAN_C | 阀值取自相邻区域的平均值 |
| ADPTIVE_THRESH_GAUSSIAN_C | 阀值取自相邻区域的加权和, 权重为一个高斯窗口 |
thresholdType 见threshold方法的type
# coding:utf-8

import cv2
import numpy as np


def show(img):
    # cv2.namedWindow('aa', cv2.WINDOW_NORMAL)
    cv2.imshow('aa', img)
    cv2.waitKey(0)
    cv2.destroyAllWindows()

if __name__ == '__main__':
    print([i for i in dir(cv2) if i.startswith('THRESH_')])
    # 一次从(左上,左下,右下,右上) 取点
    img = cv2.imread('./sfz.jpg', cv2.IMREAD_GRAYSCALE)
    out = cv2.adaptiveThreshold(img, 255, cv2.ADAPTIVE_THRESH_MEAN_C, cv2.THRESH_BINARY, 11, 15)
    show(out)
3, Otsu's 二值化
对于一个双峰的图像, 该方法可以自动选取双峰之前的一个值, 如果是非双峰的图像, 该方法效果不明显
flatten()
二维数组转一维数组
plt的也是边看边学, 后面在系统学习分享
# coding:utf-8

import cv2
import numpy as np
from matplotlib import pyplot as plt


def show(img):
    # cv2.namedWindow('aa', cv2.WINDOW_NORMAL)
    cv2.imshow('aa', img)
    cv2.waitKey(0)
    cv2.destroyAllWindows()

if __name__ == '__main__':
    print([i for i in dir(cv2) if i.startswith('THRESH_')])
    # 一次从(左上,左下,右下,右上) 取点
    img = cv2.imread('./sfz.jpg', cv2.IMREAD_GRAYSCALE)

    pts1 = np.float32([[50, 65], [78, 292], [457, 238], [414, 17]])
    pts2 = np.float32([[0, 0], [0, 540], [856, 540], [856, 0]])
    M = cv2.getPerspectiveTransform(pts1, pts2)
    img = cv2.warpPerspective(img, M, (856, 540))

    show(img)
    print(img.shape)
    ret, out = cv2.threshold(img,0, 255, cv2.THRESH_BINARY+cv2.THRESH_OTSU)

    # 直方图会进行统计各个区间的数值
    plt.hist(img.flatten(), np.arange(0,256,1), color='fuchsia', alpha=0.5)  # alpha设置透明度,0为完全透明

    plt.xlabel('scores')
    plt.ylabel('count')
    plt.xlim(0, 256)  # 设置x轴分布范围

    plt.show()
    show(out)
