

1. The Basics 基礎知識
1.1 用CLI 創建新的component
ng generate component new-component-name
ng g c new-component-name
Example:
//--spec false,不創建.spec test file
ng g c recipes --spec false
//在不同路徑下創建component
ng g c recipes/recipe-list --spec false
CLI會自動幫助創建新的component,包括folder,html,css,ts文件,以及把引用添加到app.model.ts文件中,包括declaration的添加
//app.model.ts中的對模板的引用
import { Assignment2Component } from './assignment2/assignment2.component';
文件的命名規則
assignment2.component.css
assignment2.component.html
assignment2.component.ts
1.2 Inline Template vs. External Template
可以在ts code中直接寫html代碼,也可以在external files中寫(推薦)
//引用外部文件
@Component({
  selector: 'app-servers',
  templateUrl: './servers.component.html',
  styleUrls: ['./servers.component.css']
})
//使用template在內部寫html
@Component({
  selector: 'app-servers',
  template: `<app-server>

  </app-server>``,
  styleUrls: ['./servers.component.css']
}
1.3 為component設置style
在app.component.css中寫,以及配合bootstrap使用,style也可以inline寫
1.4 Component Selector
selector必須是unique的
selector的三種方式:
- select by element:
selector: 'app-servers' - select by attribute:
selector: '[app-servers]' - select by class name
selector: '.app-servers'
2. Databinding 數據綁定
2.1 概念
在Angular网页应用中,数据绑定是数据模型(model)与视图(view)组件的自动同步。
大多数模板系统中只有单向绑定:它们将模板和数据合并起来加入到视图中去,合并完成之后,任何对数据模型或者相关内容的改变都不会自动反映到视图中去。
Angular模板的工作方式则不同。差别体现在:其一,模板(指未经编译的附加了标记和指令的HTML)是在浏览器中编译的。其二,编译阶段生成了动态(live)视图。保持视图动态的原因是,任何视图中的改变都会立刻反映到数据模型中去,任何数据模型的改变都会传播到视图中去。

Combination of both: Two-Way-Binding
([(ngModel)] = "data")
2.2 String interpolation
- string interpolation has to resolve a string in the end
//server.component.html
<p>server with {{ serverId }} is {{ serverStatus }}</p>

//server.component.ts
export class ServerComponent{
  serverId = 10;
  serverStatus = "offline"
}
{{}}中也可放函數,只要返回string就行
2.3 Property binding
[ ] 表示的是property binding
<button [disabled]="!allowNewServer">Add Server</button>
2.4 Event binding
( ) 表示的是 event binding
<button [disabled]="!allowNewServer" (click)="onCreateServer()">Add Server</button>
2.5 Event binding 傳參數
//servers.component.html
<input type="text" class="form-control" (input)="onUpdateServerName($event)">

//servers.component.ts
onUpdateServerName(event: Event) {
    this.serverName = (<HTMLInputElement>event.target).value;
  }
2.6 雙向數據綁定 Two-Way-Binding
In two way data binding, we combine property and event binding.
語法是這樣:[ ( ngModel ) ]
<input type="text" class="form-control" [(ngModel)]="serverName">
2.7 Directives (中文翻譯為)指令
參考好文:Angular Directive 初探 - Part.1 2017-03-25 blog.crazyalu.com/2017/03/25/…
引自官方文檔:There are three kinds of directives in Angular:Components, Structural directives, Attribute directives.
Directives are instructions in the DOM! Tipically, directives are added by using an attribute selector
- Components—directives with a template.
- Structural directives—change the DOM layout by adding and removing DOM elements.
- Attribute directives—change the appearance or behavior of an element, component, or another directive.
在 Angular 的世界中,directive 扮演相當重要的角色之一,它可以在特定的 DOM 元素上執行,進而擴充這個元素的功能,為元素增加新的方法。而我們最常用的組件 ( Component ),基本上就是一個帶有 template 的 directive,它繼承了 directive,是 directive 的一個子類別,通常用來打造 UI 的部分。
2.7.1 ngIf
引自官方文檔:When the expression evaluates to true, Angular renders the template provided in a then clause, and when false or null, Angular renders the template provided in an optional else clause. The default template for the else clause is blank. angular.io/api/common/…
- ngIf是一個structual directive,接收一個true或false值
exmaple:
//servers.component.html
<p *ngIf="serverCreated">Server was created, server name is {{ serverName }}</p>

//servers.component.ts,serverCreated的值被改變為true
onCreateServer() {
    this.serverCreated = true;
    this.servers.push(this.serverName);
    this.serverCreationStatus = "server was created! Name is " + this.serverName;
}
2.7.2 ngIf else
需要用#創建一個local reference,並在中寫else的語句
- The <ng-template>
- The <ng-template> is an Angular element for rendering HTML. It is never displayed directly. In fact, before rendering the view, Angular replaces the <ng-template> and its contents with a comment.
Exmaple:
//當serverCreated是false時,執行noserver中的代碼
<p *ngIf="serverCreated; else noServer">Server was created, server name is {{ serverName }}</p>
<ng-template #noServer>
  <p>No server was created!</p>
</ng-template>
2.7.3 ngStyle
Example:
//key pair values
<p [ngStyle]="{'background-color': yellow}">server with {{ serverId }} is {{ serverStatus }}</p>
<p [ngStyle]="{backgroundColor: getColor()}">server with {{ serverId }} is {{ serverStatus }}</p>
2.7.4 ngClass
Usage: Adds or removes CSS classes on an HTML element.
ngClass also has key pairs, the keys are the css class names, and the values are the conditions determining whether the class should be attached or not.
Exmaple:
//online是css的class名,如果serverStatus是true,則執行,反之不執行
<p [ngStyle]="{'background-color': yellow}" [ngClass]={online: serverStatus==='online'}>server with {{ serverId }} is {{ serverStatus }}</p>
2.7.5 ngFor
We use the NgFor directive to loop over an array of items and create multiple elements dynamically from a template element.
<app-server *ngFor="let server of servers"></app-server>
Example:
// log是一個array, logItem是循環的array中的元素,動態生成p tag
<button class="btn btn-primary" (click)="onButtonClick()">Display Details</button>
<p *ngIf="paragraphStatus">This is for assignment3</p>
<div *ngFor="let logItem of log">
  <p>This is the {{ logItem }} click</p>
</div>
2.7.6 綜合應用練習
//當logItem >= 5時,給p tag加style
<button class="btn btn-primary" (click)="onButtonClick()">Display Details</button>
<p *ngIf="paragraphStatus">This is for assignment3</p>
<div
  *ngFor="let logItem of log"
  [ngStyle]="{backgroundColor: logItem >=5 ? 'blue' : 'transparent'}"
  [ngClass]="{white: logItem >= 5}">
  <p>This is the {{ logItem }} click</p>
</div>
3. Debugging
Angular Augury augury.rangle.io/
4. Components & Databinding 深入
Property&Event Binding can be applied to
- HTML elements
- Directives
- Components
這一節介紹綁定自定義(Custom)的property和event
4.1 組件交互
让两个或多个组件之间共享信息
4.1.1 @Input decorations
通过输入型绑定把数据从父组件传到子组件。 父-->子
//父組件可以獲得子組件的屬性,並綁定,此時的element就是一個自定義的property
@Input() element: {type: string, name: string, content: string};
4.1.2 別名(不推薦用)
//在父類的*ngFor中,就可以使用[srvElement]綁定
@Input('srvElement') element: {type: string, name: string, content: string};
4.1.3 父组件监听子组件的事件
子组件暴露一个 EventEmitter 属性,当事件发生时,子组件利用该属性 emits(向上弹射)事件。父组件绑定到这个事件属性,并在事件发生时作出回应。子组件的 EventEmitter 属性是一个输出属性,通常带有@Output 装饰器
這部分需要加深理解,是難點 子-->父
//子組件server-element.component.html  用來顯示被添加的server
<div
  class="panel panel-default">
  <div class="panel-heading">{{ element.name }}</div>
  <div class="panel-body">
    <p>
      <strong *ngIf="element.type === 'server'" style="color: red">{{ element.content }}</strong>
      <em *ngIf="element.type === 'blueprint'">{{ element.content }}</em>
    </p>
  </div>
</div>
//子組件server-element.component.ts
import { Component, OnInit, Input } from '@angular/core';

@Component({
  selector: 'app-server-element',
  templateUrl: './server-element.component.html',
  styleUrls: ['./server-element.component.css']
})
export class ServerElementComponent implements OnInit {
  @Input('srvElement') element: {type: string, name: string, content: string};
  constructor() { }

  ngOnInit() {
  }

}
//子組件cockpit.component.html  用來接收添加的server
<div class="row">
  <div class="col-xs-12">
    <p>Add new Servers or blueprints!</p>
    <label>Server Name</label>
    <input type="text" class="form-control" [(ngModel)]="newServerName">
    <label>Server Content</label>
    <input type="text" class="form-control" [(ngModel)]="newServerContent">
    <br>
    <button
      class="btn btn-primary"
      (click)="onAddServer()">Add Server</button>
    <button
      class="btn btn-primary"
      (click)="onAddBlueprint()">Add Server Blueprint</button>
  </div>
</div>
//子組件cockpit.component.ts
import { Component, OnInit, EventEmitter, Output } from '@angular/core';

@Component({
  selector: 'app-cockpit',
  templateUrl: './cockpit.component.html',
  styleUrls: ['./cockpit.component.css']
})
export class CockpitComponent implements OnInit {
  @Output() serverCreated = new EventEmitter<{serverName: string, serverContent: string}>();
  @Output() blueprintCreated = new EventEmitter<{serverName: string, serverContent: string}>();

  newServerName = '';
  newServerContent = '';
  constructor() { }

  ngOnInit() {
  }

  onAddServer(){
    this.serverCreated.emit({serverName: this.newServerName, serverContent: this.newServerContent});
  }

  onBlueprint(){
    this.blueprintCreated.emit({serverName: this.newServerName, serverContent: this.newServerContent});
  }

}
//父組件app.component.html
<div class="container">
  <app-cockpit
  (serverCreated)="onServerAdded($event)"
  (blueprintCreated)="onBlueprintAdded($event)"
  ></app-cockpit>
  <hr>
  <div class="row">
    <div class="col-xs-12">
        <app-server-element *ngFor="let serverElement of serverElements" [srvElement]="serverElement"></app-server-element>
    </div>
  </div>
</div>
//父組件app.component.ts
import { Component } from '@angular/core';

@Component({
  selector: 'app-root',
  templateUrl: './app.component.html',
  styleUrls: ['./app.component.css']
})
export class AppComponent {
  serverElements = [{type:'server',name:'Test Server',content:'Just a Test!'}];

  onServerAdded(serverData: {serverName: string, serverContent: string}) {
    this.serverElements.push({
      type: 'server',
      name: serverData.serverName,
      content: serverData.serverContent
    });
  }

  onBlueprintAdded(blueprintData: {serverName: string, serverContent: string}) {
    this.serverElements.push({
      type: 'blueprint',
      name: blueprintData.serverName,
      content: blueprintData.serverContent
    });
  }
}
4.2 组件样式
Angular能把组件样式捆绑在组件上,以实现比标准样式表更加模块化的设计。组件的 CSS 样式被封装进了自己的视图中,而不会影响到应用程序的其它部分。
4.2.1 视图封装模式
通过在组件的元数据上设置视图封装模式,你可以分别控制每个组件的封装模式。
// src/app/quest-summary.component.ts
// warning: few browsers support shadow DOM encapsulation at this time
encapsulation: ViewEncapsulation.Native
Emulated 模式(默认值)通过预处理(并改名)CSS 代码来模拟 Shadow DOM 的行为,以达到把 CSS 样式局限在组件视图中的目的。 更多信息,见附录 1 。(译注:只进不出,全局样式能进来,组件样式出不去)
5. Course Project
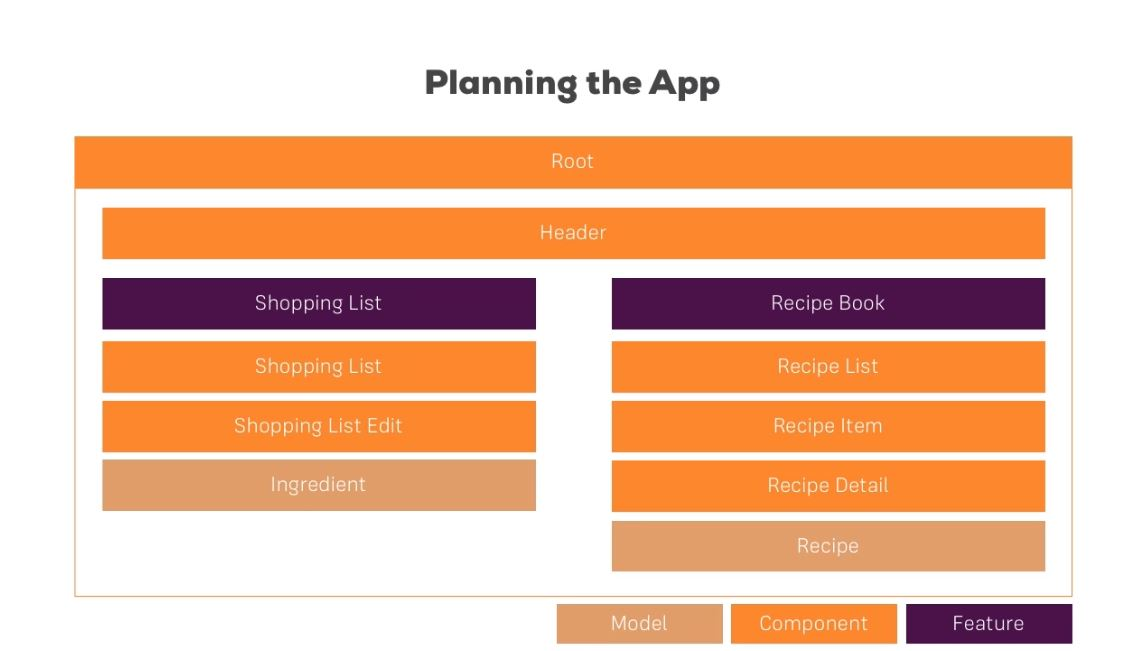
Folder Structure:
app
├── header
├── recipes
│   └── recipe-detail
│   └── recipe-list
│       └── recipe-item
├── shared
├── shopping-list
│    └── shopping-edit
