总所周知canvas绘制的图形没有交互功能,这篇文章是我这两天基于canvas绘制地铁图总结出来了。
这篇文章描述的图形
- 圆形
- 三角形
- 矩形
-
四边形待更新 -
直线待更新 -
曲线待更新 - 扇形
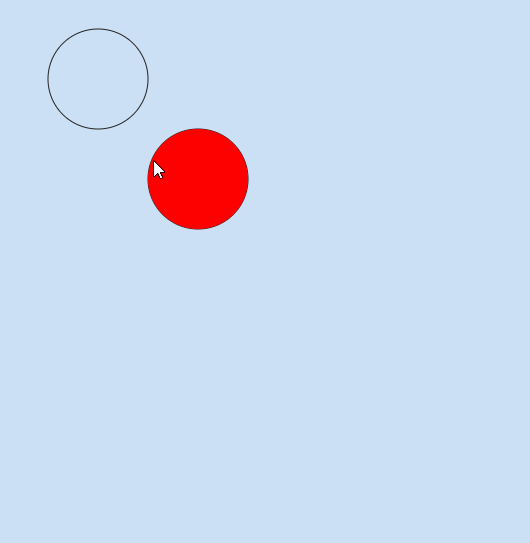
圆形交互
原理:我们当我们鼠标在canvas滚动的时候,鼠标滚动事件可以获取到
offsetX和offsetY,如果这个坐标点减去圆心坐标点的差大于半径,说明鼠标位于圆形外,反之,鼠标位于圆形内
上代码
首先我们对canvas添加鼠标移动事件,来监听canvas上的鼠标位置,我们把鼠标移动的位置申明在全局作用域下mouse对象上
const mouse = {
    x: 0,
    y: 0
}

canvas.addEventListener('mousemove', e => {
    const {offsetX, offsetY} = e
    mouse.x = offsetX
    mouse.y = offsetY
})
接下来我们申明一个类叫做Point类,包含了两个方法,一个draw和update
update函数来判断鼠标是否在圆形上面,如果是将该实例的hover属性设置为true
class Circular {
    constructor (x, y, radius) {
        this.x = x
        this.y = y
        this.radius = radius
        this.hover = false // 判断是否移动到上面去
    }
    draw () {
        const {x, y, radius, hover} = this
        ctx.beginPath()
        ctx.arc(x, y, radius, 0, Math.PI * 2, false)
        ctx.strokeStyle = '#222'
        ctx.stroke()
        if (hover) {
            ctx.fillStyle = 'red'
            ctx.fill()
        }
    }
    updata () {
        const {x, y , radius} = this
        const offsetY = mouse.y
        const offsetX = mouse.x
        const isMoveUp = ((x - offsetX)**2 + (y - offsetY)**2) <= (radius ** 2)
        if (isMoveUp) {
            this.hover = true
        } else {
            this.hover = false
        }
        this.draw()
    }
}


const circulares = new Set()
circulares.add(new Point(100, 100, 50))
接下来我们顶一个函数animate来绘制圆形,并在函数来申明一个requestAnimationFrame函数来不停的调用animate
// 我们将申明的圆形实例放入这个对象中
const circulares = new Set()
circulares.add(new Point(100, 100, 50))
circulares.add(new Point(200, 200, 50))

// 定义animate函数来绘制圆形
function animate () {
    requestAnimationFrame(animate)
    ctx.clearRect(0, 0, width, height)
    for (const circular of circulares) {
        circular.updata()
    }
}
animate()
完成代码
const mouse = {
    x: 0,
    y: 0
}

canvas.addEventListener('mousemove', e => {
    const {offsetX, offsetY} = e
    mouse.x = offsetX
    mouse.y = offsetY
})

class Point {
    constructor (x, y, radius) {
        this.x = x
        this.y = y
        this.radius = radius
        this.hover = false // 判断是否移动到上面去
    }
    draw () {
        const {x, y, radius, hover} = this
        ctx.beginPath()
        ctx.arc(x, y, radius, 0, Math.PI * 2, false)
        ctx.strokeStyle = '#222'
        ctx.stroke()
        if (hover) {
            ctx.fillStyle = 'red'
            ctx.fill()
        }
    }
    updata () {
        const {x, y , radius} = this
        const offsetY = mouse.y
        const offsetX = mouse.x
        const isMoveUp = ((x - offsetX)**2 + (y - offsetY)**2) <= (radius ** 2)
        if (isMoveUp) {
            this.hover = true
        } else {
            this.hover = false
        }
        this.draw()
    }
}

const circulares = new Set()
circulares.add(new Point(100, 100, 50))
circulares.add(new Point(200, 200, 50))

// 定义animate函数来绘制圆形
function animate () {
    requestAnimationFrame(animate)
    ctx.clearRect(0, 0, width, height)
    for (const circular of circulares) {
        circular.updata()
    }
}
animate()
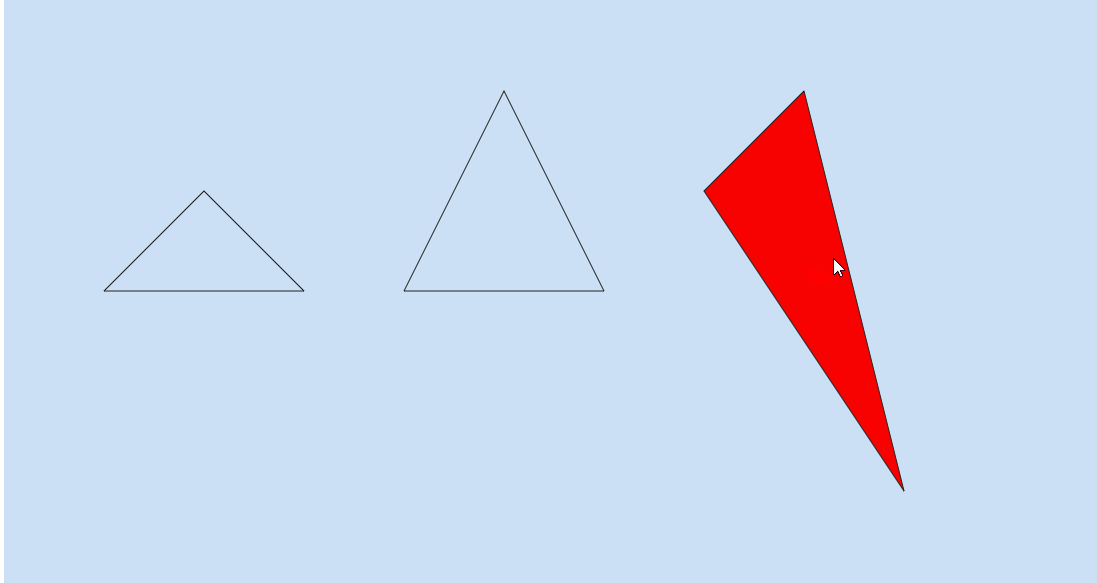
三角形
首先我们来看一张图(自己随便你画的,明白意思就好了)
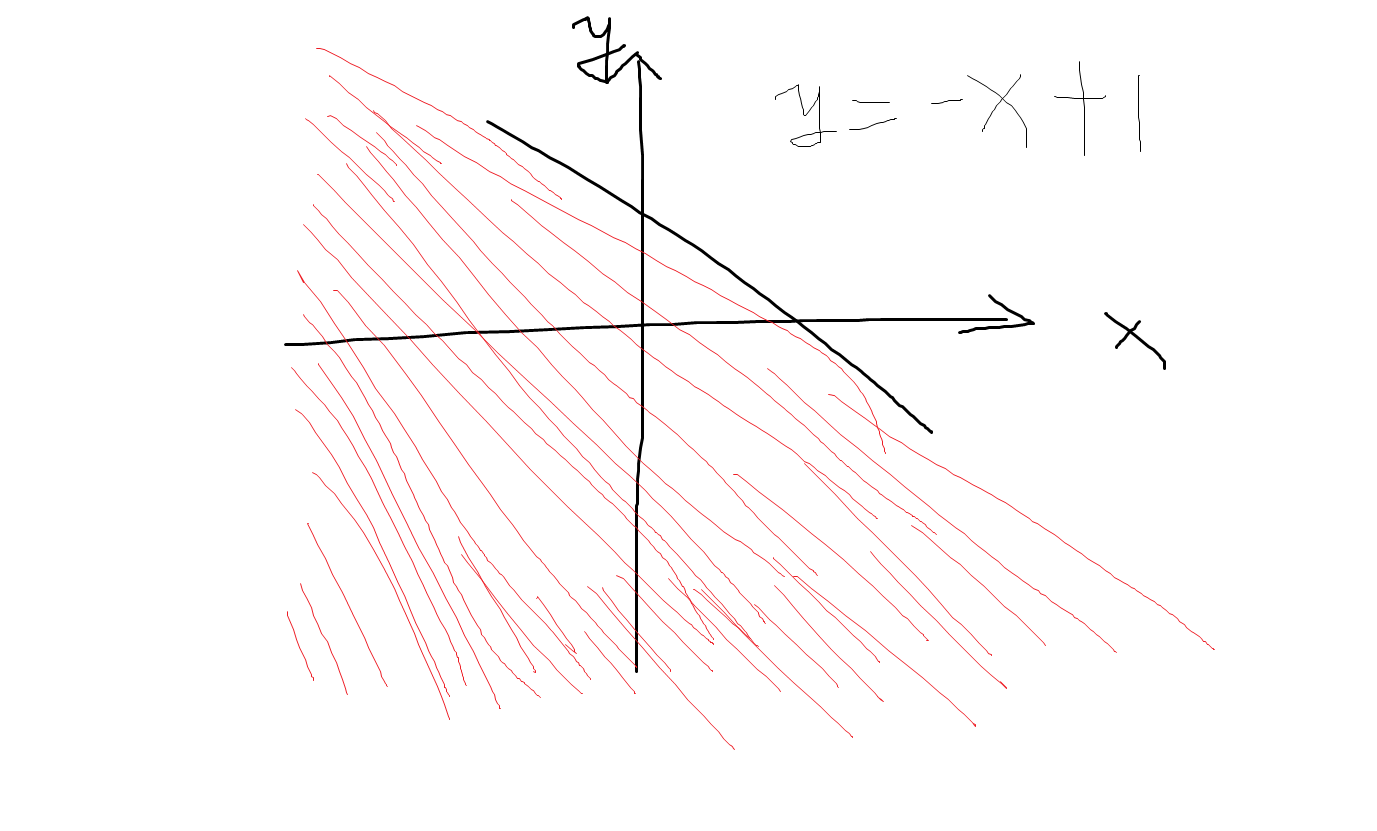
我们假设上图中的函数表达式为
y = -x + 1我们怎么判断鼠标位置处于红色部分,我们中学时代学过函数不等式,y <= -x + 1图形中表达出来就是位于函数下方,y>= -x + 1表示位于图形上方。上图红色区域任何一点都满足y <= -x + 1。把这个思想换位到三角形中,如下图
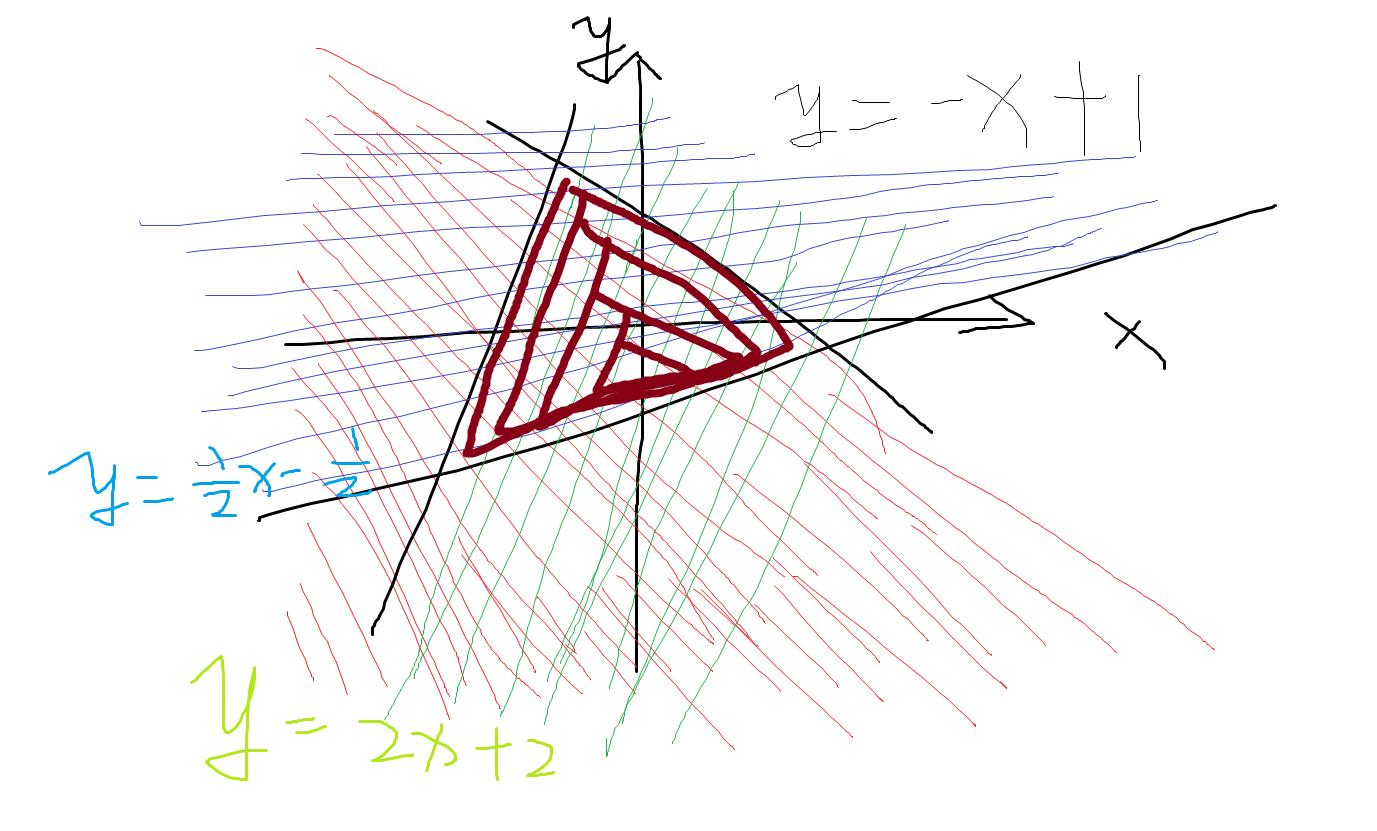
只要点满足以下3个条件及就可以判断坐标位于三角形中
- y = -x + 1 下方(y <= -x + 1)
- y = 2x + 2 下方(y <= 2x + 2)
- y = 1/2x + 1/2 上方(y>= 1/2x + 1/2)
但是还有一个问题,我们写代码的时候并不知道该点是否在函数表达式的上面还是下面,所以我们还要再判断一下
- 第一个点和第二个点的函数表达式来判断第三个点
- 第二个点和第三个点的函数表达式来判断第一个点
- 第一个点和第三个点的函数表达式来判断第二个点
    const {start, middle, end} = this
    // 求出相邻点的k值,以及b值
    const o = this.twoPointK(start, middle)
    const n = this.twoPointK(middle, end)
    const j = this.twoPointK(start, end)
    const k1 = o.k
    const b1 = o.b
    const k2 = n.k
    const b2 = n.b
    const k3 = j.k
    const b3 = j.b
    // 依次判断三点位置方向
    let d1 = end[0]*k1 + b1 >= end[1]
    let d2 = start[0]*k2 + b2 >= start[1]
    let d3 = middle[0]*k3 + b3 >= middle[1]
    if (d1) {// d1 为true表示 第三个点位于第一条边的上方
        // 如果鼠标点位于函数下方表示不满足
        if ((x*k1 + b1 <= y)) {
            return false
        }
    } else {// d1 为false表示 第三个点位于第一条边的下方
        // 如果鼠标点位于函数上方表示不满足
        if ((x*k1 + b1 >= y)) {
            return false
        }
    }
    if (d2) {// d2 为true表示 第一个点位于第二条边的上方
        // 如果鼠标点位于函数下方表示不满足
        if ((x*k2 + b2 <= y)) {
            return false
        }
    } else {//  d2 为true表示 第一个点位于第二条边的下方
        // 如果鼠标点位于函数上方表示不满足
        if ((x*k2 + b2 >= y)) {
            return false
        }
    }
    if (d3) {// d3 为true表示 第二个点位于第三条边的上方
        // 如果鼠标点位于函数下方表示不满足
        if ((x*k3 + b3 <= y)) {
            return false
        }
    } else {// d3 为true表示 第二个点位于第三条边的下方
        // 如果鼠标点位于函数上方表示不满足
        if ((x*k3 + b3 >= y)) {
            return false
        }
    }
    return true
完整代码
const mouse = {
    x: 0,
    y: 0
}

canvas.addEventListener('mousemove', e => {
    const {offsetX, offsetY} = e
    mouse.x = offsetX
    mouse.y = offsetY
})

class Triangle {
    constructor (option) {
        const [start, middle, end] = option
        this.start = start
        this.middle = middle
        this.end = end
        this.active = false
        console.log(start, middle, end)
    }
    draw () {
        const {active, start, middle, end} = this
        ctx.save()
        ctx.beginPath()
        ctx.strokeStyle = '#222'
        ctx.moveTo(start[0], start[1],)
        ctx.lineTo(middle[0], middle[1])
        ctx.lineTo(end[0], end[1])
        ctx.closePath()
        if (active) {
            ctx.fillStyle = 'red'
            ctx.fill()
        }
        ctx.stroke()
        ctx.restore()
    }
    twoPointK (start, end) {
        const k = (start[1] - end[1]) / (start[0] - end[0])
        const b = start[1] - start[0] * k
        return {
            k, b
        }
    }
    computed () {
        const {start, middle, end} = this
        const o = this.twoPointK(start, middle)
        const n = this.twoPointK(middle, end)
        const j = this.twoPointK(start, end)
        const {x, y} = mouse
        const k1 = o.k
        const b1 = o.b
        const k2 = n.k
        const b2 = n.b
        const k3 = j.k
        const b3 = j.b
        let d1 = end[0]*k1 + b1 >= end[1]
        let d2 = start[0]*k2 + b2 >= start[1]
        let d3 = middle[0]*k3 + b3 >= middle[1]
        // console.log('方向:', d1, d2, d3)
        if (d1) {
            if ((x*k1 + b1 <= y)) {
                return false
            }
        } else {
            if ((x*k1 + b1 >= y)) {
                return false
            }
        }
        if (d2) {
            if ((x*k2 + b2 <= y)) {
                return false
            }
        } else {
            if ((x*k2 + b2 >= y)) {
                return false
            }
        }
        if (d3) {
            if ((x*k3 + b3 <= y)) {
                return false
            }
        } else {
            if ((x*k3 + b3 >= y)) {
                return false
            }
        }
        return true
    }
    updata () {
        if (this.computed()) {
            this.active = true
        } else {
            this.active = false
        }
        this.draw()
    }
}

const triangles = new Set()
const list = {
    one: [
        [200, 200],
        [300, 300],
        [100, 300]
    ],
    two: [
        [500, 100],
        [600, 300],
        [400, 300]
    ],
    three: [
        [700, 200],
        [800, 100],
        [900, 500]
    ]
}
for (const key in list) {
    if (list.hasOwnProperty(key)) {
        const triangle = list[key];
        triangles.add(new Triangle(triangle))
    }
}

function animate () {
    requestAnimationFrame(animate)
    ctx.clearRect(0, 0, width, height)
    for (const triangle of triangles) {
        triangle.updata()
    }
}
animate()
示例
矩形
矩形相对于来说较为简单,我们就直接上代码好了
判断鼠标是否大于起点位置,小于结束位置即可
const canvas = document.getElementById('canvas')
const ctx = canvas.getContext('2d')
const width = window.innerWidth
const height = window.innerHeight

canvas.width = width
canvas.height = height

const mouse = {
    x: 0,
    y: 0
}

canvas.addEventListener('mousemove', e => {
    const {offsetX, offsetY} = e
    mouse.x = offsetX
    mouse.y = offsetY
})

class Rectangle {
    constructor (x, y, width, height) {
        this.x = x
        this.y = y
        this.width = width
        this.height = height
        this.active = false
    }
    draw () {
        const {x, y, width, height, active} = this
        ctx.strokeStyle = '#789'
        ctx.rect(x, y, width, height)
        ctx.stroke()
        if (active) {
            ctx.fillStyle = 'red'
            ctx.fill()
        }
    }

    updata () {
        const {x, y, width, height} = this
        const mouseX = mouse.x
        const mouseY = mouse.y
        if (mouseX >= x && mouseX <= (width + x) && mouseY >= y && mouseY <= (y + height)) {
            this.active = true
        } else {
            this.active = false
        }
        this.draw()
    }
}

const rectangles = new Set()
rectangles.add(new Rectangle(100, 100, 200, 150))

function animate () {
    requestAnimationFrame(animate)
    ctx.clearRect(0, 0, width, height)
    for (const rectangle of rectangles) {
        rectangle.updata()
    }
}

animate()
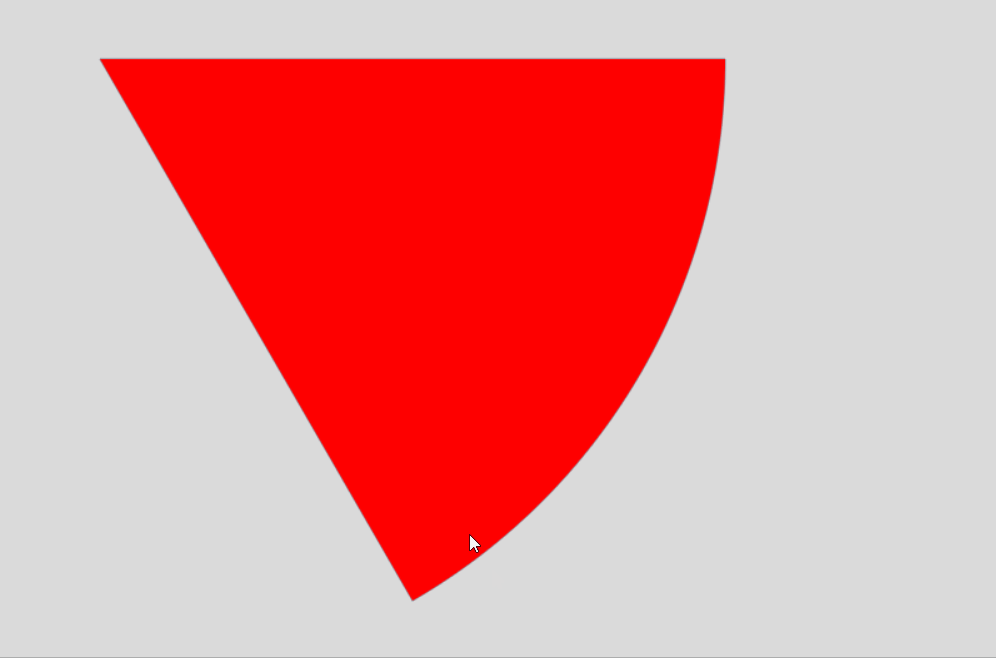
扇形
扇形的判断原理是基于圆形判断半径的基础上再判断角度
- 首先判断半径是否小于圆形半径
- 判断鼠标所在的点的角度(通过
Math.asin Math.acos函数反求角度),这里为什么需要求两个值呢?原因是在三角函数中sin 和 cos是周期性变化的,如果我们只有一个叫值来判断角度,那会有无数个值
完整代码
const canvas = document.getElementById('canvas')
const ctx = canvas.getContext('2d')
const width = window.innerWidth
const height = window.innerHeight

canvas.width = width
canvas.height = height

const mouse = {
    x: 0,
    y: 0
}

canvas.addEventListener('mousemove', e => {
    const {offsetX, offsetY} = e
    mouse.x = offsetX
    mouse.y = offsetY
})

class Sector {
    constructor (x, y, radius, start, end) {
        this.x = x
        this.y = y
        this.radius = radius
        this.start = start
        this.end = end
        this.active = false
    }
    draw () {
        const {x, y, radius, start, end, active} = this
        ctx.strokeStyle = '#789'
        ctx.beginPath()
        ctx.moveTo(x, y)
        ctx.lineTo(x + Math.cos(start) * radius, y + Math.sin(start) * radius)
        ctx.arc(x, y, radius, start, end)
        ctx.closePath()
        ctx.stroke()
        if (active) {
            ctx.fillStyle = 'red'
            ctx.fill()
        }
    }

    updata () {
        const {x, y, radius, start, end} = this
        const mouseX = mouse.x
        const mouseY = mouse.y
        const dx = mouseX - x
        const dy = mouseY - y
        const dr = Math.sqrt(dx**2 + dy ** 2)
        if (dr <= radius) {
            const sinDeg = Math.asin(dy / dr)
            const cosDeg = Math.acos(dx / dr)
            if (sinDeg >= start && sinDeg <= end && cosDeg >= start && cosDeg <= end) {
                this.active = true
            } else {
                this.active = false
            }
        } else {
            this.active = false
        }
        this.draw()
    }
}

const sectores = new Set()
sectores.add(new Sector(100, 100, 500, 0, Math.PI / 3))

function animate () {
    requestAnimationFrame(animate)
    ctx.clearRect(0, 0, width, height)
    for (const sector of sectores) {
        sector.updata()
    }
}

animate()