

学习 Node 有段时间了,一直想尝试用Node写点东西,个人还没有博客所以尝试着想撘一个简单的Blog。功能简单一点(后台文章:发布、修改;前端的:文章列表、文章详情、添加评论)。前端UI采用 Ant Design Pro,后端采用 koa + mysql。
博客介绍
- 前后端分离开发(Node服务端+后台管理系统+前端页面展现)
- 博客页面基于 Ant Design Pro 详细参考 Ant Design Pro
- 前端地址:github.com/GDLong/koa2…
- 后台地址:github.com/GDLong/koa2…
- 账号:
| 用户名 | 密码 |
|---|---|
| admin | 123123 |
| xiaohuo | 123123 |
实现功能
- 主页+列表页+
- 博客标签
- 用户评论回复
- 用户登录
- markdown 代码高亮
- 回到顶部
- 完全响应式
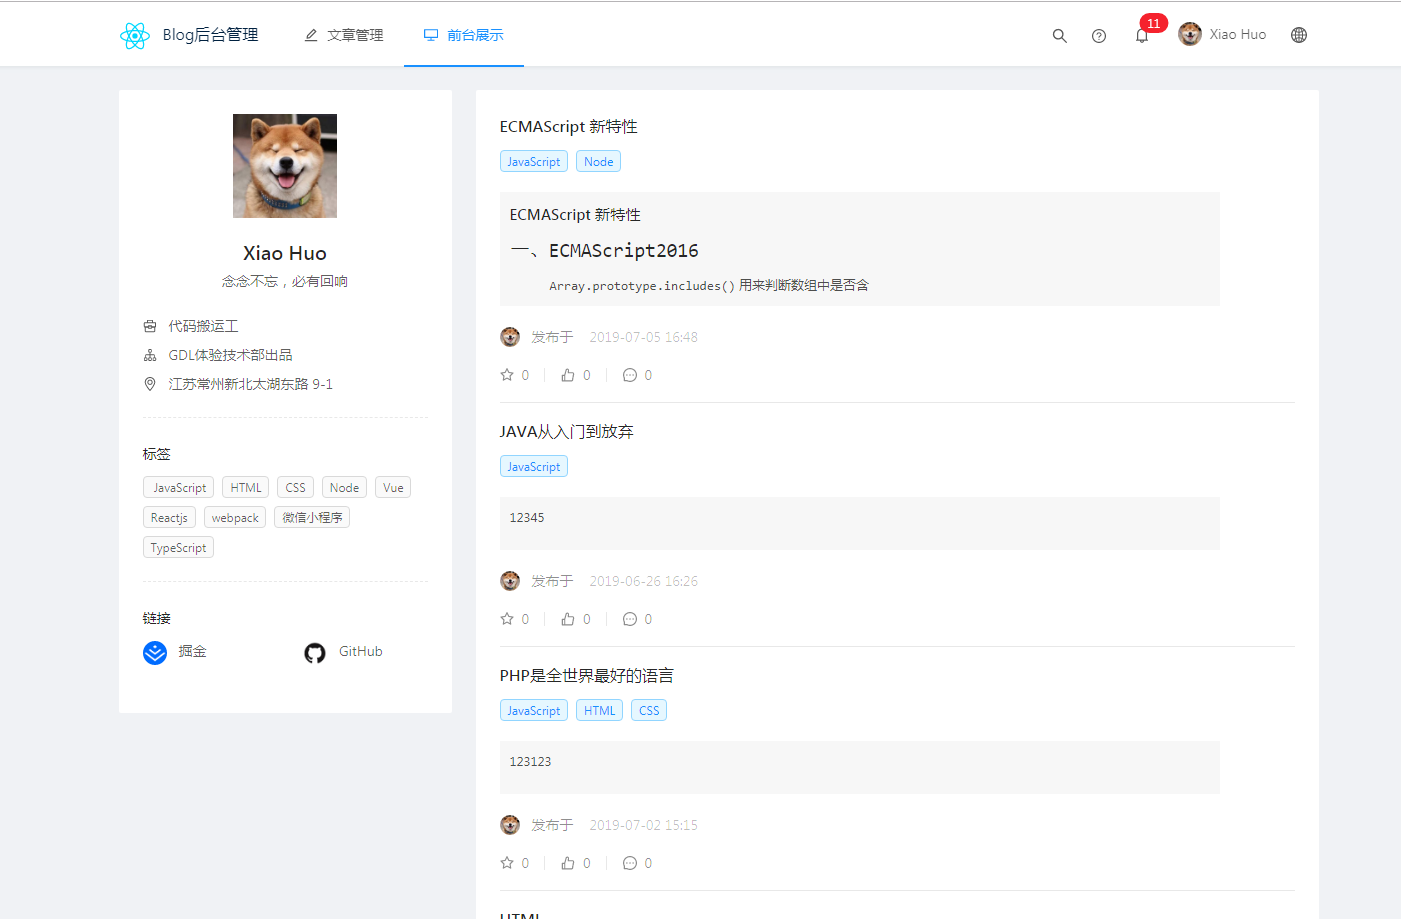
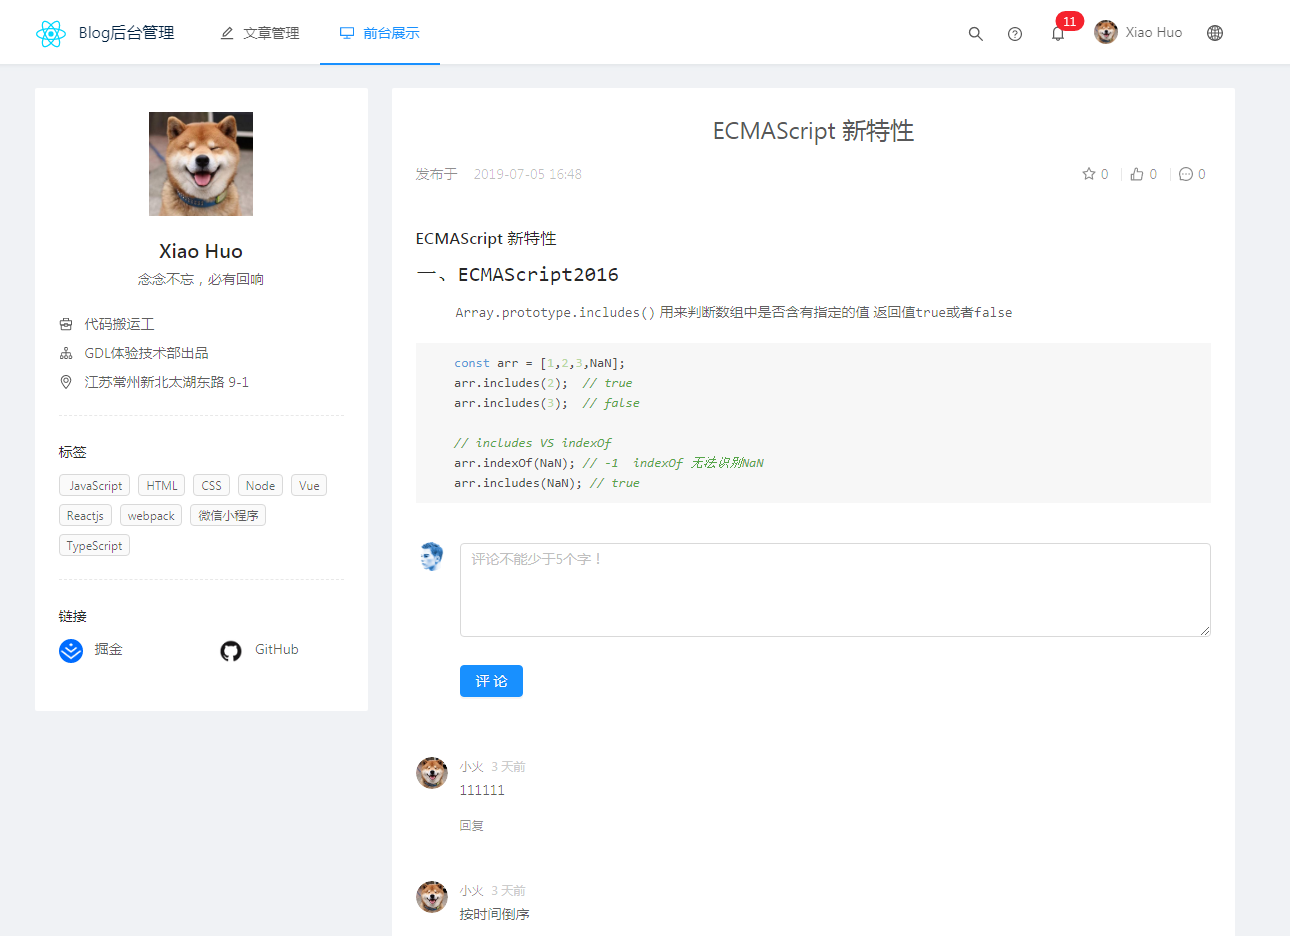
前端效果预览
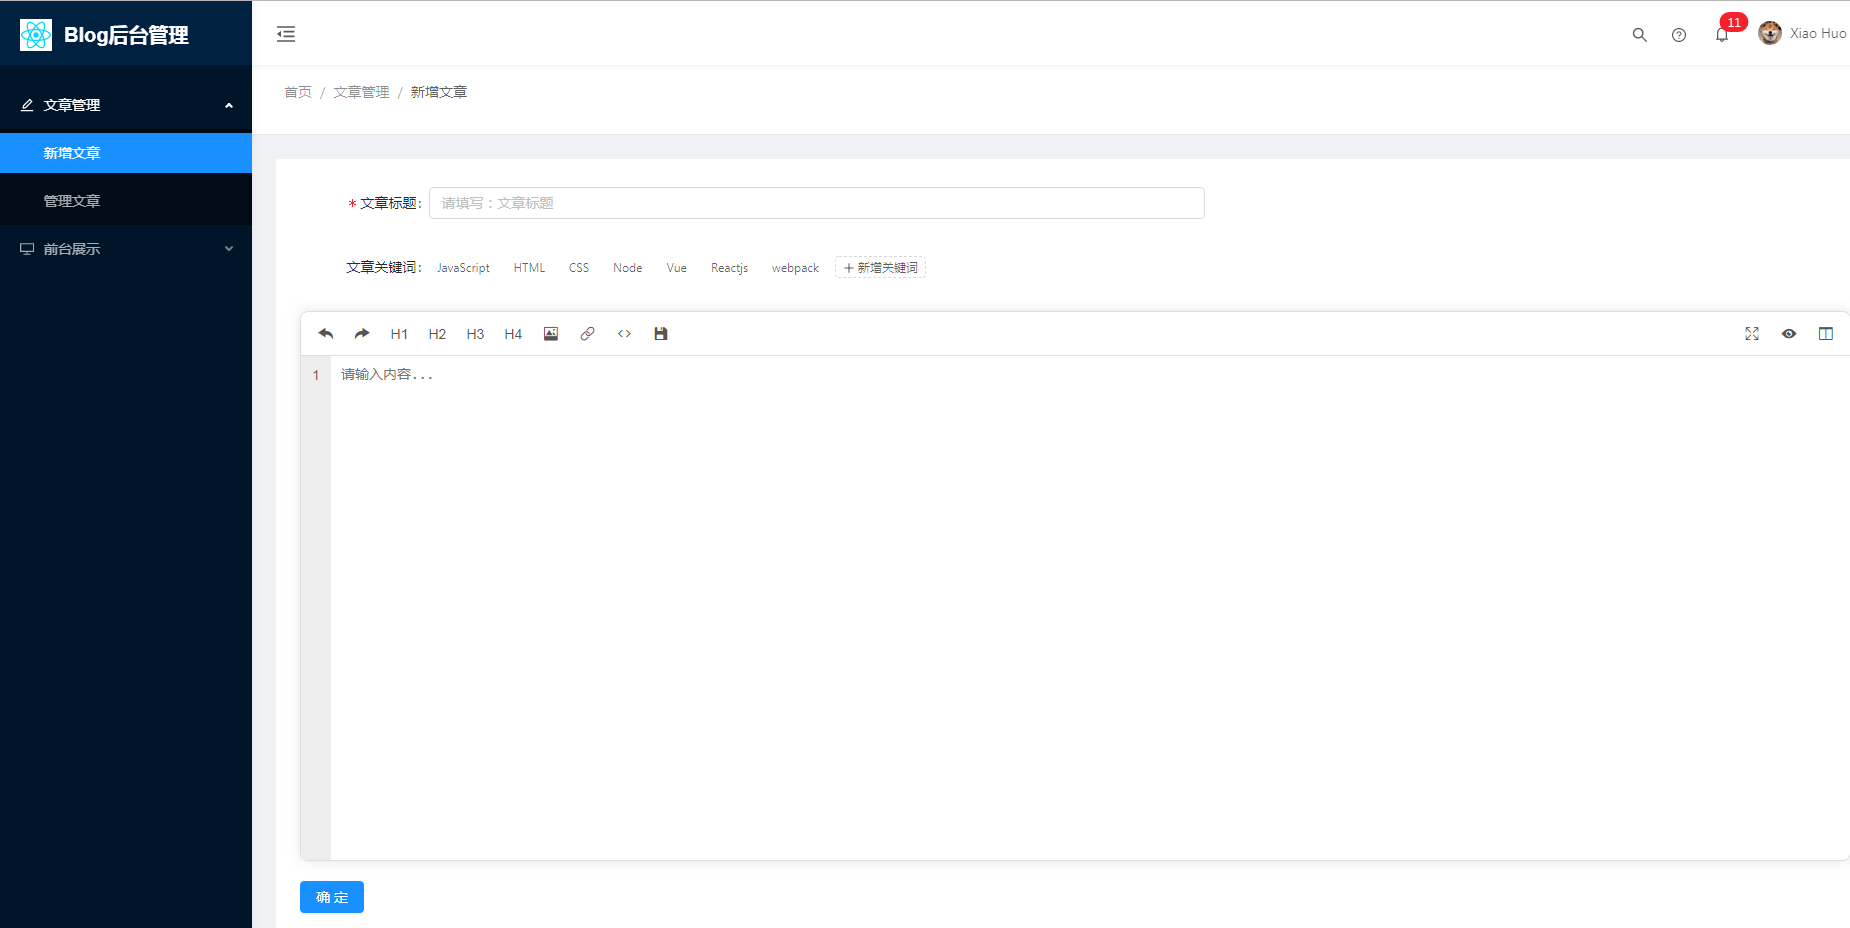
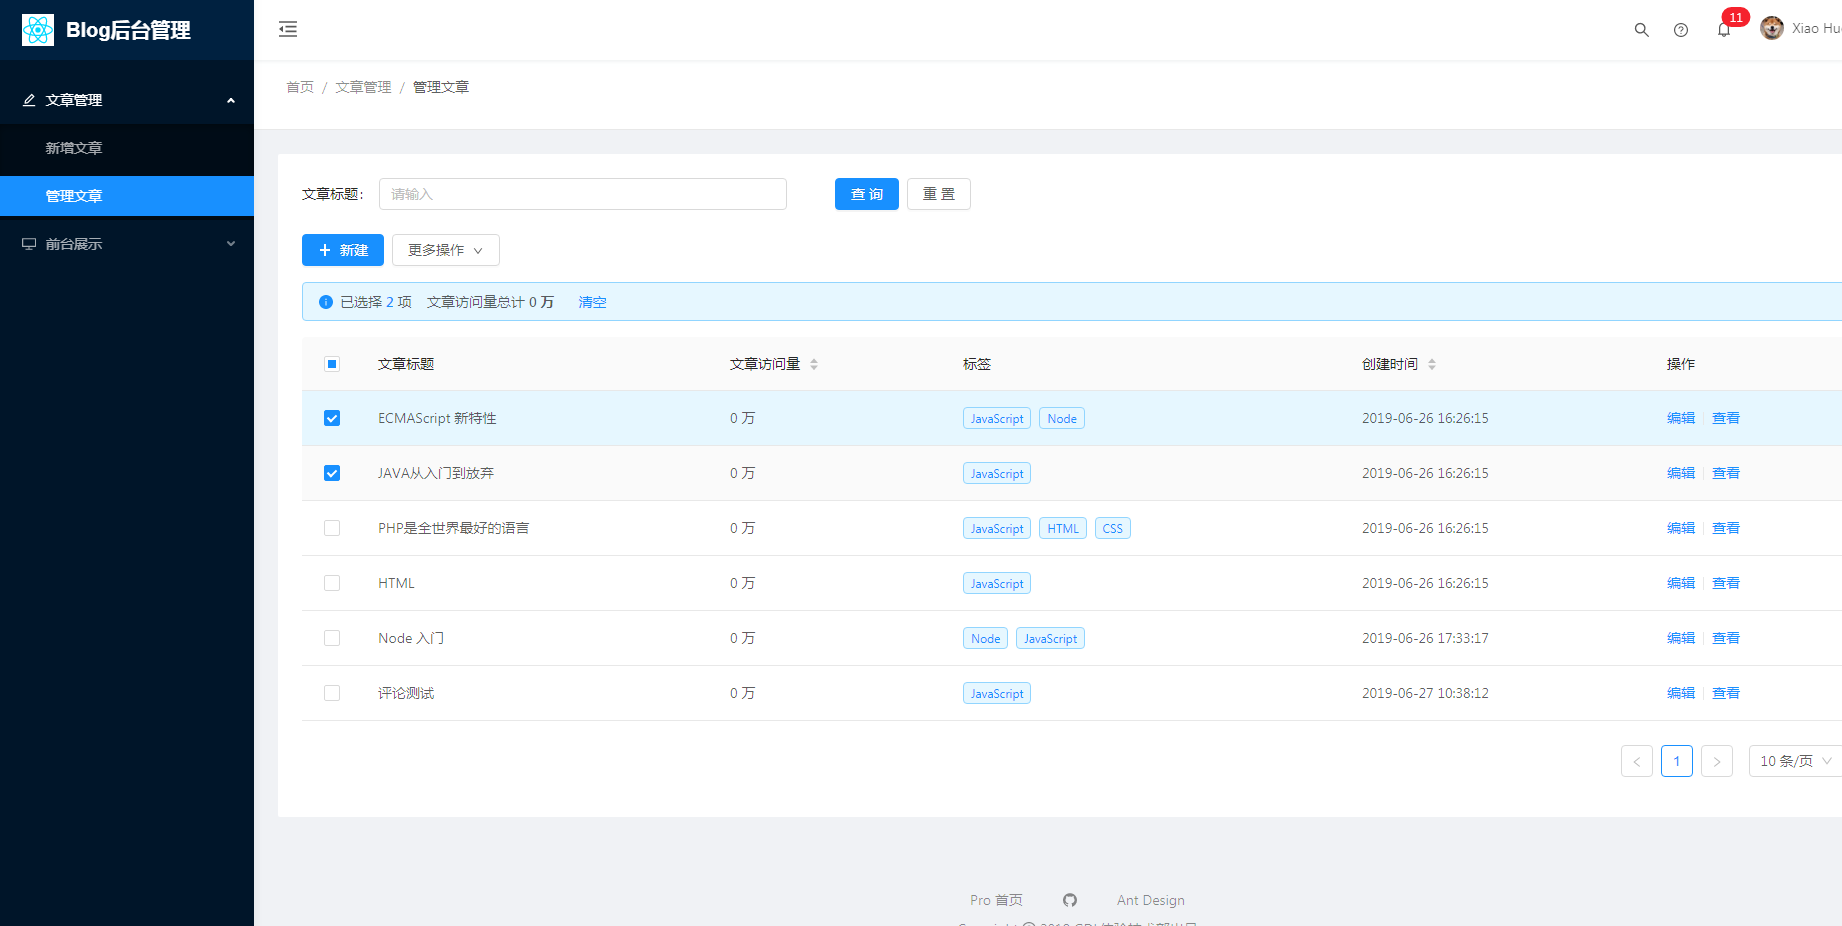
后台管理预览
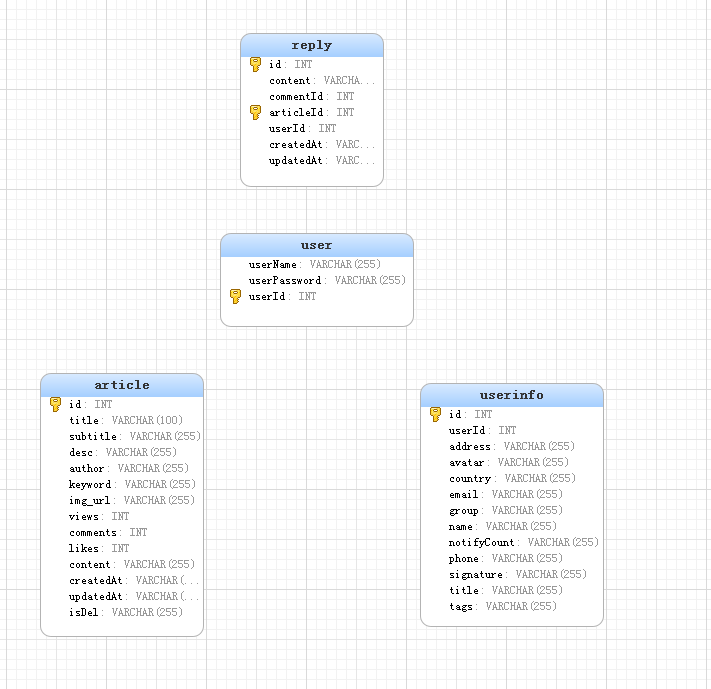
数据库结构
总结
虽然是从零开发但是因为用的 ant design pro 所以在UI和数据交互上并没有费多大功夫,项目的目的也是为了熟悉后端开发的流程,虽然功能很简单但也是遇到了不好问题,这里罗列一下 供大家参考吧!
初识 Koa 可已参考这个网站:Koa 中文网
前端部分
- 熟练使用Antd的各种组件
- 了解Antd的路由和菜单配置
- 了解Antd与服务端交互流程
marked+highlight代码高亮
import marked  from 'marked';
import hljs from 'highlight.js';
import 'highlight.js/styles/vs2015.css';

marked.setOptions({
  renderer: new marked.Renderer(),
  highlight: function(code) {
    return hljs.highlightAuto(code).value;
  },
  sanitize: false,
  pedantic: false,
  gfm: true,
  tables: true,
  breaks: true,
  smartLists: true,
  smartypants: true,
  xhtml: false
});

// 文章翻译
const MakeDownTransForm = ({domString})=>{
  const {data:{content}} = domString;
  const count = marked(content);
  return <div className={styles.articleDetail} dangerouslySetInnerHTML={{ __html: count }} />
}

render() {
    return(
        <MakeDownTransForm domString={article}/>
    )
}
- 对评论单条数据进行重新整合成树结构
const data = [{
  "id": 23,
  "content": "yyyyyyyyyyyyy",
  "commentId": 0,
  "articleId": 35,
  "userId": 1,
  "createdAt": "2019-07-05T08:50:03.000Z",
  "updatedAt": "2019-07-05T08:50:03.000Z"
},
{
  "id": 11,
  "content": "JAVA从入门到放弃789",
  "commentId": 0,
  "articleId": 35,
  "userId": 1,
  "createdAt": "2019-07-05T01:44:28.000Z",
  "updatedAt": "2019-07-05T01:44:28.000Z"
},
{
  "id": 10,
  "content": "JAVA从入门到放弃",
  "commentId": 0,
  "articleId": 35,
  "userId": 1,
  "createdAt": "2019-07-05T01:42:34.000Z",
  "updatedAt": "2019-07-05T01:42:34.000Z"
}]
  const trans = this.transReply(data);//获取到后台的评论数据

  transReply=(data)=>{
    const parents = data.filter(item=>item.commentId == 0 || item.commentId == null)
    const children = data.filter(item=>item.commentId !== 0 || item.commentId !== null)

    let translator = (parents,children)=>{
      parents.forEach(parent => {
        // 遍历子节点数据
        children.forEach((child,index) => {
          // 如果找到父子对应关系
          if(child.commentId == parent.id){
            let temp = JSON.parse(JSON.stringify(children))
            temp.splice(index,1)//当前子节点从拷贝元素中删除
            translator([child],temp)
            //把找到子节点放入父节点的children属性中
            typeof parent.children !== 'undefined' ? parent.children.push(child) : parent.children = [child]
          }
        })
      });
    }
    translator(parents, children)
    //返回最终的结果
    return parents
  }
// 最终结果
//0: {id: 23, content: "yyyyyyyyyyyyy", commentId: 0, articleId: 35, userId: 1, …}
//1: {id: 11, content: "JAVA从入门到放弃789", commentId: 0, articleId: 35, userId: 1, …}
//2: {id: 10, content: "JAVA从入门到放弃", commentId: 0, articleId: 35, userId: 1, …}
后端部分
- Koa中间件的使用
- 对sql语句的熟练使用(当前还没有使用ORM,后期会配置sequelize)
- 登录操作配置服务端缓存
session
const Koa = require('koa')
const app = new Koa()
const cors = require('koa2-cors');
const session = require('koa-session')

app.use(cors({
  // origin:'http://192.168.0.99:8000',
  credentials:true
}))

// 配置session
app.keys = ['some secret hurr']
const CONFIG = {
  key: 'koa:sess', /**  cookie的key。 (默认是 koa:sess) */
  maxAge: 6000,   /**  session 过期时间,以毫秒ms为单位计算 。*/
  autoCommit: true, /** 自动提交到响应头。(默认是 true) */
  overwrite: true, /** 是否允许重写 。(默认是 true) */
  httpOnly: true, /** 是否设置HttpOnly,如果在Cookie中设置了"HttpOnly"属性,那么通过程序(JS脚本、Applet等)将无法读取到Cookie信息,这样能有效的防止XSS攻击。  (默认 true) */
  signed: true, /** 是否签名。(默认是 true) */
  rolling: true, /** 是否每次响应时刷新Session的有效期。(默认是 false) */
  renew: false, /** 是否在Session快过期时刷新Session的有效期。(默认是 false) */
};
app.use(session(CONFIG, app));
- 错误日志的统一处理
log4js
项目结构
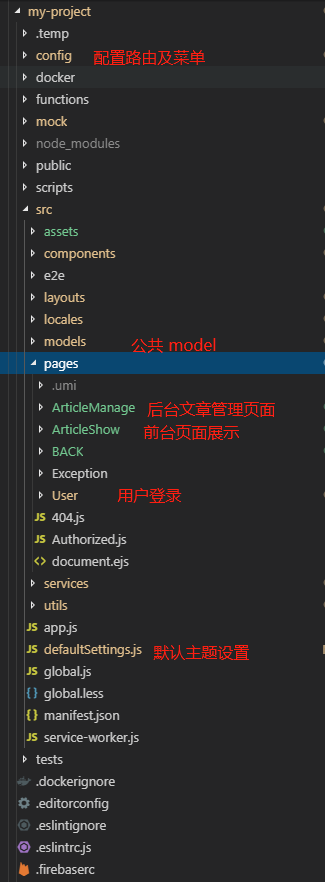
前端项目结构
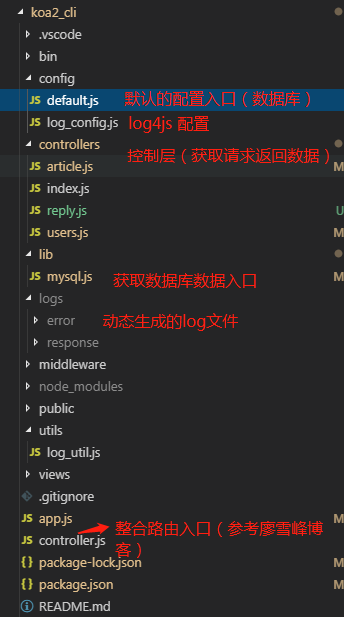
后台项目结构
结语
第一次写文章Σ( ° △ °|||)︴,参考了不少别的博主的写作格式,非常感谢!
项目会在接下来的文章中更新和维护
