点击上方“Android技术杂货铺” ,选择“标星”
干货文章,第一时间送达!
 封面/pixbay
前些天又有一个同学私信我,问我侧滑删除功能改如何实现?时不时的就会收到相似的问题,有空的时候我会说一下大概的实现思路或者扔一个Github 的链接,没空的时候就会叫他们自己Google一下,网上有一些现成的开源库,拿来自己改一下或者能实现设计给的UI效果的,直接用上就好。
侧滑菜单确实是一个比较常见的功能,其中场景较多的就是侧滑删除,它是iOS列表删除通用交互方式,比如微信、QQ、苹果自带的短信、通讯录列表等,都有侧滑删除功能。由于国内Android、iOS通常都是一套设计,因次,Android端怎么能少得了这个功能呢?Android 端实现起来确实稍显麻烦,它需要你掌握自定义View、属性动画、事件分发等一些比较深入的知识点。如果这些知识点你掌握得不错,那么实现一个侧滑菜单其实也不难。本文就讲讲实现思路和整理的一些不错的关于侧滑菜单的开源库。
基本实现思路
通过自定义View的方式实现步骤:1、自定义ViewGroup2、在onLayout 中,获取childView并对他们进行布局,这一步比较重要, content 占满屏幕,菜单View 在屏幕之外,当滑动的时候,content滑屏幕,menu 进入屏幕,就达到了我需要的效果,布局草图如下:

3、重写dispatchTouchEvent和onInterceptTouchEvent方法拦截事件和处理滚动。滑动效果的实现既可以用 Scroller,也可以用属性动画ValueAnimator。
以上就是实现一个策侧滑单的思路。下面就看一下给大家整理的几个不错的库,思路都是差不多的,只是最后的实现和封装有所差异。有兴趣的去看看源码。
整理的一些不错的侧滑菜单库
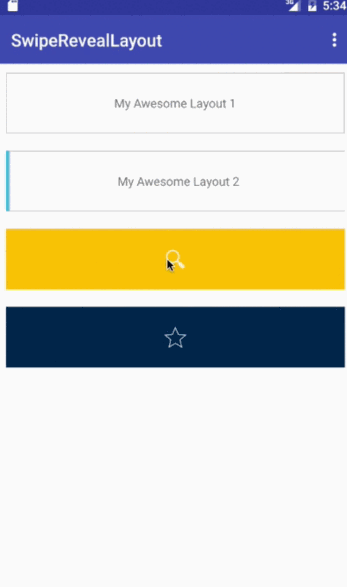
1、SwipeRevealLayout
SwipeRevealLayout 使用简单、代码入侵低,不但支持左右侧滑菜单,还支持上下滑出菜单。可以配合各种布局使用,包括 RecyclerView 、ListView、 ScrollView 等,效果很赞
https://github.com/chthai64/SwipeRevealLayout
使用方式:
<com.chauthai.swipereveallayout.SwipeRevealLayout android:layout_width="match_parent" android:layout_height="match_parent" app:mode="same_level" app:dragEdge="left"> <!-- Your secondary layout here --> <FrameLayout android:layout_width="wrap_content" android:layout_height="match_parent" /> <!-- Your main layout here --> <FrameLayout android:layout_width="match_parent" android:layout_height="match_parent" /></com.chauthai.swipereveallayout.SwipeRevealLayout>在adapterclass 中:
public class Adapter extends RecyclerView.Adapter { // This object helps you save/restore the open/close state of each view private final ViewBinderHelper viewBinderHelper = new ViewBinderHelper(); public Adapter() { // uncomment the line below if you want to open only one row at a time // viewBinderHelper.setOpenOnlyOne(true); } @Override public void onBindViewHolder(ViewHolder holder, int position) { // get your data object first. YourDataObject dataObject = mDataSet.get(position); // Save/restore the open/close state. // You need to provide a String id which uniquely defines the data object. viewBinderHelper.bind(holder.swipeRevealLayout, dataObject.getId()); // do your regular binding stuff here }}private class ViewHolder extends RecyclerView.ViewHolder { private SwipeRevealLayout swipeLayout; private View frontLayout; private View deleteLayout; private TextView textView; public ViewHolder(View itemView) { super(itemView); swipeLayout = (SwipeRevealLayout) itemView.findViewById(R.id.swipe_layout); frontLayout = itemView.findViewById(R.id.front_layout); deleteLayout = itemView.findViewById(R.id.delete_layout); textView = (TextView) itemView.findViewById(R.id.text); } public void bind(final String data) { deleteLayout.setOnClickListener(new View.OnClickListener() { @Override public void onClick(View v) { mDataSet.remove(getAdapterPosition()); notifyItemRemoved(getAdapterPosition()); } }); textView.setText(data); frontLayout.setOnClickListener(new View.OnClickListener() { @Override public void onClick(View view) { String displayText = "" + data + " clicked"; Toast.makeText(mContext, displayText, Toast.LENGTH_SHORT).show(); Log.d("RecyclerAdapter", displayText); } }); } }效果图:


2、SwipeDelMenuLayout
https://github.com/mcxtzhang/SwipeDelMenuLayout
和SwipeRevealLayout差不多。
使用方式:在RecyclerView、ListView 可直接使用,在Adapter 中,在item布局最外层包上 SwipeMenuLayout就好。
<?xml version="1.0" encoding="utf-8"?><com.mcxtzhang.swipemenulib.SwipeMenuLayout xmlns:android="http://schemas.android.com/apk/res/android" android:layout_width="match_parent" android:layout_height="100dp" android:clickable="true" android:paddingBottom="1dp"> <TextView android:id="@+id/content" android:layout_width="match_parent" android:layout_height="match_parent" android:background="?android:attr/selectableItemBackground" android:gravity="center" android:text="项目中我是任意复杂的原ContentItem布局"/> <!-- 以下都是侧滑菜单的内容依序排列 --> <Button android:id="@+id/btnTop" android:layout_width="60dp" android:layout_height="match_parent" android:background="#d9dee4" android:text="置顶" android:textColor="@android:color/white"/> <Button android:id="@+id/btnUnRead" android:layout_width="120dp" android:layout_height="match_parent" android:background="#ecd50a" android:clickable="true" android:text="标记未读" android:textColor="@android:color/white"/> <Button android:id="@+id/btnDelete" android:layout_width="60dp" android:layout_height="match_parent" android:background="@color/red_ff4a57" android:text="删除" android:textColor="@android:color/white"/></com.mcxtzhang.swipemenulib.SwipeMenuLayout>效果图:

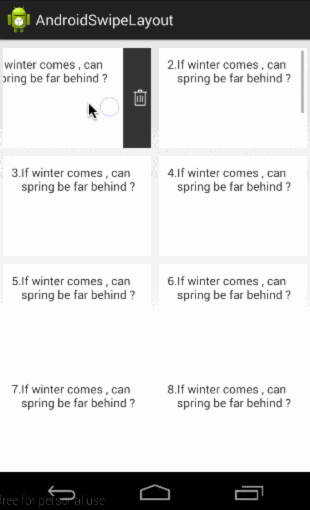
3、AndroidSwipeLayout
https://github.com/daimajia/AndroidSwipeLayout
出自代码家大神,功能强大,支持上下左右四个方向滑出菜单,可单独使用,也支持 RecyclerView 和 ListView等列表,Adapter需要继承 RecylerViewAdapter或者BaseSwipeAdapter。
使用:
<com.daimajia.swipe.SwipeLayout xmlns:android="http://schemas.android.com/apk/res/android" android:layout_width="match_parent" android:layout_height="80dp"> <!-- Bottom View Start--> <LinearLayout android:background="#66ddff00" android:id="@+id/bottom_wrapper" android:layout_width="160dp" android:weightSum="1" android:layout_height="match_parent"> <!--What you want to show--> </LinearLayout> <!-- Bottom View End--> <!-- Surface View Start --> <LinearLayout android:padding="10dp" android:background="#ffffff" android:layout_width="match_parent" android:layout_height="match_parent"> <!--What you want to show in SurfaceView--> </LinearLayout> <!-- Surface View End --></com.daimajia.swipe.SwipeLayout>代码中:
SwipeLayout swipeLayout = (SwipeLayout)findViewById(R.id.sample1);//set show mode.swipeLayout.setShowMode(SwipeLayout.ShowMode.LayDown);//add drag edge.(If the BottomView has 'layout_gravity' attribute, this line is unnecessary)swipeLayout.addDrag(SwipeLayout.DragEdge.Left, findViewById(R.id.bottom_wrapper));swipeLayout.addSwipeListener(new SwipeLayout.SwipeListener() { @Override public void onClose(SwipeLayout layout) { //when the SurfaceView totally cover the BottomView. } @Override public void onUpdate(SwipeLayout layout, int leftOffset, int topOffset) { //you are swiping. } @Override public void onStartOpen(SwipeLayout layout) { } @Override public void onOpen(SwipeLayout layout) { //when the BottomView totally show. } @Override public void onStartClose(SwipeLayout layout) { } @Override public void onHandRelease(SwipeLayout layout, float xvel, float yvel) { //when user's hand released. } });配合RecyclerView 和 ListView 等列表的使用,请看github给出的 Samples效果图:
4、SwipeRecyclerView
https://github.com/yanzhenjie/SwipeRecyclerView
本库的一大特色是它滑出的菜单可以是左右排列的,也可以是上下排列,提供多种选择,不过侵入性稍微有点高,需要使用本库提供的SwipeRecyclerView,但是使用方式与提供的api和原生的 RecyclerView是一样的。还有它通过代码来创建划出的菜单。如下:
// 设置监听器。swipeRecyclerView.setSwipeMenuCreator(mSwipeMenuCreator);// 创建菜单:SwipeMenuCreator mSwipeMenuCreator = new SwipeMenuCreator() { @Override public void onCreateMenu(SwipeMenu leftMenu, SwipeMenu rightMenu, int position) { SwipeMenuItem deleteItem = new SwipeMenuItem(mContext) ...; // 各种文字和图标属性设置。 leftMenu.addMenuItem(deleteItem); // 在Item左侧添加一个菜单。 SwipeMenuItem deleteItem = new SwipeMenuItem(mContext) ...; // 各种文字和图标属性设置。 leftMenu.addMenuItem(deleteItem); // 在Item右侧添加一个菜单。 // 注意:哪边不想要菜单,那么不要添加即可。 }};// 菜单点击监听。swipeRecyclerView.setOnItemMenuClickListener(mItemMenuClickListener);OnItemMenuClickListener mItemMenuClickListener = new OnItemMenuClickListener() { @Override public void onItemClick(SwipeMenuBridge menuBridge, int position) { // 任何操作必须先关闭菜单,否则可能出现Item菜单打开状态错乱。 menuBridge.closeMenu(); // 左侧还是右侧菜单: int direction = menuBridge.getDirection(); // 菜单在Item中的Position: int menuPosition = menuBridge.getPosition(); }};效果图:


5、RecyclerViewUndoSwipe
https://github.com/HoneyNeutrons/RecyclerViewUndoSwipe
一个可以拖拽和侧滑的UI效果,动画非常炫。
效果图:

它没有封装成库,是一个效果demo,具体使用方式和实现,可以去看源码
---end---
推荐阅读:
教你如何定制一个Android「填空题」控件(仿学习强国填空题控件)
Android App Shortcuts——实现应用快捷方式