

新增next.js使用踩坑
juejin.cn/post/684490…
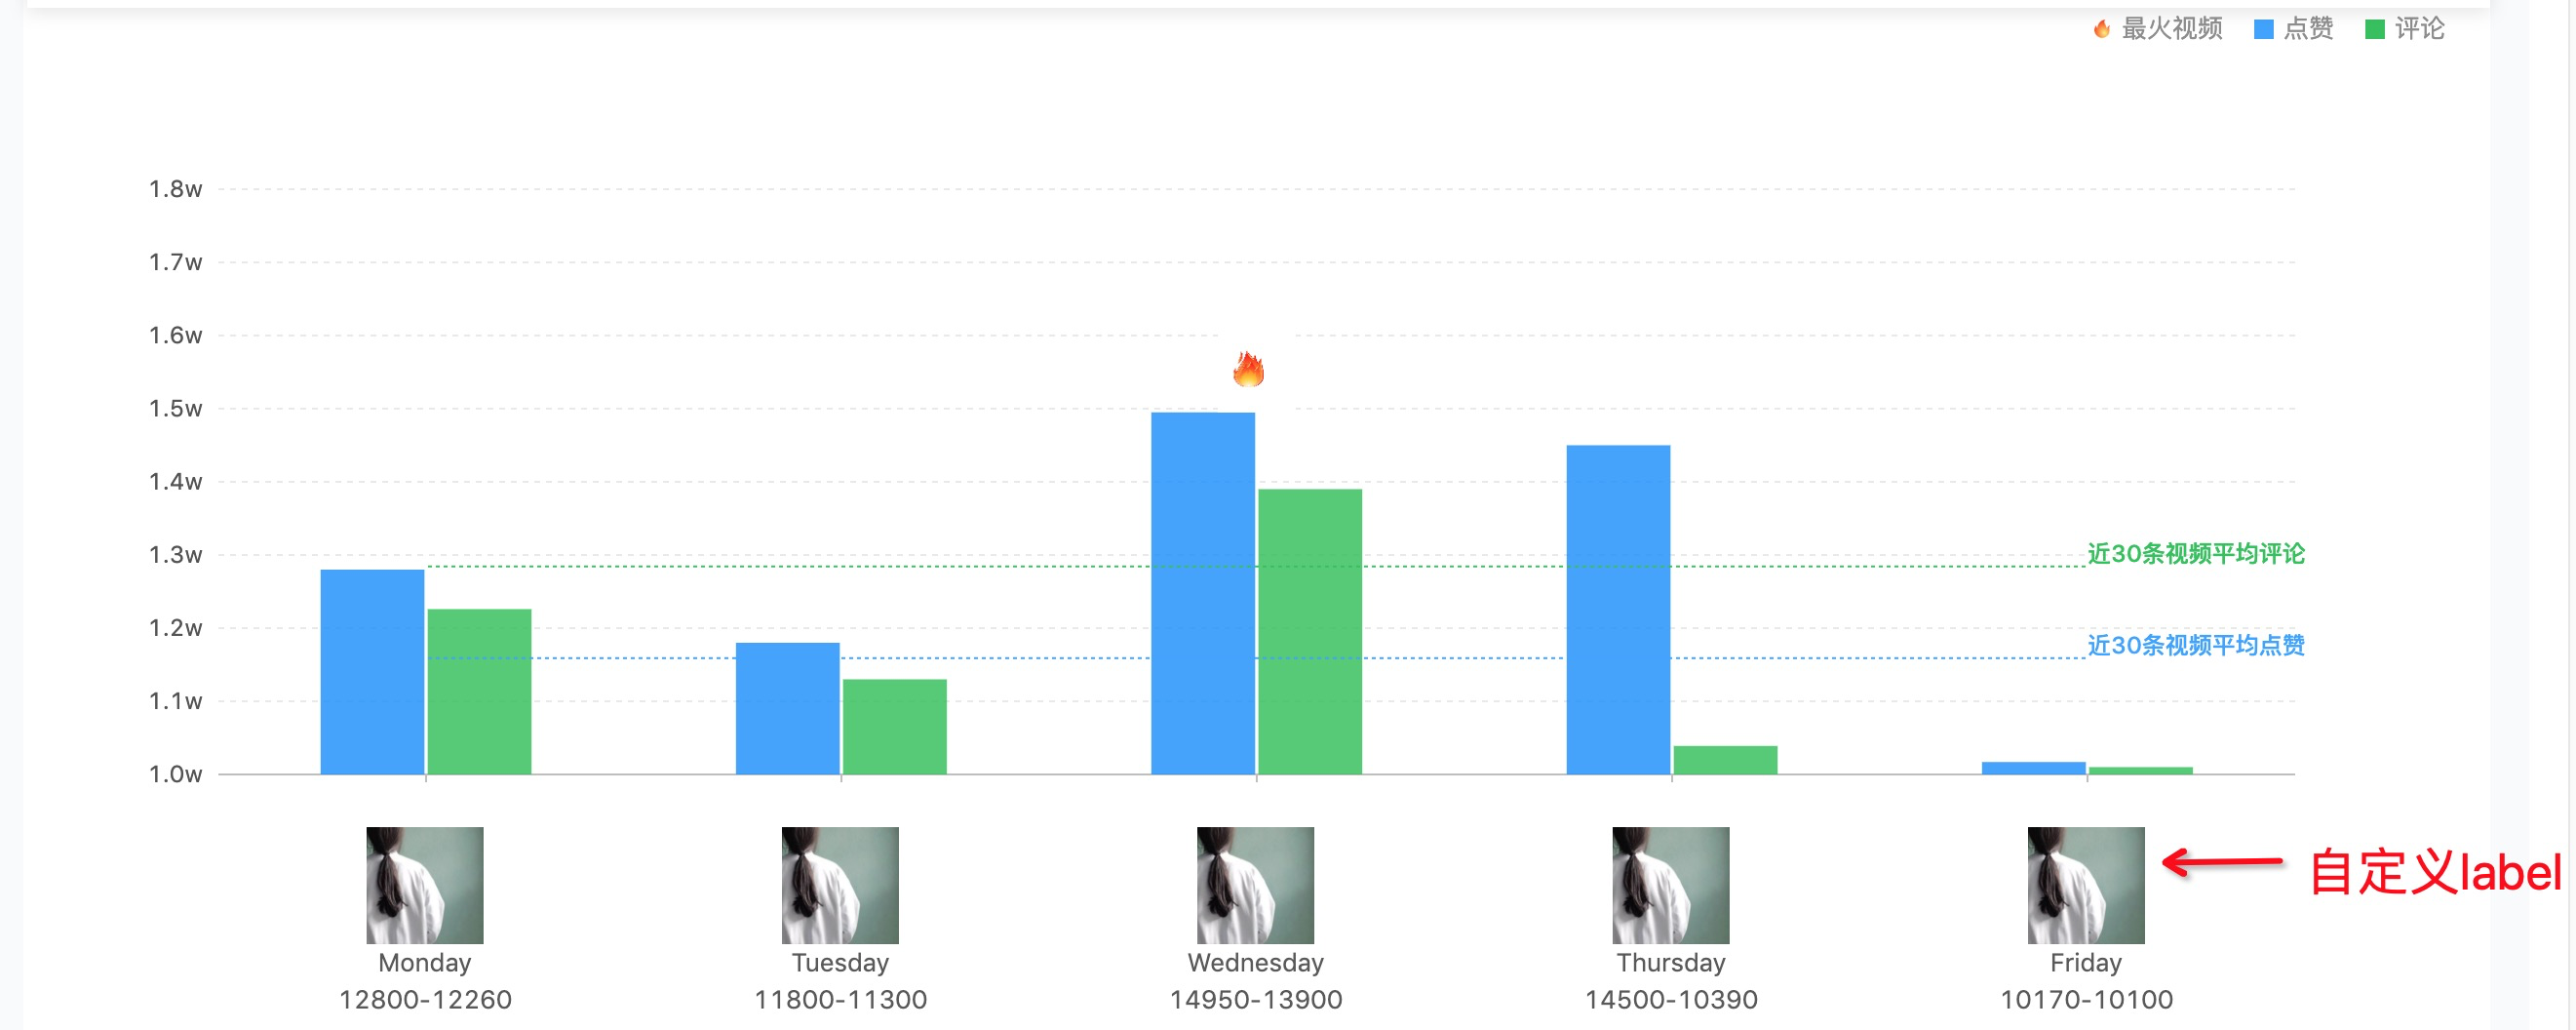
1.给柱状图-添加平均值辅助线-数据特殊标记-自定义label
效果如下:
代码奉上
import React from "react";
import {
  G2,
  Chart,
  Geom,
  Axis,
  Tooltip,
  Coord,
  Label,
  Legend,
  View,
  Guide,
  Shape,
  Facet,
  Util
} from "bizcharts";
import {
  g2Tooltip, getMinNumber, getMaxNumber
} from "./config";
import { formatW } from "../../util";
import './GroupedColumn.less'
import DataSet from "@antv/data-set";
const { Line } = Guide;
export default class GroupedColumn extends React.Component {
  getAvgNumber = (data = [], key) => {
    if (data.length > 0) {
      return data.reduce((pre, next) => pre + next[key], 0) / data.length;
    }
  }
  render() {
    const data = [
      {
        label: "Monday",
        series1: 12800,
        series2: 12260,
        url: 'http://img2.imgtn.bdimg.com/it/u=571610305,1553276443&fm=26&gp=0.jpg'
      },
      {
        label: "Tuesday",
        series1: 11800,
        series2: 11300,
        url: 'http://img2.imgtn.bdimg.com/it/u=571610305,1553276443&fm=26&gp=4.jpg'
      },
      {
        label: "Wednesday",
        series1: 14950,
        series2: 13900,
        url: 'http://img2.imgtn.bdimg.com/it/u=571610305,1553276443&fm=26&gp=3.jpg'

      },
      {
        label: "Thursday",
        series1: 14500,
        series2: 10390,
        url: 'http://img2.imgtn.bdimg.com/it/u=571610305,1553276443&fm=26&gp=2.jpg'

      },
      {
        label: "Friday",
        series1: 10170,
        series2: 10100,
        url: 'http://img2.imgtn.bdimg.com/it/u=571610305,1553276443&fm=26&gp=1.jpg'

      }
    ];
    const ds = new DataSet();
    const dv = ds.createView().source(data);
    dv.transform({
      type: "fold",
      fields: ["series1", "series2"],
      // 展开字段集
      key: "type",
      // key字段
      value: "value", // value字段
      callback: obj => {
        obj.value = [obj.series1, obj.series2];
        return obj;
      }
    });
    const scale = {
      type: { formatter: d => ({ series1: '点赞', series2: '评论' }[d]) },
      value: {
        min: getMinNumber('series1', data) > getMinNumber('series2', data) ? getMinNumber('series2', data) : getMinNumber('series1', data),
        max: getMaxNumber('series1', data) > getMaxNumber('series2', data) ? getMaxNumber('series1', data) : getMaxNumber('series2', data),
        formatter: val => {
          return formatW(val);
        }
      }

    };
    var imageMap = {
      Wednesday: 'https://timgsa.baidu.com/timg?image&quality=80&size=b9999_10000&sec=1564465427722&di=531da562d84c2f093a200c0c19d22b0d&imgtype=0&src=http%3A%2F%2Fpic.90sjimg.com%2Fdesign%2F01%2F35%2F21%2F37%2F5a3c542fb97ba.png',
    };
    //自定义label
    const labelConfig = {
      htmlTemplate(text, item, index) {
        //由于官方不支持返回原始数据,所以需要自己取值,⚠️⚠️这里的text必须是唯一值
        const dataItem = data.filter(one => one.label == text)[0]
        return ` <div style="position: relative;top:60px;text-align:center">
          <div>
             <img
               width='60px'
               height='60px'
               src=${dataItem.url}/>
          </div>
          <div style='width:100px'>${text}</div>
          <div style='width:100px'>${dataItem.series1}-${dataItem.series2}</div>
       </div>
        `
      }
    }
    return (
      <div>
        <div className='legend-customize'>
          <div>
            <div className='block-legend fire'></div>
            <div>最火视频</div>
          </div>
          <div>
            <div className='block-legend blue'></div>
            <div>点赞</div>
          </div>
          <div>
            <div className='block-legend green'></div>
            <div>评论</div>
          </div>
        </div>
        <Chart height={500} data={dv} scale={scale}
          padding={[70, 100, 130]}
          forceFit>
          <Coord />
          <Axis name="label" label={labelConfig}
          />
          <Axis name="value" />
          <Tooltip g2-tooltip={g2Tooltip} />
          <Geom
            type="interval"
            position="label*value"
            color={'type'}
            adjust={[
              {
                type: "dodge",
                marginRatio: 1 / 32
              }
            ]}
          />
          <Geom
            type="point"
            position="label*value"
            size={40}
            shape={[
              ['label', 'type'],
              function (name, type) {
                if (type == 'series1') {
                  return ["image", imageMap[name]];
                }
                return ['image', null];
              }
            ]}
          />

          <Guide>
            <GuideLine content='近30条视频平均评论' middle={this.getAvgNumber(data, 'series1')} />
            <GuideLine content='近30条视频平均点赞' middle={this.getAvgNumber(data, 'series2')} color='#3AA1FF' />

          </Guide>
        </Chart>
      </div>
    );
  }
}


const GuideLine = ({ middle, color = '#2fc25b', content = '平均' }) => {
  return <Line
    top
    start={{ label: "Monday", value: middle }}
    end={{ label: "Friday", value: middle }}
    lineStyle={{
      stroke: color,
      lineDash: [0, 1, 1],
      lineWidth: 1,
    }}
    text={{
      position: 'end',
      style: {
        fill: color,
      },
      content: content,
    }}
  />

}
总结:在使用某个组件时,不要过分依赖组件。刚开始时我总是询问是否支持返回原始数据,觉得不支持就不好处理,以至于钻入了死胡同,这个时候建议广大开发者,要想想自己想要的结果,我们可以改变自己的解决方式,这样你就会一步一步接近自己的结果
2.关于自定义htmlContent
官网bug

官网代码
<Tooltip useHtml htmlContent={(title, items) => {
return `<div class="g2-tooltip">
<div class="g2-tooltip-title">${title} </div>
<ul><li>${JSON.stringify(items)}</li></ul>
</div>`}}
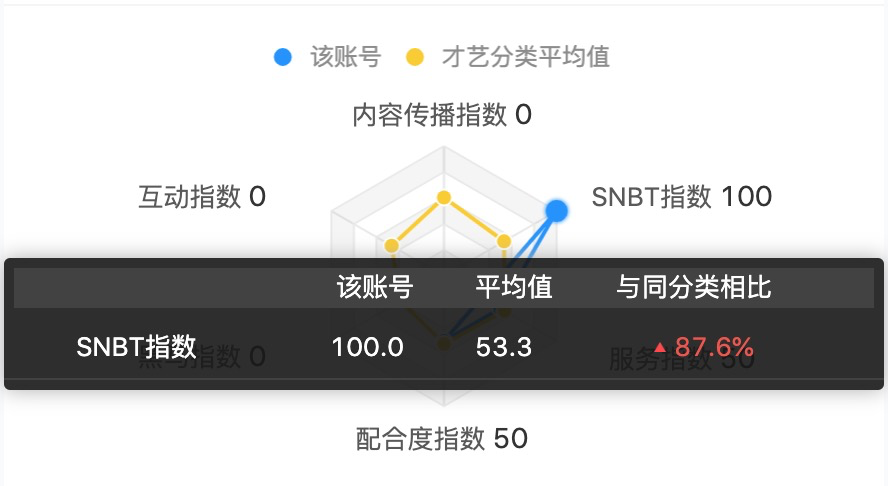
/>修改后自定义Tooltip效果图
⚠️必须手动写css,否则自定义的会样式会bug
//js中class
<Tooltip
htmlContent={function (title, items) {
            const { list = [] } = items[0]
 return `<div class='custom-tooltip'>你需要的内容<div>`
}
/>//css样式
.custom-tooltip {
    position: absolute;
    left: 20px;
    background: rgba(24, 24, 24, 0.9);
    color: #fff;
    width: 440px;
    height: auto;
    border-radius: 3px;
    font-size: 13px;
    right: 0;
    background-size: 100% auto;
    background-repeat: no-repeat;
    box-shadow: 0px 0px 10px #aeaeae;
    z-index: 999;
}总结:在使用组件库的时候,不仅会使用到组件内部提供的东西,还需要了解其依赖的库,在G2中可以看到这个custom-tooltip的样式
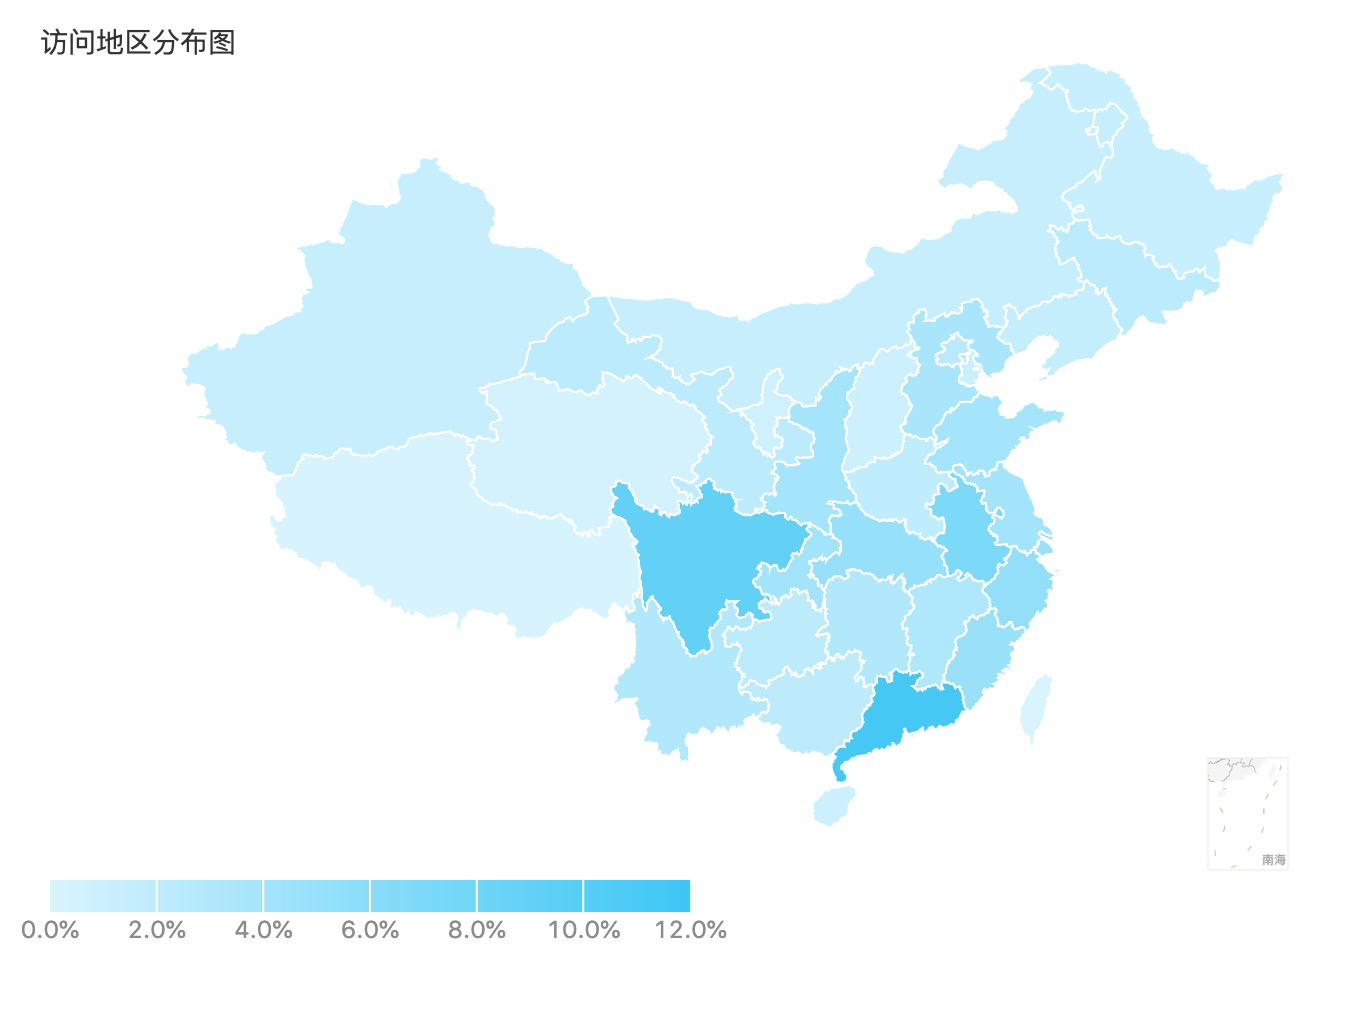
3. 关于地图的使用
地图效果:
需要引入高德api
<!-- 引入高德地图JSAPI --> <script src="//webapi.amap.com/maps?v=1.3&key=89a0871d1c4bf418cd9ab88c01e3bd5d"></script> <!-- 引入UI组件库(1.0版本) --> <script src="//webapi.amap.com/ui/1.0/main.js"></script>地图代码
import React, { Component } from 'react'const { AMap, AMapUI } = window;import { Chart, Geom, Tooltip, Legend, Guide} from "bizcharts";import numeral from 'numeral'import DataSet from "@antv/data-set";const constructGeoJSON = (features) => { if (!features) return false; if (Array.isArray(features)) { return { type: 'FeatureCollection', features: [...features], }; } return features;};/** 传入adcode获取geojson,部分数据需要处理一下*/const getGeojsonByCode = (adcode = 100000, withSub = true) => { const { AMapUI } = window; if (!AMapUI) { return Promise.reject(); } // 文档:https://lbs.amap.com/api/javascript-api/reference-amap-ui/geo/district-explorer return new Promise((resolve, reject) => { AMapUI.load("ui/geo/DistrictExplorer", DistrictExplorer => { const districtExplorer = new DistrictExplorer(); districtExplorer.loadAreaNode(adcode, (error, areaNode) => { if (error) { reject(); } let res = null; if (withSub) { res = areaNode.getSubFeatures(); } else { res = areaNode.getParentFeature(); } resolve(constructGeoJSON(res)); }); }); });};// 绘制思路// 前提:页面加载高德地图及其UI的SDK,参考html页面// 1、通过高德的数据接口获取geojson数据// 2、通过Dataset进行数据处理// 3、绘制class MapChart extends Component { state = { chinaGeo: null, } componentDidMount() { getGeojsonByCode(100000, true).then(res => { this.setState({ chinaGeo: res, }); }); } processGeoData = (geoData, dataValue) => { const { features } = geoData features.map((one) => { const name = one.properties.name dataValue.map((item) => { if (name.includes(item.name)) { one.value = item.value } }) }) const geoDv = new DataSet.View().source(geoData, { type: 'GeoJSON', }); return geoDv; } render() { const area =[ { "key":"10105", "name":"广东", "value":0.1138 }, { "key":"10125", "name":"四川", "value":0.0899 }, { "key":"10102", "name":"安徽", "value":0.0695 }, { "key":"10130", "name":"浙江", "value":0.0525 }, { "key":"10112", "name":"湖北", "value":0.0505 }, { "key":"10124", "name":"上海", "value":0.0495 }, { "key":"10103", "name":"福建", "value":0.0484 }, { "key":"10131", "name":"重庆", "value":0.0419 }, { "key":"10115", "name":"江苏", "value":0.0402 }, { "key":"10123", "name":"陕西", "value":0.0388 }, { "key":"10121", "name":"山东", "value":0.0387 }, { "key":"10109", "name":"河北", "value":0.0359 }, { "key":"10116", "name":"江西", "value":0.0315 }, { "key":"10113", "name":"湖南", "value":0.0304 }, { "key":"10129", "name":"云南", "value":0.0294 }, { "key":"10101", "name":"北京", "value":0.0246 }, { "key":"10104", "name":"甘肃", "value":0.0232 }, { "key":"10114", "name":"吉林", "value":0.0229 }, { "key":"10107", "name":"贵州", "value":0.0223 }, { "key":"10106", "name":"广西", "value":0.0220 }, { "key":"10110", "name":"河南", "value":0.0190 }, { "key":"10117", "name":"辽宁", "value":0.0152 }, { "key":"10118", "name":"内蒙古", "value":0.0142 }, { "key":"10128", "name":"新疆", "value":0.0142 }, { "key":"10111", "name":"黑龙江", "value":0.0140 }, { "key":"10126", "name":"天津", "value":0.0122 }, { "key":"10122", "name":"山西", "value":0.0103 }, { "key":"10108", "name":"海南", "value":0.0098 }, { "key":"10119", "name":"宁夏", "value":0.0080 }, { "key":"10120", "name":"青海", "value":0.0052 }, { "key":"10127", "name":"西藏", "value":0.0020 } ] const { chinaGeo } = this.state; if (!chinaGeo) { return '数据加载中...' } const data = this.processGeoData(chinaGeo, area); const scale = { latitude: { sync: true, nice: false, }, longitude: { sync: true, nice: false, }, value: { formatter: val => { return numeral(val || 0).format('0.0%') } }, }; const { Image } = Guide; return ( <div style={{ position: "relative" }}> <Chart height={500} width={645} scale={scale} data={data} padding={[0, 0, 0, 90]}> <Geom type="polygon" position="longitude*latitude" style={{ lineWidth: 1, stroke: "white" }} // color={['value', ['#31c5f8', '#61d3f8', '#89dcfd', '#b0e8f8', '#d8f3ff']]} color={['value', ['#d9f4ff', '#33c5f6']]} tooltip={['name*value', (name, value) => { return { name: name, value: numeral(value || 0).format('0.0%') } }]} > <Tooltip showTitle={false} /> <Legend position='bottom-left' offsetY={-130} offsetX={-60} slidable={false} width={320} /> </Geom> </Chart> <div style={{ position: "absolute", bottom: 100, right: 0 }}> <img height='58' width='42' src={require('../img/map-line.png')} /> </div> </div> ); }}export default MapChart4.给图表后面加文字
效果图
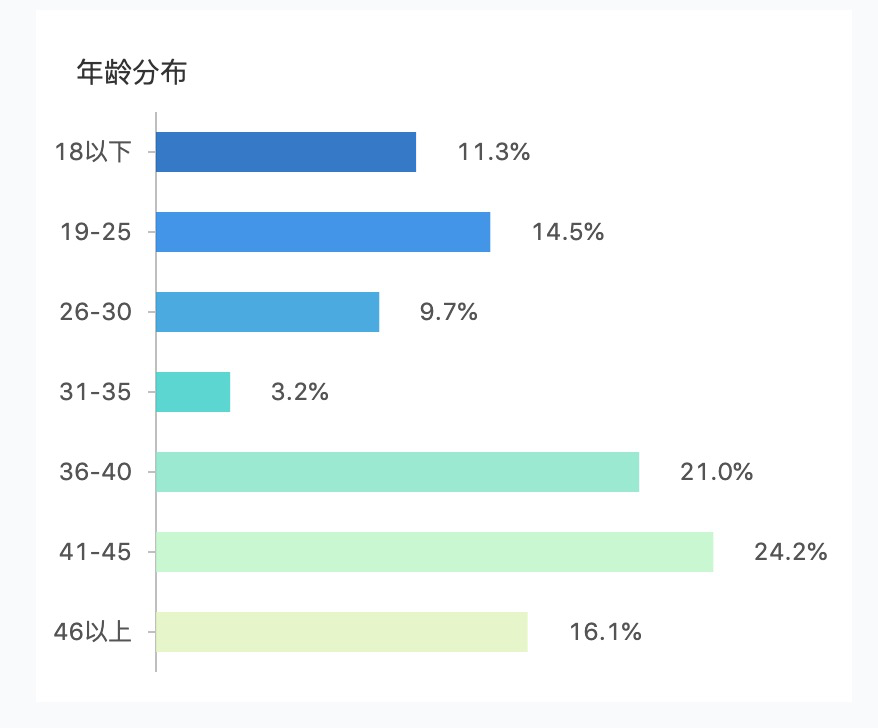
   <Geom type="interval" position="name*value" >            //此处为每个柱图后字段
            <Label content={["name*value", (name, value) => {
             return numeral(value || 0).format('0.0%');
               }]} />
   </Geom>
多个返回一个
bizcharts.net/products/bi…
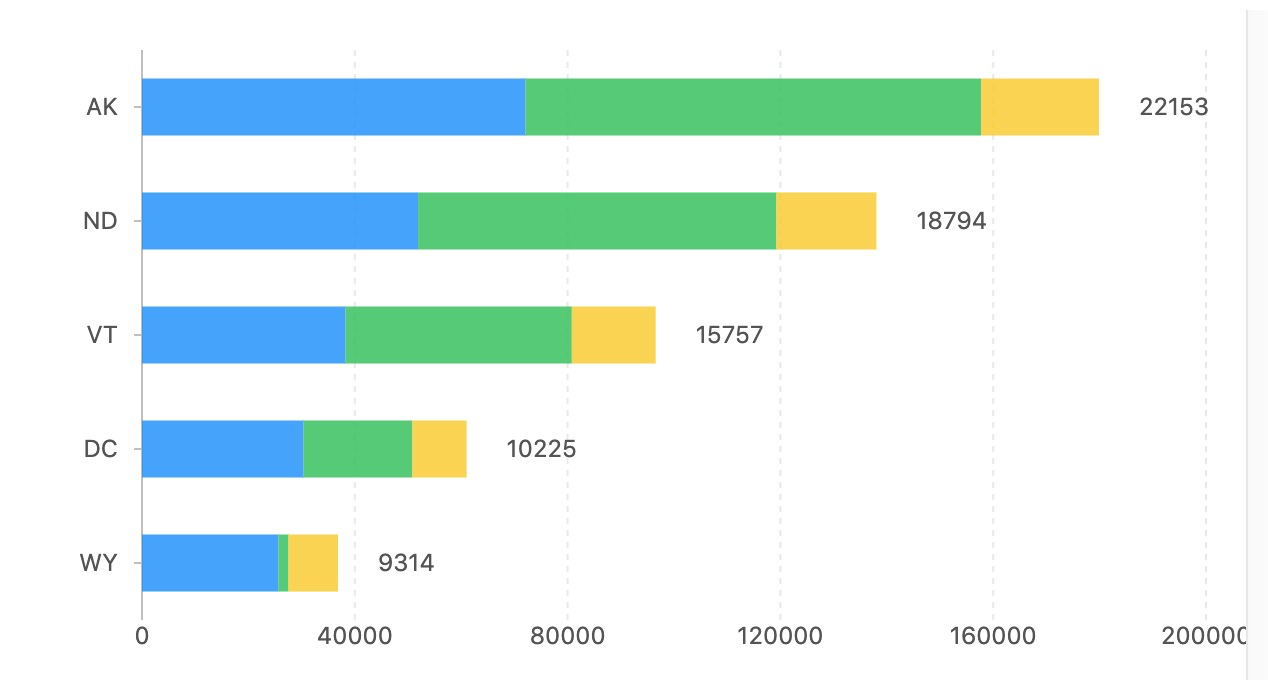
 <Geom
            type="intervalStack"
            position="State*人口数量"
            color={"年龄段"}
            >
           <Label content={["年龄段*人口数量", (name, value) => {
               console.log(name, value)
                if(name=='14至17岁')
                 return value;
               }]} />
 </Geom>
总结:处理问题要举一反三,多想想你的目的,如果你写这个组件你会怎么处理这个问题呢?不想要就是过滤
5. 关于图例的文案修改成中文

在cols添加如下代码:
user: { formatter: d => ({ a: '修改a', b: '修改b' }[d]) }添加后效果图:
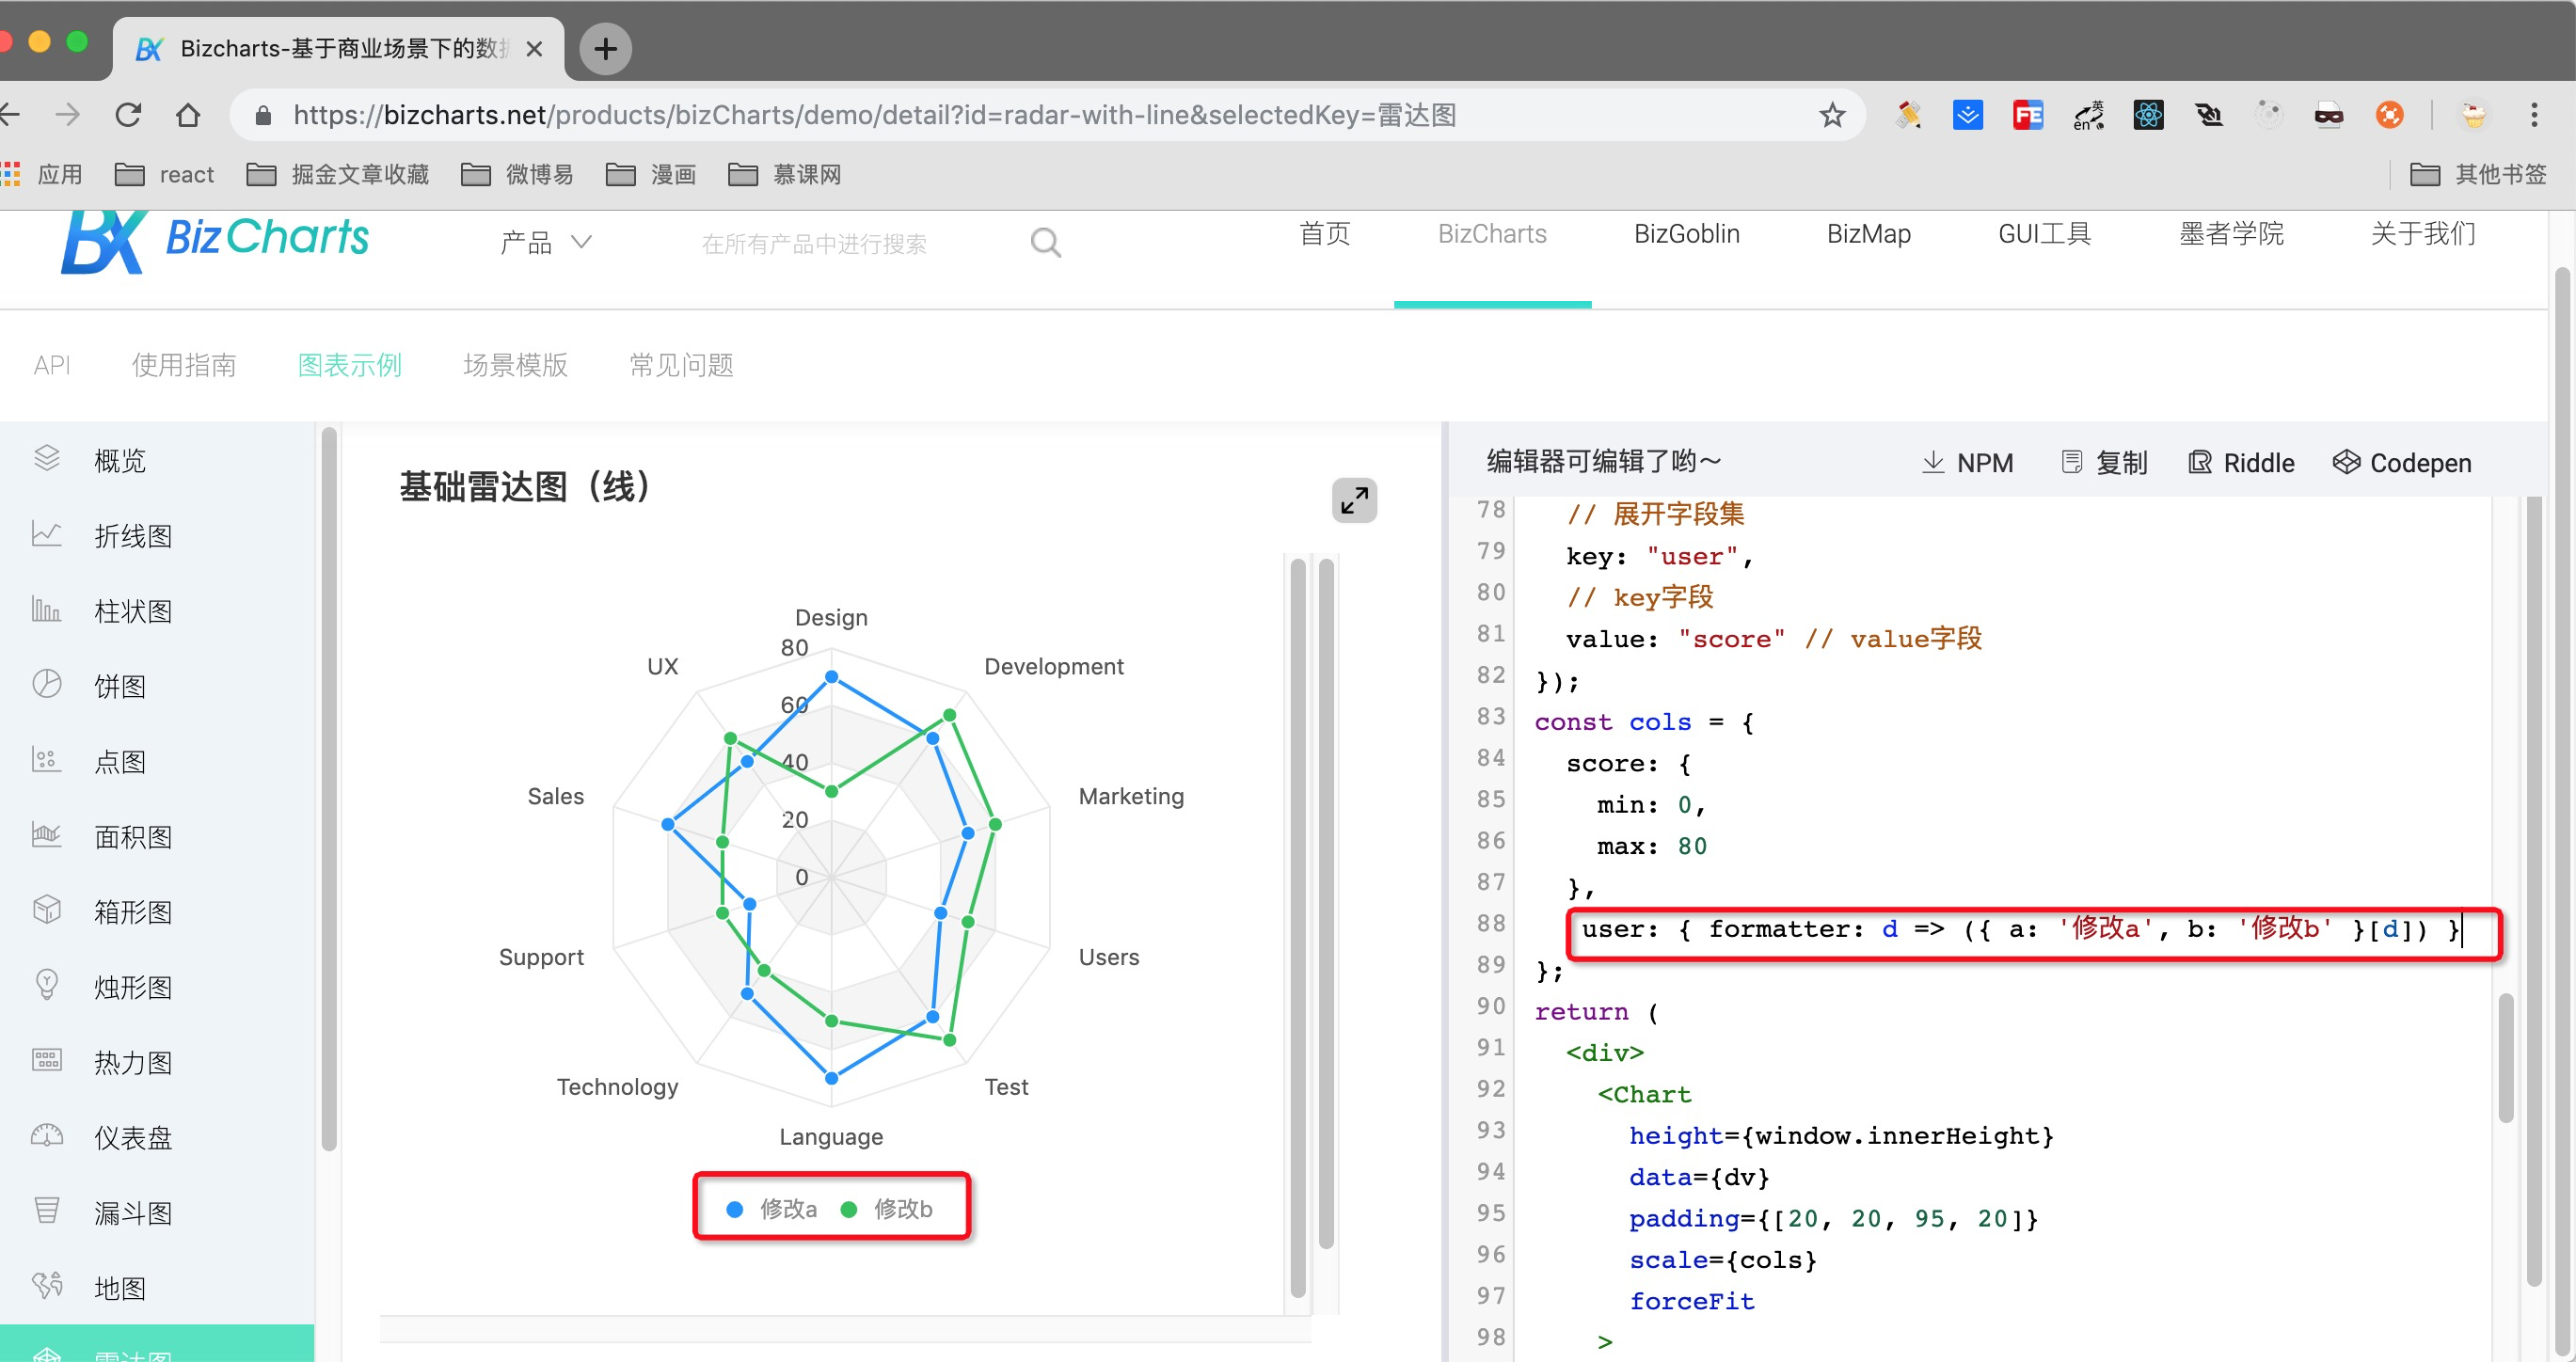
总结,关注每个细小的点,一个人修改一点,一堆人加起来是多大的工作量
