

前言
前面几篇文章一直都以源码分析为主,其实枯燥无味,对于新手玩家来说很不友好。这篇文章主要讲讲
Vue的响应式系统,形式与前边的稍显 不同吧,分析为主,源码为辅,如果能达到深入浅出的效果那就更好了。
什么是响应式系统
「响应式系统」一直以来都是我认为
Vue里最核心的几个概念之一。想深入理解Vue,首先要掌握「响应式系统」的原理。
从一个官方的例子开始
由于 Vue 不允许动态添加根级响应式属性,所以你必须在初始化实例前声明所有根级响应式属性,哪怕只是一个空值:
var vm = new Vue({
  data: {
    // 声明 message 为一个空值字符串
    message: ''
  },
  template: '<div>{{ message }}</div>'
})
// 之后设置 `message`
vm.message = 'Hello!'
如果你未在 data 选项中声明 message,
Vue将警告你渲染函数正在试图访问不存在的属性。
当然,仅仅从上面这个例子我们也只能知道,Vue不允许动态添加根级响应式属性。这意味我们需要将使用到的变量先在data函数中声明。
抛砖🧱引玉
新建一个空白工程,加入以下代码
export default {
    name: 'JustForTest',
    data () {
        return {}
    },
    created () {
        this.b = 555
        console.log(this.observeB)
        this.b = 666
        console.log(this.observeB)
    },
    computed: {
    	observeB () {
            return this.b
    	}
    }
}
运行上述代码,结果如下👇
555
555
😅显然,变量 b 并不是响应式的,这也就造成了二次赋值的时候,对应的 computed 并没有发生变化。接下来我们来深究下这其中的原因。
computed 与依赖收集
咱们简单看下 computed 属性定义与触发的流程👇
属性定义:
initComputed- 创建一个对应
computed属性key值的watcher对象 defineComputed(挂载代理函数,并把对应的属性代理到当前组件的对象上)
触发:
- 访问
computed属性 - 执行对应的
computed属性绑定下的函数
在这两个过程中,只有触发 computed 属性时,才会访问到 computed 中依赖的变量,比如👇
computed: {
    test () {
        return this.a + this.b
    }
}
第一次访问 this.test 时,其实也就是访问了 this.a 和 this.b
真实的执行流程👇
- 触发
computed属性的getter - 执行
evaluate - 执行
get
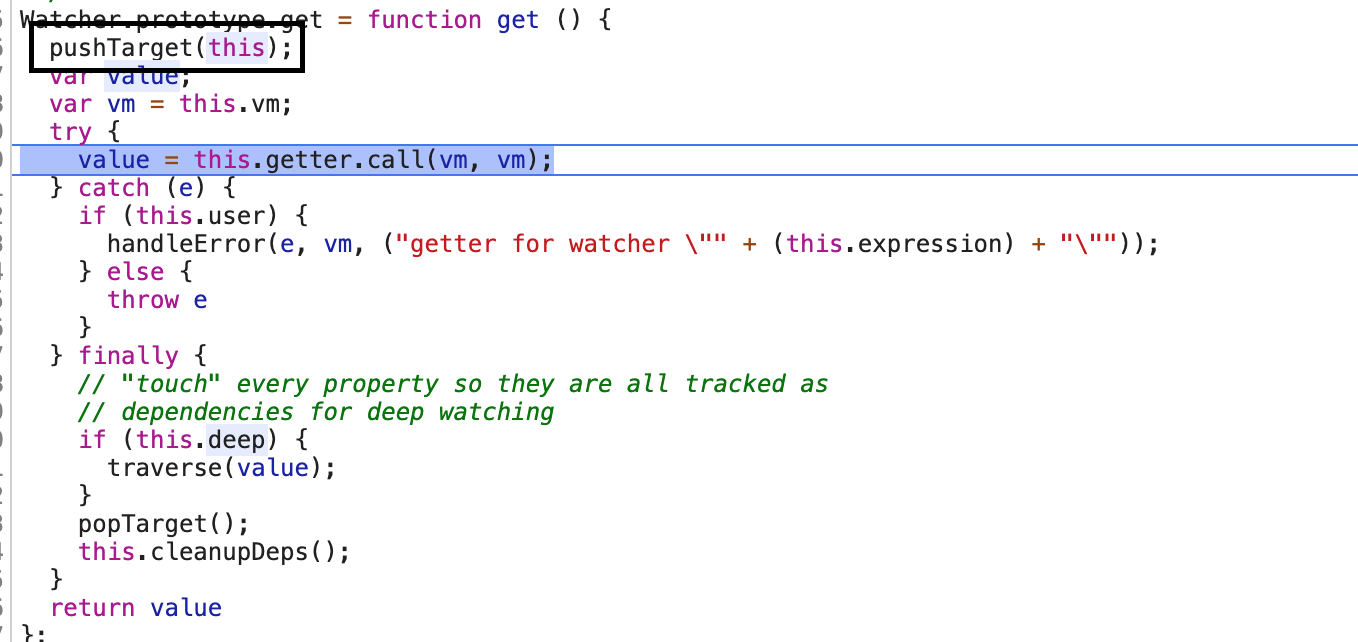
前面说到,第一次访问 this.test 时也就是访问了 this.a 和 this.b,其实也就是访问了它们的 getter👇
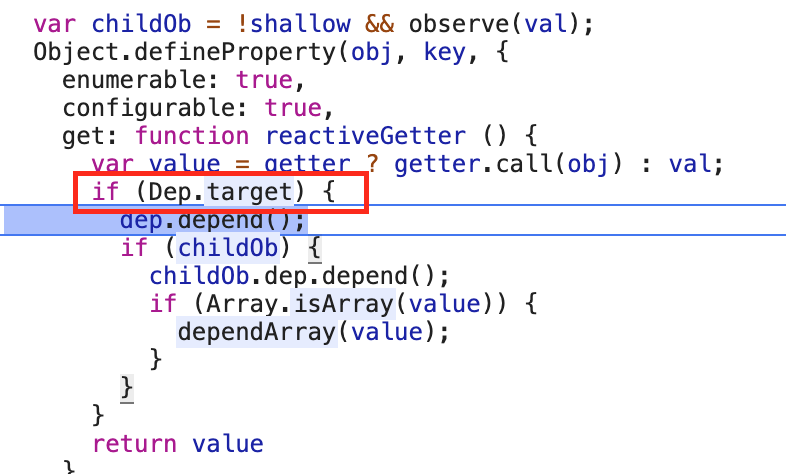
这里会对 Dep.target 进行判断后才接着走下一步,那么它的取值到底是什么呢?
我们看到在 Watcher.prototype.get 执行了 pushTarget(this)
function pushTarget (target) {
  targetStack.push(target);
  Dep.target = target;
}
这里是直接将 this(也就是 watcher 对象)存在了 Dep.target 上,于是我们在收集依赖的时候就能将变量对应的 watcher 存进去,大致的流程如下👇

相关代码:
Dep.prototype.depend = function depend () {
  if (Dep.target) {
    Dep.target.addDep(this);
  }
};
Watcher.prototype.addDep = function addDep (dep) {
  var id = dep.id;
  if (!this.newDepIds.has(id)) {
    this.newDepIds.add(id);
    this.newDeps.push(dep);
    if (!this.depIds.has(id)) {
      dep.addSub(this);
    }
  }
};
Dep.prototype.addSub = function addSub (sub) {
  this.subs.push(sub);
};
响应式更新
当变量的值变化时,就会触发 setter,这个时候变量依赖的 watcher 当然也要做出相应的更新👇
set: function reactiveSetter (newVal) {
      var value = getter ? getter.call(obj) : val;
      /* eslint-disable no-self-compare */
      if (newVal === value || (newVal !== newVal && value !== value)) {
        return
      }
      /* eslint-enable no-self-compare */
      if (process.env.NODE_ENV !== 'production' && customSetter) {
        customSetter();
      }
      // #7981: for accessor properties without setter
      if (getter && !setter) { return }
      if (setter) {
        setter.call(obj, newVal);
      } else {
        val = newVal;
      }
      childOb = !shallow && observe(newVal);
      dep.notify();
    }
对应的 notify 函数,这里的 subs 其实就是一个 watcher 数组👇
Dep.prototype.notify = function notify () {
  // stabilize the subscriber list first
  var subs = this.subs.slice();
  if (process.env.NODE_ENV !== 'production' && !config.async) {
    // subs aren't sorted in scheduler if not running async
    // we need to sort them now to make sure they fire in correct
    // order
    subs.sort(function (a, b) { return a.id - b.id; });
  }
  for (var i = 0, l = subs.length; i < l; i++) {
    subs[i].update();
  }
}
更加方便的定义响应式属性
文档中提到,Vue 建议在根级声明变量。通过上面的分析我们也知道,在 data 函数中
声明变量则使得变量变成「响应式」的,那么是不是所有的情况下,变量都只能在 data 函数中
事先声明呢?
$set
Vue 其实提供了一个 $set 的全局函数,通过 $set 就可以动态添加响应式属性了。
export default {
	data () {
        return {}
    },
    created () {
        this.$set(this, 'b', 666)
    },
}
然而,执行上面这段代码后控制台却报错了
[Vue warn]: Avoid adding reactive properties to a Vue instance or its root $data at runtime - declare it upfront in the data option.
其实,对于已经创建的实例,Vue 不允许动态添加根级别的响应式属性。
$set 函数的执行逻辑:
- 判断实例是否是数组,如果是则将属性插入
- 判断属性是否已定义,是则赋值后返回
- 判断实例是否是
Vue的实例或者是已经存在ob属性(其实也是判断了添加的属性是否属于根级别的属性),是则结束函数并返回 - 执行
defineReactive?1,使得属性成为响应式属性 - 执行
ob.dep.notify(),通知视图更新
相关代码:
function set (target, key, val) {
  if (process.env.NODE_ENV !== 'production' &&
    (isUndef(target) || isPrimitive(target))
  ) {
    warn(("Cannot set reactive property on undefined, null, or primitive value: " + ((target))));
  }
  if (Array.isArray(target) && isValidArrayIndex(key)) {
    target.length = Math.max(target.length, key);
    target.splice(key, 1, val);
    return val
  }
  if (key in target && !(key in Object.prototype)) {
    target[key] = val;
    return val
  }
  var ob = (target).__ob__;
  if (target._isVue || (ob && ob.vmCount)) {
    process.env.NODE_ENV !== 'production' && warn(
      'Avoid adding reactive properties to a Vue instance or its root $data ' +
      'at runtime - declare it upfront in the data option.'
    );
    return val
  }
  if (!ob) {
    target[key] = val;
    return val
  }
  c(ob.value, key, val);
  ob.dep.notify();
  return val
}
数组操作
为什么要重写数组方法?
Vue无法监听到数组的length的变化,也就意味着使用方法操作数组时,setter无法捕获到赋值操作
为什么要使用继承而不是直接在 prototype 上重写
避免覆盖其他第三方库/框架上的数组方法
重写的方法有这些:
pushpopshiftunshiftsplicesortreverse
那么这些方法是怎么重写的呢?
首先,定义一个 arrayMethods 继承 Array:
var arrayProto = Array.prototype;
var arrayMethods = Object.create(arrayProto);
然后,利用 object.defineProperty,将 mutator 函数绑定在数组操作上:
def(arrayMethods, method, function mutator () { ... })
最后在调用数组方法的时候,会直接执行 mutator函数。源码中,对这三种方法做了特别
处理:
pushunshiftsplice
因为这三种方法都会增加原数组的长度。当然如果调用了这三种方法,会再调用一次 observeArray
方法(这里的逻辑就跟前面提到的一样了)
最后的最后,调用 notify 函数
核心代码:
methodsToPatch.forEach(function (method) {
 // cache original method
 var original = arrayProto[method];
 def(arrayMethods, method, function mutator () {
   var args = [], len = arguments.length;
   while ( len-- ) args[ len ] = arguments[ len ];

   var result = original.apply(this, args);
   var ob = this.__ob__;
   var inserted;
   switch (method) {
     case 'push':
     case 'unshift':
       inserted = args;
       break
     case 'splice':
       inserted = args.slice(2);
   }
   if (inserted) { ob.observeArray(inserted); }
   // notify change
   ob.dep.notify();
   return result
 });
});
总结
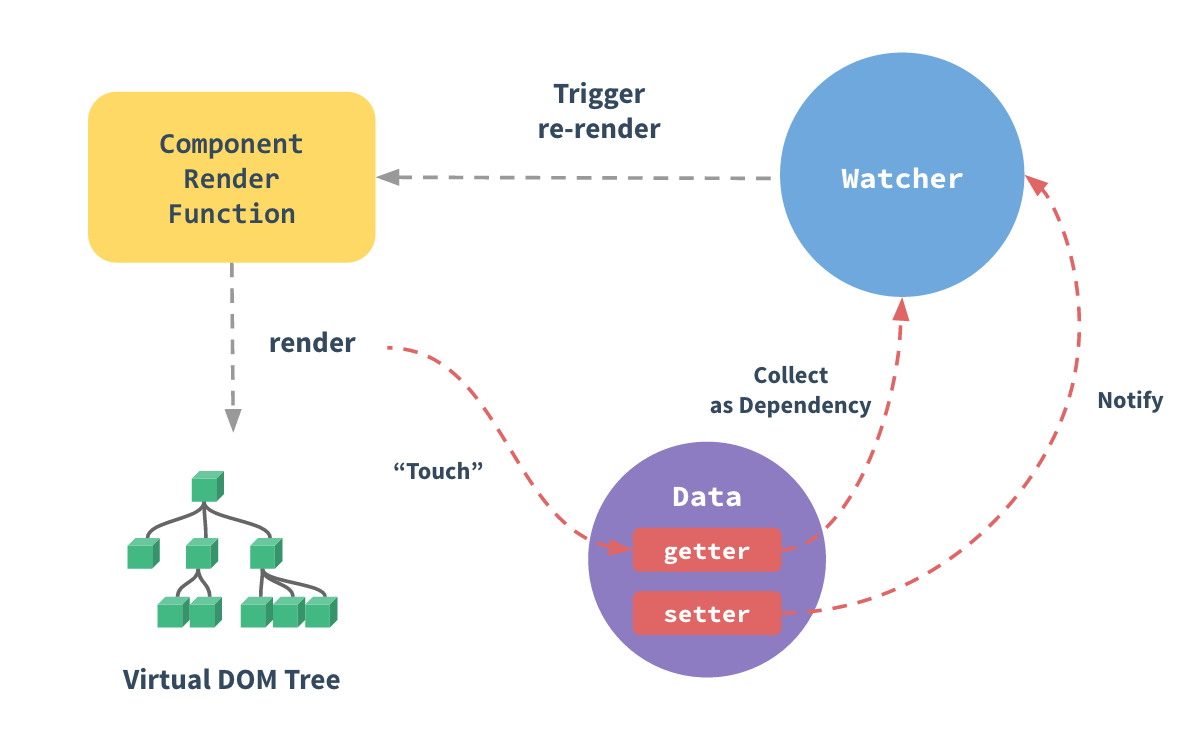
「响应式原理」借助了这三个类来实现,分别是:
WatcherObserverDep
初始化阶段,利用 getter 的特点,监听到变量被访问 Observer 和 Dep 实现对变量的「依赖收集」,
赋值阶段利用 setter 的特点,监听到变量赋值,利用 Dep 通知 Watcher,从而进行视图更新。
参考资料
扫描下方的二维码或搜索「tony老师的前端补习班」关注我的微信公众号,那么就可以第一时间收到我的最新文章。

