

接着第一章内容继续总结request的使用,还是使用Jupyter格式记录的,需要实战的课下载原文件执行。 脑图部分:
jupyter笔记部分
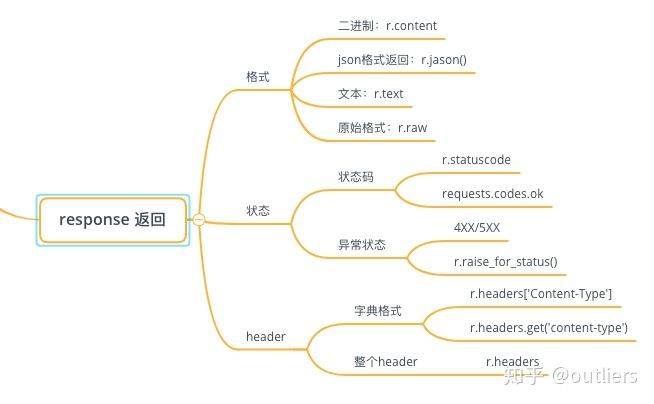
返回状态码
import requests
r = requests.get('https://httpbin.org/get')
r.status_code
requests还有一个等同的内建对象
r.status_code == requests.codes.ok返回headers
r.headersheaders是一个字典数据,可以获取指定字段值
r.headers.get('content-type')
r.headers['Content-Type']
跳转和历史
r = requests.get('http://github.com/')
r.history
### 通过设置allow_redirects参数可以设置跳转,默认为false
r = requests.get('http://github.com/', allow_redirects=False)
r.status_code
超时
通过设置timeouts可以设置超时时间,如果没有设置,默认不会超时
requests.get('https://github.com/', timeout=0.001)高级部分
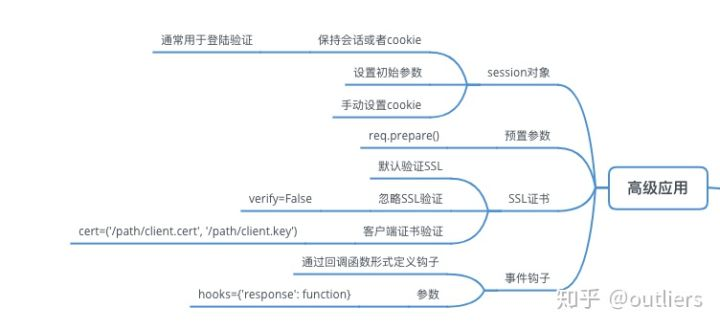
session 对象
session 对象允许你保存跨requests请求的特定参数。它也可以保持回话实例,简单说,当你API需要登录验证之后保持会话或者带上cookie信息,先调用Session方法,再调用后面的API方法
import requests
s = requests.Session()
s.get('https://httpbin.org/cookies/set/sessioncookie/123456789')
r = s.get('https://httpbin.org/cookies')
r.text
'{\n  "cookies": {\n    "sessioncookie": "123456789"\n  }\n}\n'
session也可以用来提供默认的参数
下面这个例子设置了auth和header里面的默认参数
s = requests.Session()
s.auth = ('user', 'pass')
s.headers.update({'x-test': 'true'})

#  'x-test' 和 'x-test2' 都会被提交
r=s.get('https://httpbin.org/headers', headers={'x-test2': 'true'})
r.text
需要注意的是,通过方法显示传递的参数不会被提交,下面的这个例子第二个get方法不会带上第一个cookie参数
如果你需要手动设置参数,可以通过session.cookies 设置
s = requests.Session()
r = s.get('https://httpbin.org/cookies', cookies={'from-my': 'browser'})
print(r.text)

r = s.get('https://httpbin.org/cookies')
r.text
session 也可以被上下文管理器使用
下面这个session将会随着with这个代码块结束而结束
with requests.Session() as s:
    s.get('https://httpbin.org/cookies/set/sessioncookie/123456789')
预置参数
当发起request请求时候,request的参数实际上被存储在PreparedRequest里面。你可以根据你的需求来修改预置参数。
from requests import Request, Session

s = Session()
payload = {'key1': 'value1', 'key2': 'value2'}
req = Request('POST',"https://httpbin.org/post", data=payload)
# 获取预置参数
prepped = req.prepare()

# do something with prepped.body
prepped.body = 'No, I want exactly this as the body.'

# do something with prepped.headers
del prepped.headers['Content-Type']

resp = s.send(prepped,
    timeout=10
)
resp.status_code
200
SSL证书
默认开始SSL证书验证
#需要填入一个无效证书的URL,则会抛出异常
r=requests.get('https://example')
你可以将用受信任的CAs证书将验证路径传递到CA_BUNDLE文件或目录:
requests.get('https://github.com', verify='/path/to/certfile')忽略证书验证
requests.get('https://kennethreitz.org', verify=False)
/usr/local/lib/python3.7/site-packages/urllib3/connectionpool.py:857: InsecureRequestWarning: Unverified HTTPS request is being made. Adding certificate verification is strongly advised. See: https://urllib3.readthedocs.io/en/latest/advanced-usage.html#ssl-warnings
  InsecureRequestWarning)

<Response [200]>
客户端证书验证
requests.get('https://kennethreitz.org', cert=('/path/client.cert', '/path/client.key'))如果使用错误证书或者错误路径,会得到一个SSLerror
requests.get('https://kennethreitz.org', cert='/wrong_path/client.pem')流媒体上传
request允许你直接上传文件
with open('massive-body', 'rb') as f:
    requests.post('http://some.url/streamed', data=f)
事件钩子
requests有个一钩子系统,允许你操纵request的请求过程,或者信号处理
参数定义 hooks={'response': print_url}
# 方法定义,一个打印url的钩子函数
def print_url(r, *args, **kwargs):
    print(r.url)
# 使用钩子
requests.get('https://httpbin.org/', hooks={'response': print_url})
https://httpbin.org/

<Response [200]>
你也可以同时操纵多个钩子函数
def record_hook(r, *args, **kwargs):
    r.hook_called = True
    return r
r = requests.get('https://httpbin.org/', hooks={'response': [print_url, record_hook]})
r.hook_called
https://httpbin.org/

True
公众号:自动化测试工作坊
