

使用Autolayout的一些Tips,需要的时候可以参考一下。
在xib中对UIScrollView使用autolayout
UIScrollView的contentSize要设置好,否则有警告,可能引发一些异常情况。
注意:UIScrollView在scroll的时候会重新布局界面,会导致代码添加的frame无效,又重新回到autolayout的布局(xib或者代码)。
将UIView的aspect拉出来一个outlet
对这个约束的outlet,改变其contant是无效,而multiplier是只读的。 因此将UIView的aspect拉出来一个outlet其实是没有什么作用的,只能读取其值用做其他用途。
通过UIView的transform来做动画
UIView的transform属性实际上是一个CGAffineTransform类型。
CGPoint * CGAffineTransform = Transformed CGPoint
Markdown格式的公式居然识别不了。

仿射的意思是相对立的侧边始终保持平行。
使用transform来实现动画效果:
[UIView animateWithDuration:0.3 animations:^{
    self.captureView.transform = CGAffineTransformMakeScale(0.5f, 0.5f);
    });
frame其实是虚拟的一个属性
frame = center + bounds + transform
对UIView做了transform,实际上center和bounds不会变,仅仅多了一个transform。
所以,通过UIView的transform来实现frame的改变,在界面重新布局之后会无效。
通过NSLayoutConstraint的contant变化来做动画
需要执行layoutIfNeeded方法, 必不可少 。
- (void)viewFilteredAnimation {
    [UIView animateWithDuration:2.0 animations:^{
        _widthViewFiltered.constant = MTScreenWidth;
        [self.view layoutIfNeeded];
    } completion:^(BOOL finished) {
        _lbTitle.hidden = NO;
    }];
}
xib中autolayout的生效时机
在viewDidLoad和viewWillAppear中,不会生效。 因为window是在ViewDidAppear之后才有的,那时autolayout才生效。 但在viewDidAppear之前,依然有机会通过代码调整layout:viewDidLayoutSubviews会调用多次来调整。
initWithNibName:bundle: 非storyboard初始化(包含xib和代码)
initWithCoder: 使用storyboard初始化
awakeFromNib 使用xib加载完成
loadView 加载视图的操作,在viewDidLoad之前执行。View在此加载或创建,赋值给UIViewController的view属性。
一些方法的调用顺序:
+load
+initialize
-init
-loadView
-isViewLoaded多次
-viewDidLoad
-isViewLoaded多次
-viewWillAppear:
-isViewLoaded多次
-viewWillLayoutSubviews
-viewDidLayoutSubviews
-isViewLoaded多次
-viewDidAppear:
使用NSLayoutConstraint添加约束
NSLayoutConstraint
前提是两个View要有关系,归属于一个父View,或者直接是父子View的关系。尽量不要越级。
所以先addSubview,再添加约束。 translatesAutoresizingMaskIntoConstraints属性要设置为NO。
[self.previewContainer addSubview:_videoMaskViewWhenTakingPhoto];
_videoMaskViewWhenTakingPhoto.translatesAutoresizingMaskIntoConstraints = NO;

NSLayoutConstraint *top = [NSLayoutConstraint constraintWithItem:_videoMaskViewWhenTakingPhoto
                                                       attribute:NSLayoutAttributeTop
                                                       relatedBy:NSLayoutRelationEqual
                                                          toItem:self.previewContainer
                                                       attribute:NSLayoutAttributeTop
                                                      multiplier:1
                                                        constant:0];
NSLayoutConstraint *bottom = [NSLayoutConstraint constraintWithItem:_videoMaskViewWhenTakingPhoto
                                                          attribute:NSLayoutAttributeBottom
                                                          relatedBy:NSLayoutRelationEqual
                                                             toItem:self.previewContainer
                                                          attribute:NSLayoutAttributeBottom
                                                         multiplier:1
                                                           constant:0];
NSLayoutConstraint *leading = [NSLayoutConstraint constraintWithItem:_videoMaskViewWhenTakingPhoto
                                                           attribute:NSLayoutAttributeLeading
                                                           relatedBy:NSLayoutRelationEqual
                                                              toItem:self.previewContainer
                                                           attribute:NSLayoutAttributeLeading
                                                          multiplier:1
                                                            constant:0];
NSLayoutConstraint *trailing = [NSLayoutConstraint constraintWithItem:_videoMaskViewWhenTakingPhoto
                                                            attribute:NSLayoutAttributeTrailing
                                                            relatedBy:NSLayoutRelationEqual
                                                               toItem:self.previewContainer
                                                            attribute:NSLayoutAttributeTrailing
                                                           multiplier:1
                                                             constant:0];

[NSLayoutConstraint activateConstraints:@[top, bottom, leading, trailing]];
使NSLayoutConstraint生效
addConstraint:和addConstraints:等已经弃用,在iOS 11.2中遇到过layout不生效的情况。 使用activateConstraints:即可。
[NSLayoutConstraint activateConstraints:@[top, bottom, leading, trailing]];
使用VFL
总之,VFL这套布局的语法也很晦涩(其实是不会,也懒得去学了)。。。
调试Autolayout的异常
可以通过添加全局的symbolic断点来调试Autolayout的异常
-
添加UIViewAlertForUnsatisfiableConstraints的Symbol断点
-
添加对应的action
对于OC:
po [[UIWindow keyWindow] _autolayoutTrace]
对于Swift:
expr -l objc++ -O -- [[UIWindow keyWindow] _autolayoutTrace]
如图:
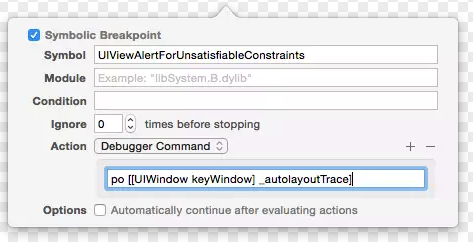
这样,遇到autolayout的异常问题,就会停在断点,然后通过LLDB进行调试了。
界面刷新的一些方法
- setNeedsDisplay 需要更新页面,但不会立刻更新
- layoutIfNeeded 立刻更新页面
- layoutSubviews 重写布局
- setNeedsUpdateConstraints 需更新约束,但不立刻开始
- updateConstraintsIfNeeded 立刻更新约束
- updateConstraints 更新约束
Masonry源码
使用方法
[aView addSubview:bView];
[bView mas_makeConstraints:^ (MASConstraintMaker *maker) {
    maker.top.equalTo(aView);
    maker.leading.equalTo(aView);
    maker.width.equalTo(aView);
    maker.height.equalTo(aView);
}];
构建一个 MASConstraintMaker 对象,传入mas_makeConstraints的block中,构建约束规则。
约束规则
先看每一条约束语句:
在 MASConstraintMaker.m 中,可以看到 maker.top.equalTo(aView); 语句最终会调用到 **- (MASConstraint )constraint:(MASConstraint )constraint addConstraintWithLayoutAttribute:(NSLayoutAttribute)layoutAttribute 方法,在其中构建一个 MASViewConstraint 对象,添加到 MASConstraintMaker 对象的 constraints 属性(NSMutableArray)中,
- (MASConstraint *)addConstraintWithLayoutAttribute:(NSLayoutAttribute)layoutAttribute {
    return [self constraint:nil addConstraintWithLayoutAttribute:layoutAttribute];
}

- (MASConstraint *)top {
    return [self addConstraintWithLayoutAttribute:NSLayoutAttributeTop];
}

- (MASConstraint *)constraint:(MASConstraint *)constraint addConstraintWithLayoutAttribute:(NSLayoutAttribute)layoutAttribute {
    MASViewAttribute *viewAttribute = [[MASViewAttribute alloc] initWithView:self.view layoutAttribute:layoutAttribute];
    MASViewConstraint *newConstraint = [[MASViewConstraint alloc] initWithFirstViewAttribute:viewAttribute];
    if ([constraint isKindOfClass:MASViewConstraint.class]) {
        //replace with composite constraint
        NSArray *children = @[constraint, newConstraint];
        MASCompositeConstraint *compositeConstraint = [[MASCompositeConstraint alloc] initWithChildren:children];
        compositeConstraint.delegate = self;
        [self constraint:constraint shouldBeReplacedWithConstraint:compositeConstraint];
        return compositeConstraint;
    }
    if (!constraint) {
        newConstraint.delegate = self;
        [self.constraints addObject:newConstraint];
    }
    return newConstraint;
}
总结一句话,执行了 mas_makeConstraints: 方法后,会构建一个 MASConstraintMaker 对象,然后分别根据4个约束语句构建4个 MASViewConstraint 对象,将其添加到 MASConstraintMaker 对象的 constraints 属性中。这样,所有的约束规则即交给 MASConstraintMaker 对象来管理了。
约束生效
接下来,看Masonry如何使这些约束规则生效的:
在 UIView+MASAdditions.m 中,关键在于调用 MASConstraintMaker 对象的 install 方法。
- (NSArray *)mas_makeConstraints:(void(^)(MASConstraintMaker *))block {
    self.translatesAutoresizingMaskIntoConstraints = NO;
    MASConstraintMaker *constraintMaker = [[MASConstraintMaker alloc] initWithView:self];
    block(constraintMaker);
    return [constraintMaker install];
}
再看 MASConstraintMaker.m 中:
- (NSArray *)install {
    if (self.removeExisting) {
        NSArray *installedConstraints = [MASViewConstraint installedConstraintsForView:self.view];
        for (MASConstraint *constraint in installedConstraints) {
            [constraint uninstall];
        }
    }
    NSArray *constraints = self.constraints.copy;
    for (MASConstraint *constraint in constraints) {
        constraint.updateExisting = self.updateExisting;
        [constraint install];
    }
    [self.constraints removeAllObjects];
    return constraints;
}
取出 constraints 数组中的每一个 MASViewConstraint 对象,执行其 install 方法,该方法的完整代码如下:
- (void)install {
    if (self.hasBeenInstalled) {
        return;
    }

    if ([self supportsActiveProperty] && self.layoutConstraint) {
        self.layoutConstraint.active = YES;
        [self.firstViewAttribute.view.mas_installedConstraints addObject:self];
        return;
    }

    MAS_VIEW *firstLayoutItem = self.firstViewAttribute.item;
    NSLayoutAttribute firstLayoutAttribute = self.firstViewAttribute.layoutAttribute;
    MAS_VIEW *secondLayoutItem = self.secondViewAttribute.item;
    NSLayoutAttribute secondLayoutAttribute = self.secondViewAttribute.layoutAttribute;

    // alignment attributes must have a secondViewAttribute
    // therefore we assume that is refering to superview
    // eg make.left.equalTo(@10)
    if (!self.firstViewAttribute.isSizeAttribute && !self.secondViewAttribute) {
        secondLayoutItem = self.firstViewAttribute.view.superview;
        secondLayoutAttribute = firstLayoutAttribute;
    }

    MASLayoutConstraint *layoutConstraint
        = [MASLayoutConstraint constraintWithItem:firstLayoutItem
                                        attribute:firstLayoutAttribute
                                        relatedBy:self.layoutRelation
                                           toItem:secondLayoutItem
                                        attribute:secondLayoutAttribute
                                       multiplier:self.layoutMultiplier
                                         constant:self.layoutConstant];

    layoutConstraint.priority = self.layoutPriority;
    layoutConstraint.mas_key = self.mas_key;

    if (self.secondViewAttribute.view) {
        MAS_VIEW *closestCommonSuperview = [self.firstViewAttribute.view mas_closestCommonSuperview:self.secondViewAttribute.view];
        NSAssert(closestCommonSuperview,
                 @"couldn't find a common superview for %@ and %@",
                 self.firstViewAttribute.view, self.secondViewAttribute.view);
        self.installedView = closestCommonSuperview;
    } else if (self.firstViewAttribute.isSizeAttribute) {
        self.installedView = self.firstViewAttribute.view;
    } else {
        self.installedView = self.firstViewAttribute.view.superview;
    }


    MASLayoutConstraint *existingConstraint = nil;
    if (self.updateExisting) {
        existingConstraint = [self layoutConstraintSimilarTo:layoutConstraint];
    }
    if (existingConstraint) {
        // just update the constant
        existingConstraint.constant = layoutConstraint.constant;
        self.layoutConstraint = existingConstraint;
    } else {
        [self.installedView addConstraint:layoutConstraint];
        self.layoutConstraint = layoutConstraint;
        [firstLayoutItem.mas_installedConstraints addObject:self];
    }
}
看其中最关心的布局相关代码:
MASLayoutConstraint *layoutConstraint
        = [MASLayoutConstraint constraintWithItem:firstLayoutItem
                                        attribute:firstLayoutAttribute
                                        relatedBy:self.layoutRelation
                                           toItem:secondLayoutItem
                                        attribute:secondLayoutAttribute
                                       multiplier:self.layoutMultiplier
                                         constant:self.layoutConstant];

layoutConstraint.priority = self.layoutPriority;
layoutConstraint.mas_key = self.mas_key;

...

if (existingConstraint) {
    // just update the constant
    existingConstraint.constant = layoutConstraint.constant;
    self.layoutConstraint = existingConstraint;
} else {
    [self.installedView addConstraint:layoutConstraint];
    self.layoutConstraint = layoutConstraint;
    [firstLayoutItem.mas_installedConstraints addObject:self];
}
MASLayoutConstraint 是 NSLayoutConstraint 的子类。 可以看到,对于已有的约束,会直接对其 constant 赋值进行更新;对于新的约束,会调用 addConstraint: 方法来添加约束。
至此,我们已经看到了Masonry的布局代码是如何生效的,最终也是调用 NSLayoutConstraint 的相关方法。
SnapKit源码
使用SnapKit来更新约束,要添加updateConstraints 而使用remake,则会先移除掉已添加的snp约束。
使用方法
self.view.addSubview(box)
box.backgroundColor = UIColor.red

box.snp.makeConstraints { (make) -> Void in
    make.top.equalTo(self.view).offset(100)
    make.leading.equalTo(self.view).offset(100)
    make.width.height.equalTo(50)
}
box.snp.makeConstraints { xxx } 是Swift特色的代码样式,理解这句就要先看下边几处关键代码。
// ConstraintView.swift
public typealias ConstraintView = UIView
// ConstraintView+Extensions.swift
public extension ConstraintView {
    public var snp: ConstraintViewDSL {
        return ConstraintViewDSL(view: self)
    }
}
// ConstraintDSL.swift
public protocol ConstraintDSL {
    var target: AnyObject? { get }
    func setLabel(_ value: String?)
    func label() -> String?
}
public protocol ConstraintBasicAttributesDSL : ConstraintDSL {
}
public protocol ConstraintAttributesDSL : ConstraintBasicAttributesDSL {
}
// ConstraintViewDSL.swift
public struct ConstraintViewDSL: ConstraintAttributesDSL {
    ...

    public func makeConstraints(_ closure: (_ make: ConstraintMaker) -> Void) {
        ConstraintMaker.makeConstraints(item: self.view, closure: closure)
    }

    ...
}
约束规则
以 make.top.equalTo(self.view).offset(100) 为例,
// ConstraintMaker.swift
public class ConstraintMaker {
    public var top: ConstraintMakerExtendable {
        return self.makeExtendableWithAttributes(.top)
    }

    ......

    internal func makeExtendableWithAttributes(_ attributes: ConstraintAttributes) -> ConstraintMakerExtendable {
        let description = ConstraintDescription(item: self.item, attributes: attributes)
        self.descriptions.append(description)
        return ConstraintMakerExtendable(description)
    }
}
SnapKit在这里,引入了 ConstraintDescription 用于描述每一条约束规则,将其添加到 ConstraintMaker 对象的 descriptions 属性(ConstraintDescription数组)中。 因此,这一系列的约束规则,实际上会对应构建一个个ConstraintDescription对象,存于ConstraintMaker中。
然后,从ConstraintMaker的descriptions对象中,解析得出每一条实际的Constraint对象。
// ConstraintMaker.swift
public class ConstraintMaker {
    ...

    internal static func makeConstraints(item: LayoutConstraintItem, closure: (_ make: ConstraintMaker) -> Void) {
            let maker = ConstraintMaker(item: item)
            closure(maker)
            var constraints: [Constraint] = []
            for description in maker.descriptions {
                guard let constraint = description.constraint else {
                    continue
                }
                constraints.append(constraint)
            }
            for constraint in constraints {
                constraint.activateIfNeeded(updatingExisting: false)
            }
        }

    ...
}
所以,
box.snp.makeConstraints { (make) -> Void in
    make.top.equalTo(self.view).offset(100)
    make.leading.equalTo(self.view).offset(100)
    make.width.height.equalTo(50)
}
这段代码的目的也是类似:构建一个 ConstraintMaker 对象,传入 box.snp.makeConstraints 的闭包中,解析并构建每一条约束规则。 最后,调用activateIfNeeded方法来应用这些约束规则。
约束生效
与Masonry类似,我们来看看关键的布局代码。
在 Constraint.swift 中:
internal func activateIfNeeded(updatingExisting: Bool = false) {
        guard let item = self.from.layoutConstraintItem else {
            print("WARNING: SnapKit failed to get from item from constraint. Activate will be a no-op.")
            return
        }
        let layoutConstraints = self.layoutConstraints

        if updatingExisting {
            var existingLayoutConstraints: [LayoutConstraint] = []
            for constraint in item.constraints {
                existingLayoutConstraints += constraint.layoutConstraints
            }

            for layoutConstraint in layoutConstraints {
                let existingLayoutConstraint = existingLayoutConstraints.first { $0 == layoutConstraint }
                guard let updateLayoutConstraint = existingLayoutConstraint else {
                    fatalError("Updated constraint could not find existing matching constraint to update: \(layoutConstraint)")
                }

                let updateLayoutAttribute = (updateLayoutConstraint.secondAttribute == .notAnAttribute) ? updateLayoutConstraint.firstAttribute : updateLayoutConstraint.secondAttribute
                updateLayoutConstraint.constant = self.constant.constraintConstantTargetValueFor(layoutAttribute: updateLayoutAttribute)
            }
        } else {
            NSLayoutConstraint.activate(layoutConstraints)
            item.add(constraints: [self])
        }
    }
这一段代码的逻辑几乎与Masonry的一样了。
可以看到,对于已有的约束,会直接对其 constant 赋值进行更新;对于新的约束,会调用 NSLayoutConstraint.activate(layoutConstraints) 方法来添加约束。
FlexBox
Autolayout实际上是通过解方程的方式来计算各个view的frame。采用Cassowary算法来专门计算这些布局关系。因此autolayout在布局复杂的情况下,性能是非常低的。
Cassowary是个解析工具包,能够有效解析线性等式系统和线性不等式系统,用户的界面中总是会出现不等关系和相等关系,Cassowary开发了一种规则系统可以通过约束来描述视图间关系。约束就是规则,能够表示出一个视图相对于另一个视图的位置。
