

老规矩我是: 我想静静
让我们开始今天的课程
DEMO 1
1、第一步还是vue.js官网 CDM 拿到编辑器放到script 里面,
2、在body 容器中创建一个 template 模板
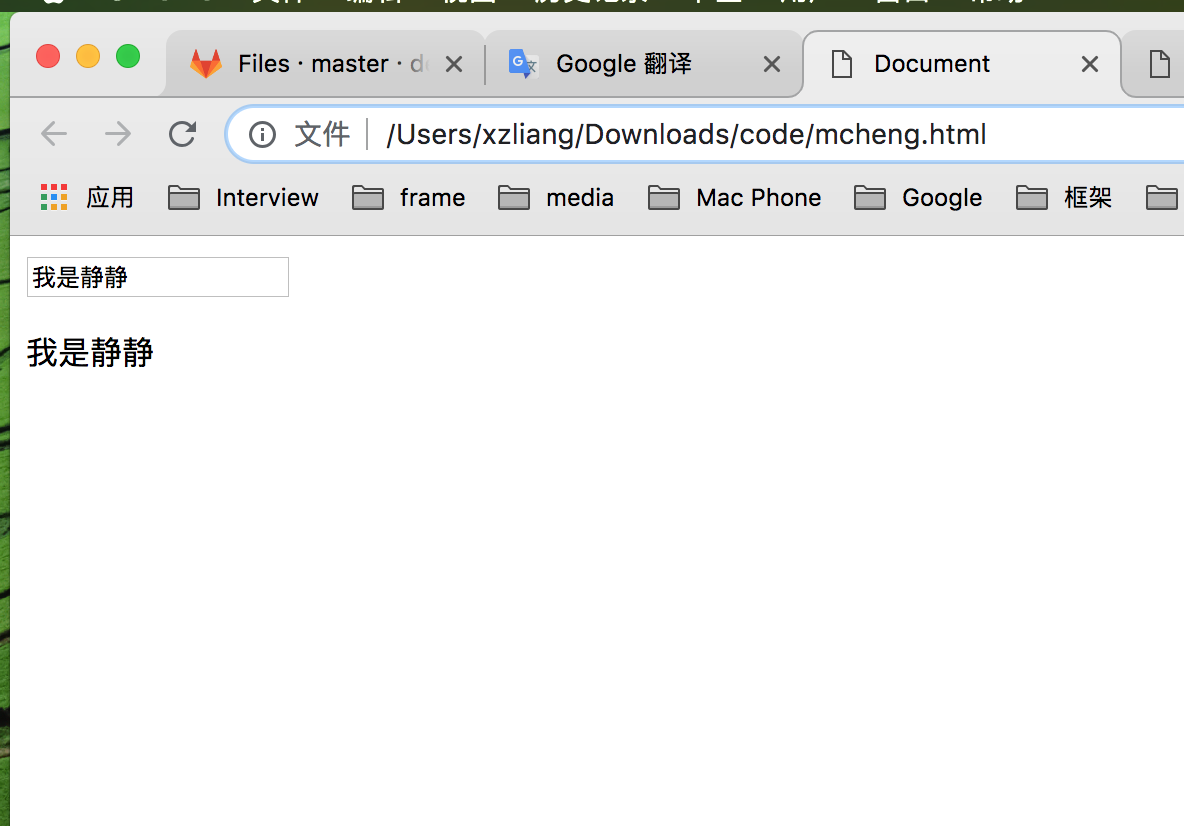
    <body>
    <div id="app">
      <input type="text" v-on:input="changeTitle" />
      <p>{{ title }}</p>
    </div>
  </body>
3、然后在script 里面进行创建new Vue({}); 实例
    <script>
    new Vue({
      el: "#app",
      data: {
        title: "hello word"
      },
      methods: {
        changeTitle(event) {
          this.title = event.target.value;
        }
      }
    });
  </script>
  <!--
    这里解释 在methods 方法中传入 形参event 事件,然后
    通过 this.title 的指向 data 数据中的 内容,然后通过 event 事件来更改目标的 value 值
  -->
4、看图说话
整体课程
1、getting  started  入门

2、interacting with the Dom  templates  模板与Dom 互动

3、understanding the VueJs instance   理解vue js 实例

4、Vue CLi       vue cli

5、components      组件

6、Forms           形式

7、Directives Filters & Mixins    过滤器

8、Animations & Transitions     动画和过渡

9、working with http          使用http

10、Routing                   路由

11、state Management         管理

12、 Deploying a VueJS App     部署VueJS应用程序
Understanding and Using Directives 理解和使用指令
DOM interaction Dom 交互
插值表达式
this {{}} syntax is also called 此{{}}语法也被调用
interpolation or string interpolation 插值或字符串插值
在 插值表达式里面写 方法 也是可以的
    <body>
    <div id="app">
      <p>{{ sayHello() }}</p>
    </div>
  </body>
  <script>
    new Vue({
      el: "#app",
      data: {
        titel: "hello word"
      },
      methods: {
        sayHello() {
          return "hello";
        //   return titel   报错
        // return this.titel 正确
        }
      }
    });
  </script>
  <!--
    当我们在methods 方法里面 把这个return 出去情况下 直接return titel 这个名就会报错,需要 使用 this.titel 给一个指向 这个的数据
  -->
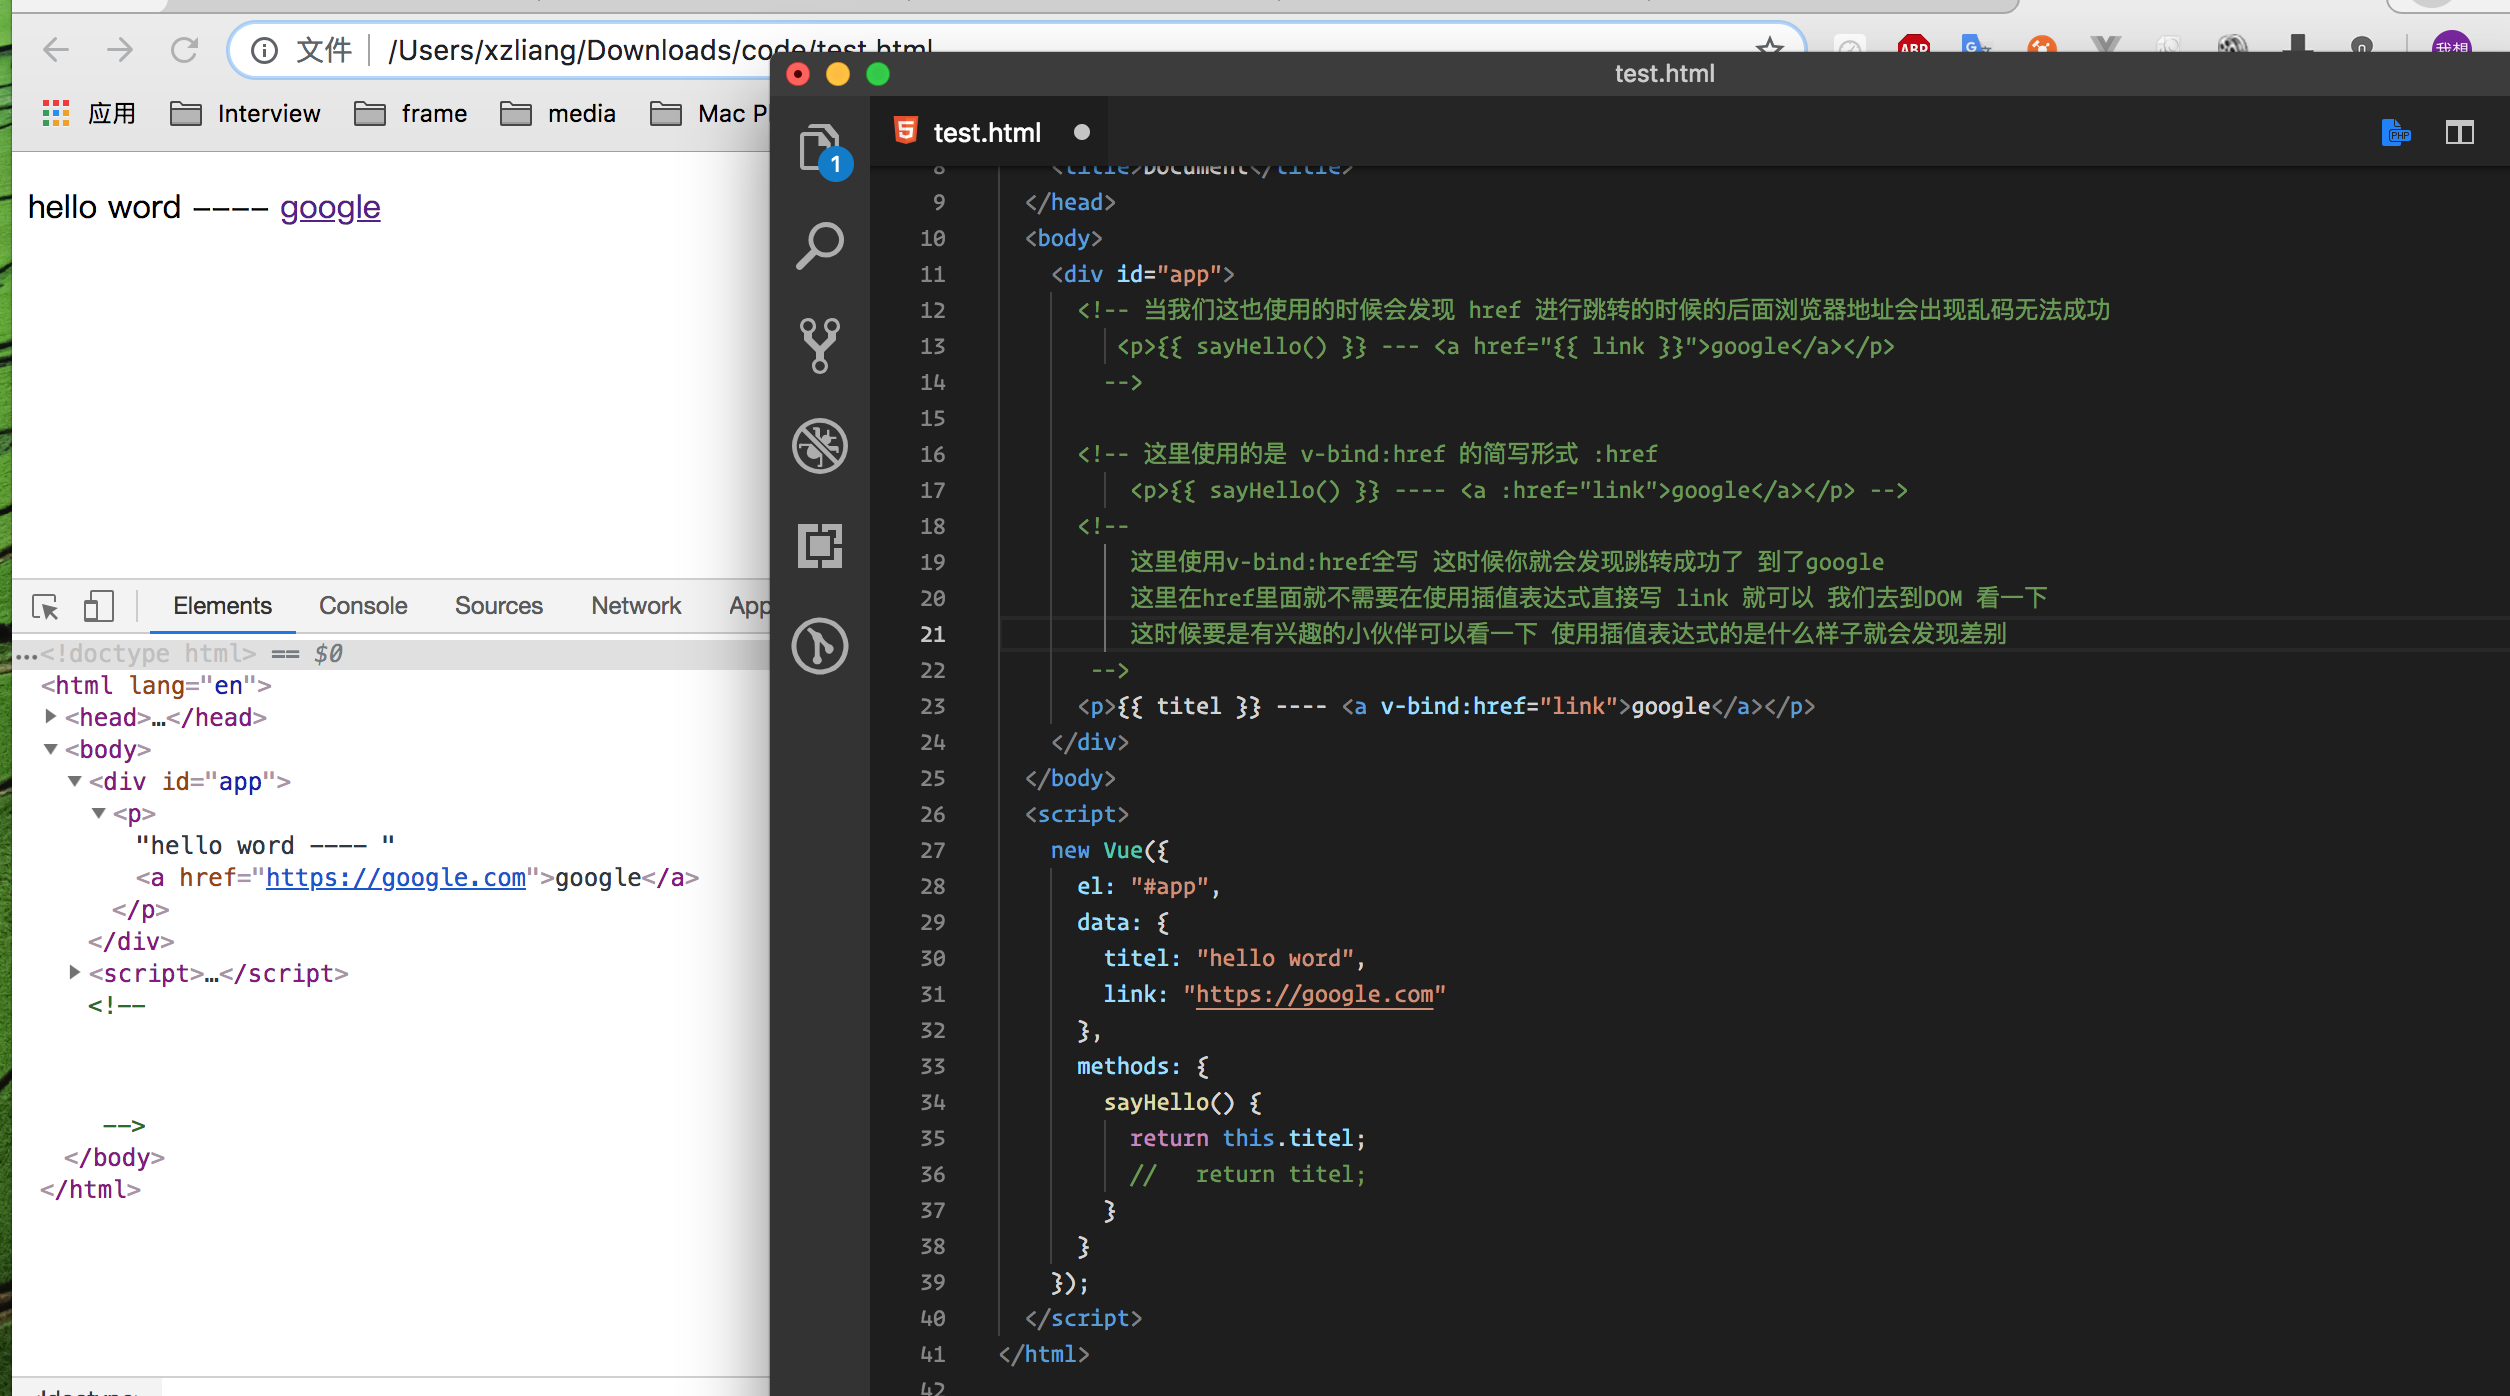
v-bind的讲解
<body>
    <div id="app">
  <!-- 当我们这也使用的时候会发现 href 进行跳转的时候的后面浏览器地址会出现乱码无法成功
 	 <p>{{ sayHello() }} --- <a href="{{ link }}">google</a></p>
	-->

  <!-- 这里使用的是 v-bind:href 的简写形式 :href
	  <p>{{ sayHello() }} ---- <a :href="link">google</a></p> -->
  <!--
	  这里使用v-bind:href全写 这时候你就会发现跳转成功了 到了google
	  这里在href里面就不需要在使用插值表达式直接写 link 就可以 我们去到DOM 看一下
	  这时候要是有兴趣的小伙伴可以看一下 使用插值表达式的是什么样子就会发现差别
   -->
      <p>{{ titel }} ---- <a v-bind:href="link">google</a></p>
    </div>
  </body>
  <script>
    new Vue({
      el: "#app",
      data: {
        titel: "hello word",
        link: "https://google.com"
      },
      methods: {
        sayHello() {
          return this.titel;
          //   return titel;
        }
      }
    });
  </script>
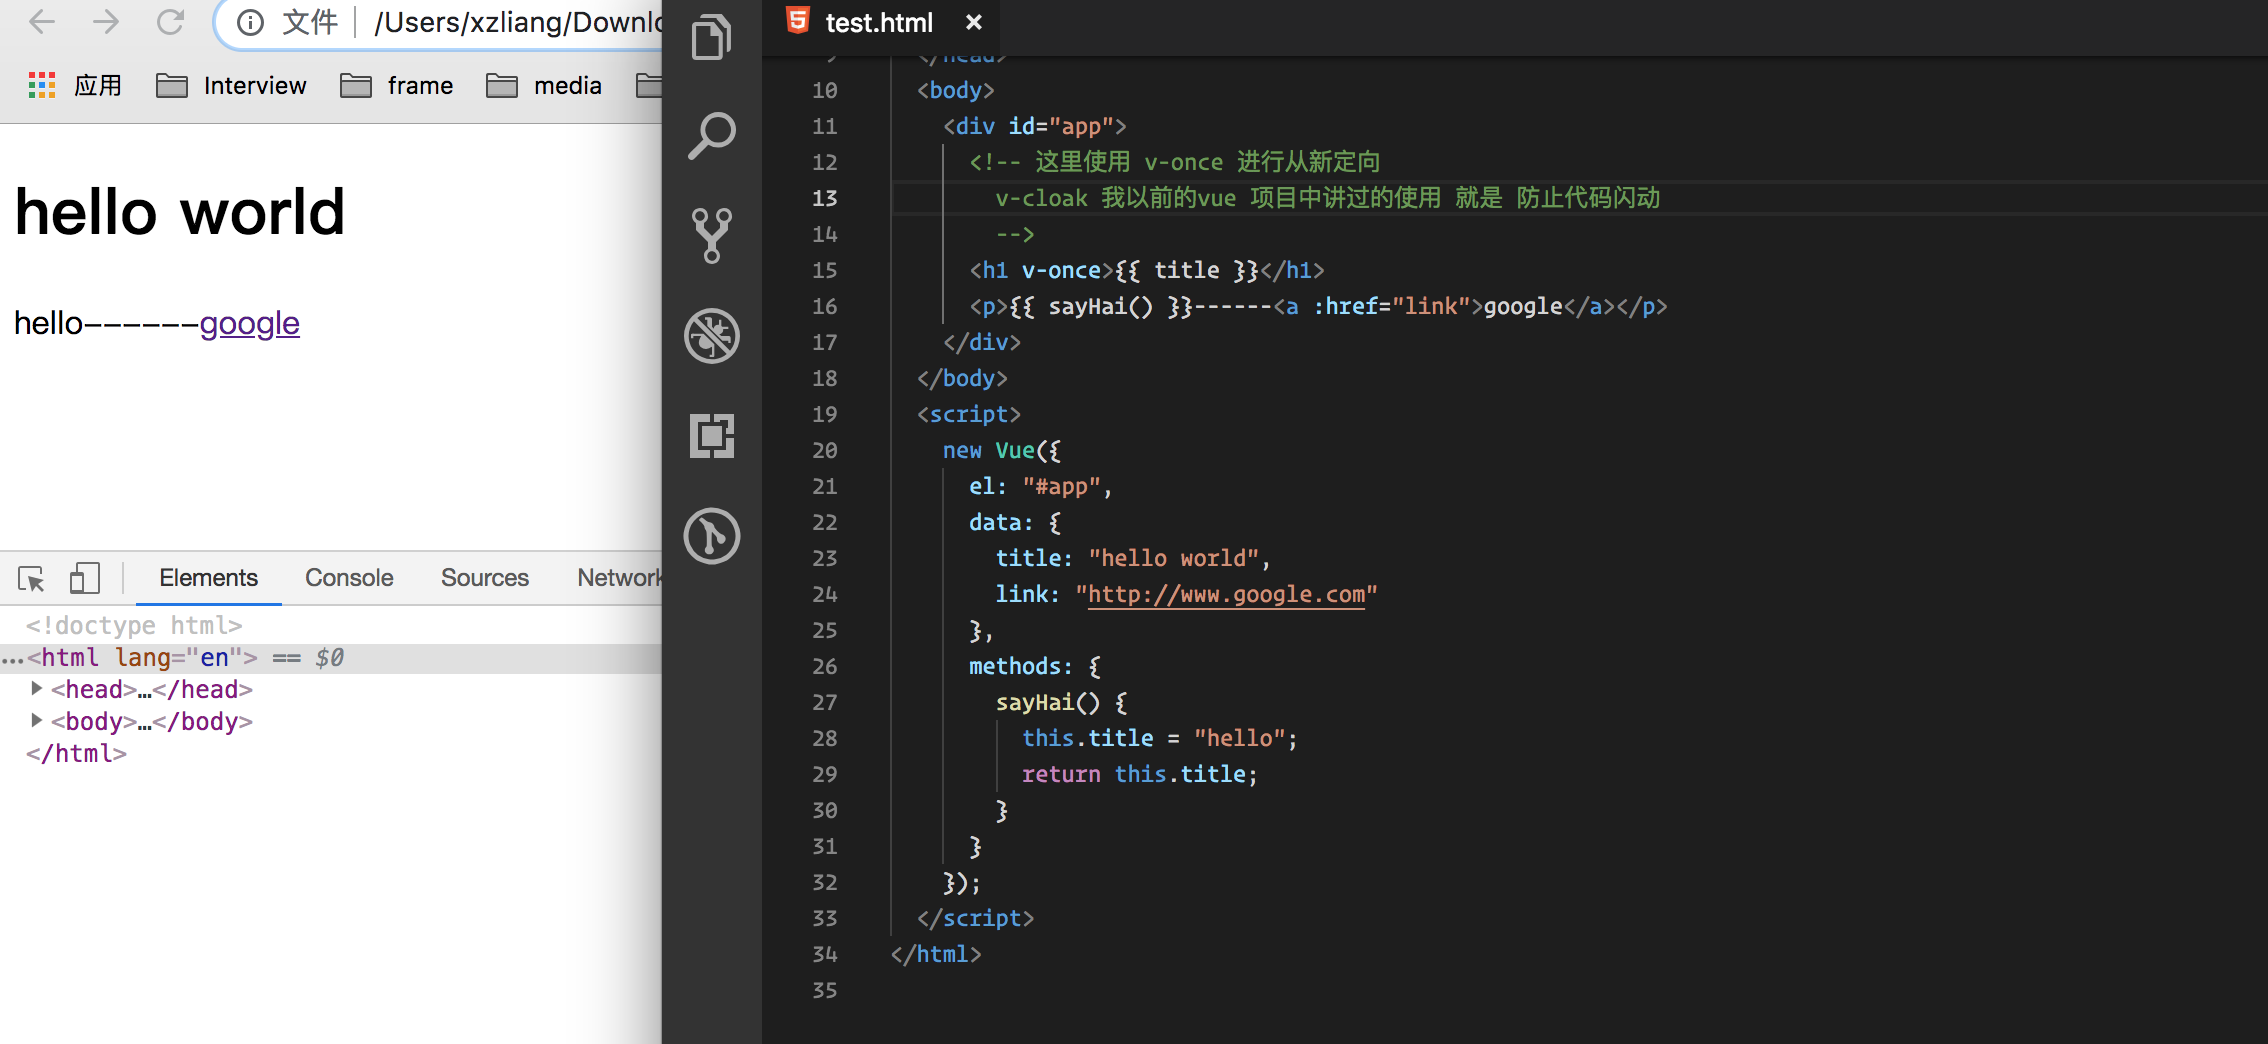
Disable Re-Rendering with v-once 使用v-once禁用重新渲染
<body>
    <div id="app">
      <!-- 这里使用 v-once 进行从新定向
	v-cloak 我以前的vue 项目中讲过的使用 就是 防止代码闪动
    -->
      <h1 v-once>{{ title }}</h1>
      <p>{{ sayHai() }}------<a :href="link">google</a></p>
    </div>
</body>
  <script>
    new Vue({
      el: "#app",
      data: {
        title: "hello world",
        link: "http://www.google.com"
      },
      methods: {
        sayHai() {
          this.title = "hello";
          return this.title;
        }
      }
    });
  </script>
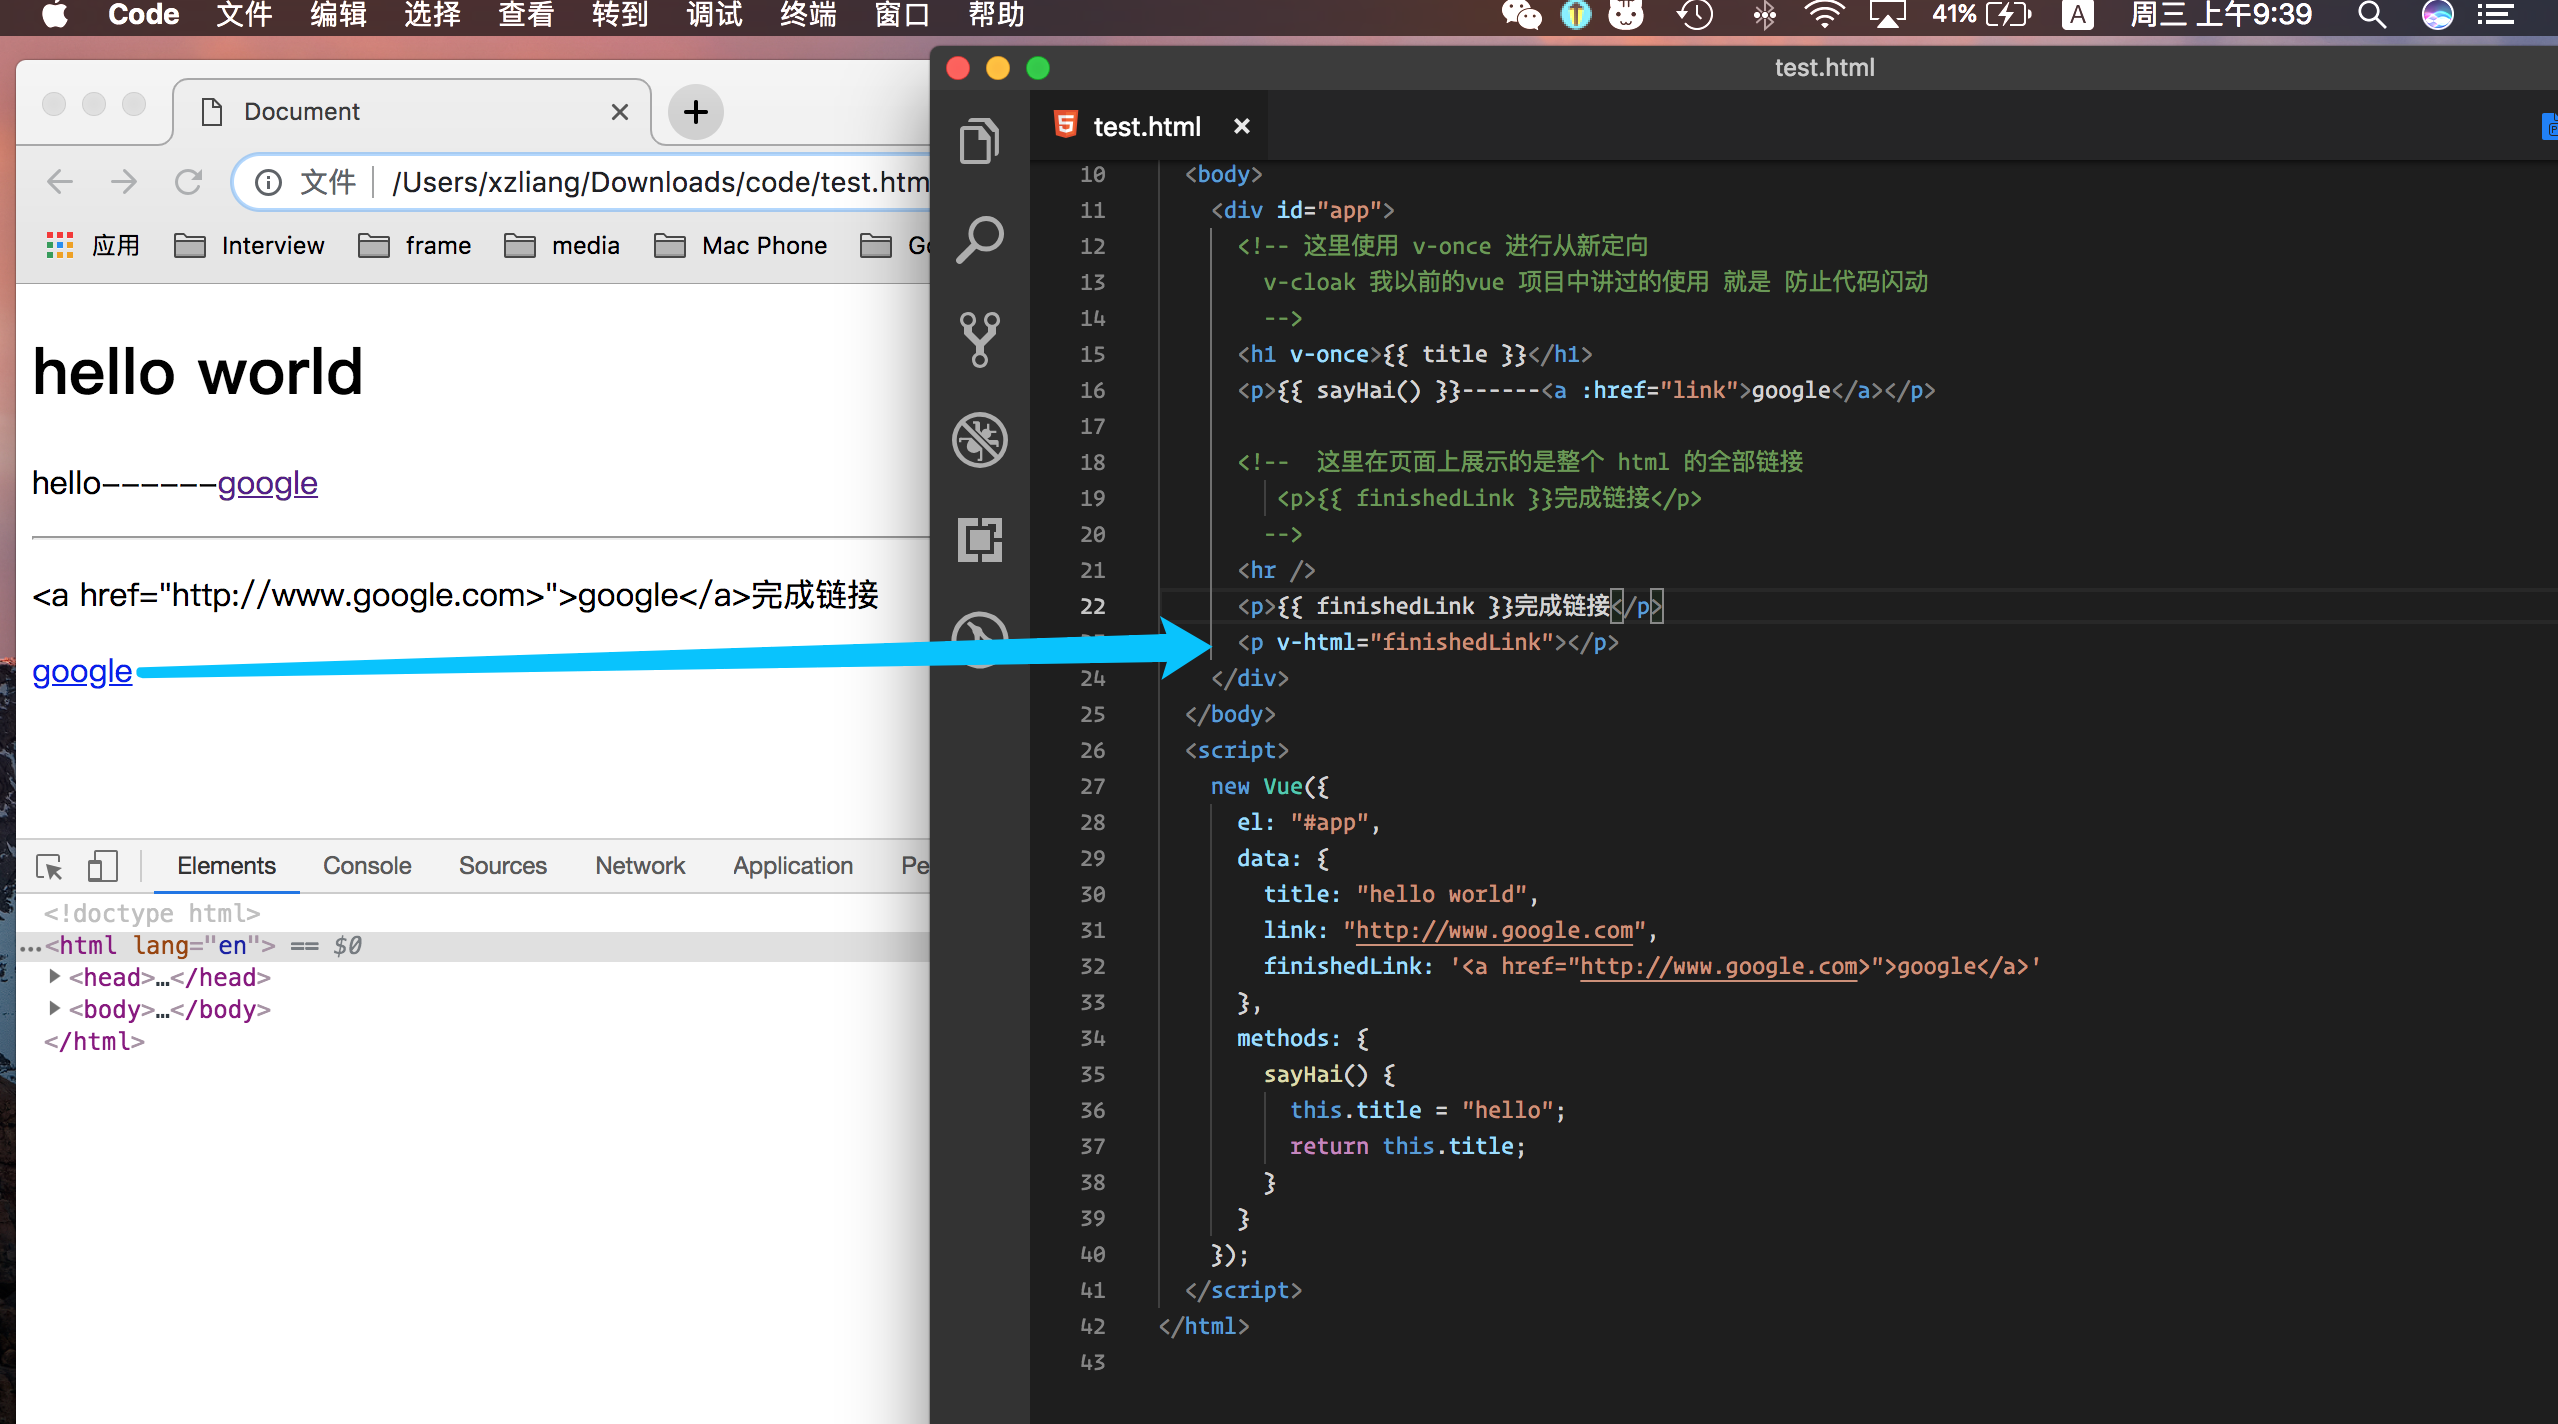
v-html的使用与 差别
    <body>
    <div id="app">
      <!-- 这里使用 v-once 进行从新定向
		v-cloak 我以前的vue 项目中讲过的使用 就是 防止代码闪动
		-->
      <h1 v-once>{{ title }}</h1>
      <!-- 这里使用方法调用data中的数据 -->
      <p>{{ sayHai() }}------<a :href="link">google</a></p>

      <!--	这里在页面上展示的是整个 html 的全部链接
		 <p>{{ finishedLink }}完成链接</p>
		-->
      <hr />
      <p>{{ finishedLink }}完成链接</p>
      <p v-html="finishedLink"></p>
    </div>
  </body>
  <script>
    new Vue({
      el: "#app",
      data: {
        title: "hello world",
        link: "http://www.google.com",
        finishedLink: '<a href="http://www.google.com>">google</a>'
      },
      methods: {
        sayHai() {
          this.title = "hello";
          return this.title;
        }
      }
    });
  </script>
Listening to Events 事件的监听
v-on:click="" 简写形式 @click=""
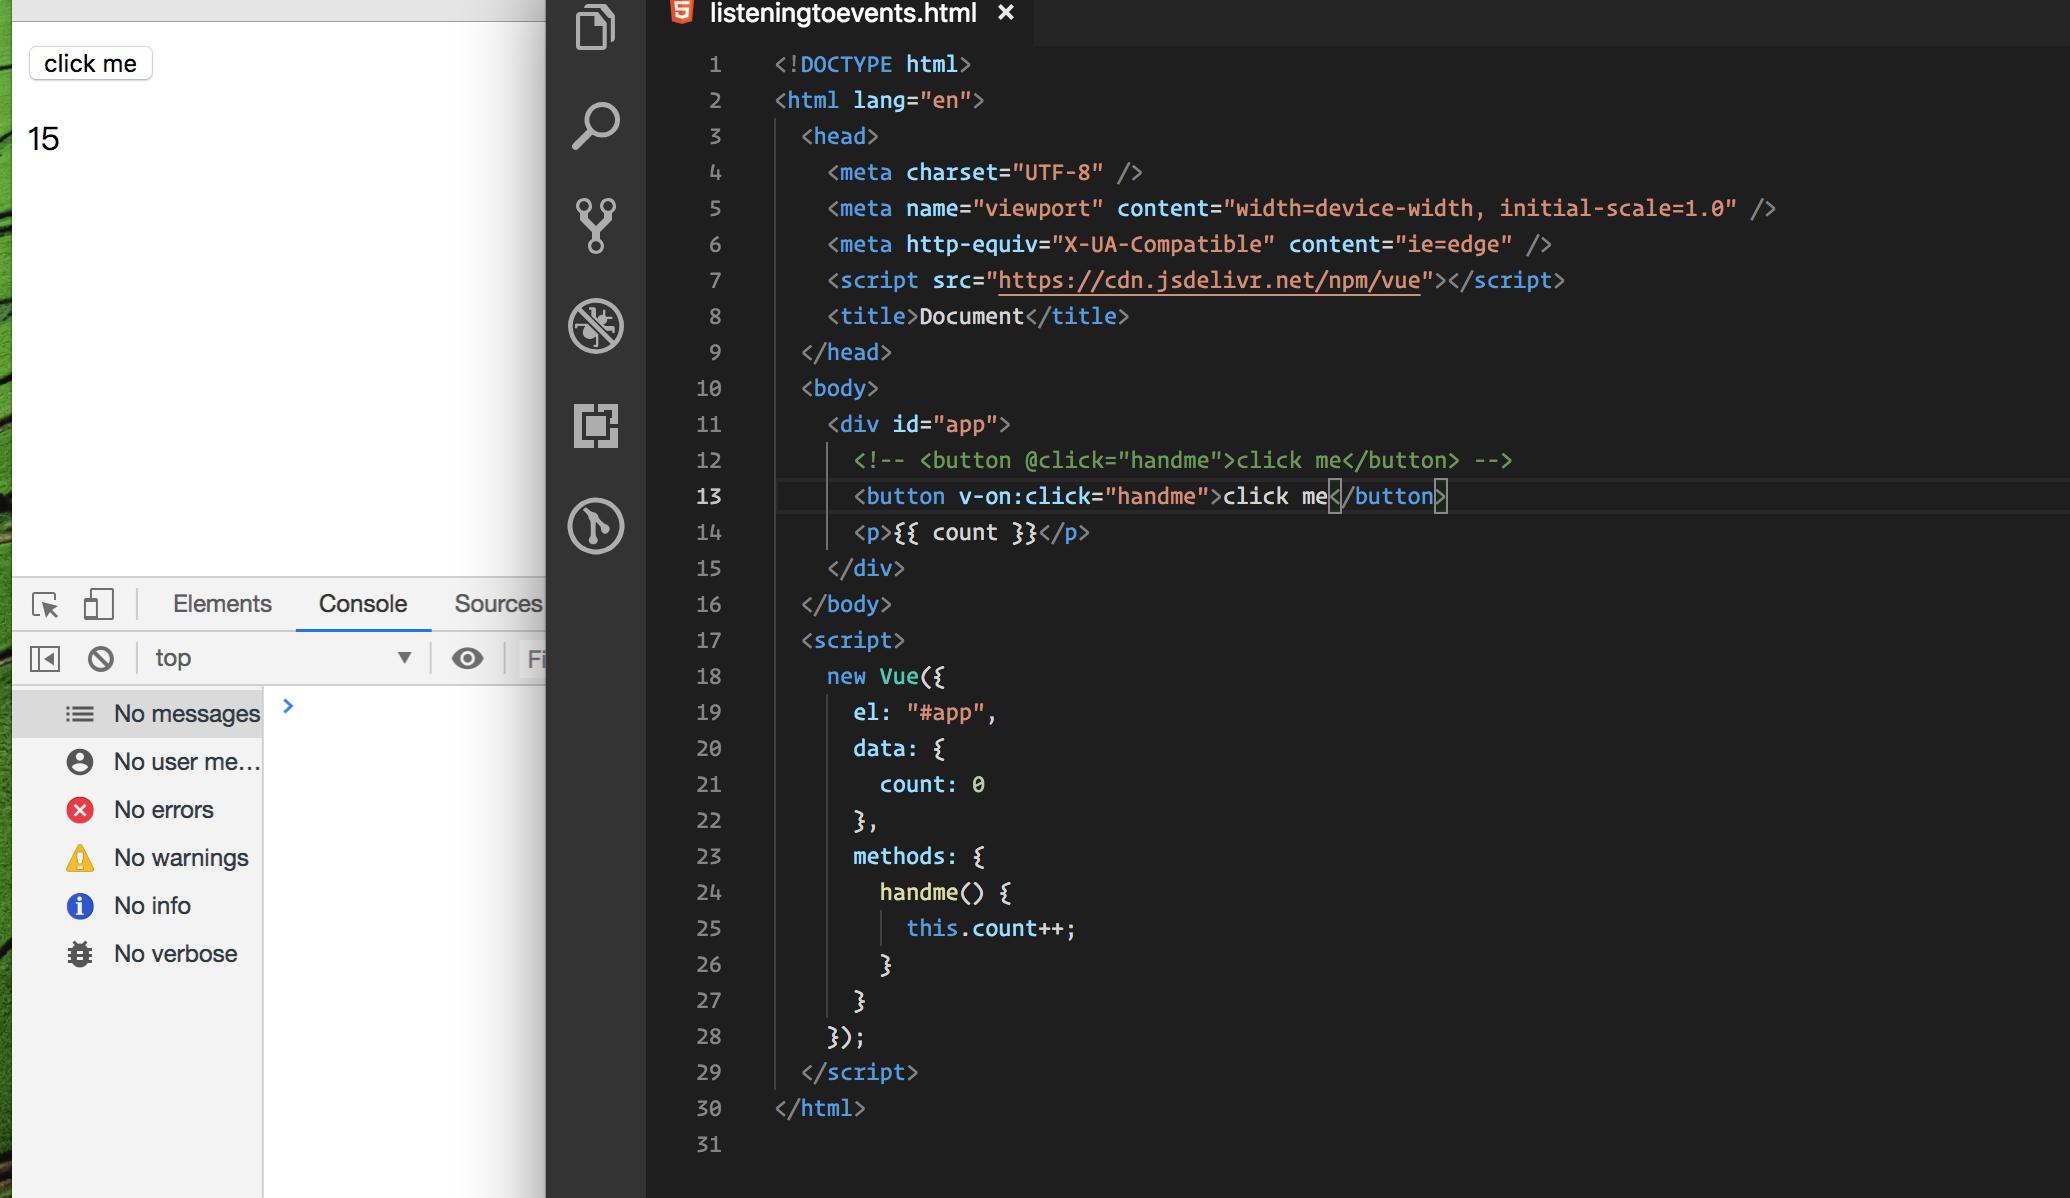
<body>
    <div id="app">
      <!-- <button @click="handme">click me</button> -->
      <button v-on:click="handme">click me</button>
      <p>{{ count }}</p>
    </div>
  </body>
  <script>
    new Vue({
      el: "#app",
      data: {
        count: 0
      },
      methods: {
        handme() {
          this.count++;
        }
      }
    });
  </script>
@mousemove 和 坐标方向 clientX clientY
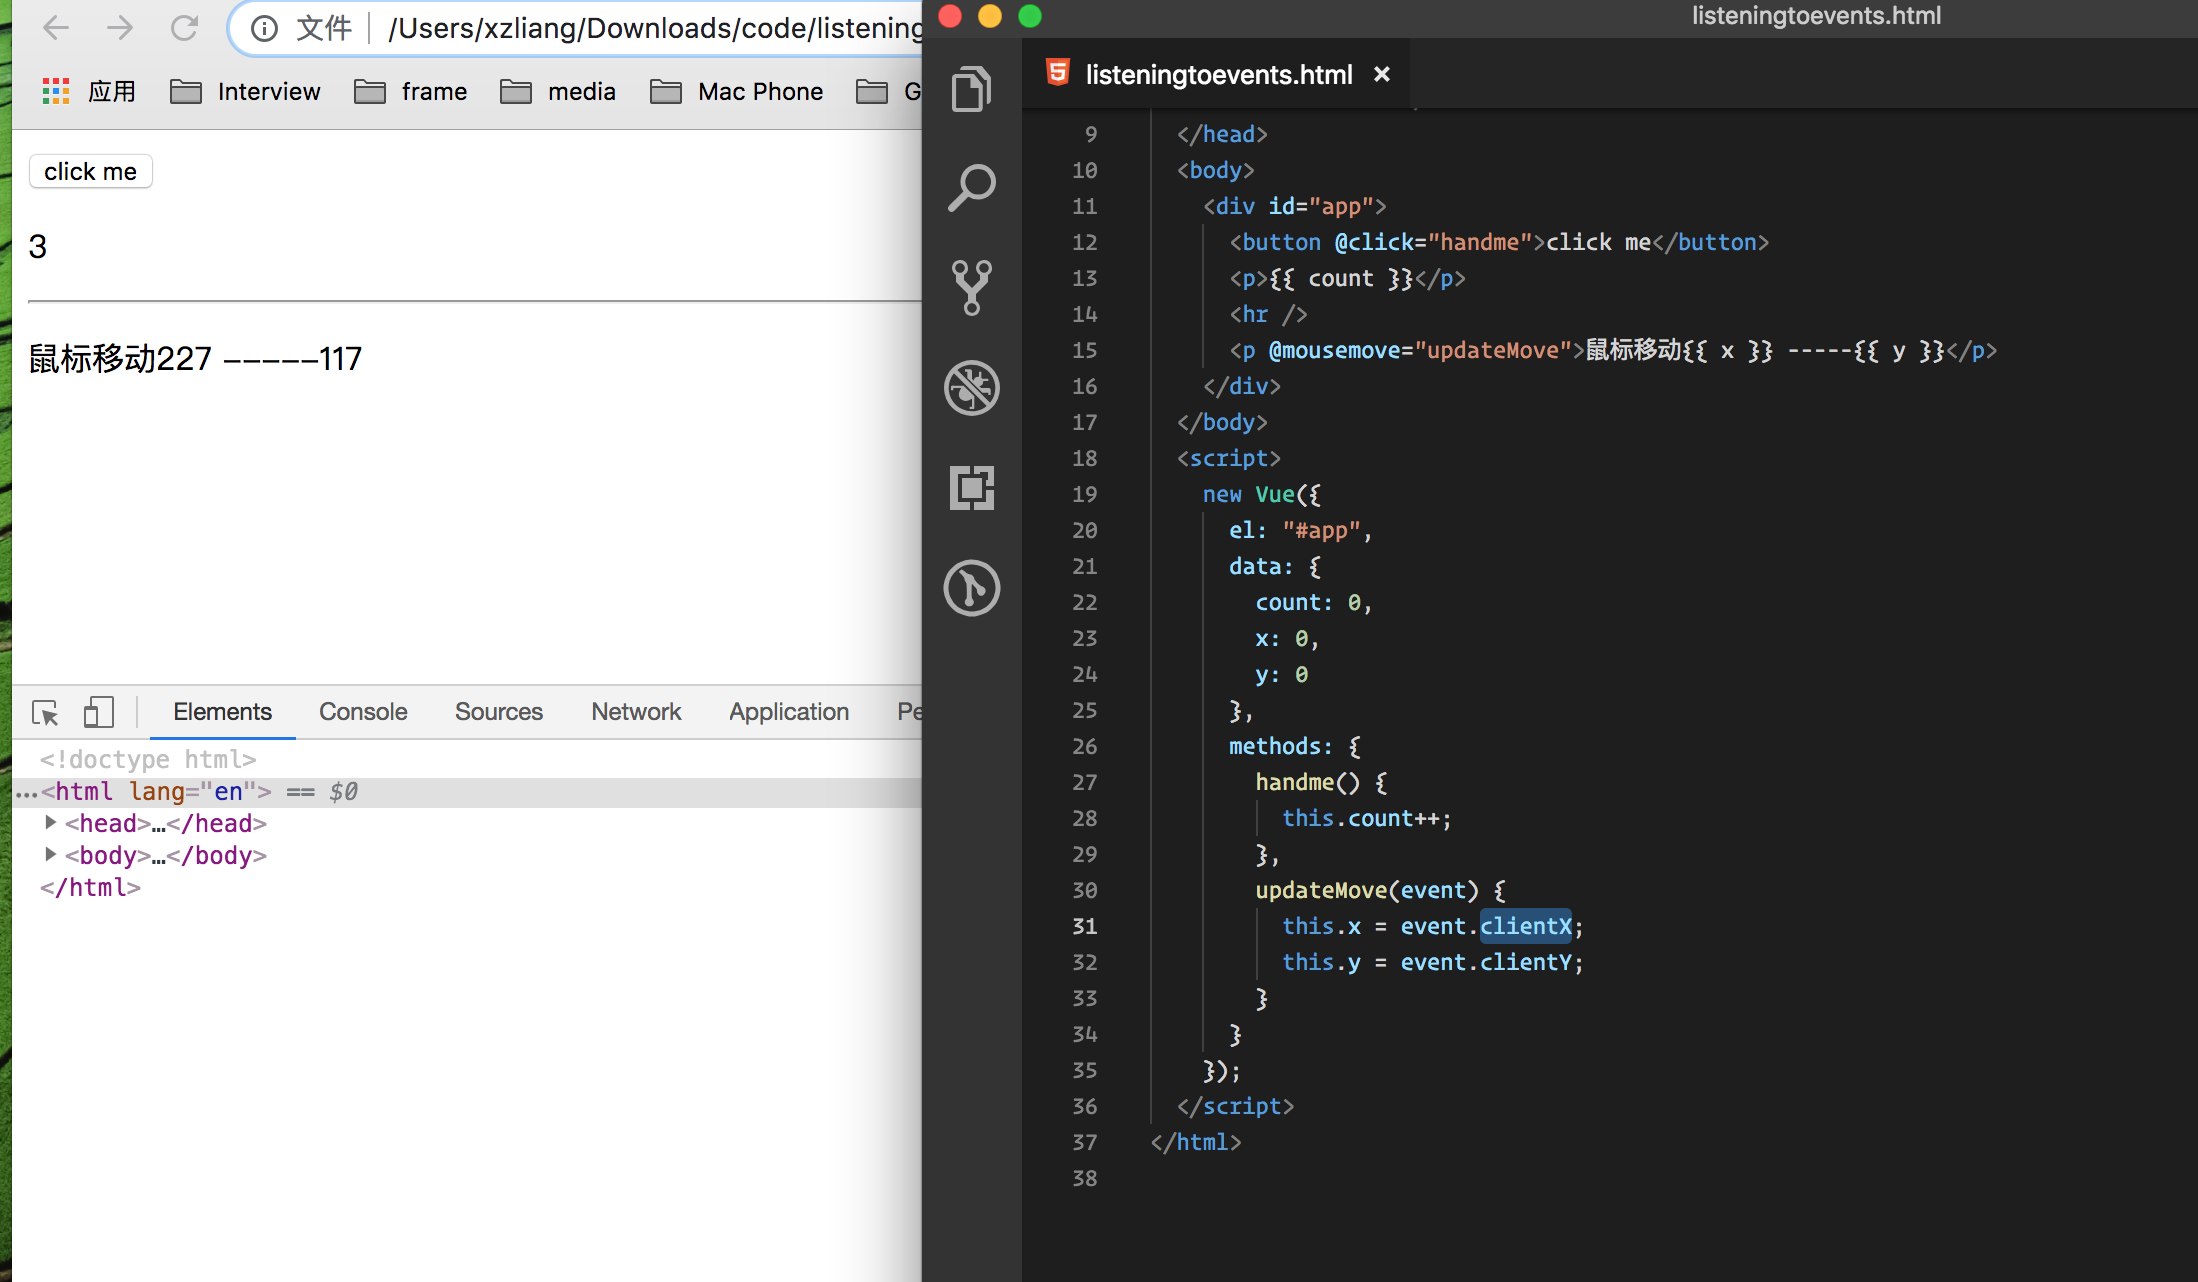
    <body>
    <div id="app">
      <button @click="handme">click me</button>
      <p>{{ count }}</p>
      <hr />
      <p @mousemove="updateMove">鼠标移动{{ x }} -----{{ y }}</p>
    </div>
  </body>
  <script>
    new Vue({
      el: "#app",
      data: {
        count: 0,
        x: 0,
        y: 0
      },
      methods: {
        handme() {
          this.count++;
        },
        updateMove(event) {
          this.x = event.clientX;
          this.y = event.clientY;
        }
      }
    });
  </script>
stopPropagation 到达指定区域停止
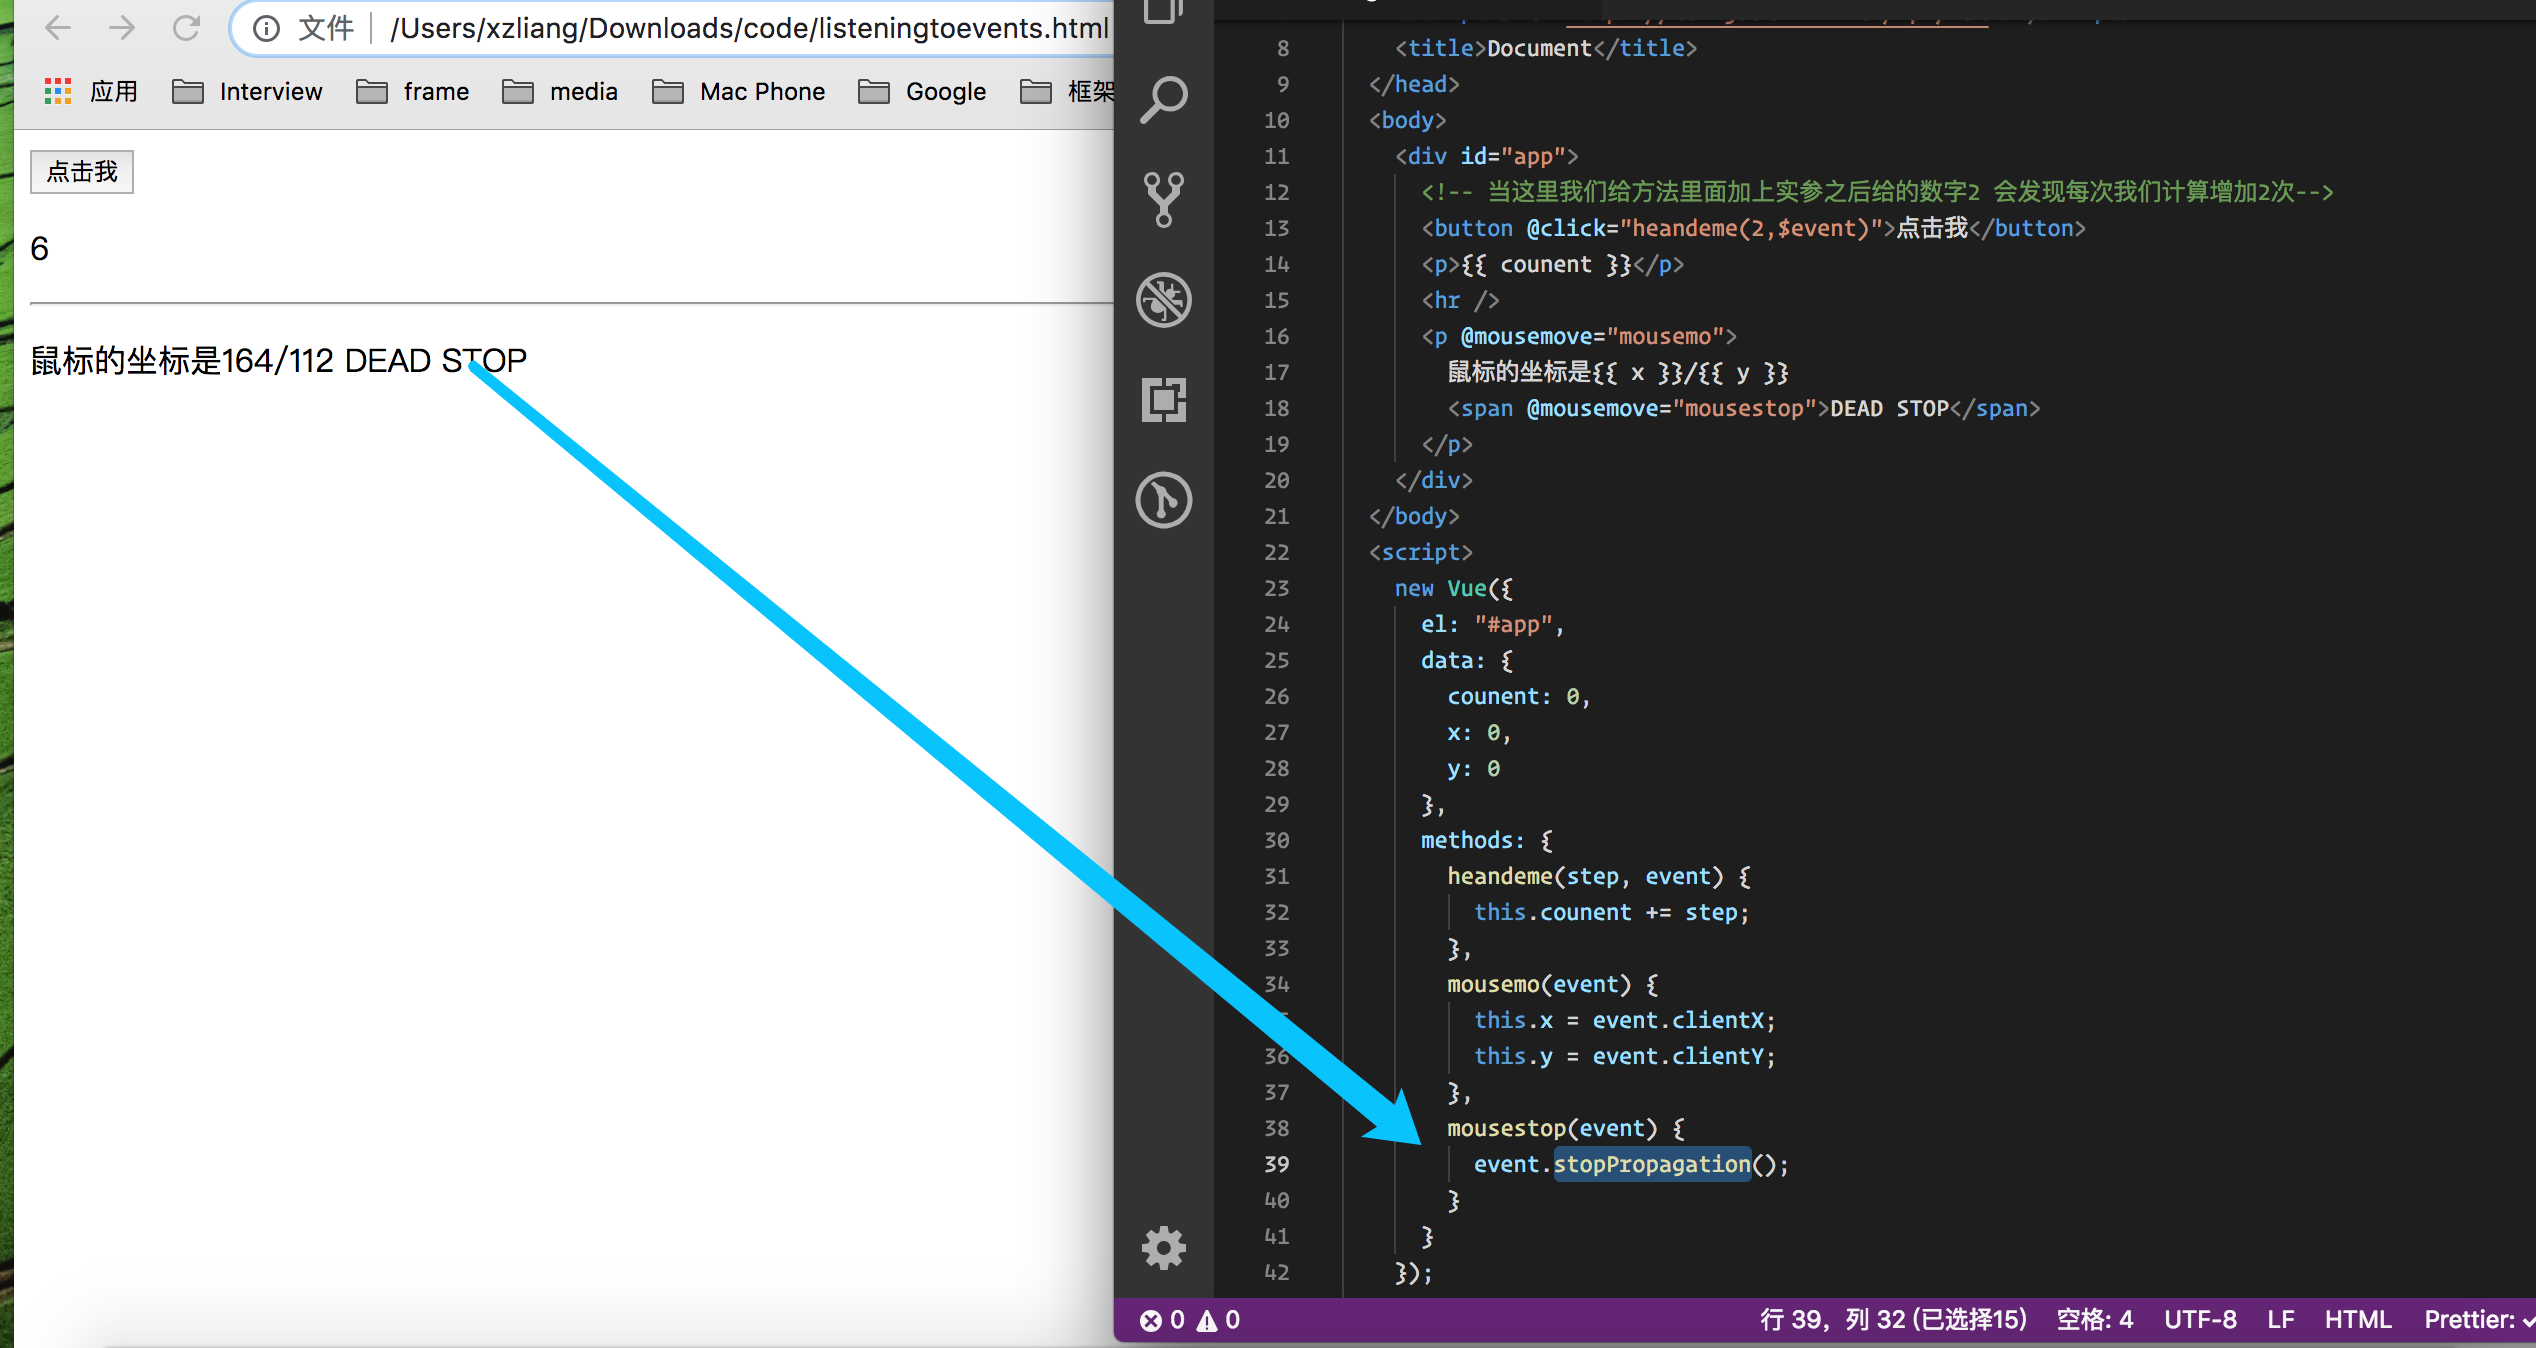
<body>
    <div id="app">
      <!-- 当这里我们给方法里面加上实参之后给的数字2 会发现每次我们计算增加2次-->
      <button @click="heandeme(2,$event)">点击我</button>
      <p>{{ counent }}</p>
      <hr />
      <p @mousemove="mousemo">
        鼠标的坐标是{{ x }}/{{ y }}
        <span @mousemove="mousestop">DEAD STOP</span>
      </p>
    </div>
  </body>
  <script>
    new Vue({
      el: "#app",
      data: {
        counent: 0,
        x: 0,
        y: 0
      },
      methods: {
        heandeme(step, event) {
          this.counent += step;
        },
        mousemo(event) {
          this.x = event.clientX;
          this.y = event.clientY;
        },
        mousestop(event) {
          event.stopPropagation();
        }
      }
    });
  </script>

这个是去掉函数方法的写法简便写法
  <span @mousemove.stop.prevent="mousestop">DEAD STOP</span>
Listening to Keyboard Events 键盘的监听事件
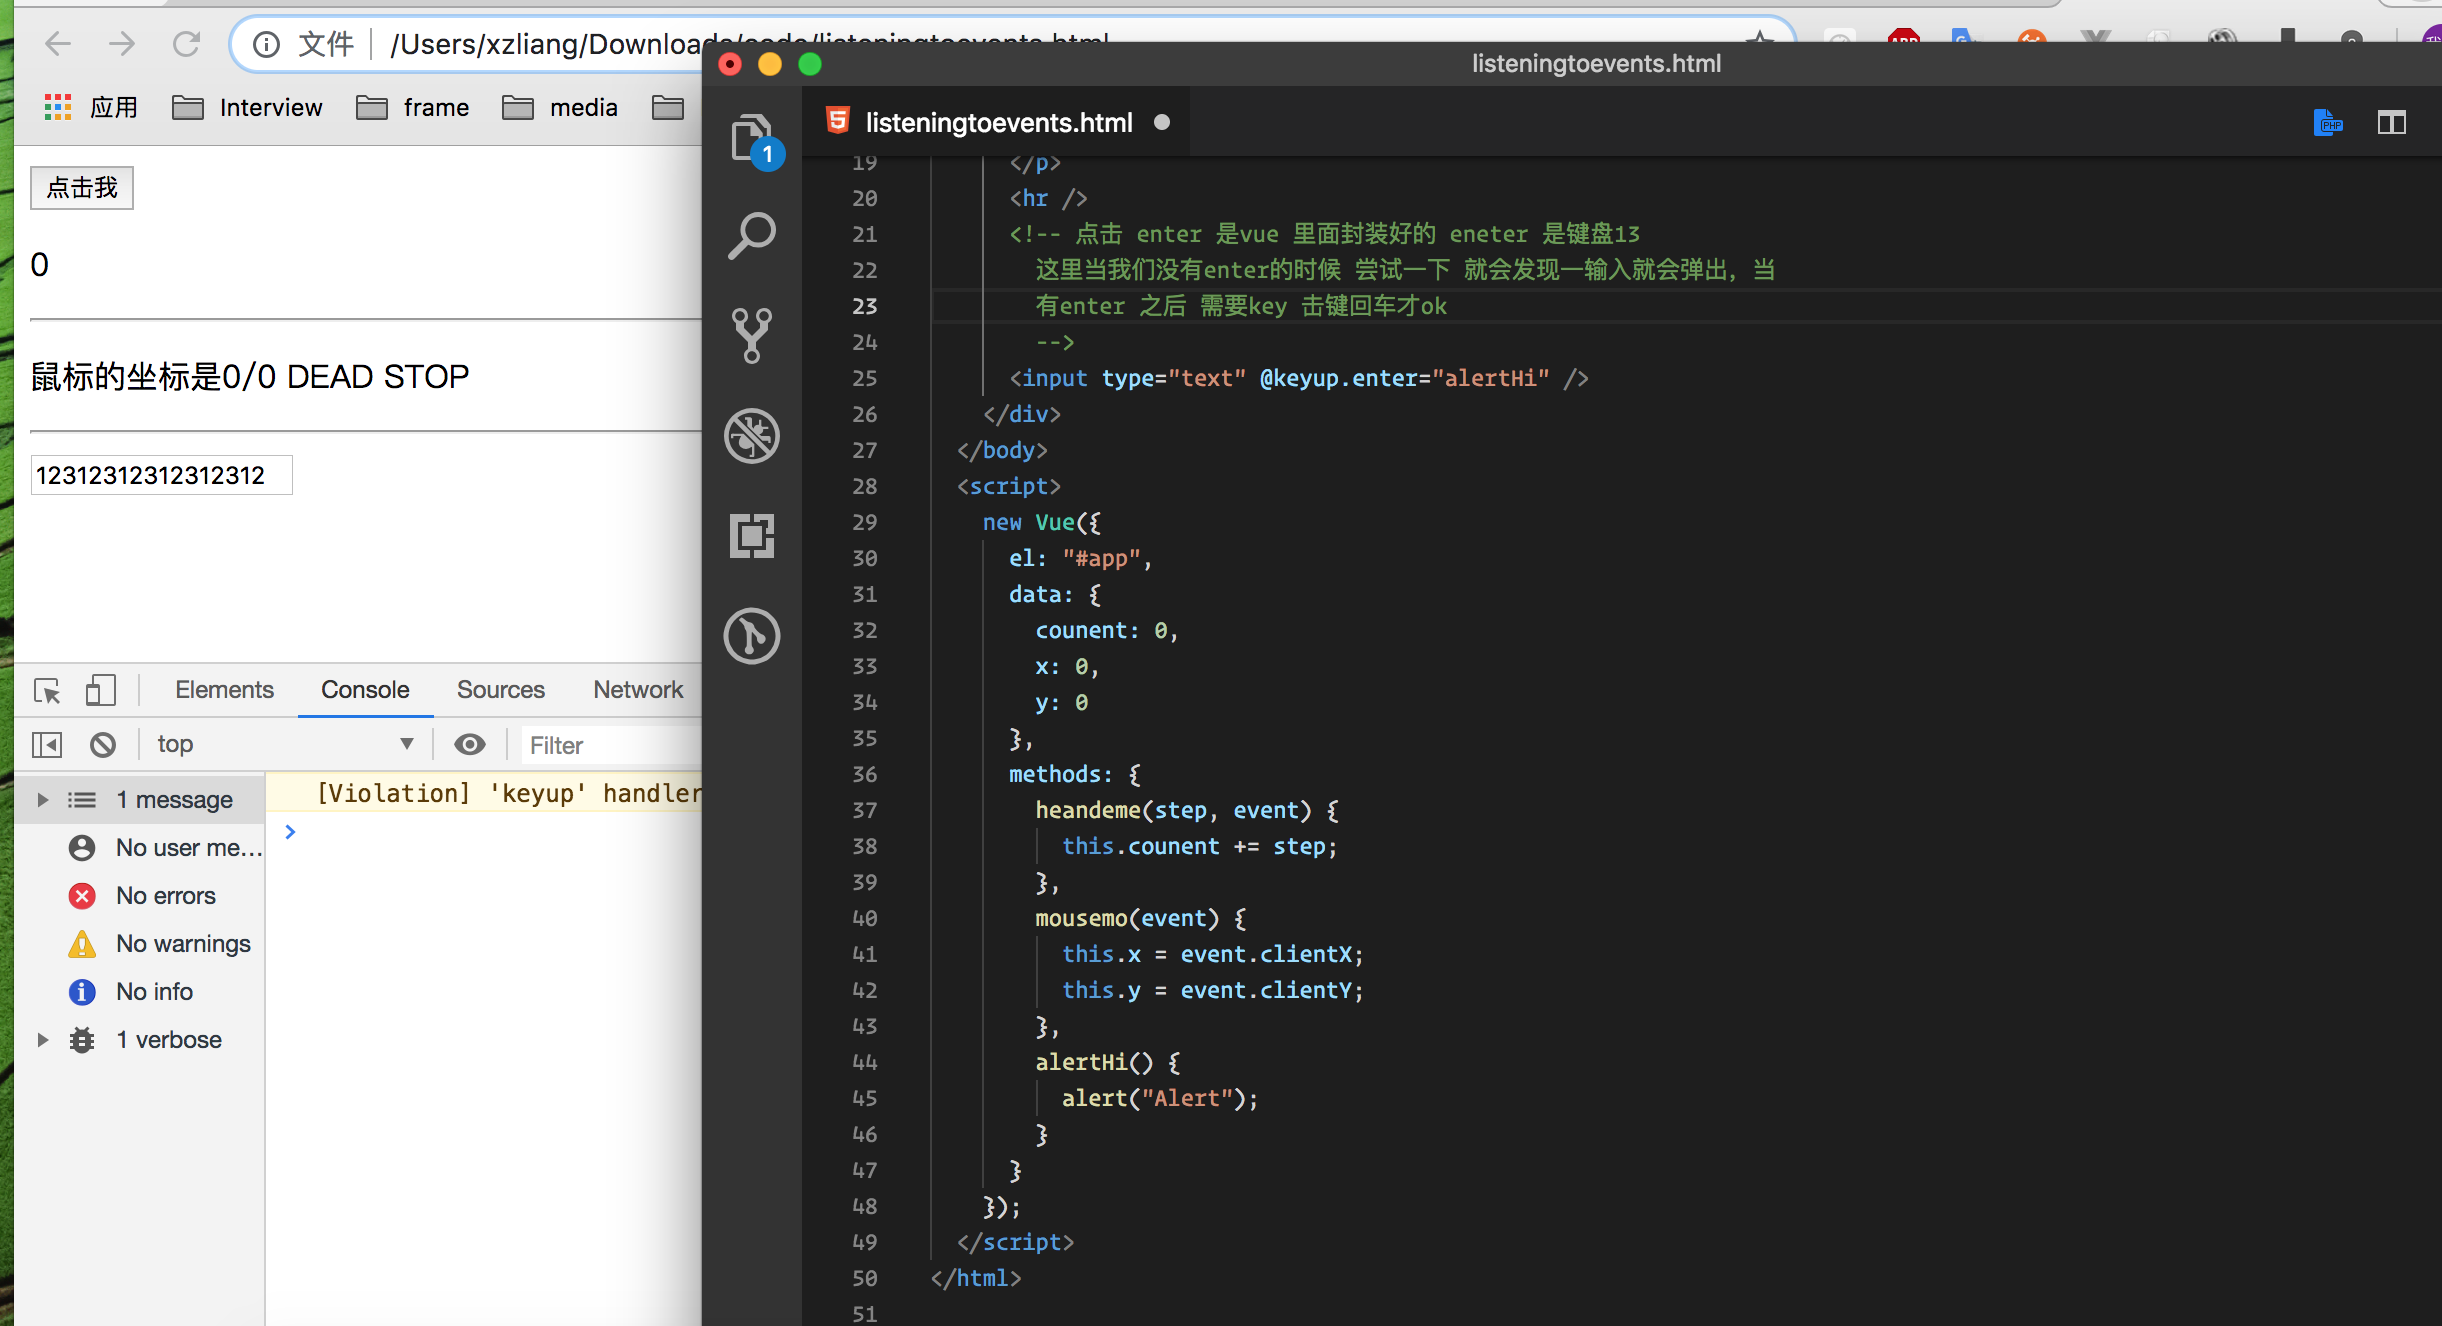
  <hr />
      <!-- 点击 enter 是vue 里面封装好的 eneter 是键盘13
        这里当我们没有enter的时候 尝试一下 就会发现一输入就会弹出,当
        有enter 之后 需要key 击键回车才ok
        -->
      <input type="text" @keyup.enter="alertHi" />
    </div>
  </body>
  <script>
    new Vue({
      el: "#app",
      data: {
        counent: 0,
        x: 0,
        y: 0
      },
      methods: {
        heandeme(step, event) {
          this.counent += step;
        },
        mousemo(event) {
          this.x = event.clientX;
          this.y = event.clientY;
        },
        alertHi() {
          alert("Alert");
        }
      }
    });
  </script>
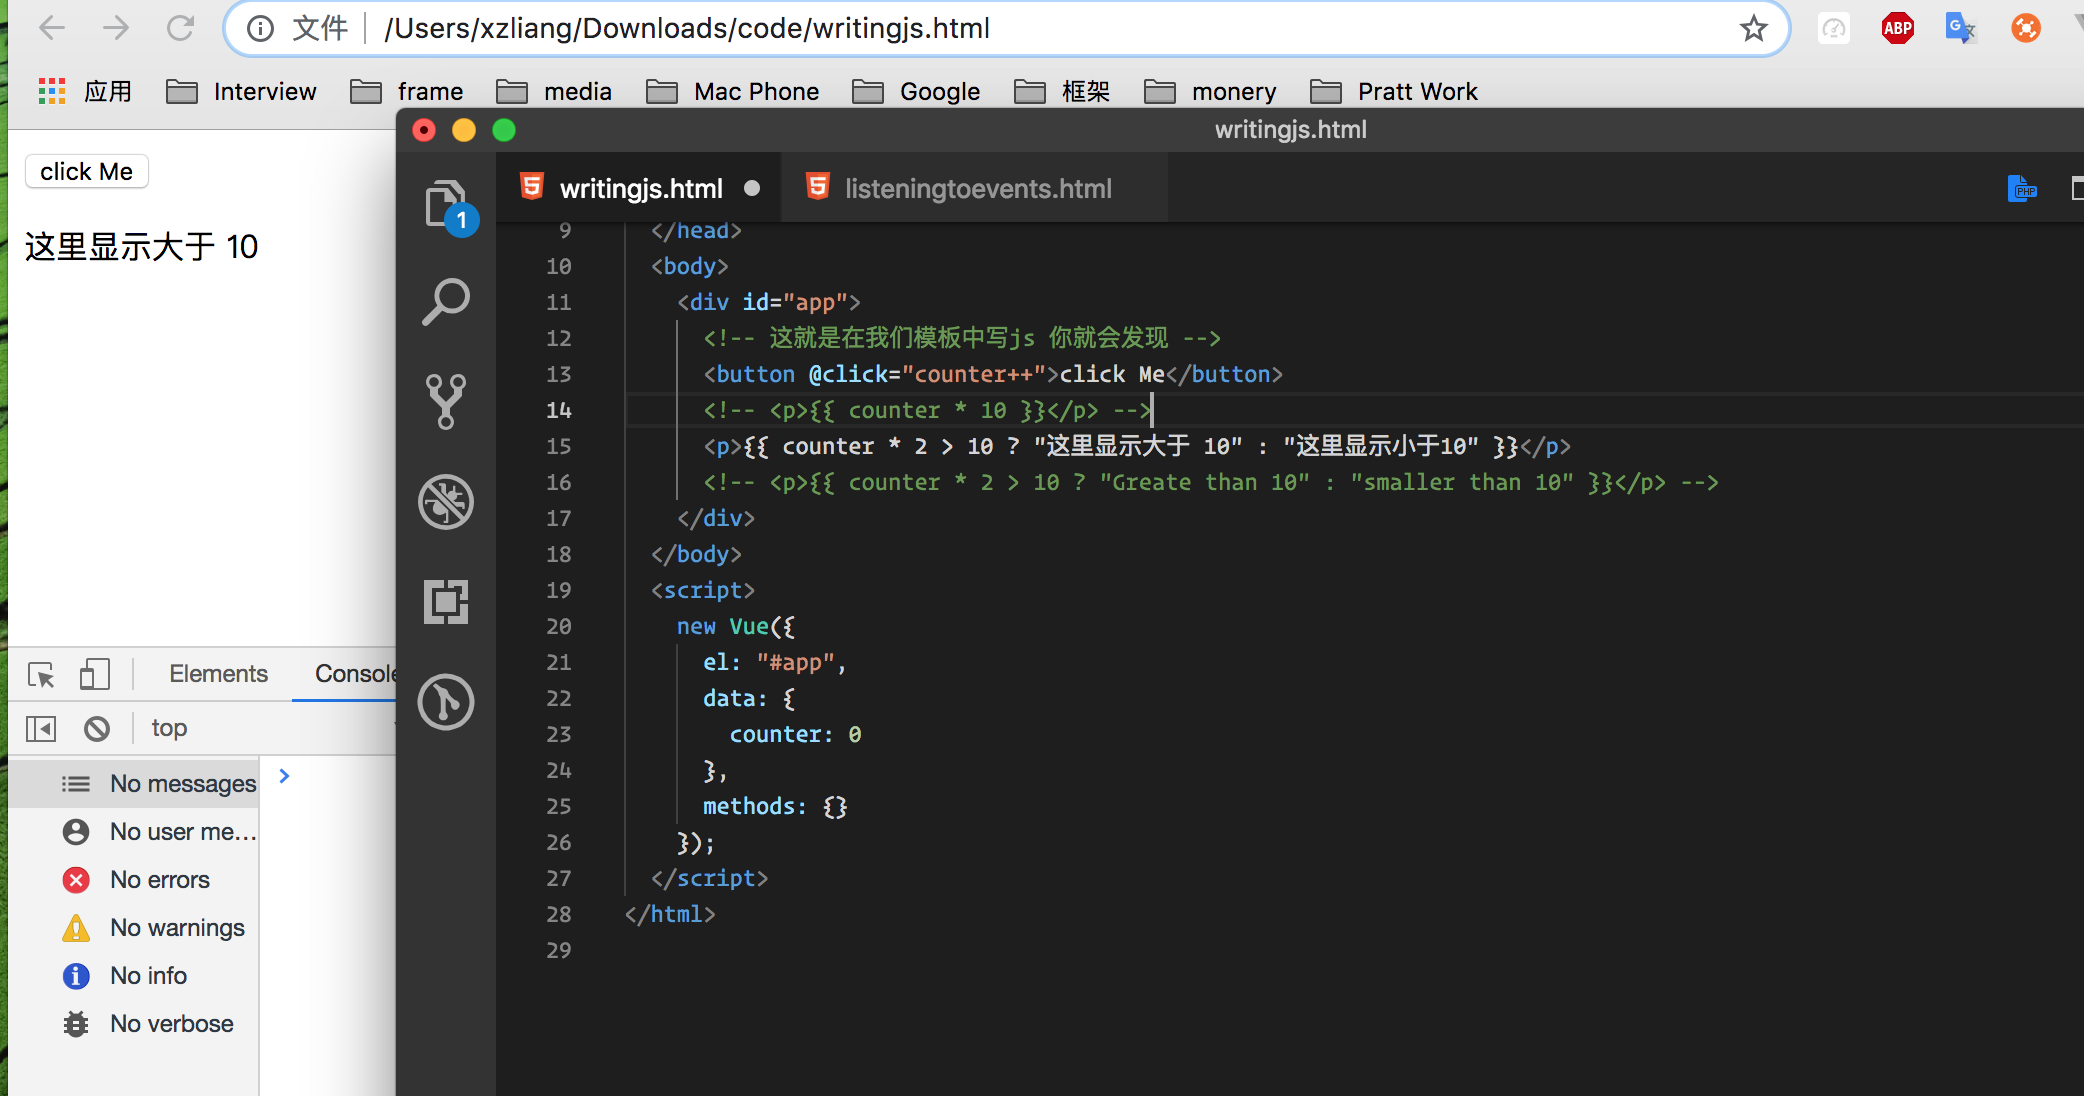
Writing JavaScript Code in the Templates 在模板中编写js 代码
这时候我们在methods 里面没有写任何方法发现也是能使用的
 <div id="app">
      <!-- 这就是在我们模板中写js 你就会发现 -->
      <button @click="counter++">click Me</button>
      <!-- <p>{{ counter * 10 }}</p> -->
      <p>{{ counter * 2 > 10 ? "这里显示大于 10" : "这里显示小于10" }}</p>
      <!-- <p>{{ counter * 2 > 10 ? "Greate than 10" : "smaller than 10" }}</p> -->
    </div>
  </body>
  <script>
    new Vue({
      el: "#app",
      data: {
        counter: 0
      },
      methods: {}
    });
  </script>
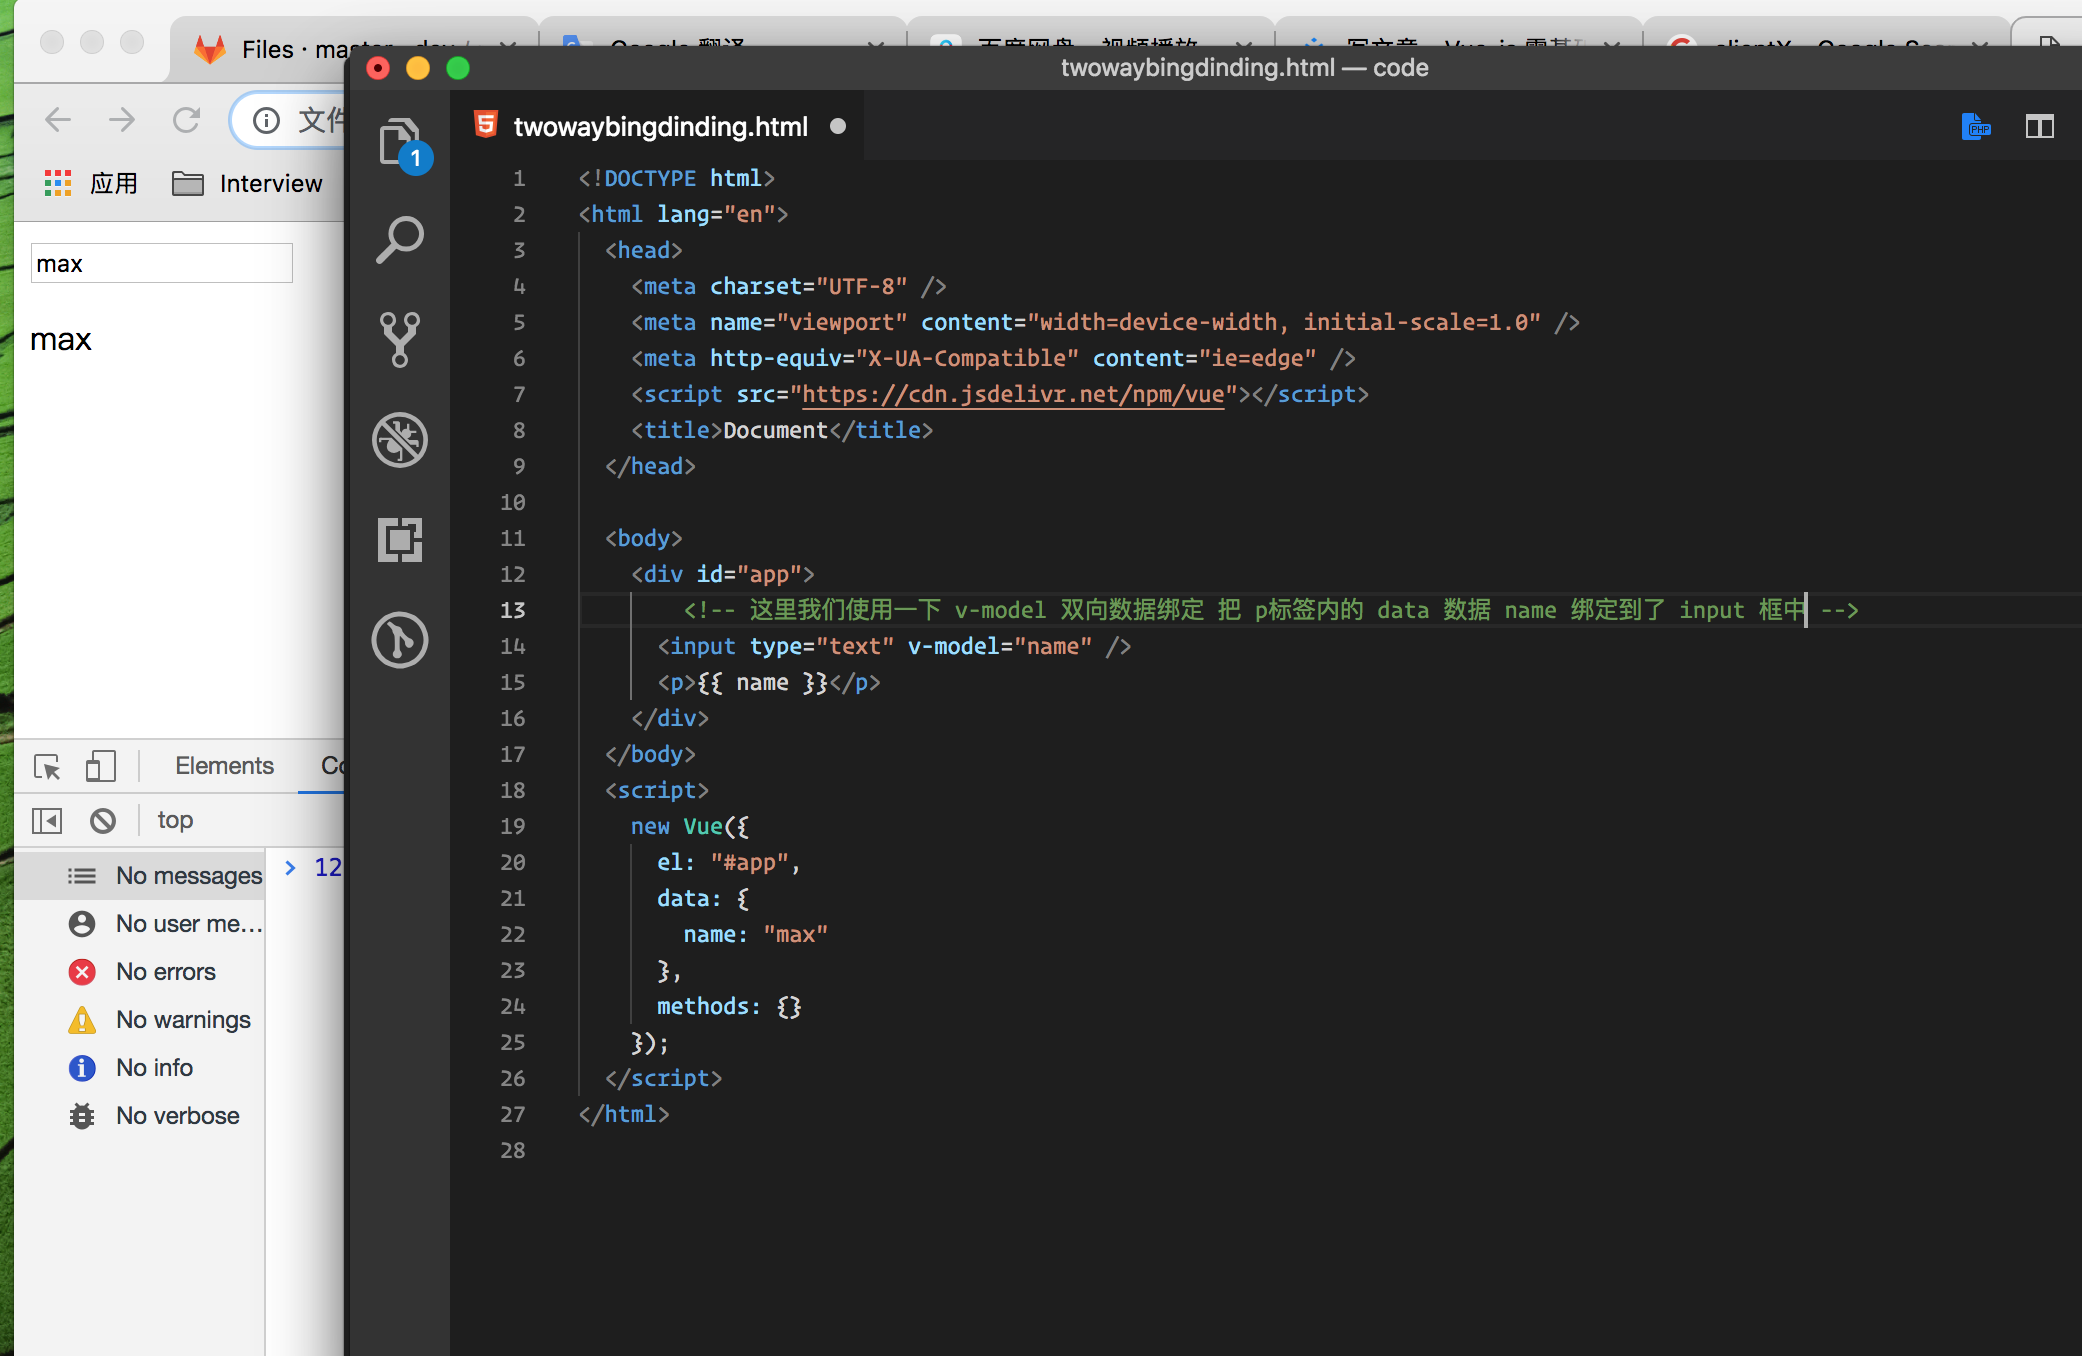
Using Two-Way-Binding 使用双向绑定
之前在最前面使用v-on:input="" 的方法methods 中使用 event 实现过,但是很麻烦,我们现在使用 v-model
<body>
    <div id="app">
        <!-- 这里我们使用一下 v-model 双向数据绑定 把 p标签内的 data 数据 name 绑定到了 input 框中 -->
      <input type="text" v-model="name" />
      <p>{{ name }}</p>
    </div>
  </body>
  <script>
    new Vue({
      el: "#app",
      data: {
        name: "max"
      },
      methods: {}
    });
  </script>
  我们从input 框中拿到 下面标签中的 插值
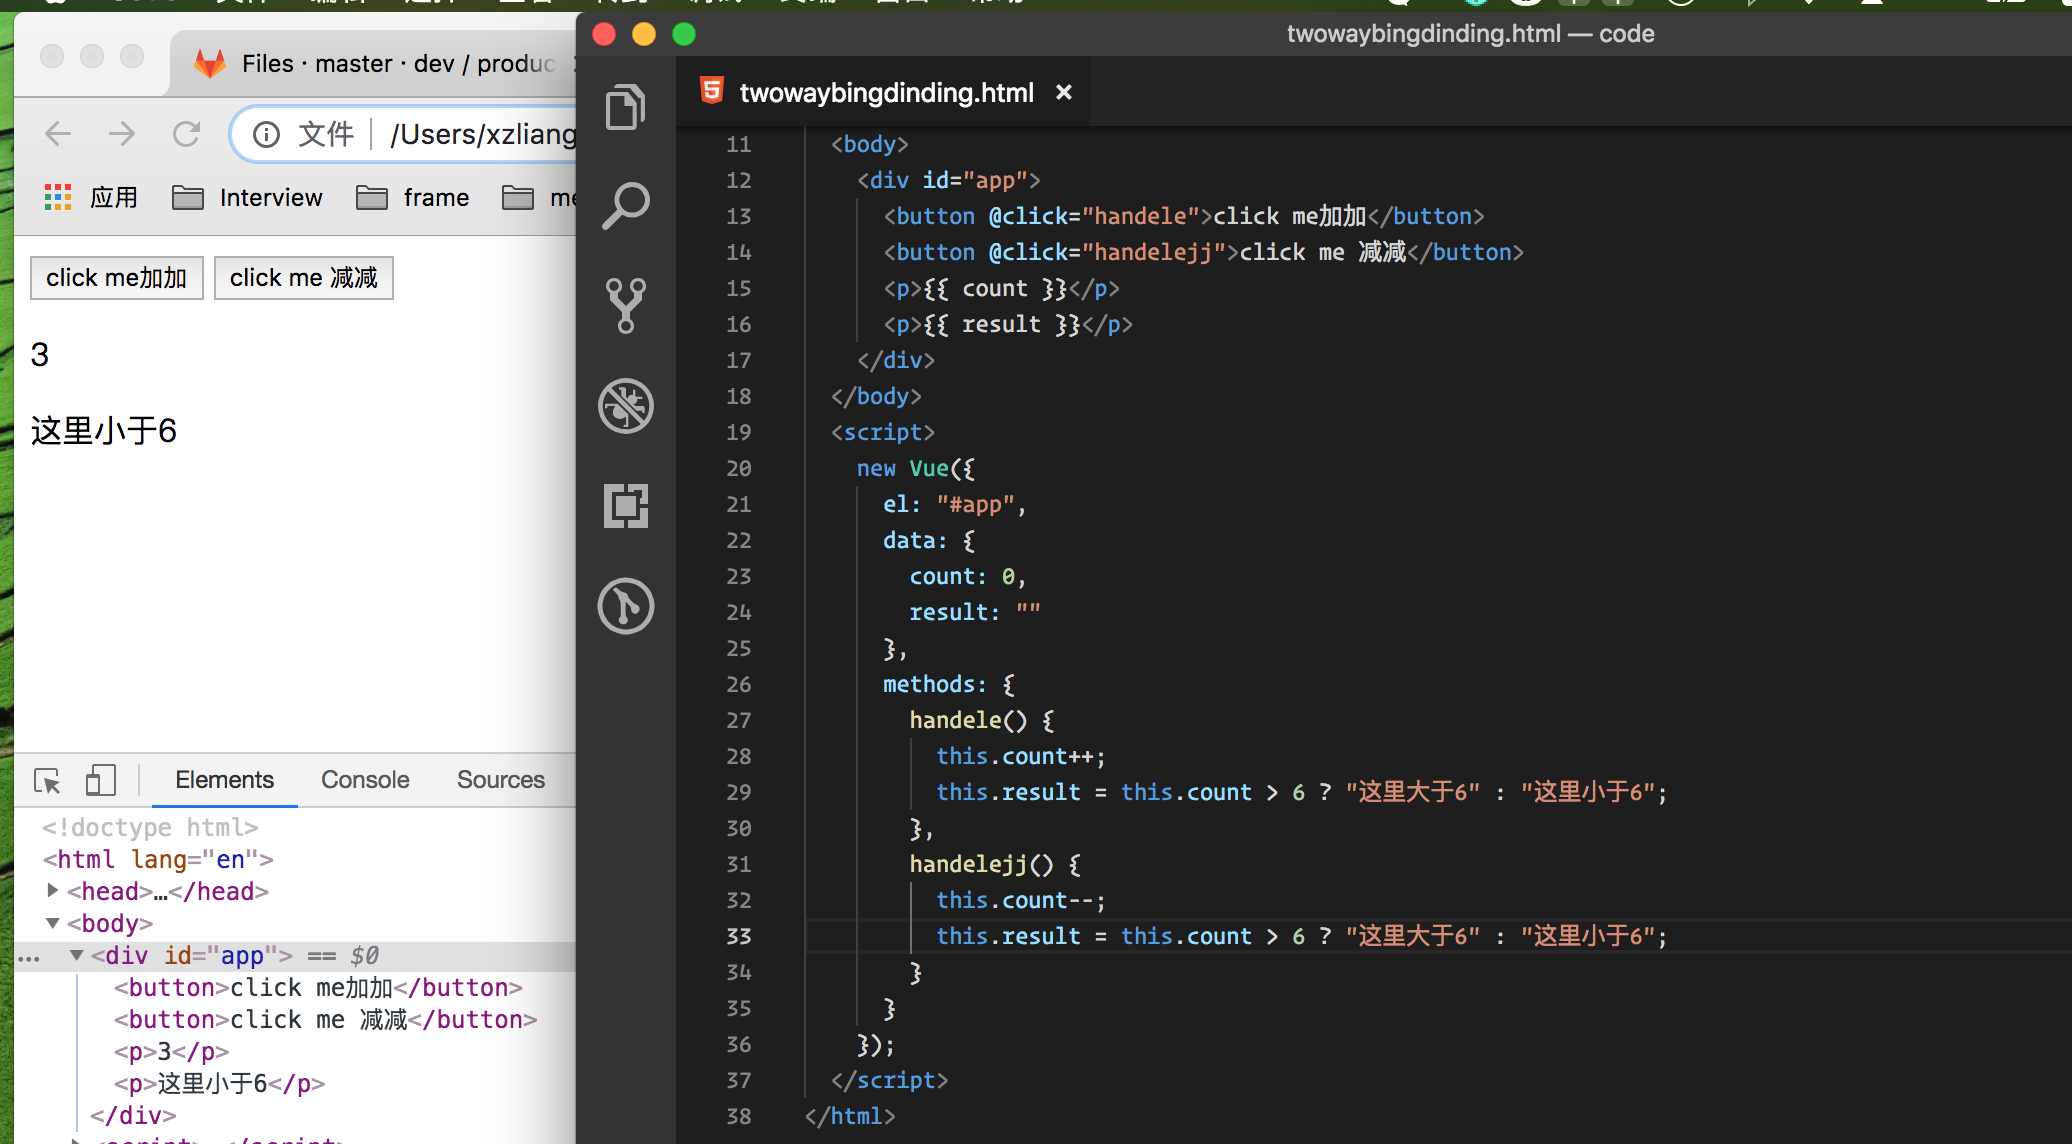
Reacting to Changes with Computed Properties 使用计算属性对更改做出反应
第一种写法 看好了超级麻烦
<body>
    <div id="app">
      <button @click="handele">click me加加</button>
      <button @click="handelejj">click me 减减</button>
      <p>{{ count }}</p>
      <p>{{ result }}</p>
    </div>
  </body>
  <script>
    new Vue({
      el: "#app",
      data: {
        count: 0,
        result: ""
      },
      methods: {
        handele() {
          this.count++;
          this.result = this.count > 6 ? "这里大于6" : "这里小于6";
        },
        handelejj() {
          this.count--;
          this.result = this.count > 6 ? "这里大于6" : "这里小于6";
        }
      }
    });
  </script>
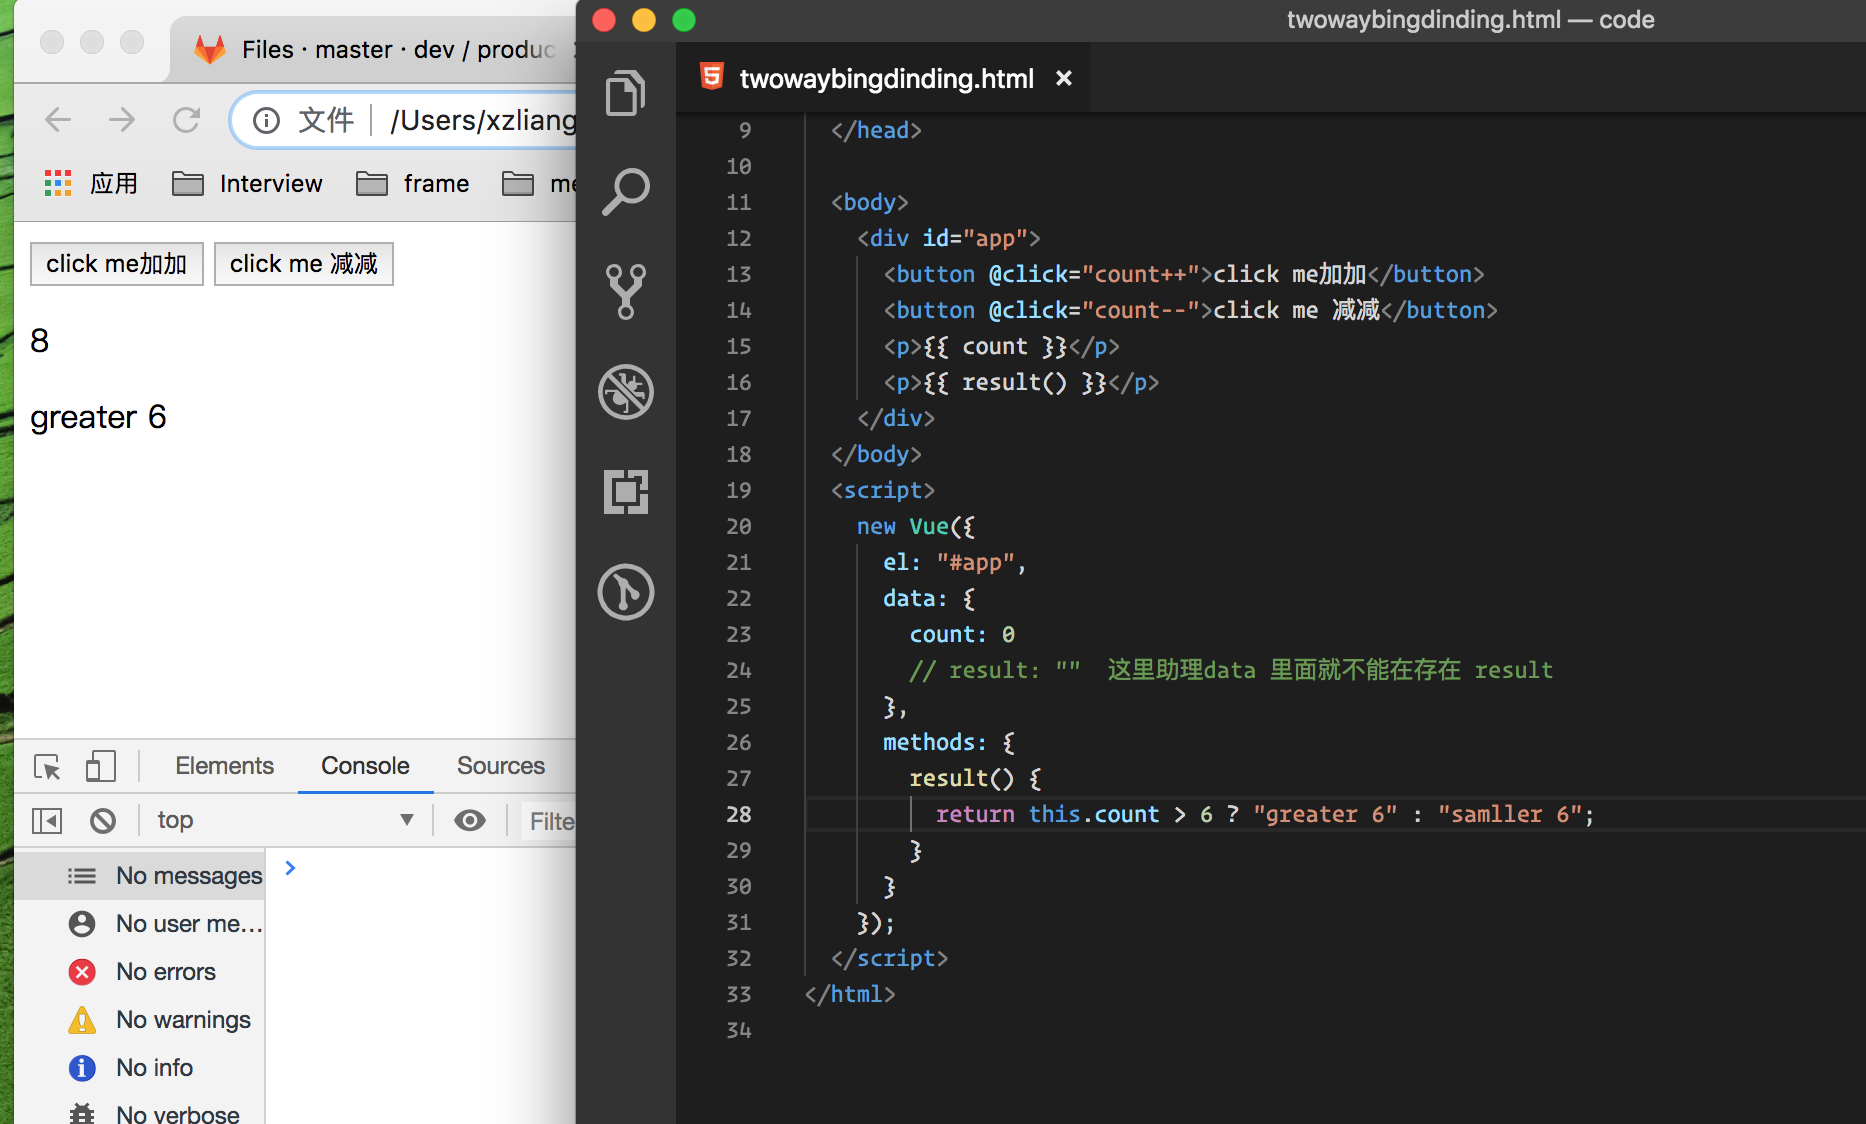
计算属性的第二种写法
<body>
    <div id="app">
    <!--这里我们发现使用的是@click指令进行 p标签内的 加加减减 -->
      <button @click="count++">click me加加</button>
      <button @click="count--">click me 减减</button>
      <p>{{ count }}</p>
      <p>{{ result() }}</p>
    </div>
  </body>
  <script>
    new Vue({
      el: "#app",
      data: {
        count: 0
        // result: ""  这里注意data 里面就不能在存在 result
      },
      methods: {
        result() {
          return this.count > 6 ? "greater 6" : "samller 6";
        }
      }
    });
  </script>
计算属性

<body>
    <div id="app">
      <button @click="count++">click me加加</button>
      <button @click="count--">click me 减减</button>
      <button @click="secondCounter++">seconde me加加</button>
      <p>{{ count }} | {{ secondCounter }}</p>
      <p>{{ result() }} | {{ output }}</p>
    </div>
  </body>
  <script>
    new Vue({
      el: "#app",
      data: {
        count: 0,
        secondCounter: 0
      },
      computed: {
        output() {
          console.log("computed");
          return this.count > 6 ? "greater 6" : "samller 6";
        }
      },
      methods: {
        result() {
          console.log("methods");
          return this.count > 6 ? "greater 6" : "samller 6";
        }
      }
    });
  </script>

  这里可以通过在console.log看到里面打印出来的属性不同
计算属性一个里面展示不同
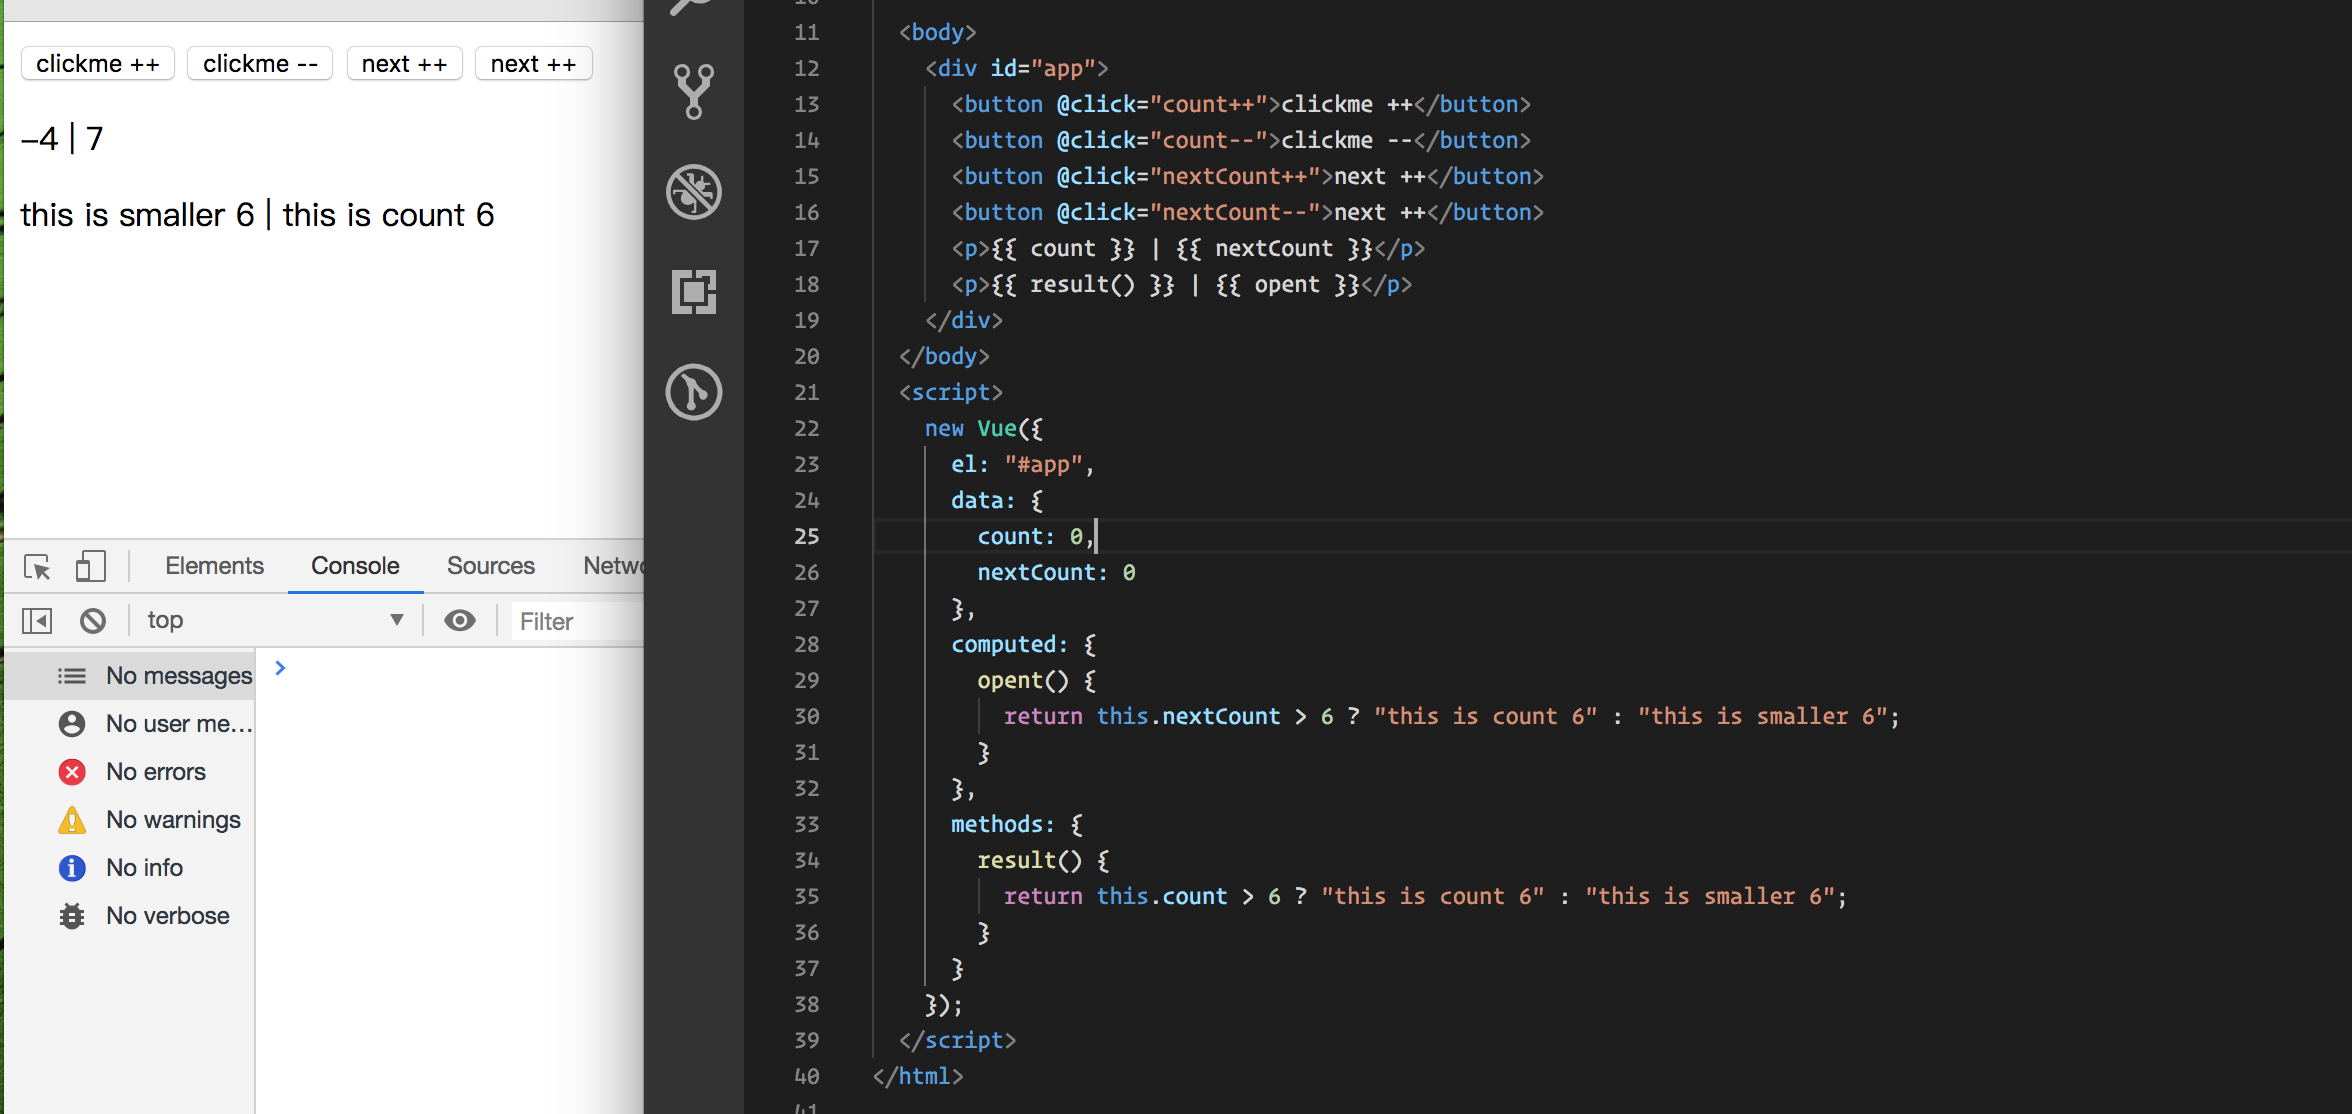
<body>
    <div id="app">
      <button @click="count++">clickme ++</button>
      <button @click="count--">clickme --</button>
      <button @click="nextCount++">next ++</button>
      <button @click="nextCount--">next ++</button>
      <p>{{ count }} | {{ nextCount }}</p>
      <p>{{ result() }} | {{ opent }}</p>
    </div>
  </body>
  <script>
    new Vue({
      el: "#app",
      data: {
        count: 0,
        nextCount: 0
      },
      computed: {
        opent() {
          return this.nextCount > 6 ? "this is count 6" : "this is smaller 6";
        }
      },
      methods: {
        result() {
          return this.count > 6 ? "this is count 6" : "this is smaller 6";
        }
      }
    });
  </script>
An Alternative to Computed Properties Watching for Changes 计算属性的替代方案,观察变化使用 watch
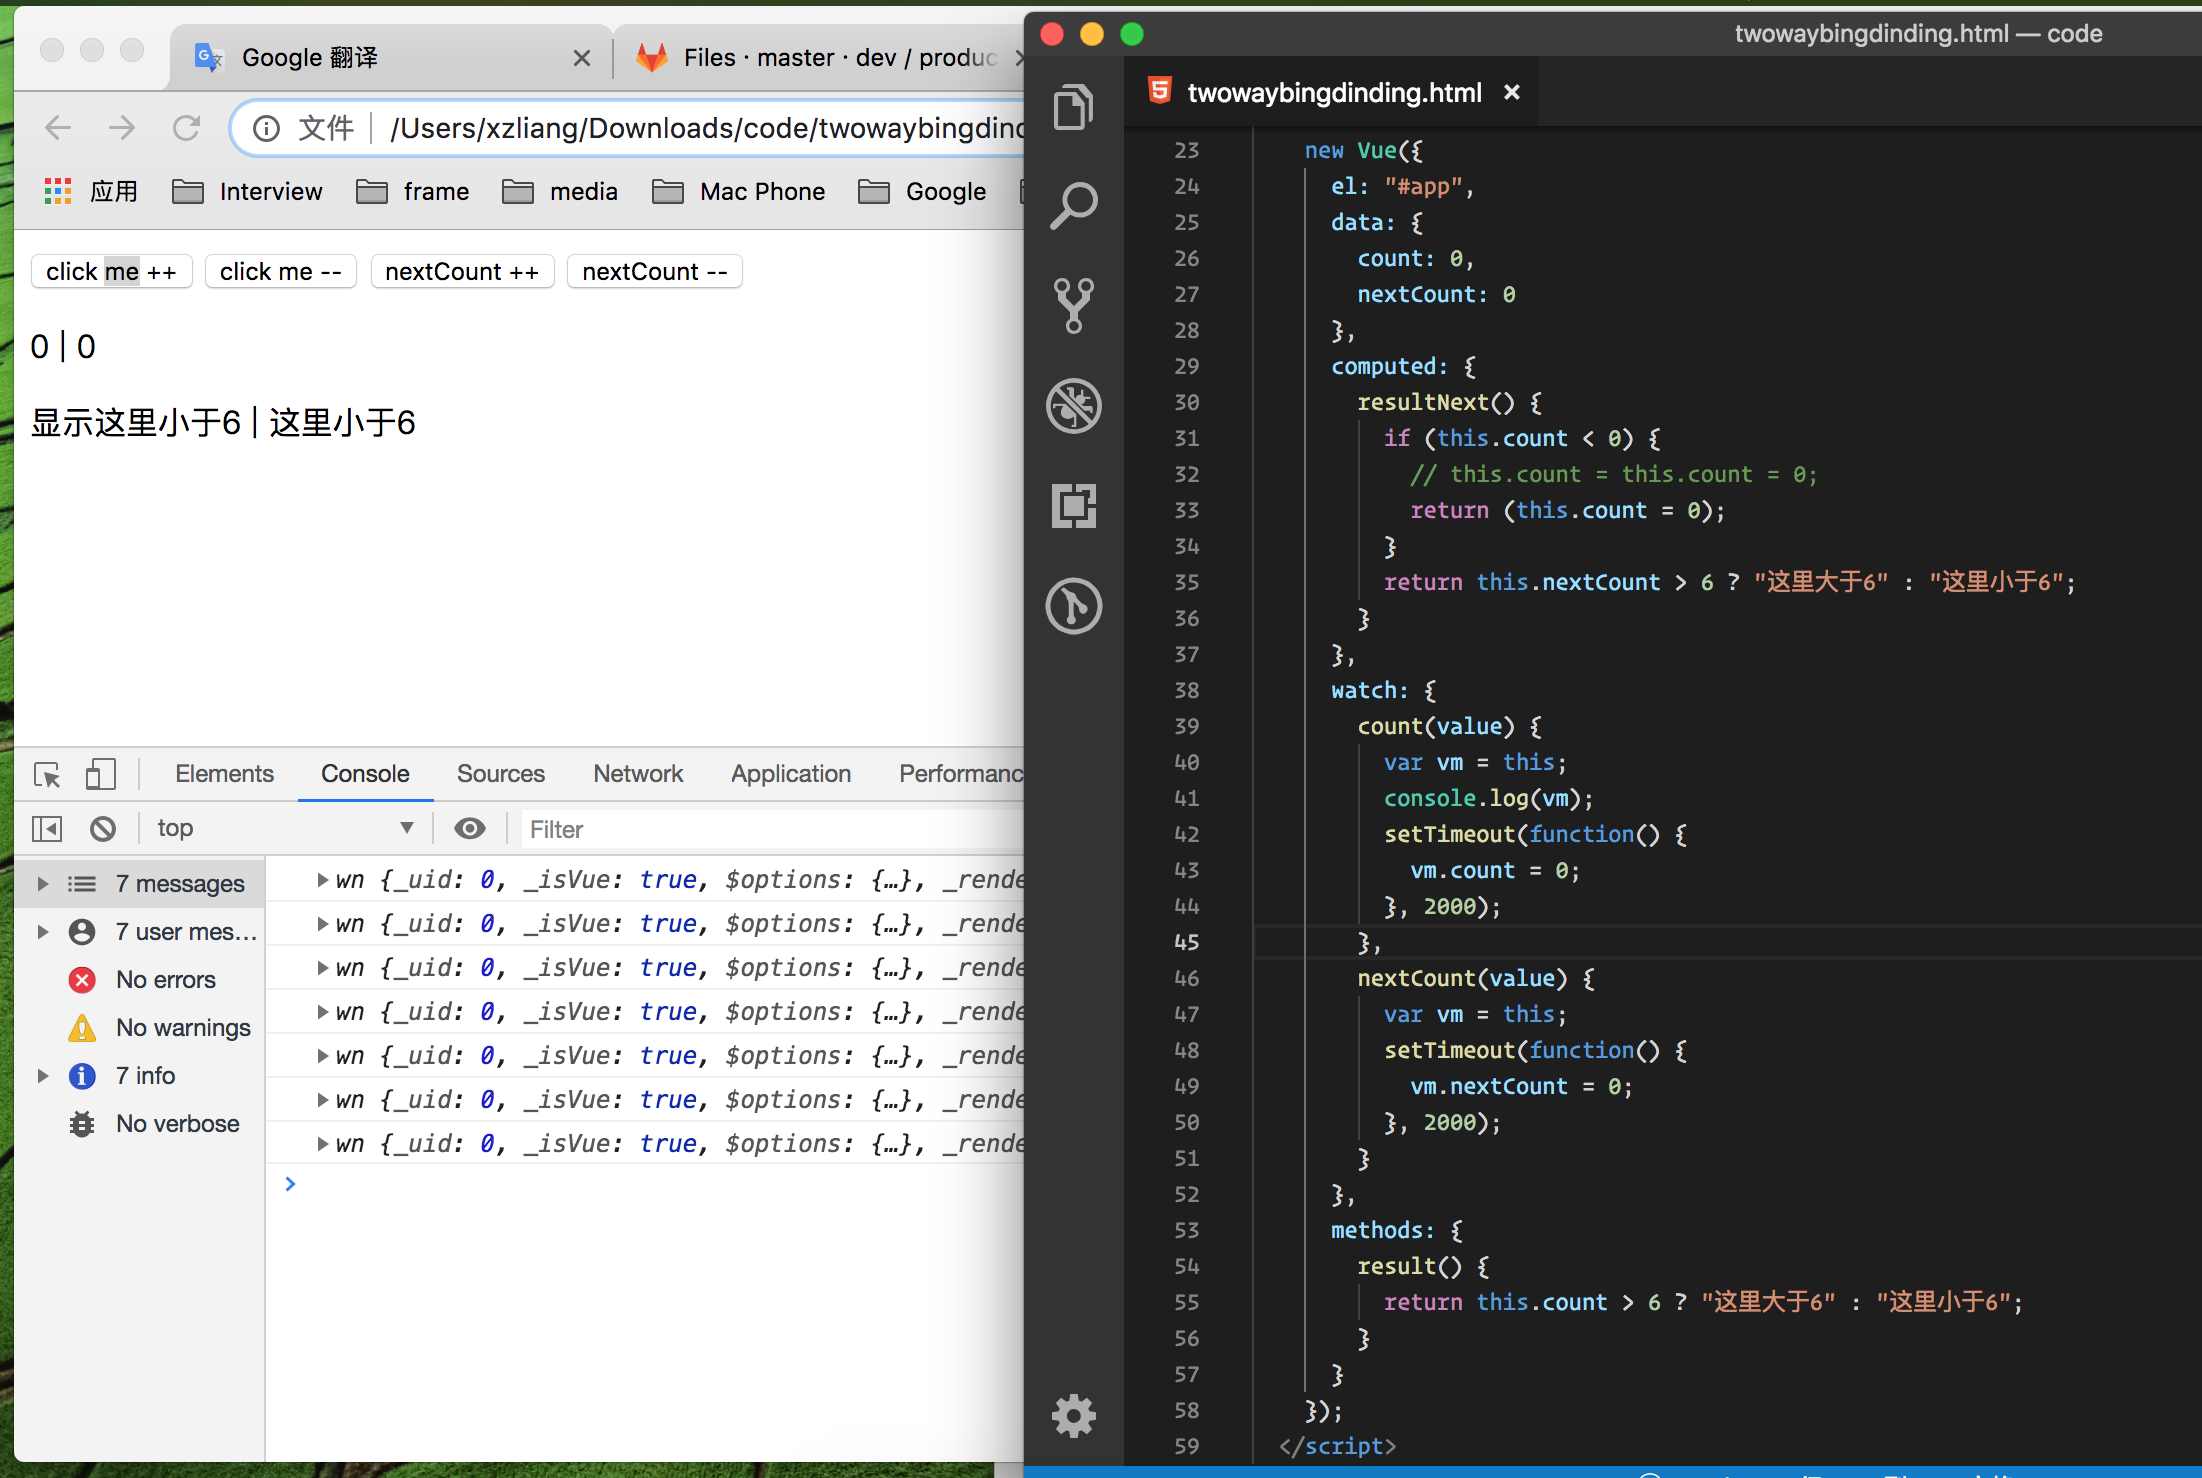
      computed: {
        resultNext() {
          if (this.count < 0) {
            // this.count = this.count = 0;
            return (this.count = 0);
          }
          return this.nextCount > 6 ? "这里大于6" : "这里小于6";
        }
      },
      watch: {
       watch监控数据使用 count data的数据value的值的变化,
        count(value) {
        然后把 this 指向 声明的var vm 我们这时候答应出vm发现
          var vm = this;
          发现是window的对象
          console.log(vm);
          然后使用 setTimeout 定时器进行 vm.count 清除变0
          setTimeout(function() {
            vm.count = 0;
          }, 2000);
        },
        nextCount(value) {
          var vm = this;
          setTimeout(function() {
            vm.nextCount = 0;
          }, 2000);
        }
      },
这里主要是在 computed 里面 增加了一个判断判断count小于0 的时候怎么办,两种写法都可以成功

主要:然后在watch 监控里面写了一个定时器,监控页面变化然后在两秒后回复原状。
简写形式咱们用过了这里就一带而过了
v-on:click="" 简写@click=""
v-bind:href=""  简写:href=""
Dynamic Styling with CSS Classes - Basics 使用CSS类的动态样式 - 基础知识
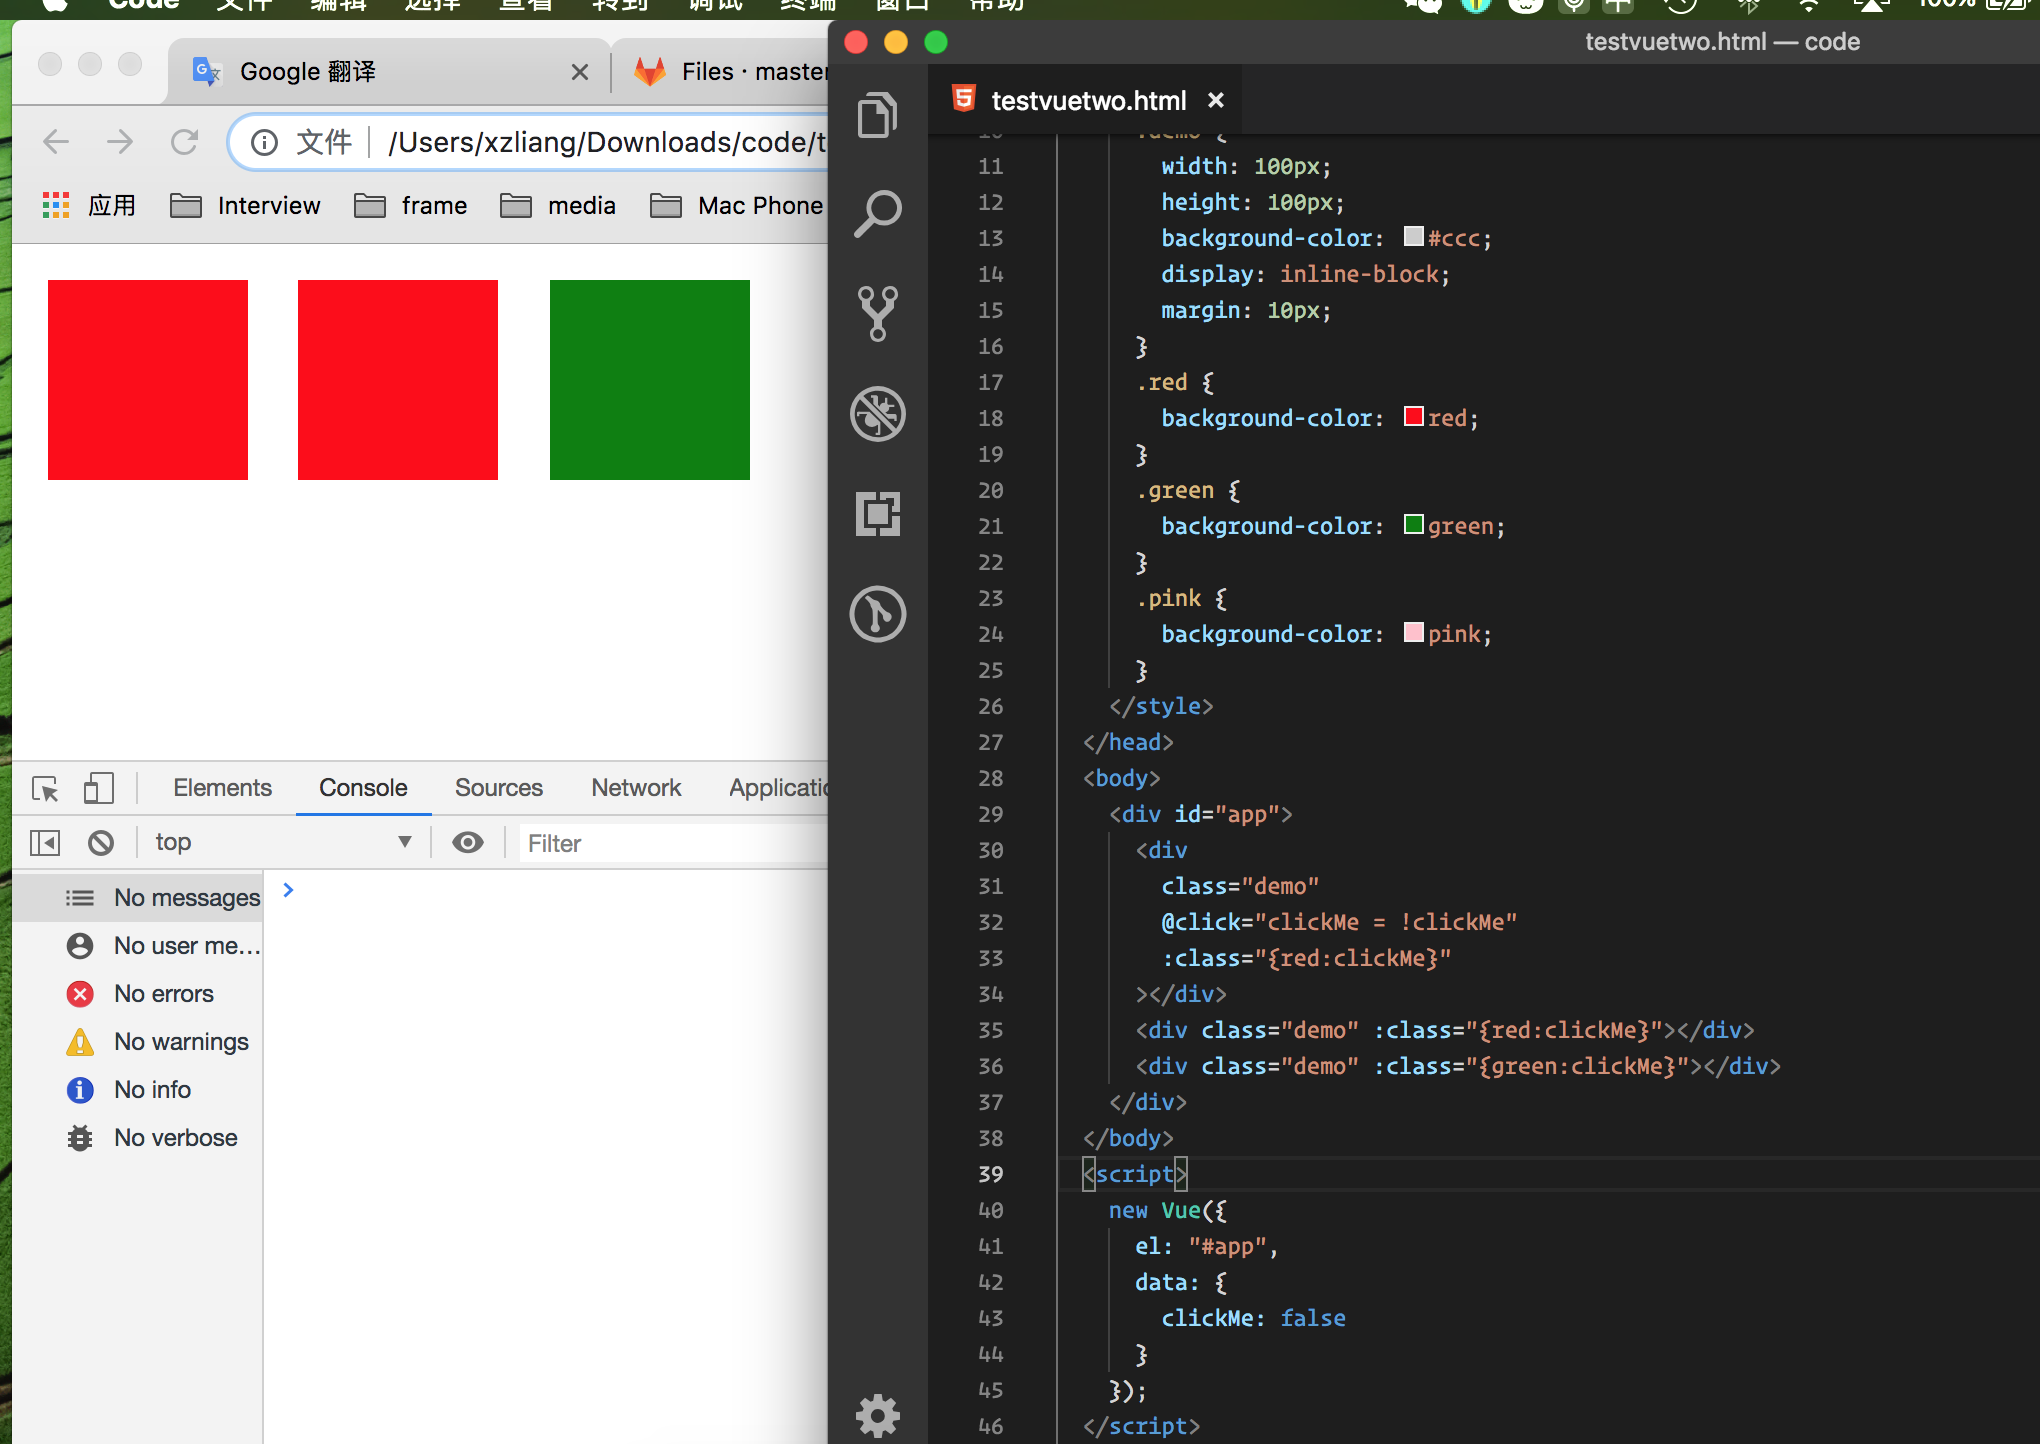
 <div id="app">
      <div
        class="demo"
        @click="clickMe = !clickMe"
        :class="{red:clickMe}"
      ></div>
      <div class="demo" :class="{red:clickMe}"></div>
      <div class="demo" :class="{green:clickMe}"></div>
    </div>
  </body>
  <script>
    new Vue({
      el: "#app",
      data: {
        clickMe: false
      }
    });
  </script>

这段代码详解:DOM里面有三个div 然后 给其中一个注册一个点击事件,@click给他一个事件,然后进行取反
在data数据中我们给@click这个事件 一个false 然后 使用v-bind简写 形式进行一个class类的样式绑定 :class="{red:clickMe}"这里我们发现绑定的样式是一个字符串里面加一个对象然后,在这个对象里面 前面是 css 样式 后面是 属性名以后我们自己用的时候也这么绑定即可。
Dynamic Styling with CSS Classes - Using Objects 使用CSS类动态样式 - 使用对象
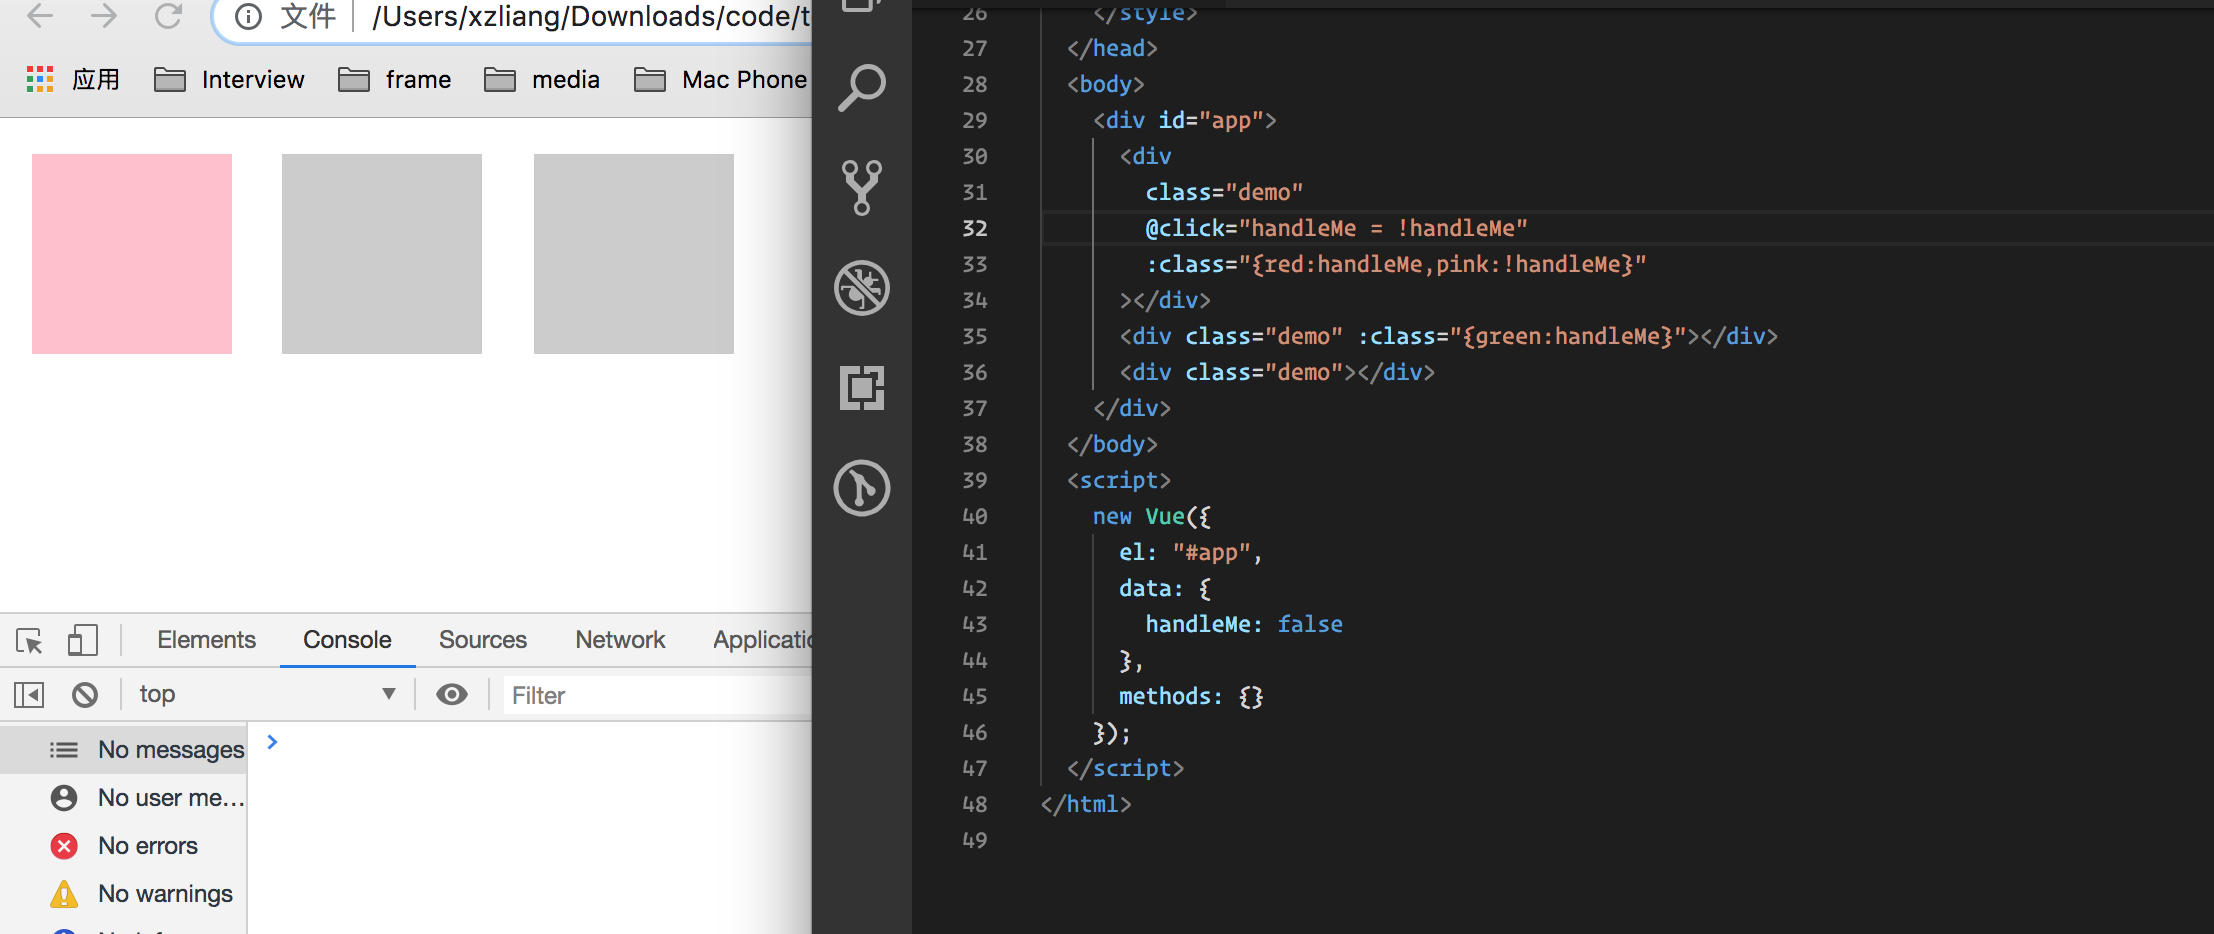
 <body>
    <div id="app">
      <div
        class="demo"
        @click="handleMe = !handleMe"
        :class="{red:handleMe,pink:!handleMe}"
      ></div>
      <div class="demo" :class="{green:handleMe}"></div>
      <div class="demo"></div>
    </div>
  </body>
  <script>
    new Vue({
      el: "#app",
      data: {
        handleMe: false
      },
      methods: {}
    });
  </script>
这里我们在模板中 v-bind:class:"{}"这里我们取反给了一个数据然后呈现粉色,
下面我们在js 中使用一下看一下
计算属性computed 控制颜色
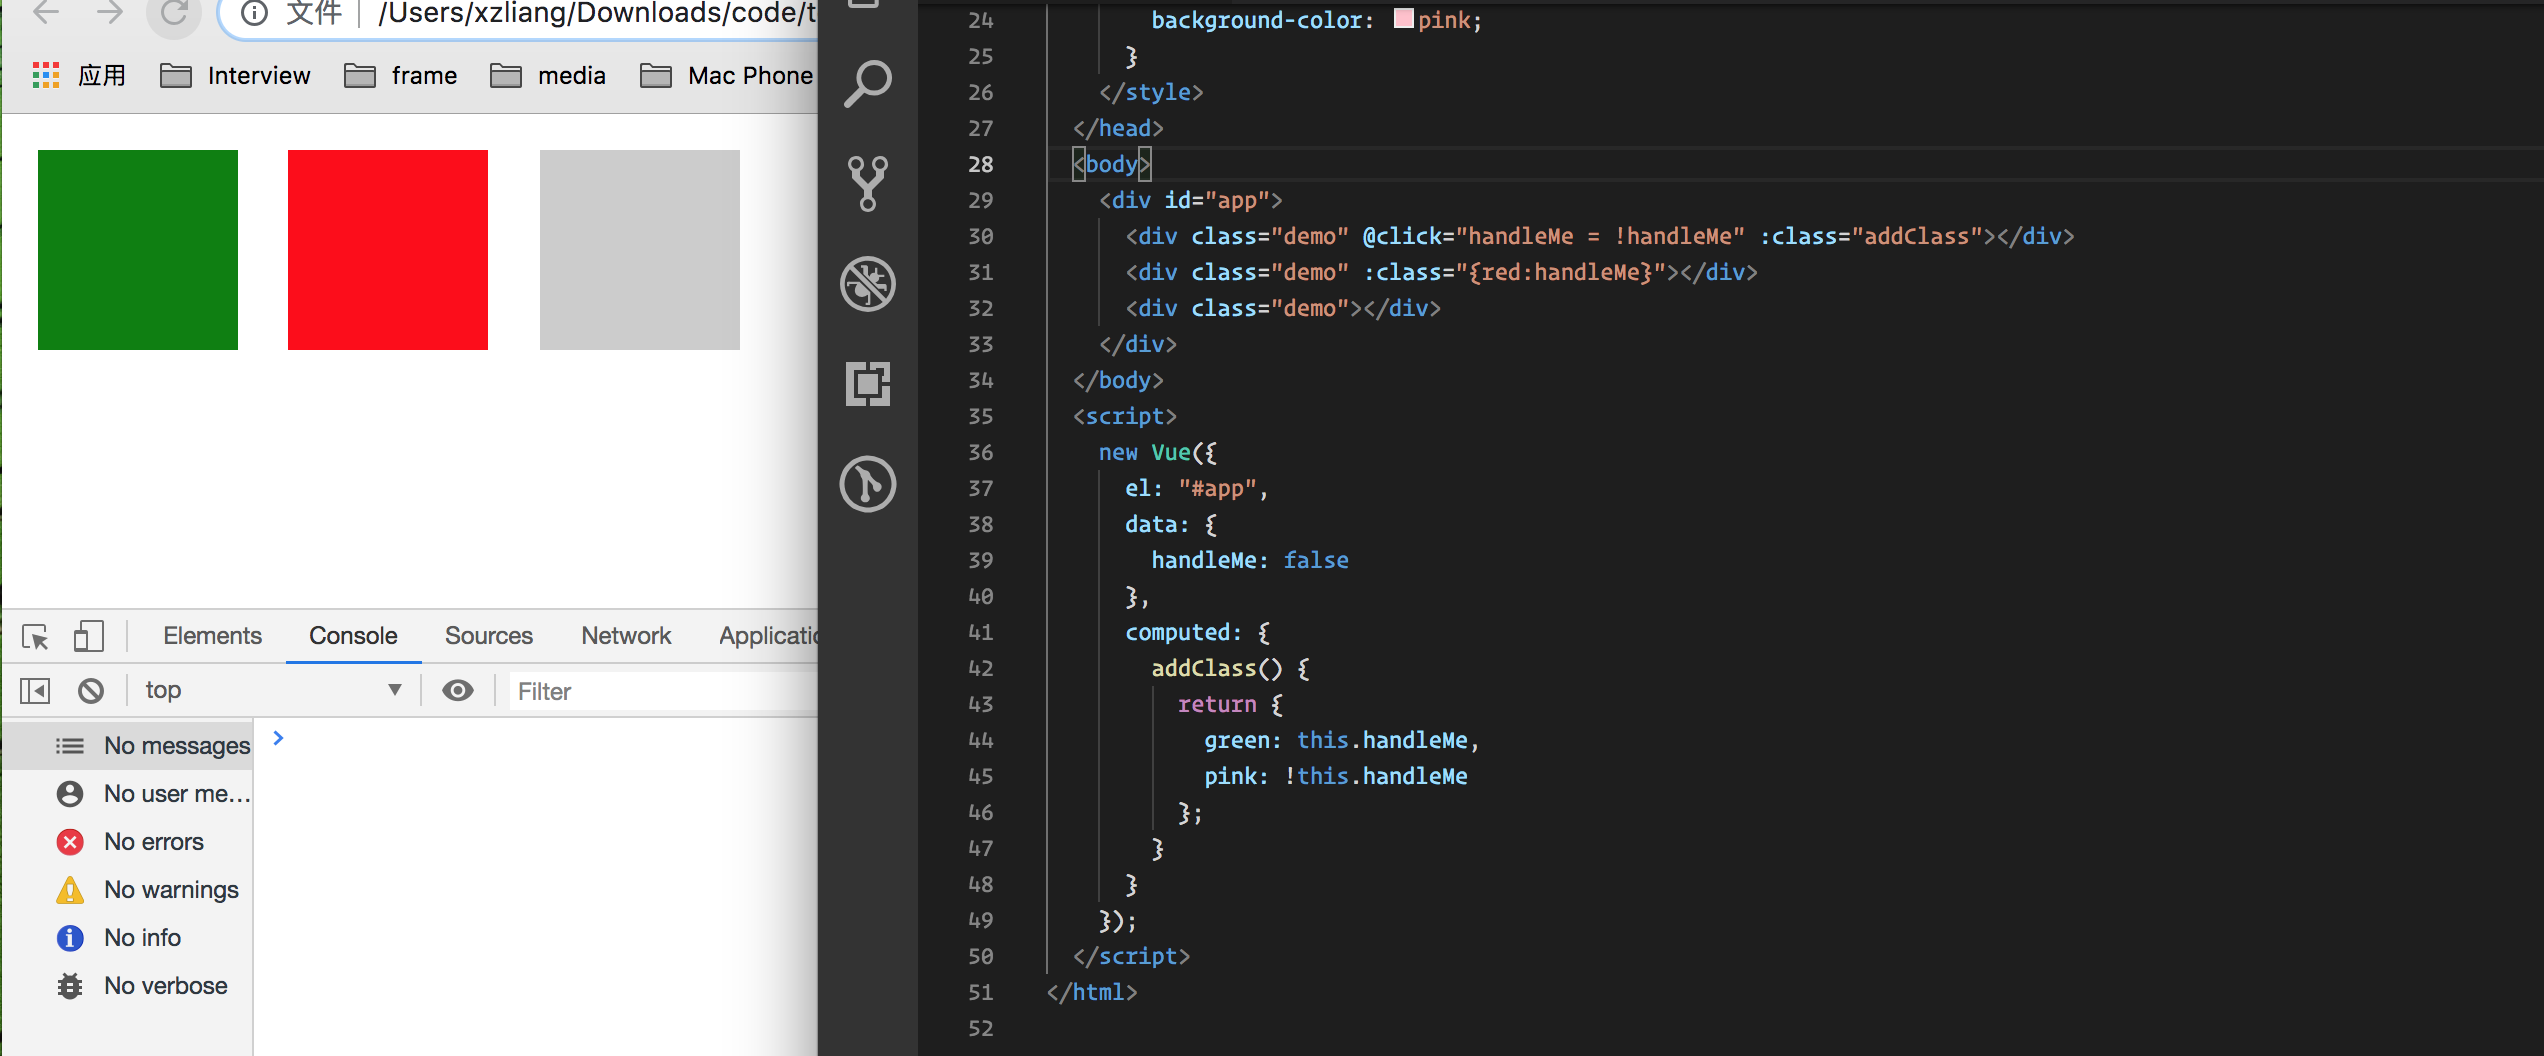
 <body>
    <div id="app">
      <div class="demo" @click="handleMe = !handleMe" :class="addClass"></div>
      <div class="demo" :class="{red:handleMe}"></div>
      <div class="demo"></div>
    </div>
  </body>
  <script>
    new Vue({
      el: "#app",
      data: {
        handleMe: false
      },
      computed: {
        addClass() {
          return {
            green: this.handleMe,
            pink: !this.handleMe
          };
        }
      }
    });
  </script>
Dynamic Styling with CSS Classes - Using Names 使用css 类样式动态使用名称
使用v-model 控制样式
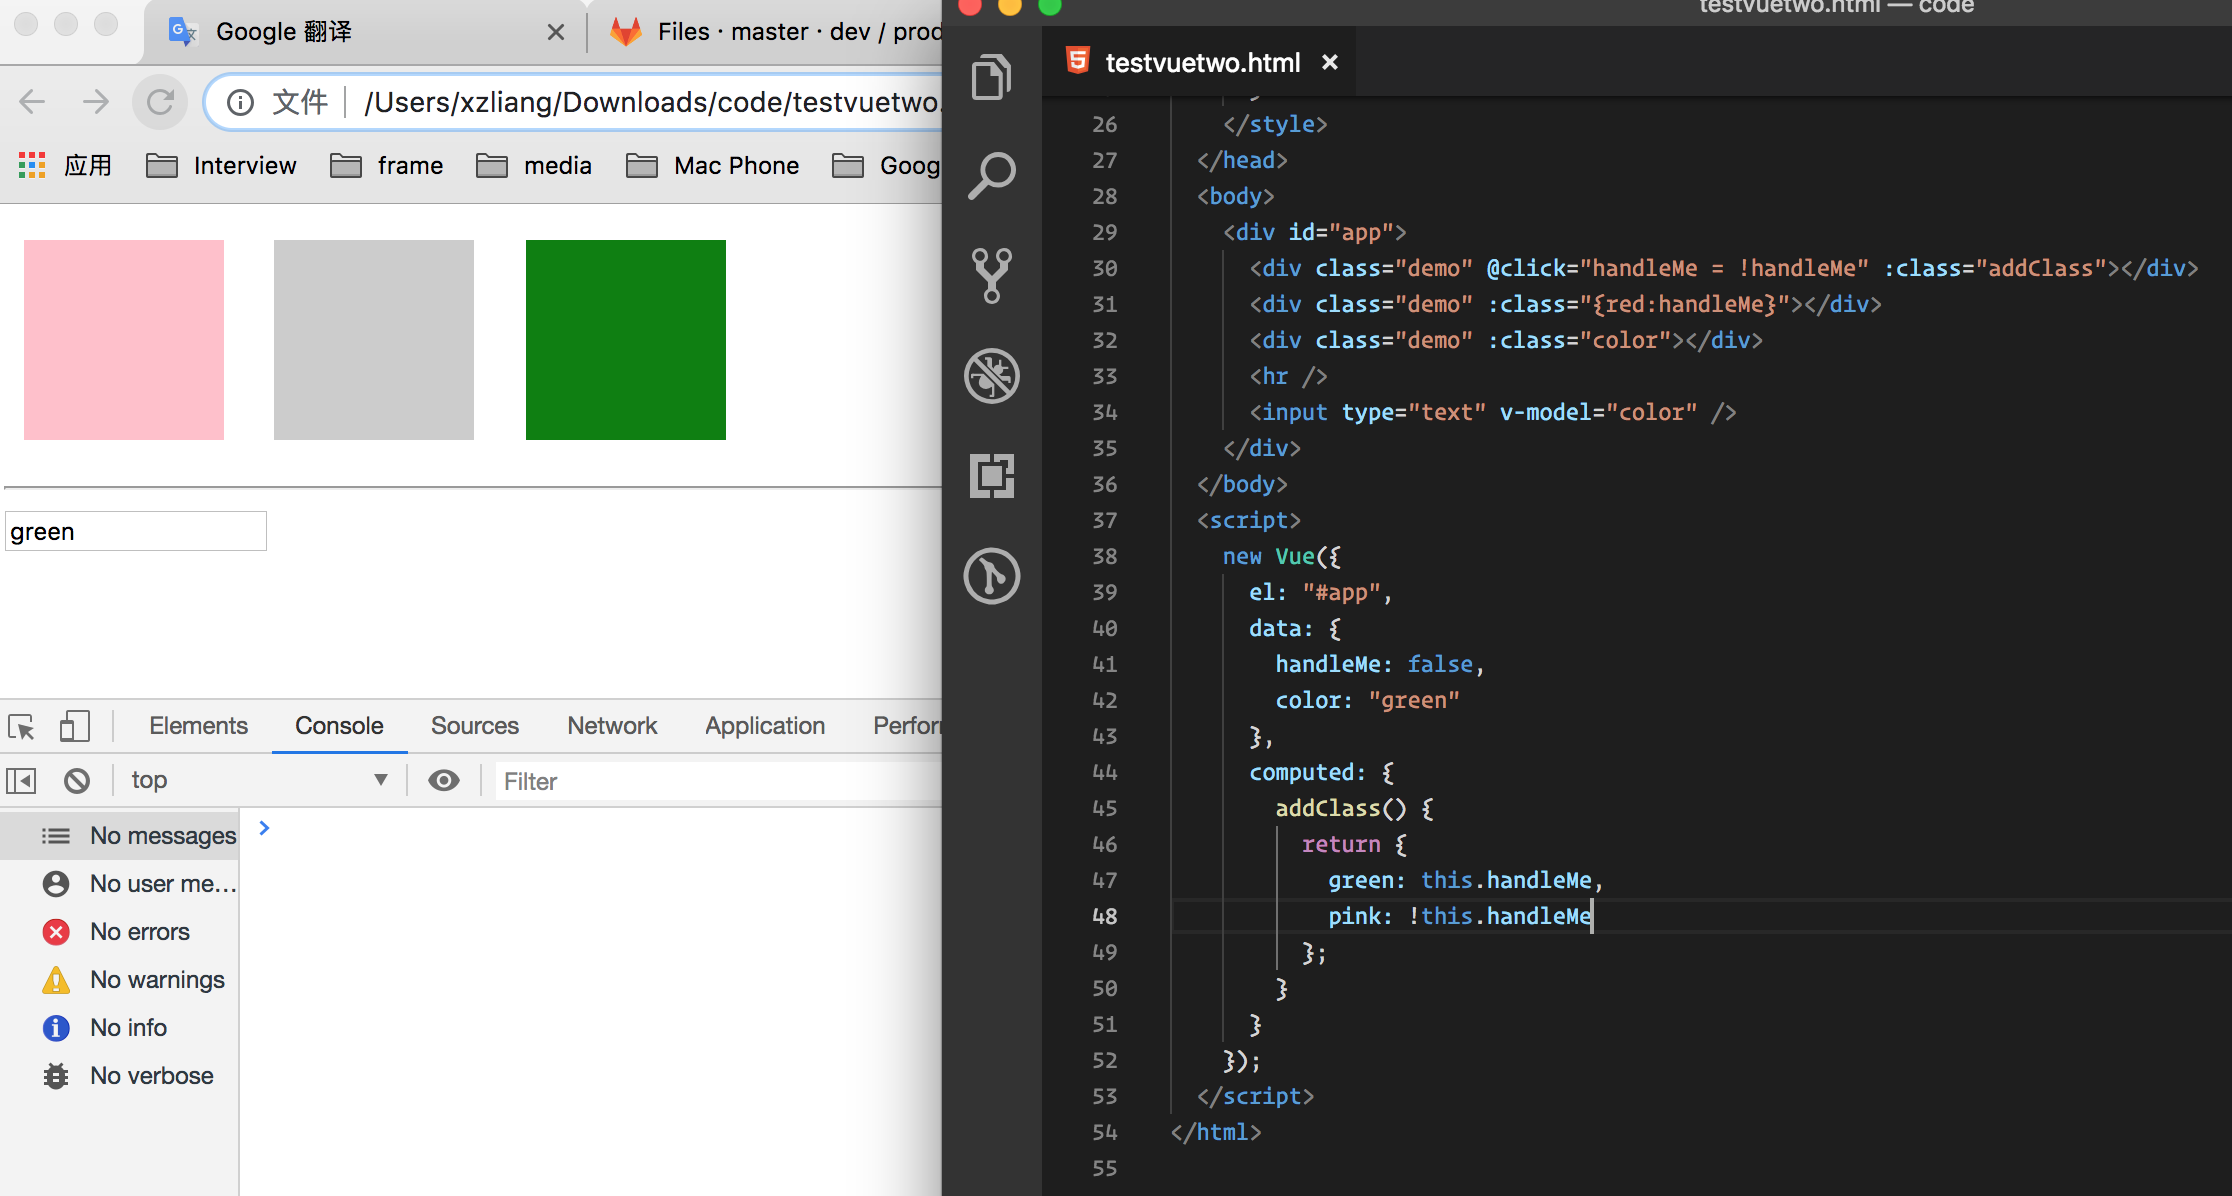
<body>
    <div id="app">
      <div class="demo" @click="handleMe = !handleMe" :class="addClass"></div>
      <div class="demo" :class="{red:handleMe}"></div>
      <div class="demo" :class="color"></div>
      <hr />
      <input type="text" v-model="color" />
    </div>
  </body>
  <script>
    new Vue({
      el: "#app",
      data: {
        handleMe: false,
        color: "green"
      },
      computed: {
        addClass() {
          return {
            green: this.handleMe,
            pink: !this.handleMe
          };
        }
      }
    });
  </script>
 这里我们给data 中给一个color 数据 然后在 DOM 中给input中 v-model=""传入color 然后把传入的color 给绑定到 上面的div 中v-bind:class里面然后进行控制


 这里我们尝试一下 把绑定样式的color 这么写 会变成上面样子

 <div class="demo" :class="[color,{red:handleMe}]"></div>
Setting Styles Dynamically without CSS Classes 动态设置样式 而不 使用css样式
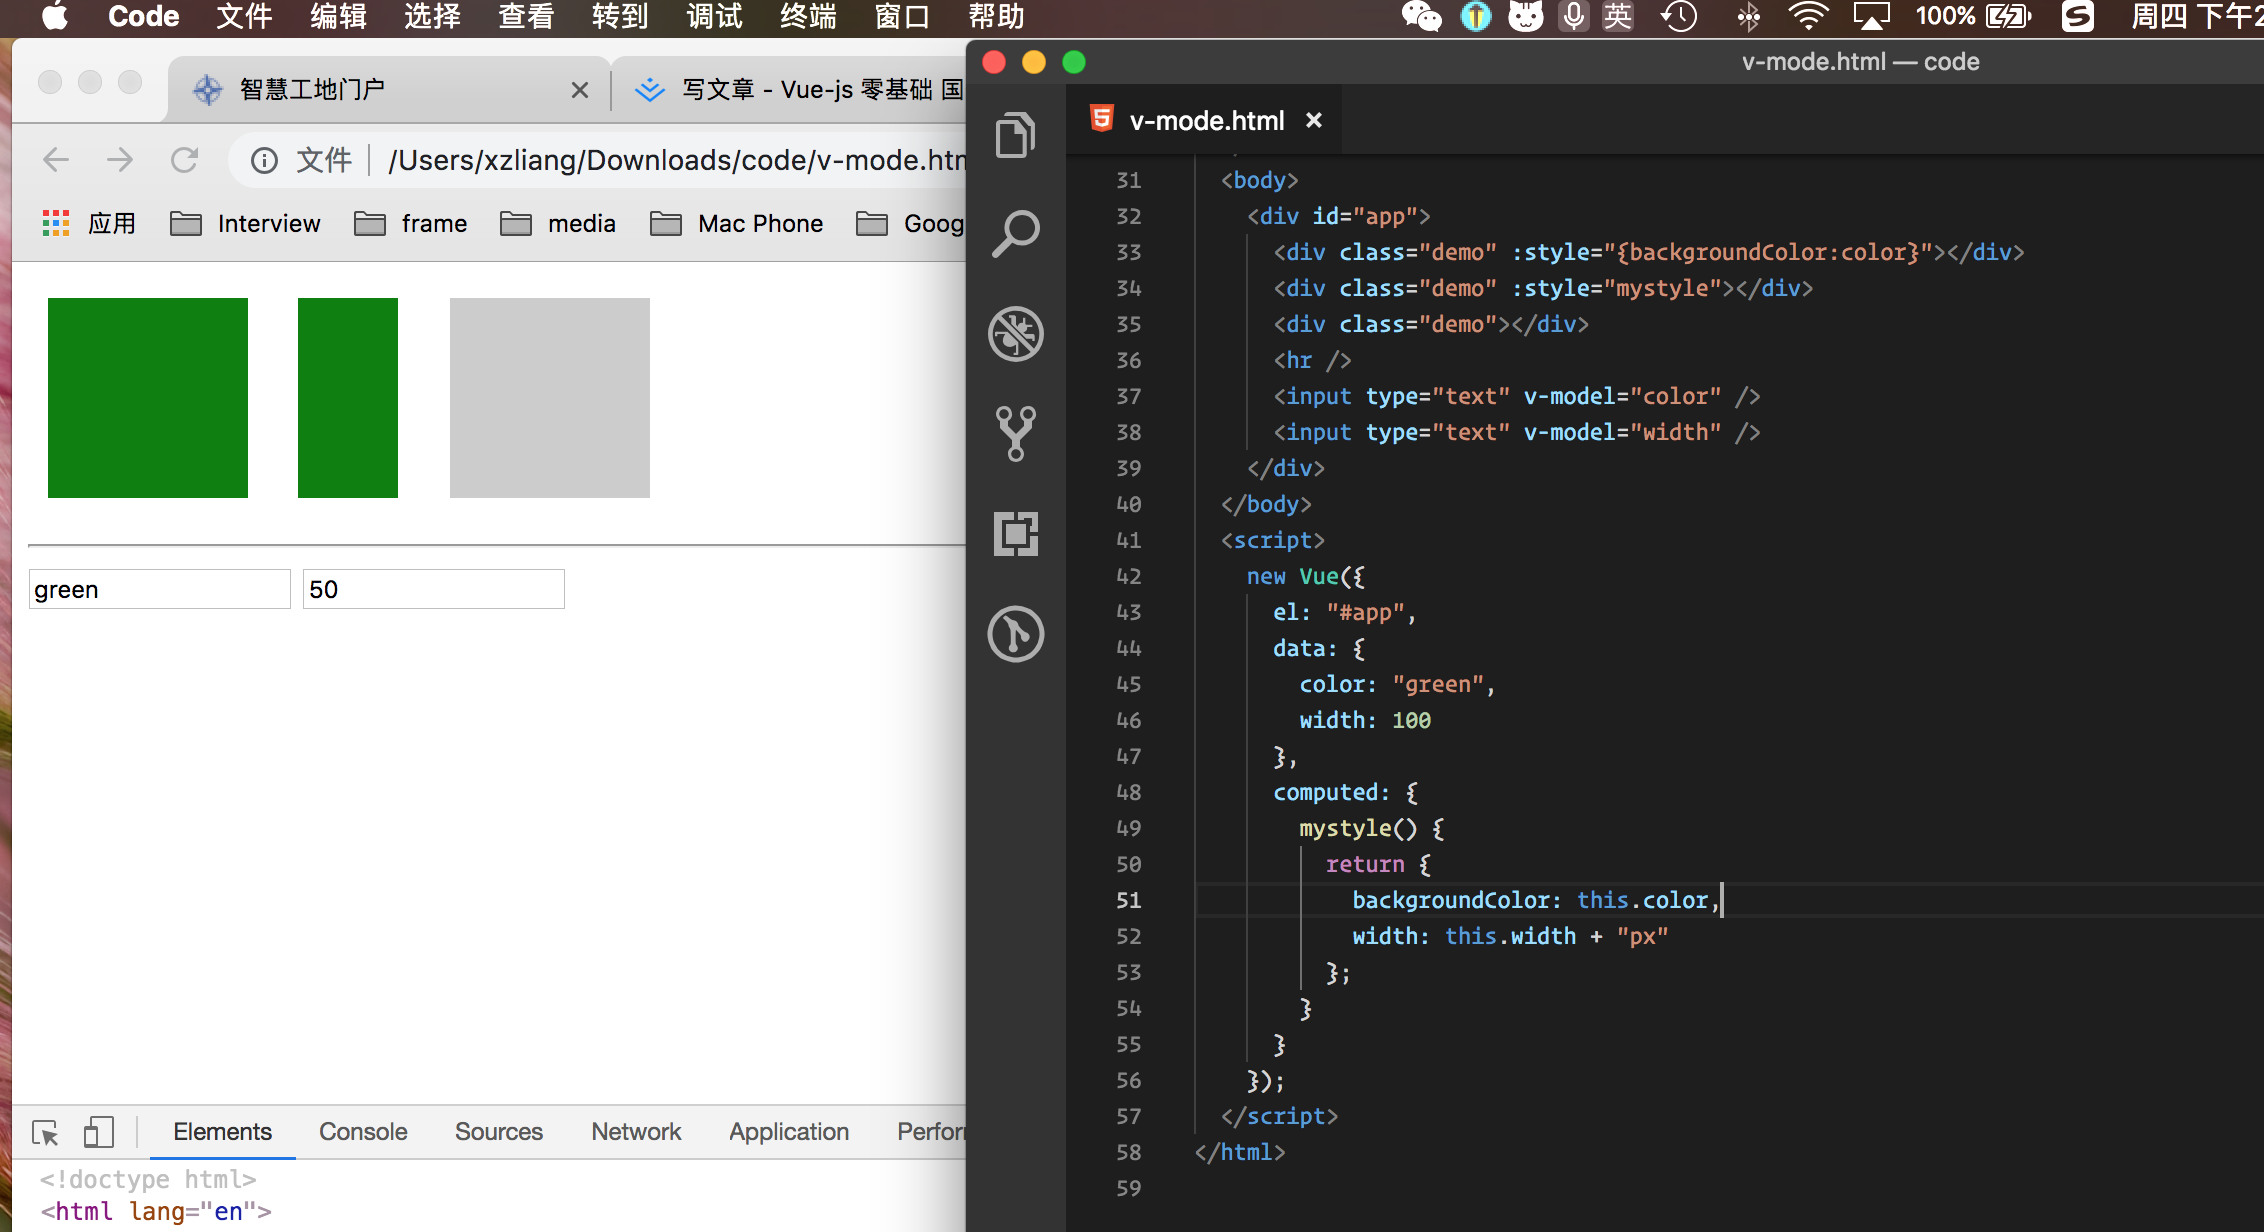
<body>
    <div id="app">
      <div class="demo" :style="{backgroundColor:color}"></div>
      <div class="demo" :style="mystyle"></div>
      <div class="demo"></div>
      <hr />
      <input type="text" v-model="color" />
      <input type="text" v-model="width" />
    </div>
  </body>
  <script>
    new Vue({
      el: "#app",
      data: {
        color: "green",
        width: 100
      },
      computed: {
        mystyle() {
          return {
            backgroundColor: this.color,
            width: this.width + "px"
          };
        }
      }
    });
  </script>
