

在分布式环境中,许多服务依赖项中的一些不可避免地会失败。Hystrix是一个Java类库,可通过添加容错逻辑来帮助您控制这些分布式服务之间的交互。Hystrix通过隔离服务之间的访问点,阻止它们之间的级联故障以及提供后备选项来实现这一目标,所有这些都可以提高系统的整体弹性。
ServiceComb内置了组件handler-bizkeeper实现和服务降级相关的功能,比如隔离、熔断、容错。开发者可以非常简单的使用。handler-bizkeeper组件基于Netflix Hystrix实现。具体可参考官方网址↓↓↓
https://docs.servicecomb.io/java-chassis/zh_CN/build-provider/configuration/downgrade-strategy.html
SpringCloud也有基于Netflix Hystrix实现的一套服务降级工具Spring Cloud Hystrix。
开发者在ServiceComb框架中可以自由选择使用其中一个库。
 下面通过一个场景演示ServiceComb结合Spring Cloud Hystrix的使用
使用步骤
下面通过一个场景演示ServiceComb结合Spring Cloud Hystrix的使用
使用步骤
-
排除ServiceComb的内置组件handler-bizkeeper(注意依赖传递)
-
添加依赖org.springframework.cloud:spring-cloud-starter-hystrix
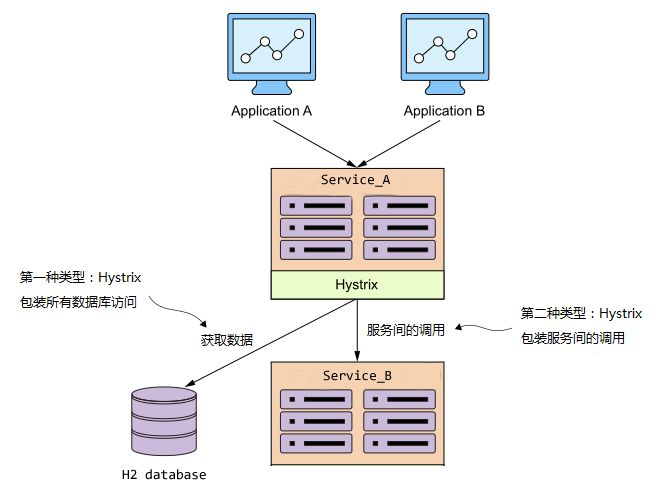
本篇以典型的服务间调用超时,和数据库服务调用超时来演示服务降级的使用。如下图所示,在服务Service_A当中使用Hystrix分别封装了数据库访问和服务间的调用。为方便起见,使用内存数据库H2 (如下图)
完整示例地址:https://github.com/lisenwork/servicecomb-demo/blob/master/servicecomb-hystrix
一. 启动ServiceCenter注册中心开发者可参考官方README https://github.com/apache/servicecomb-service-center/blob/master/README.md 进行下载安装和启动
二. 服务消费者Service_A1. 添加依赖
新建pom.xml文件,加入以下关键依赖
<dependency> <groupId>org.springframework.cloud</groupId> <artifactId>spring-cloud-starter-hystrix</artifactId> <version>1.4.4.RELEASE</version></dependency><dependency> <groupId>org.apache.servicecomb</groupId> <artifactId>spring-boot-starter-provider</artifactId> <version>1.1.0</version> <exclusions> <exclusion> <groupId>org.apache.servicecomb</groupId> <artifactId>handler-bizkeeper</artifactId> </exclusion> </exclusions></dependency><!-- 内存数据库 --><dependency> <groupId>com.h2database</groupId> <artifactId>h2</artifactId></dependency><!-- 数据库ORM框架 --><dependency> <groupId>org.springframework.boot</groupId> <artifactId>spring-boot-starter-data-jpa</artifactId></dependency>完整pom.xml文件请见
https://github.com/lisenwork/servicecomb-demo/blob/master/servicecomb-hystrix/Service_A/pom.xml
2. 配置
(1) 在resources目录下新建ServiceComb配置文件microservice.yaml,添加微服务定义信息
APPLICATION_ID: service-hystrix # 应用名,注意与网关服务器的应用名保持一致service_description: name: service_a # 微服务名 version: 0.0.4 # 微服务版本号servicecomb: service: registry: address: http://127.0.0.1:30100 # 服务注册中心(重要) rest: address: 0.0.0.0:8989 # 微服务启动端口(2) 在resources目录下新建ServiceComb配置文件application.yml,添加数据库配置信息
spring: datasource: url: jdbc:h2:mem:h2test;DB_CLOSE_DELAY=-1;DB_CLOSE_ON_EXIT=FALSE platform: h2 username: sa password: driverClassName: org.h2.Driver schema: classpath:db/schema.sql data: classpath:db/data.sql jpa: database-platform: org.hibernate.dialect.H2Dialect hibernate: ddl-auto: update properties: hibernate: show_sql: true use_sql_comments: true format_sql: truelogging: level: debug(3) 添加数据库初始化脚本。在resources/db目录下新建data.sql和schema.sql。schema.sql
CREATE TABLE t_user( id INTEGER NOT NULL,name VARCHAR(25) NOT NULL, age INTEGER DEFAULT NULL)data.sql
INSERT INTO t_user(id,name,age)VALUES ('1','张三',18);INSERT INTO t_user(id,name,age)VALUES ('2','李四',19);3.项目入口
新建启动类Application。其中EnableCircuitBreaker是为了使Spring-Cloud-Hystrix生效。EnableServiceComb是使ServiceComb生效。RestTemplate对象用于后面的服务间接口调用↓↓↓
@SpringBootApplication@EnableServiceComb@EnableCircuitBreakerpublic class Application { public static void main(String[] args) { SpringApplication.run(Application.class, args); } @LoadBalanced @Bean public RestTemplate getRestTemplate(){ return new RestTemplate(); }}4. 模拟业务代码
新建AController类提供对外的接口↓↓↓
@RestSchema(schemaId = "aController")@RequestMapping("/")public class AController{ @Autowired private AService aService; @GetMapping("/getSomethingFromServiceB") public String getSomethingFromServiceB(){ return aService.getSomethingFromServiceB(); } @GetMapping("/getSomethingFromDataSource") public List<User> getSomethingFromDataSource(){ return aService.getSomethingFromDataSource(); }}新建AService类模拟业务逻辑
-
访问数据库,随机加延时。模拟调用超时降级
-
访问其它微服务(Service_B),模拟调用超时降级 (延时逻辑在被调用的微服务代码里,在本文章即Service_B)
@Servicepublic class AService { @Autowired LoadBalancerClient loadBalancerClient; @Autowired RestTemplate restTemplate; @Autowired private UserRepository userRepository; @HystrixCommand( fallbackMethod = "errorHandler", commandProperties = { @HystrixProperty(name = "execution.isolation.thread.timeoutInMilliseconds", value = "1000") } ) public String getSomethingFromServiceB() { ServiceInstance serviceInstance = loadBalancerClient.choose("service_b"); String url = "http://" + serviceInstance.getHost() + ":" + serviceInstance.getPort()+"/getSomething"; System.out.println(url); return restTemplate.getForObject(url, String.class); } @HystrixCommand(fallbackMethod = "defaultStores", commandProperties = { @HystrixProperty(name = "execution.isolation.thread.timeoutInMilliseconds", value = "500") } ) public List<User> getSomethingFromDataSource() { randomlyRunLong(); List<User> userList = userRepository.findAll(); userList.forEach(System.out::println); return userList; } public List<User> defaultStores() { System.out.println("defaultStores"); return new ArrayList<>(); } public String errorHandler(Throwable throwable){ return throwable.toString(); } private void randomlyRunLong(){ Random rand = new Random(); int randomNum = rand.nextInt((3 - 1) + 1) + 1; if (randomNum==3) sleep(); } private void sleep(){ try { Thread.sleep(20000); } catch (InterruptedException e) { e.printStackTrace(); } }}Service_B的代码比较简单,只是对外提供一个接口,并加了随机延时接口定义如下↓↓↓
@RestSchema(schemaId = "bController")@RequestMapping("/")public class BController { @GetMapping("/getSomething") public String getSomething(){ randomlyRunLong(); return "Hello"; } private void randomlyRunLong(){ Random rand = new Random(); int randomNum = rand.nextInt((3 - 1) + 1) + 1; if (randomNum==3) sleep(); } private void sleep(){ try { Thread.sleep(20000); } catch (InterruptedException e) { e.printStackTrace(); } }}完整Service_B项目代码请参考 https://github.com/lisenwork/servicecomb-demo/blob/master/servicecomb-hystrix/Service_B/pom.xml
四. 演示 >>> > 启动服务Service_A和Service_B1. 数据库的访问
在浏览器(或Postman)访问http://localhost:8989/getSomethingFromDataSource,多次后会出现返回空数组的现象。
2. 服务间的调用
在浏览器(或Postman)访问http://localhost:8989/getSomethingFromServiceB,多次后会出现返回异常信息的现象
文末小结
本文向社区读者从使用角度阐述了ServiceComb是如何支持Spring Cloud Hystrix的。
我们也非常欢迎爱好者们向社区提问和贡献代码:)
如果在阅读代码时有任何疑问想交流,欢迎扫码加入进微信群。
▼期待志同道合的朋友们加入
ServiceComb的大门为你们敞开~
扫描二维码,添加微服务小助手
▼ 用心做开源/不忘初衷


前期阅读
ServiceComb之Java-Chassis启动流程分析
ServiceComb内置负载均衡组件handler-loadbalance
ServiceComb+SpringCloud Ribbon源码解读
负载均衡之ServiceComb + SpringCloud Ribbon

了解更多信息请访问:
官方网站 http://servicecomb.apache.org/
Github代码仓库 https://github.com/apache?q=ServiceComb
 好看你就点点我


赶紧点击阅读原文阅读相关源码
并给ServiceComb点个“Star”吧
