

前言
若想把握 Glide 图片加载的精髓, 首先要理清 Glide 图片加载的一次流程
// 这里便是与 Glide 3+ 的不同
RequestOptions options = new RequestOptions()
        .placeholder(R.drawable.loading);
// 它需要一个
Glide.with(this)
     .load(url)
     .apply(options)
     .into(imageView);
好的, 可以看到 Glide 的使用方式极为简单, 但往往越是简单的背后, 越是隐藏了复杂的实现, 接下来我们就一步一步的分析 Glide 4.9 的一次加载流程
一. with
public class Glide implements ComponentCallbacks2 {

  public static RequestManager with(@NonNull Context context) {
    // 1. 调用了 getRetriever 获取一个 RequestManagerRetriever
    // 2. 调用了 RequestManagerRetriever.get 获取一个 RequestManager 描述一个图片加载请求的管理者
    return getRetriever(context).get(context);
  }

  private static RequestManagerRetriever getRetriever(@Nullable Context context) {
    // 1.1 调用了 Glide.get 获取 Glide 对象
    // 1.2 通过 Glide 对象获取一个 RequestManagerRetriever
    // 这个 Retriever 用来获取一个 RequestManager 对象, 可以参考 Android Framework 源码中的 SystemRetriever
    return Glide.get(context).getRequestManagerRetriever();
  }
}
好的, 可以看到 Glide.with 操作, 主要做了两件事情
- 通过 Glide.getRetriever 获取一个 RequestManagerRetriever 对象, 它描述为请求管理的获取器
- 调用 Glide.get 获取 Glide 对象
- 调用 Glide.getRequestManagerRetriever, 获取 RequestManagerRetriever 对象
- 调用 getRequestManagerRetriever.get 获取一个 RequestManager
接下来我们一步一步的看, 首先是获取 RequestManagerRetriever
一) 获取 Glide 对象
从上面的分析可只, RequestManagerRetriever 是通过 Glide.getRequestManagerRetriever 获取到的, 因此需要先获取 Glide 对象的实例, 因此我们先看看这个 Glide 是如何构造的
public class Glide implements ComponentCallbacks2 {

  private static volatile Glide glide;

  public static Glide get(@NonNull Context context) {
    if (glide == null) {
      synchronized (Glide.class) {
        if (glide == null) {
          checkAndInitializeGlide(context);
        }
      }
    }
    return glide;
  }

  private static volatile boolean isInitializing;

  private static void checkAndInitializeGlide(@NonNull Context context) {
    if (isInitializing) {
      // 抛出二次初始的异常
    }
    isInitializing = true;
    // 进行初始化操作
    initializeGlide(context);
    isInitializing = false;
  }

  private static void initializeGlide(@NonNull Context context) {
    // 创建了一个 GlideBuilder() 实例传入 initializeGlide, 很显然是为了初始化 Glide 对象
    // 接下来我们就看看它是如何初始化 Glide 的
    initializeGlide(context, new GlideBuilder());
  }

  private static void initializeGlide(@NonNull Context context, @NonNull GlideBuilder builder) {
    Context applicationContext = context.getApplicationContext();
    // 1. 获取 @GlideModule 注解驱动生成的 GeneratedAppGlideModuleImpl 和 GeneratedAppGlideModuleFactory 类
    GeneratedAppGlideModule annotationGeneratedModule = getAnnotationGeneratedGlideModules();
    ......
    // 2. 尝试从注解生成的 annotationGeneratedModule 中获取 RequestManager 的构造工厂对象
    RequestManagerRetriever.RequestManagerFactory factory = annotationGeneratedModule != null
            ? annotationGeneratedModule.getRequestManagerFactory() : null;
    // 3. 向 Glide 的 Builder 中添加这个请求管理器的构造工厂
    builder.setRequestManagerFactory(factory);
    ......
    // 4. 构建 Glide 的实体对象
    Glide glide = builder.build(applicationContext);
    ......
    // 5. 向 Application 中注册一个组件的回调, 用于检测系统 Config 改变和内存占用量低的信号
    applicationContext.registerComponentCallbacks(glide);
    // 保存在静态的成员变量中
    Glide.glide = glide;
  }
}
从上的代码可以看到 Glide 对象是进程间单例的, 初次创建会调用 initializeGlide 方法, 其处理事务如下
- 首先找寻 @GlideModule 注解生成类(这里省略了它的实现)
- 然后将一个 RequestManagerFactory 添加到 GlideBuilder 内部
- 后便构建了一个 Glide 的对象
我们主要关注一下 Glide 对象创建的过程
public final class GlideBuilder {
  // 管理线程池的引擎
  private Engine engine;
  // 1. 线程池
  private GlideExecutor sourceExecutor;
  private GlideExecutor diskCacheExecutor;
  private GlideExecutor animationExecutor;
  // 2. 内存的缓存策略
  private MemorySizeCalculator memorySizeCalculator;
  private MemoryCache memoryCache;
  // 3. 享元复用池
  private BitmapPool bitmapPool;
  private ArrayPool arrayPool;
  // 4. 磁盘缓存和请求构建工厂
  private DiskCache.Factory diskCacheFactory;
  private RequestManagerFactory requestManagerFactory;

  @NonNull
  Glide build(@NonNull Context context) {
    /*
      1. 线程池
     */
    // 1.1 网络操作使用线程池
    if (sourceExecutor == null) {
      sourceExecutor = GlideExecutor.newSourceExecutor();
    }
    // 1.2 磁盘缓存使用的线程池
    if (diskCacheExecutor == null) {
      diskCacheExecutor = GlideExecutor.newDiskCacheExecutor();
    }
    // 1.3 执行动画的线程池
    if (animationExecutor == null) {
      animationExecutor = GlideExecutor.newAnimationExecutor();
    }
    /*
     2. 内存缓存
     */
    // 2.1 描述一个内存的计算器, 智能加载图片的大小, 判断其需要的内存空间
    if (memorySizeCalculator == null) {
      memorySizeCalculator = new MemorySizeCalculator.Builder(context).build();
    }
    // 2.2 LRU 资源内存缓存
    if (memoryCache == null) {
      memoryCache = new LruResourceCache(memorySizeCalculator.getMemoryCacheSize());
    }
    // 2.3 LRU 的 Bitmap 复用池
    if (bitmapPool == null) {
      int size = memorySizeCalculator.getBitmapPoolSize();
      if (size > 0) {
        bitmapPool = new LruBitmapPool(size);
      } else {
        bitmapPool = new BitmapPoolAdapter();
      }
    }
    // 2.4 LRU 数组复用池
    if (arrayPool == null) {
      arrayPool = new LruArrayPool(memorySizeCalculator.getArrayPoolSizeInBytes());
    }

    /*
     3 磁盘缓存的工厂
     */
    if (diskCacheFactory == null) {
      diskCacheFactory = new InternalCacheDiskCacheFactory(context);
    }

    // 4. RequestManagerRetriever 对象
    RequestManagerRetriever requestManagerRetriever =  new RequestManagerRetriever(requestManagerFactory);

    // 5. 构建了一个负责管理线程池与缓存的执行引擎
    if (engine == null) {
      engine =
          new Engine(
              memoryCache,
              diskCacheFactory,
              diskCacheExecutor,
              sourceExecutor,
              GlideExecutor.newUnlimitedSourceExecutor(),
              GlideExecutor.newAnimationExecutor(),
              isActiveResourceRetentionAllowed);
    }

    ......
    // 6. 创建了 Glide 对象
    return new Glide(
        context,
        engine,
        memoryCache,
        bitmapPool,
        arrayPool,
        requestManagerRetriever,
        connectivityMonitorFactory,
        logLevel,
        defaultRequestOptions.lock(),
        defaultTransitionOptions,
        defaultRequestListeners,
        ......);
  }

}
好的, 可以看到 Glide 对象的构建过程异常的复杂, 笔者调整了部分的数据, 它们的流程如下
- 构建线程池
- 根据不同的任务特性, 构建了不同的线程池
- 构建内存缓存策略
- 内存计算器
- LRU 资源内存缓存
- 数组对象复用池
- Bitmap 复用池
- 创建了一个 RequestManagerRetriever 描述请求管理对象的获取器
- 构建引擎类, 用于组织和调度线程池和缓存
- 创建 Glide 对象
Glide 的创建流程如下
Glide 的创建
public class Glide implements ComponentCallbacks2 {

  private final Registry registry;

  Glide(......) {
    // 1 将 Builder 中的线程池, 缓存池等保存
    this.engine = engine;
    this.bitmapPool = bitmapPool;
    this.arrayPool = arrayPool;
    this.memoryCache = memoryCache;
    this.requestManagerRetriever = requestManagerRetriever;
    this.connectivityMonitorFactory = connectivityMonitorFactory;
    // 2. 使用 registry 注册 Glide 需要的 Encoder 与 Decoder
    DecodeFormat decodeFormat = defaultRequestOptions.getOptions().get(Downsampler.DECODE_FORMAT);
    bitmapPreFiller = new BitmapPreFiller(memoryCache, bitmapPool, decodeFormat);
    final Resources resources = context.getResources();
    // 创建注册器
    registry = new Registry();
    // 注册图片头解析器
    registry.register(new DefaultImageHeaderParser());
    ......
    // 3. 构建一个 Glide 的上下文, 方便在请求时获取全局数据
    glideContext =
        new GlideContext(
            context,
            arrayPool,
            registry,
            imageViewTargetFactory,
            defaultRequestOptions,
            defaultTransitionOptions,
            defaultRequestListeners,
            engine,
            isLoggingRequestOriginsEnabled,
            logLevel);
}
Glide 对象的创建如下
- 将 GlideBuilder 中的数据导入
- 构建一个 registry, 注册了众多的编解码器
- 构建了上下文对象, 保存可能会用到的数据
二) 获取 RequestManagerRetriever
在创建 GlideBuilder.build 中, 我们看到了它 new 了一个 RequestManagerRetriever 对象并且传递到了 Glide 对象内部, 于是通过 Glide.getRequestManagerRetriever 就可以很方便的获取到 RequestManagerRetriever 这个对象了
接下来我们看看如何通过 RequestManagerRetriever.get() 获取 RequestManager 对象
三) 获取 RequestManager
public class RequestManagerRetriever implements Handler.Callback {

  public RequestManager get(@NonNull Context context) {
    if (context == null) {
      throw new IllegalArgumentException("You cannot start a load on a null Context");
    } else if (Util.isOnMainThread() && !(context instanceof Application)) {
      // 1. 若在主线程 并且 Context 不为 Application
      if (context instanceof FragmentActivity) {
        return get((FragmentActivity) context);
      } else if (context instanceof Activity) {
        return get((Activity) context);
      } else if (context instanceof ContextWrapper) {
        // 不断的查找其 BaseContext, 判断是否能够与 FragmentActivity/Activity 等目标匹配
        return get(((ContextWrapper) context).getBaseContext());
      }
    }
    // 2. 若不在 MainThread 或 context 为 Application 的类型, 则使用 ApplicationManager
    return getApplicationManager(context);
  }
}
可以看到 RequestManagerRetriever.get 方法会判断 Context 的类型
- 若在主线程并且不为 Application 类型的 Context 则找寻其依赖的 Activity
- 若非主线程或为 Application 类型的 Context, 则使用 ApplicationManager
为什么要优先找到 Activity 呢, 这么做是何用意呢?, 我们带着问题去看看参数为 Activity 的 get 的重载方法
1. 获取 Activity 的 RequestManager
public class RequestManagerRetriever implements Handler.Callback {

  public RequestManager get(@NonNull Activity activity) {
    if (Util.isOnBackgroundThread()) {
      // 若非主线程, 直接获取 Application 类型的 RequestManager
      return get(activity.getApplicationContext());
    } else {
      // 不可在 activity 销毁时执行加载
      assertNotDestroyed(activity);
      // 获取其 FragmentManager
      android.app.FragmentManager fm = activity.getFragmentManager();
      return fragmentGet(
          activity, fm, /*parentHint=*/ null, isActivityVisible(activity));
    }
  }

  private RequestManager fragmentGet(@NonNull Context context,
      @NonNull android.app.FragmentManager fm,
      @Nullable android.app.Fragment parentHint,
      boolean isParentVisible) {
    // 1. 从 Activity 中获取一个 RequestManagerFragment, 用于监管 Activity 的声明周期
    RequestManagerFragment current = getRequestManagerFragment(fm, parentHint, isParentVisible);
    // 2. 获取 Fragment 中保存的当前页面的请求管理器
    RequestManager requestManager = current.getRequestManager();
    // 3. 不存在则创建一个请求管理器保存在 RequestManagerFragment 中
    if (requestManager == null) {
      Glide glide = Glide.get(context);
      requestManager = factory.build(glide, current.getGlideLifecycle(), current.getRequestManagerTreeNode(), context);
      current.setRequestManager(requestManager);
    }
    // 返回这个请求管理器
    return requestManager;
  }

  // 描述一个即将被 FragmentManager 添加的 RequestManagerFragment 缓存
  final Map<android.app.FragmentManager, RequestManagerFragment> pendingRequestManagerFragments =
      new HashMap<>();

  private RequestManagerFragment getRequestManagerFragment(
      @NonNull final android.app.FragmentManager fm,
      @Nullable android.app.Fragment parentHint,
      boolean isParentVisible) {
    // 2.1 尝试从 FragmentManager 中获取这个 Fragment
    RequestManagerFragment current = (RequestManagerFragment) fm.findFragmentByTag(FRAGMENT_TAG);
    // 2.2 不存在则添加一个
    if (current == null) {
      // 2.3 从 pendingRequestManagerFragments 缓存中获取一个
      current = pendingRequestManagerFragments.get(fm);
      if (current == null) {
        // 2.3.1 创建并更新到缓存
        current = new RequestManagerFragment();
        ......
        // 2.3.2 添加到等待被添加的缓存中
        // 因为添加到 FragmentManager 有延迟, 用这种方式防止同一时间创建了两个 RequestManagerFragment 对象添加到 Activity 中
        pendingRequestManagerFragments.put(fm, current);
        // 2.3.3 添加到 FragmentManager 中
        fm.beginTransaction().add(current, FRAGMENT_TAG).commitAllowingStateLoss();
        // 2.3.4 添加到 FragmentManager 成功, 通过 Handler 移除这个缓存
        handler.obtainMessage(ID_REMOVE_FRAGMENT_MANAGER, fm).sendToTarget();
      }
    }
    return current;
  }
}
好的, 可以看到 RequestManagerRetriever 的 get 方法主要是在 Activity 页面中添加一个 RequestManagerFragment 实例, 以便用于监听 Activity 的生命周期, 然后给这个 Fragment 注入一个 RequestManager, 其处理的细节代码中也注释的比较详细
- 其中有个非常引人注目的细节, 考虑到将 FragmentManger 添加 Fragment 有延迟, 为了防止同一时间创建了两个 RequestManagerFragment 添加到 FragmentManager, 因此它使用了 pendingRequestManagerFragments 进行缓存
2. 获取 Application 的 RequestManager
public class RequestManagerRetriever implements Handler.Callback {

  private volatile RequestManager applicationManager;
  private final RequestManagerFactory factory;

  private RequestManager getApplicationManager(@NonNull Context context) {
    // Either an application context or we're on a background thread.
    if (applicationManager == null) {
      synchronized (this) {
        if (applicationManager == null) {
          Glide glide = Glide.get(context.getApplicationContext());
          applicationManager = factory.build(glide, new ApplicationLifecycle(),
              new EmptyRequestManagerTreeNode(), context.getApplicationContext());
        }
      }
    }
    return applicationManager;
  }

}
很简单构建了一个单例的 RequestManager, 用于处理所有的 context 类型的请求
三) 回顾
Glide.with 方法主要是为 Context 构建 RequestManager , 主要流程如下
- 获取进程间单例的 Glide 对象
- 线程池
- 缓存池
- 编解码器
- 获取进程间单例的 RequestManagerRetriever 对象
- 通过 RequestManagerRetriever 创建当前 context 的 RequestManager
- 若可以绑定 Activity, 则为 Activity 添加一个 RequestManagerFragment, 其内部含有 ReqeustManager 对象, 以便后续直接根据 Activity 的生命周期管控 Glide 请求的处理
- 若非可绑定 Activity, 则获取一个单例的 applicationManager 专门用于处理这类请求
接下来我们看看这个 RequestManager.load 方法
二. load
我们使用最熟悉的加载网络图片来分析这个 RequestManager.load 方法
public class RequestManager implements LifecycleListener,
    ModelTypes<RequestBuilder<Drawable>> {

  public RequestBuilder<Drawable> load(@Nullable String string) {
    // 1. 调用 asDrawable 创建一个目标为 Drawable 的图片加载请求
    // 2. 调用 load 将要加载的资源传入
    return asDrawable().load(string);
  }

  public RequestBuilder<Drawable> asDrawable() {
    return as(Drawable.class);
  }

  public <ResourceType> RequestBuilder<ResourceType> as(
      @NonNull Class<ResourceType> resourceClass) {
    return new RequestBuilder<>(glide, this, resourceClass, context);
  }

}
好的, 可以看到 RequestManager.load 方法先调用了 asDrawable 构建一个 RequestBuilder, 描述一个目标资源为 Drawable 的图片加载请求
然后调用了 RequestBuilder.load 方法将加载的数据源传入, 我们看看这个 load 方法做了什么
public class RequestBuilder<TranscodeType> extends BaseRequestOptions<RequestBuilder<TranscodeType>>
    implements Cloneable, ModelTypes<RequestBuilder<TranscodeType>> {

  public RequestBuilder<TranscodeType> load(@Nullable String string) {
    return loadGeneric(string);
  }

  // 描述加载的数据源
  @Nullable private Object model;
  // 描述这个请求是否已经添加了加载的数据源
  private boolean isModelSet;

  private RequestBuilder<TranscodeType> loadGeneric(@Nullable Object model) {
    this.model = model;
    isModelSet = true;
    return this;
  }

}
好的, 可以看到走到这里, RequestBuilder 就构建好了, 接下来就等待执行这个请求了, 我们看看它的 RequestBuilder 的 into 方法
三. RequestBuilder.into
public class RequestBuilder<TranscodeType> extends BaseRequestOptions<RequestBuilder<TranscodeType>>
    implements Cloneable, ModelTypes<RequestBuilder<TranscodeType>> {

  public ViewTarget<ImageView, TranscodeType> into(@NonNull ImageView view) {
    ......
    // 1. 根据 view 的 scaleType 重构 RequestOptions
    BaseRequestOptions<?> requestOptions = this;// RequestBuilder 直接继承了 BaseRequestOptions
    if (!requestOptions.isTransformationSet() && requestOptions.isTransformationAllowed() && view.getScaleType() != null) {
      switch (view.getScaleType()) {
        case CENTER_CROP:
          // 1.1 克隆原 RequestOptions, 配置一个 CenterCrop 的缩放选项
          requestOptions = requestOptions.clone().optionalCenterCrop();
          break;
        ......
      }
    }
    // 3. 调用 into 方法, 创建并且执行请求
    return into(
        // 2. 将 View 封装成 ViewTarget
        glideContext.buildImageViewTarget(view, transcodeClass),
        /*targetListener=*/ null,
        requestOptions,
        Executors.mainThreadExecutor());
  }

}
可以看到 into 方法中主要执行了如下的步骤
- 根据 ImageView 的 ScaleType 来配置 Options 选项
- 将 View 封装成 ViewTarget
- 调用了重载方法 into 执行后续构建请求操作
我们以 CenterCrop 举例, 看看它如何配置缩放效果
一) 配置 Options
public abstract class BaseRequestOptions<T extends BaseRequestOptions<T>> implements Cloneable {

  public T optionalCenterCrop() {
    // 1. 调用了 optionalTransform
    // DownsampleStrategy 描述降采样压缩的策略
    // CenterCrop 描述图像变化方式
    return optionalTransform(DownsampleStrategy.CENTER_OUTSIDE, new CenterCrop());
  }

  final T optionalTransform(@NonNull DownsampleStrategy downsampleStrategy,
      @NonNull Transformation<Bitmap> transformation) {
    ......
    // 2. 将降采样压缩策略添加到 options 中
    downsample(downsampleStrategy);
    // 3. 将图像变化方式添加到 transformations 中
    return transform(transformation, /*isRequired=*/ false);
  }

  public T downsample(@NonNull DownsampleStrategy strategy) {
    // 2.1 调用了 set, 将降采样策略保存到 options 中
    return set(DownsampleStrategy.OPTION, Preconditions.checkNotNull(strategy));
  }

  private Options options = new Options();

  public <Y> T set(@NonNull Option<Y> option, @NonNull Y value) {
    ...
    // 2.2 添加到 options 缓存中
    options.set(option, value);
    return selfOrThrowIfLocked();
  }

  T transform(@NonNull Transformation<Bitmap> transformation, boolean isRequired) {
    // 3.1 调用了 transform 的重载方法, 将这个图像变化的方式作用到多种资源类型上
    DrawableTransformation drawableTransformation = new DrawableTransformation(transformation, isRequired);
    transform(Bitmap.class, transformation, isRequired);// Bitmap 类型的资源
    transform(Drawable.class, drawableTransformation, isRequired);// Drawable类型的
    ......
    return selfOrThrowIfLocked();
  }

  private Map<Class<?>, Transformation<?>> transformations = new CachedHashCodeArrayMap<>();

  <Y> T transform(@NonNull Class<Y> resourceClass, @NonNull Transformation<Y> transformation, boolean isRequired) {
    // 3.2 添加到了 transformations 缓存中
    transformations.put(resourceClass, transformation);
    return selfOrThrowIfLocked();
  }
}
好的, 可以看到配置缩放选项的操作除了添加了图像变化操作, 还设定了采样方式, 分别保存在 transformations 和 options 中
我们知道 GlideContext 是在 Glide 对象构造时一并创建的, 它是 Context 的装饰者对象, 在 Application 类型的 Context 中, 添加了 Glide 相关的数据, 我们先看看它是如何构建 ViewTarget 的
二) 构建 ViewTarget
public class GlideContext extends ContextWrapper {

  private final ImageViewTargetFactory imageViewTargetFactory;

  public <X> ViewTarget<ImageView, X> buildImageViewTarget(
      @NonNull ImageView imageView, @NonNull Class<X> transcodeClass) {
    // 调用工厂类来创建一个 imageView 的 ViewTarget
    return imageViewTargetFactory.buildTarget(imageView, transcodeClass);
  }

}

public class ImageViewTargetFactory {
  @NonNull
  @SuppressWarnings("unchecked")
  public <Z> ViewTarget<ImageView, Z> buildTarget(@NonNull ImageView view, @NonNull Class<Z> clazz) {
    // 根据目标编码的类型来创建不同的 ViewTarget 对象, 因为我们没有 asBitmap, 因此这里为 Drawable
    if (Bitmap.class.equals(clazz)) {
      return (ViewTarget<ImageView, Z>) new BitmapImageViewTarget(view);
    } else if (Drawable.class.isAssignableFrom(clazz)) {
      return (ViewTarget<ImageView, Z>) new DrawableImageViewTarget(view);
    } else {
      ......
    }
  }
}
好的可以看到 GlideContext 中通过工厂类创建了 ImageView 的 ViewTarget 的, 它描述的是图像处理结束之后, 最终要作用到的 View 目标
三) into 重载方式
构建好了 ViewTarge, 接下来就可以分析重载的 into 方法了, 看看它是如何构建请求的
public class RequestBuilder<TranscodeType> extends BaseRequestOptions<RequestBuilder<TranscodeType>>
    implements Cloneable, ModelTypes<RequestBuilder<TranscodeType>> {

  private <Y extends Target<TranscodeType>> Y into(@NonNull Y target, @Nullable RequestListener<TranscodeType> targetListener,
      BaseRequestOptions<?> options,  Executor callbackExecutor) {
    ......
    // 1. 调用 buildRequest 构建了一个 Glide 请求
    Request request = buildRequest(target, targetListener, options, callbackExecutor);
    ......// 处理这个 ViewTarget 之前的请求与新请求的冲突
    // 2. 给 ViewTarget 绑定这个 Glide 请求
    target.setRequest(request);
    // 3. 调用了请求 RequestManager.track 方法分发请求
    requestManager.track(target, request);
    return target;
  }

}
可以看到 into 的重载方法主要执行了如下的步骤
- 将相关参数传入构建 Request 请求
- 为 ViewTarget 绑定该请求
- 调用 RequestManger.track 分发该请求
四) 回顾
RequestBuilder.into 主要做了如下的事情
- 根据 ImageView 构建采样压缩和图像变化的策略保存在 Options 和 Transform 中
- 构建 ViewTarget, 描述这个请求要作用的 View 对象
- 调用 into 重载方法
- 构建 Request 对象
- 为 ViewTarget 绑定 Request
- 交由 RequestManger 执行该请求
到这里我们的 Glide.with().load().into 就走完了, 最终会构建一个 Request 交由 RequestManger 分发执行
下面我们看看 RequestManager 是如何执行 Request 的
四. RequestManager 执行 Request 请求
public class RequestManager implements LifecycleListener,
    ModelTypes<RequestBuilder<Drawable>> {

  private final RequestTracker requestTracker;

  synchronized void track(@NonNull Target<?> target, @NonNull Request request) {
    ......
    // 1. 执行请求
    requestTracker.runRequest(request);
  }

}

public class RequestTracker {

  private final Set<Request> requests =
      Collections.newSetFromMap(new WeakHashMap<Request, Boolean>());
  private final List<Request> pendingRequests = new ArrayList<>();

  public void runRequest(@NonNull Request request) {
    requests.add(request);
    if (!isPaused) {
      // 2. 调用 request.begin 执行任务
      request.begin();
    } else {
      ......
    }
  }

}

public final class SingleRequest<R> implements Request,
    SizeReadyCallback,
    ResourceCallback,
    FactoryPools.Poolable {

  public synchronized void begin() {
    ......
    if (Util.isValidDimensions(overrideWidth, overrideHeight)) {
      // 3. 表示尺寸准备好了
      onSizeReady(overrideWidth, overrideHeight);
    } else {
      ......
    }
    ......
  }

  private Engine engine;
  private int width;
  private int height;

  public synchronized void onSizeReady(int width, int height) {
    ......
    // 4. 调用了 Engine.load 方法构建任务
    loadStatus = engine.load(......);
    ......
  }

}
好的, 可以看到最终调用到了 onSizeReady 去构建可执行任务, 接下来我们就分析这一过程
一) 任务的构建
public class Engine implements EngineJobListener,
    MemoryCache.ResourceRemovedListener,
    EngineResource.ResourceListener {

  private final Jobs jobs;

  public synchronized <R> LoadStatus load(...) {
    // 1. 根据传入的参数, 构建这个请求的 key
    EngineKey key = keyFactory.buildKey(model, signature, width, height, transformations,
        resourceClass, transcodeClass, options);
    // 2. 从缓存中查找 key 对应的资源
    // 2.1 尝试从 ActiveResources 缓存中查找这个 key 的缓存
    EngineResource<?> active = loadFromActiveResources(key, isMemoryCacheable);
    if (active != null) {
      // 若缓存存在, 则直接回调 onResourceReady 处理后续操作
      cb.onResourceReady(active, DataSource.MEMORY_CACHE);
      .......
      return null;
    }
    // 2.2 尝试从 LruResourceCache 中找寻这个资源
    EngineResource<?> cached = loadFromCache(key, isMemoryCacheable);
    if (cached != null) {
      // 回调 onResourceReady 处理后续操作
      cb.onResourceReady(cached, DataSource.MEMORY_CACHE);
      return null;
    }
    // 3. 从缓存中查找 key 对应的任务
    EngineJob<?> current = jobs.get(key, onlyRetrieveFromCache);
    if (current != null) {
      // 3.1 走到这里说明这个任务已经正在执行了, 无需再次构建执行
      current.addCallback(cb, callbackExecutor);
      ......
      // 返回加载状态即可
      return new LoadStatus(cb, current);
    }
    // 3.2 走到这里, 说明是一个新的任务
    // 3.2.1 则构建一个新的引擎任务
    EngineJob<R> engineJob = engineJobFactory.build(
            key,
            isMemoryCacheable,
            useUnlimitedSourceExecutorPool,
            useAnimationPool,
            onlyRetrieveFromCache);
    // 3.2.2 构建解码任务
    DecodeJob<R> decodeJob = decodeJobFactory.build(......, engineJob);
    // 3.2.3 添加到任务缓存
    jobs.put(key, engineJob);
    ......
    // 3.2.4 执行任务
    engineJob.start(decodeJob);
    ......
  }

}
好的, 可以看到 Engine.load 中的事情非常的重要
- 构建这个请求的 key
- 从内存缓存中查找 key 对应的资源, 若存在直接回 onResourceReady 表示资源准备好了
- 从 ActiveResources 缓存中查找
- 从 LruResourceCache 缓存中查找
- 从缓存中查找 key 对应的任务
- 若存在则说明无需再次获取资源
- 构建任务
- 构建引擎任务 EngineJob
- 引擎的任务为解码任务 DecodeJob
- 将任务添加到缓存, 防止多次构建
- 执行 EngineJob
好的, 可以看到内存缓存的处理是在 Engine 中进行的, 若两个内存缓存都没有命中, 则会构建任务并执行, 接下来我们看看任务的执行过程
二) EngineJob 的执行
class EngineJob<R> implements DecodeJob.Callback<R>,
    Poolable {

  private final GlideExecutor diskCacheExecutor;
  private DecodeJob<R> decodeJob;

  public synchronized void start(DecodeJob<R> decodeJob) {
    this.decodeJob = decodeJob;
    // 获取线程池
    GlideExecutor executor = decodeJob.willDecodeFromCache()
        ? diskCacheExecutor : getActiveSourceExecutor();
    // 执行任务
    executor.execute(decodeJob);
  }

}
简单的交由了线程池执行这个 DecodeJob
class DecodeJob<R> implements DataFetcherGenerator.FetcherReadyCallback,
    Runnable,
    Comparable<DecodeJob<?>>,
    Poolable {

  @Override
  public void run() {
     try {
      ......
      // 调用了 runWrapped
      runWrapped();
    } catch (CallbackException e) {
      ......
    }
  }

  private void runWrapped() {
    switch (runReason) {
      case INITIALIZE:
        // 1. 获取合适的任务场景
        stage = getNextStage(Stage.INITIALIZE);
        // 2. 获取这个场景的执行者
        currentGenerator = getNextGenerator();
        // 3. 执行者执行任务
        runGenerators();
        break;
      ......
    }
  }

  private Stage getNextStage(Stage current) {
    switch (current) {
      // 1.1 判断是否允许读取磁盘资源缓存, 若允许则返回 Stage.RESOURCE_CACHE, 不允许则继续找寻合适的场景
      case INITIALIZE:
        return diskCacheStrategy.decodeCachedResource()
            ? Stage.RESOURCE_CACHE : getNextStage(Stage.RESOURCE_CACHE);
      // 1.2 判断是否允许从磁盘读取源数据缓存, 若允许则返回 Stage.DATA_CACHE, 不允许则继续查找
      case RESOURCE_CACHE:
        return diskCacheStrategy.decodeCachedData()
            ? Stage.DATA_CACHE : getNextStage(Stage.DATA_CACHE);
      // 1.3 若只能允许从缓存中获取数据, 则直接 FINISH, 否则返回 Stage.SOURCE, 意为加载一个新的资源
      case DATA_CACHE:
        return onlyRetrieveFromCache ? Stage.FINISHED : Stage.SOURCE;
      case SOURCE:
      case FINISHED:
        return Stage.FINISHED;
      default:
        throw new IllegalArgumentException("Unrecognized stage: " + current);
    }
  }

  private DataFetcherGenerator getNextGenerator() {
    switch (stage) {
      case RESOURCE_CACHE:
        // 2.1 资源磁盘缓存的执行者
        return new ResourceCacheGenerator(decodeHelper, this);
      case DATA_CACHE:
        // 2.2 源数据磁盘缓存的执行者
        return new DataCacheGenerator(decodeHelper, this);
      case SOURCE:
        // 2.3 无缓存, 获取数据的源的执行者
        return new SourceGenerator(decodeHelper, this);
      case FINISHED:
        return null;
      default:
        throw new IllegalStateException("Unrecognized stage: " + stage);
    }
  }

  private void runGenerators() {
    ......
    boolean isStarted = false;
    while (!isCancelled && currentGenerator != null
        // 3.1 调用 currentGenerator.startNext() 执行当前场景的任务
        && !(isStarted = currentGenerator.startNext())) {
      // 3.2 若执行失败, 则获取下一个场景继续执行
      stage = getNextStage(stage);
      currentGenerator = getNextGenerator();
      if (stage == Stage.SOURCE) {
        reschedule();
        return;
      }
    }
    ......
  }

}
DecodeJob 的 runWrapper 方法主要做了如下的事务
- 通过 getNextStage 获取 Decode 场景
- 构建当前场景的处理器 DataFetcherGenerator
- 调用 runGenerators 处理任务
- 优先从 Resource 的磁盘缓存中取数据
- 次优先从 Data 的磁盘缓存中取数据
- 最终方案重新获取源数据
| 场景 | 场景描述 | 场景执行器 |
|---|---|---|
| Stage.RESOURCE_CACHE | 从磁盘中缓存的资源中获取数据 | ResourceCacheGenerator |
| Stage.DATA_CACHE | 从磁盘中缓存的源数据中获取数据 | DataCacheGenerator |
| Stage.SOURCE | 重新请求数据 | SourceGenerator |
关于 Resource 和 Data 磁盘缓存感兴趣可以自行分析, 我们这里主要看看 SourceGenerator 获取方案源数据方案
1. SourceGenerator 获取数据流
class SourceGenerator implements DataFetcherGenerator,
    DataFetcher.DataCallback<Object>,
    DataFetcherGenerator.FetcherReadyCallback {

  private final DecodeHelper<?> helper;

  public boolean startNext() {
    ......
    loadData = null;
    boolean started = false;
    while (!started && hasNextModelLoader()) {
      // 1. 从 DecodeHelper 的数据加载集合中, 获取一个数据加载器
      loadData = helper.getLoadData().get(loadDataListIndex++);
      if (loadData != null
          && (helper.getDiskCacheStrategy().isDataCacheable(loadData.fetcher.getDataSource())
          || helper.hasLoadPath(loadData.fetcher.getDataClass()))) {
        started = true;
        // 2. 使用加载器中 fetcher 执行数据加载
        loadData.fetcher.loadData(helper.getPriority(), this);
      }
    }
    return started;
  }

}
好的, SourceGenerator 主要有两步
- 调用 DecodeHelper.getLoadData 获取当前请求的数据加载器
- 调用加载器中的 fetcher.loadData 真正的执行数据加载
1) 获取数据加载器 LoadData
final class DecodeHelper<Transcode> {

  private final List<LoadData<?>> loadData = new ArrayList<>();
  private GlideContext glideContext;
  private Object model;
  private boolean isLoadDataSet;

  List<LoadData<?>> getLoadData() {
    if (!isLoadDataSet) {
      isLoadDataSet = true;
      loadData.clear();
      // 1. 从 Glide 注册的 register 中获取请求 model 加载器
      List<ModelLoader<Object, ?>> modelLoaders = glideContext.getRegistry().getModelLoaders(model);
      // 遍历每一个 modelLoaders
      for (int i = 0, size = modelLoaders.size(); i < size; i++) {
        // 2. 通过 modelLoaders 构建 loadData
        ModelLoader<Object, ?> modelLoader = modelLoaders.get(i);
        LoadData<?> current = modelLoader.buildLoadData(model, width, height, options);
        if (current != null) {
          // 添加到缓存
          loadData.add(current);
        }
      }
    }
    return loadData;
  }

}
它会找到一个 ModelLoader 的实现类, 通过这个实现类的 handles 方法, 判断是否可以加载这个 model
这里我们的 model 以网络的 URL 资源举例, 它的实现类为 HttpGlideUrlLoader 我们看看它如何构建一个 LoadData 对象的
public class HttpGlideUrlLoader implements ModelLoader<GlideUrl, InputStream> {

  @Nullable private final ModelCache<GlideUrl, GlideUrl> modelCache;

  @Override
  public LoadData<InputStream> buildLoadData(@NonNull GlideUrl model, int width, int height,
      @NonNull Options options) {
    GlideUrl url = model;
    .....
    int timeout = options.get(TIMEOUT);
    // 创建了一个 LoadData 对象, 并且实例化了一个 HttpUrlFetcher 给它
    return new LoadData<>(url, new HttpUrlFetcher(url, timeout));
  }

}
好的, 可以看到对于 URL 的加载, 其 fetcher 为一个 HttpUrlFetcher 的实例, 接下来我们看看数据加载的流程
2) 执行数据加载
获取到了数据加载器之后, SourceGenerator 的 startNext 中便会调用其 fetcher 的 loadData 执行数据的加载了, 我们结下来便分析一下这个过程
public class HttpUrlFetcher implements DataFetcher<InputStream> {

  public void loadData(@NonNull Priority priority,
      @NonNull DataCallback<? super InputStream> callback) {
    long startTime = LogTime.getLogTime();
    try {
      // 获取网络图片, 内部使用了 HttpConnection 实现, 仅仅做了重定向的处理
      InputStream result = loadDataWithRedirects(glideUrl.toURL(), 0, null, glideUrl.getHeaders());
      // 将 inputStream 回调出去
      callback.onDataReady(result);
    } catch (IOException e) {
      ......
      callback.onLoadFailed(e);
    } finally {
      ......
    }
  }

}
好的, 数据加载的过程也是很简单的, HttpUrlFetcher 它使用了 HttpConnection 发起了网络请求, 获取了数据流, 至此数据资源的获取就已经完成了, 后面要做的便是最重要的数据处理了, 它通过回调的方式将 InputStream 扔了出去
最终会回溯到 DecodeJob 的 onDataFetcherReady 处理这个 InputStream
2. DecodeJob 解码数据流
class DecodeJob<R> implements DataFetcherGenerator.FetcherReadyCallback,
    Runnable,
    Comparable<DecodeJob<?>>,
    Poolable {

  private Key currentSourceKey;
  private Object currentData;
  private DataSource currentDataSource;
  private DataFetcher<?> currentFetcher;

  @Override
  public void onDataFetcherReady(Key sourceKey, Object data, DataFetcher<?> fetcher,
      DataSource dataSource, Key attemptedKey) {
    this.currentSourceKey = sourceKey;  // 保存数据的 key
    this.currentData = data;            // 保存数据实体
    this.currentFetcher = fetcher;      // 保存数据的获取器
    this.currentDataSource = dataSource;// 数据来源: url 为 REMOTE 类型的枚举, 表示从远程获取
    ......
    if (Thread.currentThread() != currentThread) {
      ......
    } else {
      try {
        // 调用 decodeFromRetrievedData 解析获取的数据
        decodeFromRetrievedData();
      } finally {
        ......
      }
    }
  }

  private void decodeFromRetrievedData() {
    Resource<R> resource = null;
    try {
      // 1. 调用了 decodeFromData 获取资源
      resource = decodeFromData(/*HttpUrlFetcher*/currentFetcher, /*InputStream*/currentData,/*REMOTE*/ currentDataSource);
    } catch (GlideException e) {
      ......
    }
    if (resource != null) {
      // 2. 通知外界资源获取成功了
      notifyEncodeAndRelease(resource, currentDataSource);
    } else {
      ......
    }
  }

}
DecodeJob 解码数据流的操作如下
- 首先要将 InputStream 解码为 Resource 类型(并非 Android Resource)
- Resource 的缓存与展示
我们先看看它是如何将数据解析成 Resource
1) 解码 InputStream
class DecodeJob<R> implements DataFetcherGenerator.FetcherReadyCallback,
    Runnable,
    Comparable<DecodeJob<?>>,
    Poolable {

  private <Data> Resource<R> decodeFromData(DataFetcher<?> fetcher, Data data,
      DataSource dataSource) throws GlideException {
    try {
      ......
      // 调用了 decodeFromFetcher
      Resource<R> result = decodeFromFetcher(data, dataSource);
      ......
      return result;
    } finally {
    }
  }

  private <Data> Resource<R> decodeFromFetcher(Data data, DataSource dataSource)
      throws GlideException {
    // 1. 获取当前数据类的解析器 LoadPath
    LoadPath<Data, ?, R> path = decodeHelper.getLoadPath((Class<Data>) data.getClass());
    // 2. 通过解析器来解析来解析数据
    return runLoadPath(data, dataSource, path);
  }

  private <Data, ResourceType> Resource<R> runLoadPath(Data data, DataSource dataSource,
      LoadPath<Data, ResourceType, R> path) throws GlideException {
    Options options = getOptionsWithHardwareConfig(dataSource);
    // 2.1 根据数据类型获取一个数据重造器, 获取的数据为 InputStream, 因此它是一个 InputStreamRewinder 的实例
    DataRewinder<Data> rewinder = glideContext.getRegistry().getRewinder(data);
    try {
      // 2.2 将解析资源的任务转移到了 LoadPath.load 方法中
      return path.load( rewinder, options, width, height, new DecodeCallback<ResourceType>(dataSource));
    } finally {
      rewinder.cleanup();
    }
  }
}
可以看到为了解析数据, 首先构建了一个 LoadPath, 然后创建了一个 InputStreamRewinder 类型的 DataRewinder, 最终将数据解析的操作到了 LoadPath.load 方法中
接下来看看这个LoadPath.load 做了哪些处理
public class LoadPath<Data, ResourceType, Transcode> {

 public Resource<Transcode> load(DataRewinder<Data> rewinder, @NonNull Options options, int width,
      int height, DecodePath.DecodeCallback<ResourceType> decodeCallback) throws GlideException {
    ......
    try {
      return loadWithExceptionList(rewinder, options, width, height, decodeCallback, throwables);
    } finally {
      ......
    }
  }

  private final List<? extends DecodePath<Data, ResourceType, Transcode>> decodePaths;

  private Resource<Transcode> loadWithExceptionList(DataRewinder<Data> rewinder,
      @NonNull Options options, int width, int height, DecodePath.DecodeCallback<ResourceType> decodeCallback,
      List<Throwable> exceptions) throws GlideException {
    Resource<Transcode> result = null;
    // 遍历内部存储的 DecodePath 集合, 通过他们来解析数据
    for (int i = 0, size = decodePaths.size(); i < size; i++) {
      DecodePath<Data, ResourceType, Transcode> path = decodePaths.get(i);
      try {
        // 调用 DecodePath.decode 真正进行数据的解析
        result = path.decode(rewinder, width, height, options, decodeCallback);
      } catch (GlideException e) {
        ......
      }
      ......
    }
    return result;
  }

}

public class DecodePath<DataType, ResourceType, Transcode> {

  public Resource<Transcode> decode(DataRewinder<DataType> rewinder, int width, int height,
      @NonNull Options options, DecodeCallback<ResourceType> callback) throws GlideException {
    // 1. 调用 decodeResource 将源数据解析成中间资源
    Resource<ResourceType> decoded = decodeResource(rewinder, width, height, options);
    // 2. 调用 DecodeCallback.onResourceDecoded 处理中间资源
    Resource<ResourceType> transformed = callback.onResourceDecoded(decoded);
    // 3. 调用 ResourceTranscoder.transcode 将中间资源转为目标资源
    return transcoder.transcode(transformed, options);
  }
可以看到 DecodePath.decode 操作一共有三种 resource
- 调用 decodeResource 将源数据解析成资源
- 即获取 Bitmap 的过程
- 调用 DecodeCallback.onResourceDecoded 处理资源
- 对 Bitmap 进行 Transform 操作
- 调用 ResourceTranscoder.transcode 将资源转为目标资源
- 将 Bitmap 转为目标类型
我们先看看获取 Bitmap 的操作
Step1 获取 Bitmap
  private Resource<ResourceType> decodeResource(DataRewinder<DataType> rewinder, int width,
      int height, @NonNull Options options) throws GlideException {
    try {
      // 调用了 decodeResourceWithList
      return decodeResourceWithList(rewinder, width, height, options, exceptions);
    } finally {
      ......
    }
  }

  @NonNull
  private Resource<ResourceType> decodeResourceWithList(DataRewinder<DataType> rewinder, int width,
      int height, @NonNull Options options, List<Throwable> exceptions) throws GlideException {
    Resource<ResourceType> result = null;
    for (int i = 0, size = decoders.size(); i < size; i++) {
      ResourceDecoder<DataType, ResourceType> decoder = decoders.get(i);
      try {
        DataType data = rewinder.rewindAndGet();
        if (decoder.handles(data, options)) {
          data = rewinder.rewindAndGet();
          // 调用 ResourceDecoder.decode 解析源数据
          result = decoder.decode(data, width, height, options);
        }
      }
      ......
      if (result != null) {
        break;
      }
    }
    return result;
  }

}
因为本次流程的源数据为 InputStream 因此它的解析器为 StreamBitmapDecoder
public class StreamBitmapDecoder implements ResourceDecoder<InputStream, Bitmap> {

  private final Downsampler downsampler;

  public Resource<Bitmap> decode(@NonNull InputStream source, int width, int height,
      @NonNull Options options)
      throws IOException {
    ......
    try {
      // 根据请求配置的数据, 对数据流进行采样压缩, 获取到一个 Resource<Bitmap>
      return downsampler.decode(invalidatingStream, width, height, options, callbacks);
    } finally {
      ......
    }
  }

}
可以看到它内部通过 Downsampler.decode 方法对数据流进行采样压缩, 来获取这个流的 Bitmap
- 这个采样的策略就是我们在构建 Request 时传入的, 其采样压缩的细节, 并不是我们本次关注的重点
我们看看获取到了 Resource 之后, 如何处理这个资源
Step2 Transform Bitmap
可以看到, 当我们将源数据解析成对应的资源之后, 便会调用 DecodeCallback.onResourceDecoded 处理资源, 我们看看它的处理过程
class DecodeJob<R> implements DataFetcherGenerator.FetcherReadyCallback,
    Runnable,
    Comparable<DecodeJob<?>>,
    Poolable {

  private final class DecodeCallback<Z> implements DecodePath.DecodeCallback<Z> {

    @Override
    public Resource<Z> onResourceDecoded(@NonNull Resource<Z> decoded) {
      // 调用了外部类的 onResourceDecoded 方法
      return DecodeJob.this.onResourceDecoded(dataSource, decoded);
    }

  }

  private final DeferredEncodeManager<?> deferredEncodeManager = new DeferredEncodeManager<>();

  <Z> Resource<Z> onResourceDecoded(DataSource dataSource,
      @NonNull Resource<Z> decoded) {

    // 1. 调用 Transformation.transformation 对 Bitmap 进行变化操作
    Class<Z> resourceSubClass = (Class<Z>) decoded.get().getClass();
    Transformation<Z> appliedTransformation = null;
    Resource<Z> transformed = decoded;

    if (dataSource != DataSource.RESOURCE_DISK_CACHE) {
      appliedTransformation = decodeHelper.getTransformation(resourceSubClass);
      transformed = appliedTransformation.transform(glideContext, decoded, width, height);
    }
    ......

    // 2. 构建磁盘缓存策略
    final EncodeStrategy encodeStrategy;
    final ResourceEncoder<Z> encoder;
    if (decodeHelper.isResourceEncoderAvailable(transformed)) {
      encoder = decodeHelper.getResultEncoder(transformed);
      encodeStrategy = encoder.getEncodeStrategy(options);
    } else {
      encoder = null;
      encodeStrategy = EncodeStrategy.NONE;
    }
    Resource<Z> result = transformed;
    boolean isFromAlternateCacheKey = !decodeHelper.isSourceKey(currentSourceKey);
    if (diskCacheStrategy.isResourceCacheable(isFromAlternateCacheKey, dataSource,
        encodeStrategy)) {
      ......
      final Key key;
      switch (encodeStrategy) {
        case SOURCE:
          // 源 Bitmap 即 Source 缓存
          key = new DataCacheKey(currentSourceKey, signature);
          break;
        case TRANSFORMED:
          // 变化后的 Bitmap 即 Resource 缓存
          key =
              new ResourceCacheKey(......);
          break;
        default:
          throw new IllegalArgumentException("Unknown strategy: " + encodeStrategy);
      }
      // 5. 初始化编码管理者, 用于提交内存缓存
      LockedResource<Z> lockedResult = LockedResource.obtain(transformed);
      deferredEncodeManager.init(key, encoder, lockedResult);
      result = lockedResult;
    }
    // 返回 transform 之后的 bitmap
    return result;
  }

}
可以看到 onResourceDecoded 中, 主要是对中间资源做了如下的操作
- 调用 Transformation.transformation 对 Bitmap 进行变化操作
- 将资源转为目标效果, 如在构建 request 时, 设置的 CenterCrop
- 构建磁盘缓存的 key
- 原始 Bitmap 即: Source 缓存
- Tranform 之后的为 Resource 缓存
好的, 这个方法执行结束之后, 这个资源就与我们期望的效果一致了, 接下来只需要将它转为目标格式就可以展示了
Step3 将 Bitmap 转为目标类型
目标数据为 Drawable, 因此它的转换器为 BitmapDrawableTranscoder
public class BitmapDrawableTranscoder implements ResourceTranscoder<Bitmap, BitmapDrawable> {

  private final Resources resources;

  @Nullable
  @Override
  public Resource<BitmapDrawable> transcode(@NonNull Resource<Bitmap> toTranscode,
      @NonNull Options options) {
    // 调用了 LazyBitmapDrawableResource.obtain 获取 Resource<BitmapDrawable> 的实例对象
    return LazyBitmapDrawableResource.obtain(resources, toTranscode);
  }

}

public final class LazyBitmapDrawableResource implements Resource<BitmapDrawable>,
    Initializable {

  public static Resource<BitmapDrawable> obtain(
      @NonNull Resources resources, @Nullable Resource<Bitmap> bitmapResource) {
    ......
    // 创建了一个 LazyBitmapDrawableResource
    return new LazyBitmapDrawableResource(resources, bitmapResource);
  }

  private LazyBitmapDrawableResource(@NonNull Resources resources,
      @NonNull Resource<Bitmap> bitmapResource) {
    this.resources = Preconditions.checkNotNull(resources);
    this.bitmapResource = Preconditions.checkNotNull(bitmapResource);
  }

  public BitmapDrawable get() {
    // Get 方法反回了一个 BitmapDrawable 对象
    return new BitmapDrawable(resources, bitmapResource.get());
  }

}
好的, 转化成目标数据也非常的简单, 它将我们解析到的 bitmap 存放到 LazyBitmapDrawableResource 内部, 然后外界通过 get 方法就可以获取到一个 BitmapDrawable 的对象了
接下来看看 notifyEncodeAndRelease 如何展示数据的
2) 资源的缓存与展示
class DecodeJob<R> implements DataFetcherGenerator.FetcherReadyCallback,
    Runnable,
    Comparable<DecodeJob<?>>,
    Poolable {

  private void notifyEncodeAndRelease(Resource<R> resource, DataSource dataSource) {
    ......
    // 1. 回调上层资源准备好了
    notifyComplete(result, dataSource);
    ......
    try {
      // 2. 将数据缓存到磁盘
      if (deferredEncodeManager.hasResourceToEncode()) {
        deferredEncodeManager.encode(diskCacheProvider, options);
      }
    } finally {
      ...
    }
  }

  private Callback<R> callback;

  private void notifyComplete(Resource<R> resource, DataSource dataSource) {
    ......
    // 1.1 从 DecodeJob 的构建中, 我们知道这个 Callback 是一 EngineJob
    callback.onResourceReady(resource, dataSource);
  }

}
好的, 可以看到 DecodeJob.decodeFromRetrievedData 中, 主要做了两个操作
- 回调 EngineJob.onResourceReady 资源准备好了
- 将数据缓存到磁盘
这里我们主要看看 EngineJob.onResourceReady 中做了哪些处理
class EngineJob<R> implements DecodeJob.Callback<R>,
    Poolable {

  @Override
  public void onResourceReady(Resource<R> resource, DataSource dataSource) {
    synchronized (this) {
      this.resource = resource;
      this.dataSource = dataSource;
    }
    notifyCallbacksOfResult();
  }

  void notifyCallbacksOfResult() {
    ResourceCallbacksAndExecutors copy;
    Key localKey;
    EngineResource<?> localResource;
    synchronized (this) {
      ......
      engineResource = engineResourceFactory.build(resource, isCacheable);
      hasResource = true;
      copy = cbs.copy();
      incrementPendingCallbacks(copy.size() + 1);

      localKey = key;
      localResource = engineResource;
    }
    // 1. 通知上层 Engine 任务完成了
    listener.onEngineJobComplete(this, localKey, localResource);
    // 2. 回调给 ImageViewTarget 展示资源
    for (final ResourceCallbackAndExecutor entry : copy) {
      entry.executor.execute(new CallResourceReady(entry.cb));
    }
  }

}
EngineJob 中也是有两步操作
- 一个是通知上层任务完成了
- 另一个是回调给 ImageViewTarget 展示资源
Step1 回调 Engine 任务完成
我们先看看上层做了什么处理
public class Engine implements EngineJobListener,
    MemoryCache.ResourceRemovedListener,
    EngineResource.ResourceListener {

  public synchronized void onEngineJobComplete(
      EngineJob<?> engineJob, Key key, EngineResource<?> resource) {
    if (resource != null) {
      // 将加载好的资源添加到内存缓存
      if (resource.isCacheable()) {
        activeResources.activate(key, resource);
      }
    }
    ......
  }

}
我们知道在请求发起前是 Engine 尝试通过内存缓存读, 结束之后再回到 Engine 添加内存缓存也不足为奇了
Step2 通知 ImageViewTarget 展示资源
接下来我们看看 ImageViewTarget 展示资源的过程
public abstract class ImageViewTarget<Z> extends ViewTarget<ImageView, Z>
    implements Transition.ViewAdapter {

  public void onResourceReady(@NonNull Z resource, @Nullable Transition<? super Z> transition) {
    // 处理一些 transition 变化, 在构建 Request 时有分析过, 这里不赘述其实现细节了
    if (transition == null || !transition.transition(resource, this)) {
      setResourceInternal(resource);
    } else {
      ......
    }
  }

  private void setResourceInternal(@Nullable Z resource) {
    // 调用了 setResource
    setResource(resource);
    ......
  }

}

public class DrawableImageViewTarget extends ImageViewTarget<Drawable> {

  protected void setResource(@Nullable Drawable resource) {
    // 呈现到 View 上
    view.setImageDrawable(resource);
  }

}
ImageViewTarget 调用了子类重写的 setResource 方法, 将数据填充进去, 至此一次 Glide 图像加载就完成了
四) 流程回顾
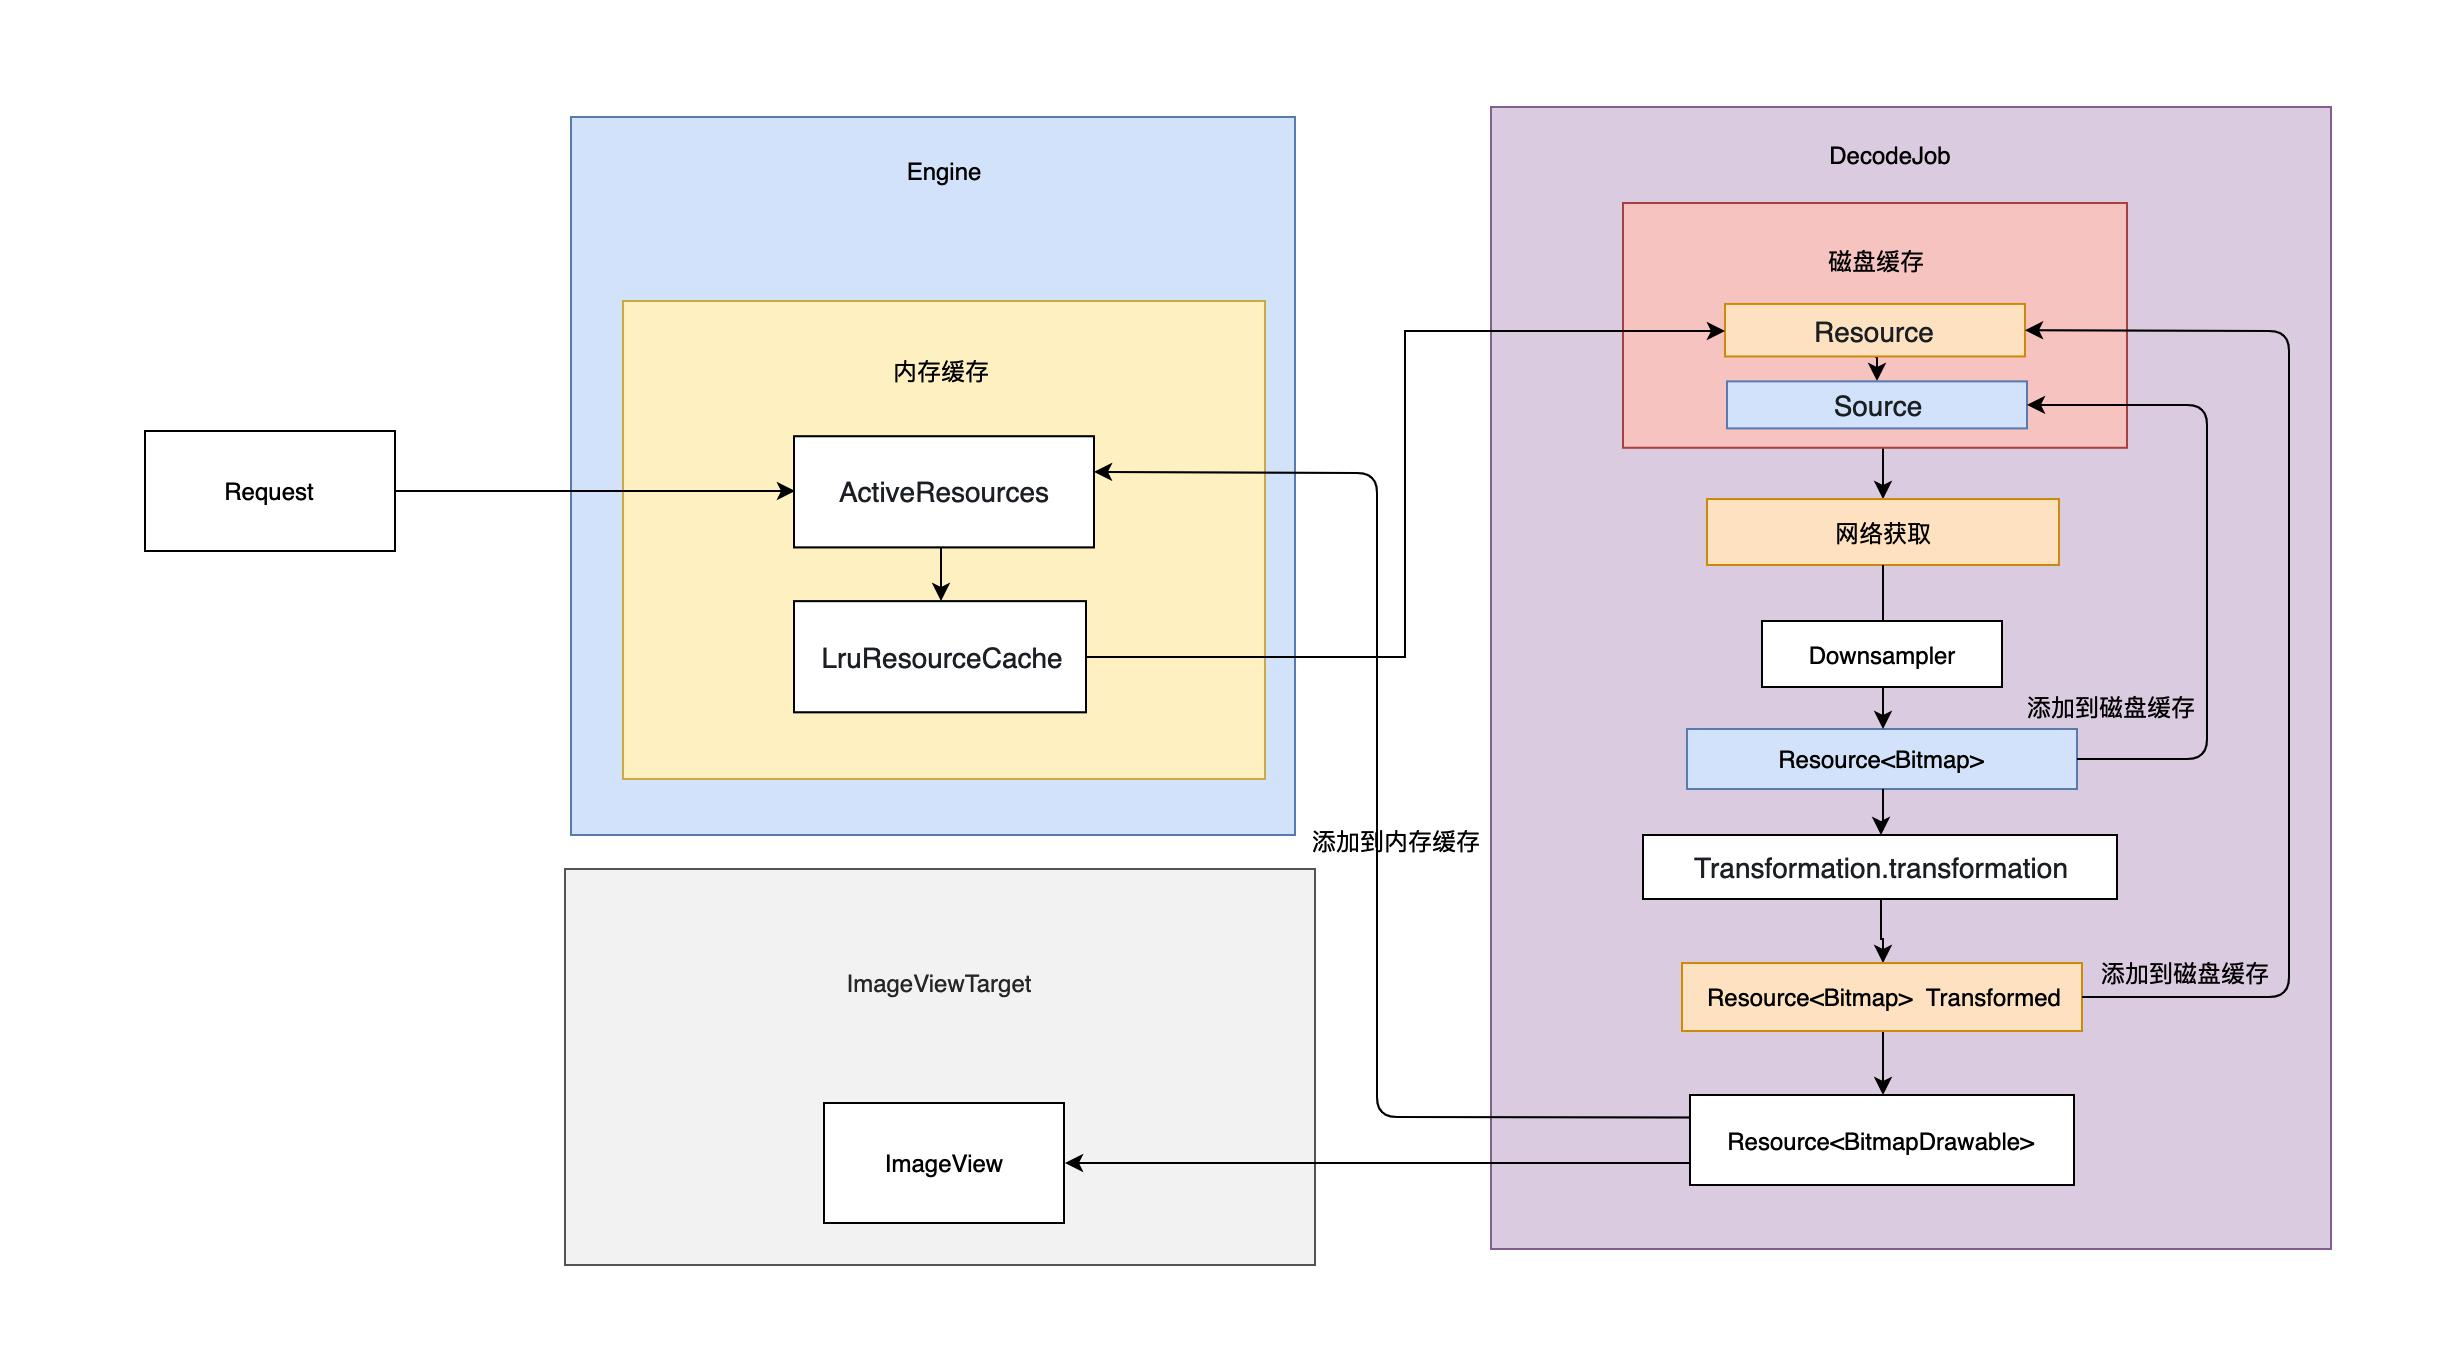
走到这里, 一个请求的数据源获取就已经完成, 其流程如下
- 任务的构建
- 构建这个请求的 key
- 从内存缓存中查找 key 对应的资源, 若存在直接回 onResourceReady 表示资源准备好了
- 从 ActiveResources 缓存中查找
- 从 LruResourceCache 缓存中查找
- 从缓存中查找 key 对应的任务
- 若存在则说明无需再次获取资源
- 构建引擎任务 EngineJob
- 引擎的任务为解码任务 DecodeJob
- 将任务添加到缓存, 防止多次构建
- 执行 EngineJob
- 任务的执行
- 通过 getNextStage 获取 Decode 场景
- 构建当前场景的处理器 DataFetcherGenerator
- 调用 runGenerators 处理任务
- 优先从 Resource 的磁盘缓存中取数据
- 次优先从 Data 的磁盘缓存中取数据
- 最终方案重新获取 Source 数据
- Source 通过 HttpUrlFetcher 获取网络数据流 InputStream
- DecodeJob 的 onDataFetcherReady 处理 InputStream
- 解析 InputStream
- 通过 Downsampler 将 InputStream 解析成 Bitmap
- 调用 Transformation.transformation 对 Bitmap 进行变化操作
- 将 Bitmap 转为 Drawable
- 资源的缓存与展示
- Engine 进行内存缓存
- ViewTarget 展示资源
- DecodeJob 进行磁盘缓存
- 原始 Bitmap 对应 SOURCE 类型
- Transform 之后的 Bitmap 对应 RESOURCE 类型
- 解析 InputStream
总结
通过一次流程分析我们得知, 整个 Glide 图片加载主要有如下几步
- with
- 获取全局单例的 Glide 对象
- 获取全局单例的 RequestManagerRetriever
- 创建当前 Context 对应的 RequestManager
- load
- 根据的宽高、采样的方式、transform 变化等构建一个 RequestBuilder 对象
- into
- 根据 ImageView 构建采样压缩和图像变化的策略保存在 Options 和 Transform 中
- 构建 ViewTarget, 描述这个请求要作用的 View 对象
- 调用 into 重载方法
- 构建 Request 对象
- 为 ViewTarget 绑定 Request
- 交由 RequestManger 执行该请求
- 请求的执行
- 任务的构建
- 构建这个请求的 key
- 从内存缓存中查找 key 对应的资源, 若存在直接回 onResourceReady 表示资源准备好了
- 从 ActiveResources 缓存中查找
- 从 LruResourceCache 缓存中查找
- 从缓存中查找 key 对应的任务
- 若存在则说明无需再次获取资源
- 构建引擎任务 EngineJob
- 引擎的任务为解码任务 DecodeJob
- 将任务添加到缓存, 防止多次构建
- 执行 EngineJob
- 任务的执行
- 通过 getNextStage 获取 Decode 场景
- 构建当前场景的处理器 DataFetcherGenerator
- 调用 runGenerators 处理任务
- 优先从 Resource 的磁盘缓存中取数据
- 次优先从 Data 的磁盘缓存中取数据
- 最终方案重新获取 Source 数据
- Source 通过 HttpUrlFetcher 获取网络数据流 InputStream
- DecodeJob 的 onDataFetcherReady 处理 InputStream
- 解析 InputStream
- 通过 Downsampler 将 InputStream 解析成 Bitmap
- 调用 Transformation.transformation 对 Bitmap 进行变化操作
- 将 Bitmap 转为 BitmapDrawable
- 资源的缓存与展示
- Engine 进行内存缓存
- ViewTarget 展示资源
- DecodeJob 进行磁盘缓存
- 原始 Bitmap 对应 SOURCE 类型
- Transform 之后的 Bitmap 对应 RESOURCE 类型
- 任务的构建
看了 Glide 的加载流程, 我似乎能够明白为什么他是 Google 推荐的图片加载框架了, 内部细节的处理做的非常的到位, 而且使用 GlideContext 用于描述 Glide 的上下文, 与 Android 的 Context 巧妙的融合在一起, 读起来真有一种阅读 Android 源码的既视感
不过这只是最简单的流程, 而且 Glide 支持 Gif, 视频加载操作, 可想而知其内部的 Decorder 处理了多少逻辑代码, 如此复杂的流程, 嵌套了如此之多的回调, 无疑增加了我们阅读源码的难度, 若是将这些操作分层, 并且使用拦截器去实现, 我想定会让一次图像加载操作变得更加清晰明了
