

简介
Tensorflow Lite是针对移动设备和嵌入式设备的轻量化解决方案,占用空间小,低延迟。Tensorflow Lite在android8.1以上的设备上可以通过ANNA启用硬件加速。
- 支持浮点运算和量化模型,并已针对移动平台进行优化,可以用来创建和运行自定义模型。开发者也可以在模型中添加自定义操作。
- FlatBuffer格式
- 具有在移动设备运行更快的内核解释器
- 支持通过Tensorflow训练好的模型转换为Tensorflow Lite格式(pd,h5等都可以)
- 当支持所有优化操作时,模型小于300k,当仅支持inception v3和mobilenet模型优化时,模型小于200k
预训练模型:
- inception v3:用于目标检测
- MobileNets:专门针对移动端的模型,具有低延迟,高速度,低内存,可用于图像识别,目标检测,图像分割,但是精度小于inception v3
- 量化版本的MobileNets,通过将float-32转为int-8,在CPU上拥有更快的速度
- 支持java,c++API
以上谈到的预训练模型基于ImageNet数据集训练,支持1000种类别。如果此数据集不能满足你的项目需要,你需要准备自己的数据集和标签,使用迁移学习重新训练模型。
模型结构
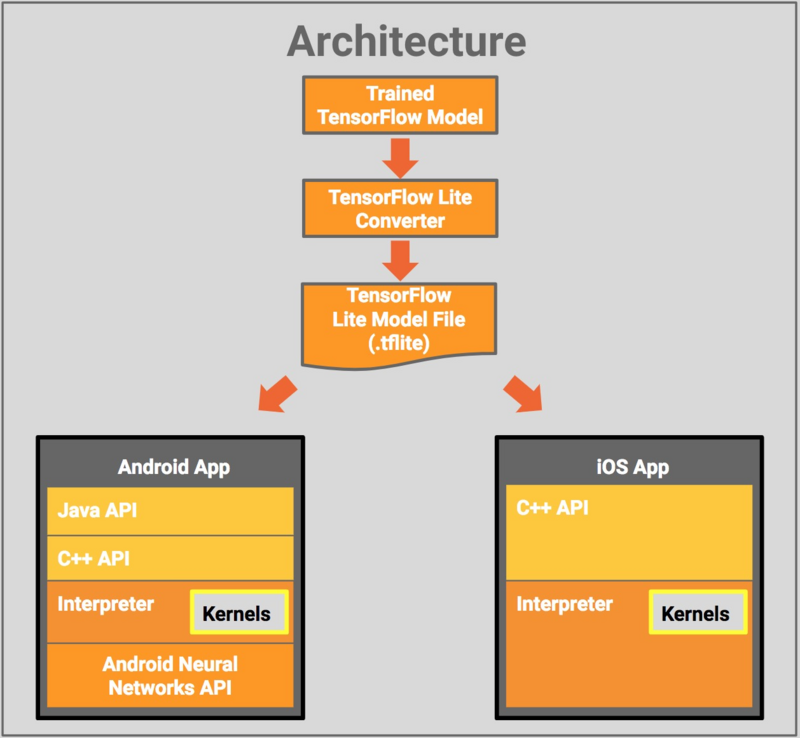
Tensorflow Lite模型的数据格式与Tensorflow桌面端不同,需要使用Tensorflow Lite转换为.tflite格式,然后应用到移动端。
模型结构:
- java-API:包装C++API,以便在android上使用java调用
- C++-API:加载Tensorflow Lite模型和解释器
- 解释器:执行模型一系列核心操作,支持选择内核加载。全部加载300kb,不加载只有100kb
- 在android8.1以上设备,可通过相关api进行硬件加速(硬件支持的情况下),否则在CPU执行
转换模型格式
Tensorflow Lite转换器支持以下格式:
- 使用python API执行SavedModel保存的模型文件
- tf.keras保存的.h5模型文件
- 转换后的GraphDef文件
转换GraphDef文件
Tensorflow模型一般保存为.pd或.pdtxt格式的文件,要转换为Tensorflow Lite支持的文件,首先需要进行frozen操作。此操作处理多个不同格式的文件:
- tf.GraphDef(pd,pdtxt):图文件,包含操作,张量,变量的定义
- checkpoint(.ckpt):包含变量,不包含解释器
- tensorflow lite(.tflite):序列化的FlatBuffer文件,包含所有需要的文件
checkpoint文件包含训练权重,tf.graphdef文件包含图结构。冻结操作就是将上述文件进行合并操作
使用命令行,执行该操作的示例如下:
freeze_graph --input_graph=/demo/mobilenet_v1_224.pd\
--input_checkpoint=/demo/checkpoints/mobilenet-1001.ckpt\
--input_binary=True\
--output_graph=/demo/frozen_mobilenet_v1_224.pd\
--output_node_names=/demo/MobileNetV1/Predictions/Reshape_1
input_binary:读取的文件是否是二进制文件,如:pd和pdtxt文件
android端使用Tensorflow Lite
可以使用android studio和源码编译两种方式,此处我们介绍第一种(由于你懂的原因,开vpn会比较顺利些)。
- 安装android studio
- SDK大于26,NDK大于14
- 导入工程项目,路径:tensorflow/lite/examples
默认使用mobilenet模型,如要使用inception模型,先下载模型文件并拷贝至asset文件夹,然后修改Camera2BasicFragment文件:
classifier = new ImageClassifierQuantizedMobileNet(getActivity())改为:
classifier = new ImageClassifierFloatInception(getActivity())
Tensorflow Lite转换器
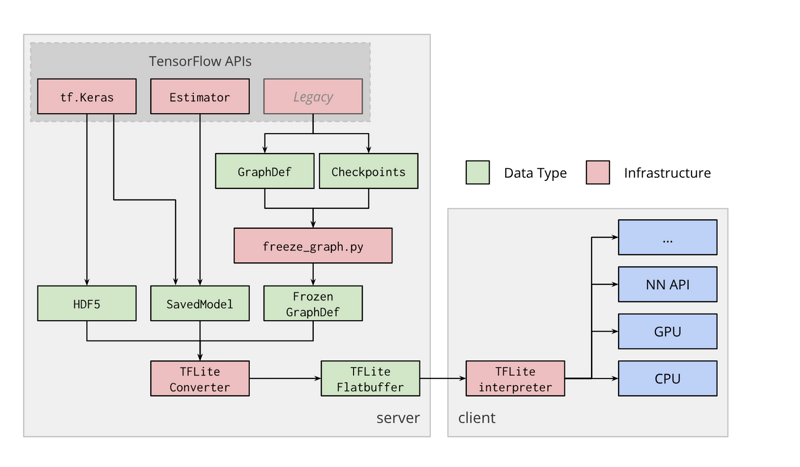
上图是Tensorflow Lite转换器的工作流程,清晰明了,就不做过多介绍了。此外,转换的方式有两种,python api的方式和命令行方式。
从Session中导出GraphDef
使用tf.Session将Tensorflow模型转为Tensorflow Lite模型
import tensorflow as tf

img = tf.placeholder(name="img", dtype=tf.float32, shape=(1, 64, 64, 3))
var = tf.get_variable("weights", dtype=tf.float32, shape=(1, 64, 64, 3))
val = img + var
out = tf.identity(val, name="out")

with tf.Session() as sess:
  sess.run(tf.global_variables_initializer())
  converter = tf.lite.TFLiteConverter.from_session(sess, [img], [out])
  tflite_model = converter.convert()
  open("converted_model.tflite", "wb").write(tflite_model)
从file中导出GraphDef
以下代码展示怎样将.pd或.pdtxt文件转为Tensorflow Lite模型支持的FlateBuffer格式文件。
import tensorflow as tf

graph_def_file = "/path/to/Downloads/mobilenet_v1_1.0_224/frozen_graph.pb"
input_arrays = ["input"]
output_arrays = ["MobilenetV1/Predictions/Softmax"]

converter = tf.lite.TFLiteConverter.from_frozen_graph(
  graph_def_file, input_arrays, output_arrays)
tflite_model = converter.convert()
open("converted_model.tflite", "wb").write(tflite_model)
将SaveModle导出
import tensorflow as tf

converter = tf.lite.TFLiteConverter.from_saved_model(saved_model_dir)
tflite_model = converter.convert()
open("converted_model.tflite", "wb").write(tflite_model)
tf.keras文件导出
import tensorflow as tf

converter = tf.lite.TFLiteConverter.from_keras_model_file("keras_model.h5")
tflite_model = converter.convert()
open("converted_model.tflite", "wb").write(tflite_model)
量化模型
import tensorflow as tf

img = tf.placeholder(name="img", dtype=tf.float32, shape=(1, 64, 64, 3))
const = tf.constant([1., 2., 3.]) + tf.constant([1., 4., 4.])
val = img + const
out = tf.fake_quant_with_min_max_args(val, min=0., max=1., name="output")

with tf.Session() as sess:
  converter = tf.lite.TFLiteConverter.from_session(sess, [img], [out])
  converter.inference_type = tf.lite.constants.QUANTIZED_UINT8
  input_arrays = converter.get_input_arrays()
  converter.quantized_input_stats = {input_arrays[0] : (0., 1.)}  # mean, std_dev
  tflite_model = converter.convert()
  open("converted_model.tflite", "wb").write(tflite_model)
TensorFlow Lite Python解释器
代码展示如何使用Tensorflow Lite解释器读取.tflite文件。
import numpy as np
import tensorflow as tf

# 加载模型并分配张量
interpreter = tf.lite.Interpreter(model_path="converted_model.tflite")
interpreter.allocate_tensors()

# 获取输入输出张量
input_details = interpreter.get_input_details()
output_details = interpreter.get_output_details()

# 随机生成测试数据,测试模型输出
input_shape = input_details[0]['shape']
input_data = np.array(np.random.random_sample(input_shape), dtype=np.float32)
interpreter.set_tensor(input_details[0]['index'], input_data)

interpreter.invoke()
output_data = interpreter.get_tensor(output_details[0]['index'])
print(output_data)
Tensorflow2.0转换器使用
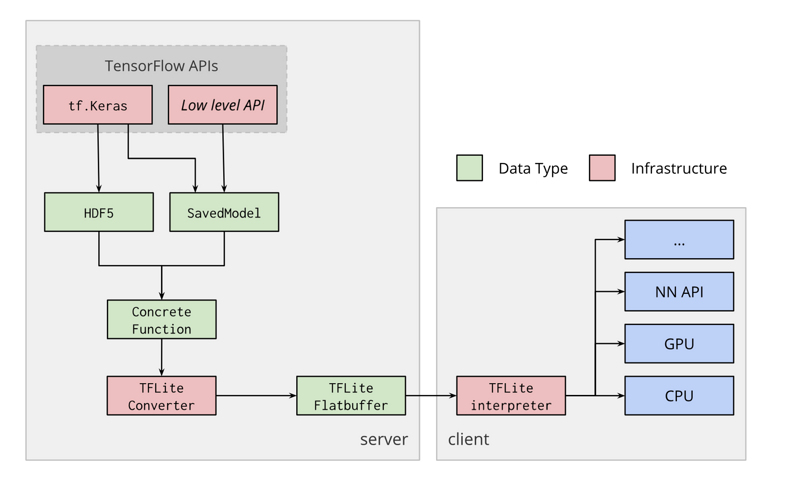
如图所示,Tensorflow2.0与之前相比,少了冻结graph模块,增加了Concrete Fn。
生成concrete Fn
为了将Tensorflow2.0模型转为Tensorflow Lite,模型需要导出concrete Fn。这是因为Tensorflow2.0中,eager execution是默认设置,虽然调试更加便利,但是它没有保存图,因为不能直接应用到移动设备。不过,可以使用tf.function包装,这样保存的模型就包含图,可以转换为Tensorflow Lite所需要的FlatBuffer格式文件。
class BasicModel(tf.Module):

  def __init__(self):
    self.const = None

  @tf.function
  def pow(self, x):
    if self.const is None:
      self.const = tf.Variable(2.)
    return x ** self.const
concrete Fn声明的图可以被转换为Tensorflow Lite模型或者使用SaveModel导出。为了导出此方法,需要声明signature,使用方法如下:
- 在tf.function中声明input_signature
- 将tf.TensorSpec传值给get_concrete_funtion
- 将input传值给get_concrete_funtion
import tensorflow as tf

root = tf.Module()

# 初始化一次变量值
root.var = None

@tf.function
def exported_function(x):

  if root.var is None:
    root.var = tf.Variable(tf.random.uniform([2, 2]))
  root.const = tf.constant([[37.0, -23.0], [1.0, 4.0]])
  root.mult = tf.matmul(root.const, root.var)
  return root.mult * x

root.func = exported_function

concrete_func = root.func.get_concrete_function(
  tf.TensorSpec([1, 1], tf.float32))
Python api执行the TensorFlow Lite converter
Tensorflow2.0中转换Tensorflow Lite模型使用tf.lite.TFLiteConverter.from_concrete_function(),示例如下:
import tensorflow as tf

# 创建模型
root = tf.train.Checkpoint()
root.v1 = tf.Variable(3.)
root.v2 = tf.Variable(2.)
root.f = tf.function(lambda x: root.v1 * root.v2 * x)

# 保存模型
export_dir = "/tmp/test_saved_model"
input_data = tf.constant(1., shape=[1, 1])
to_save = root.f.get_concrete_function(input_data)
tf.saved_model.save(root, export_dir, to_save)

# 加载模型并获取concrete fn.
model = tf.saved_model.load(export_dir)
concrete_func = model.signatures[
  tf.saved_model.DEFAULT_SERVING_SIGNATURE_DEF_KEY]

# 设置input shape
concrete_func.inputs[0].set_shape(input_data.shape)

# 转换模型
converter = tf.lite.TFLiteConverter.from_concrete_function(concrete_func)
tflite_model = converter.convert()
TensorFlow Lite 推断
TensorFlow Lite推断一般执行以下步骤:
- 加载.tflite模型
- 处理数据以适应模型input
- 调用API,创建解析器,运行模型
- 获取模型输出结果
如何选择模型
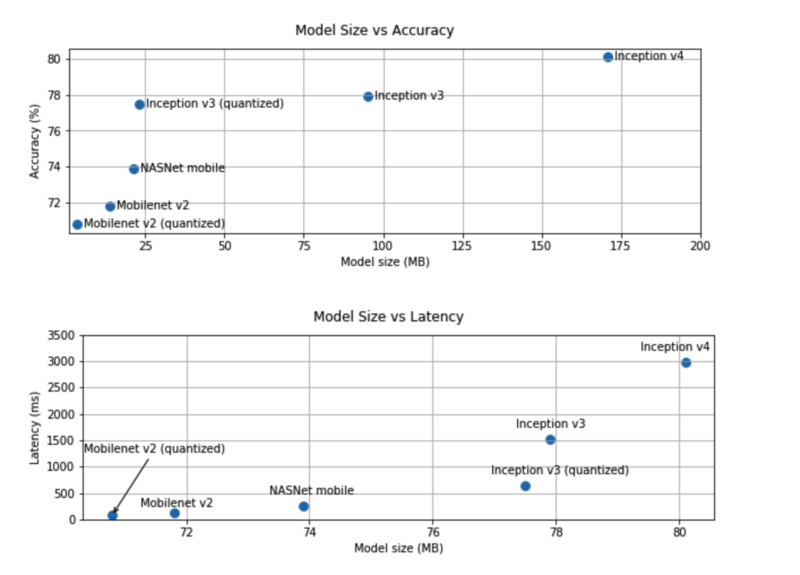
如图所示,大模型高精度,高延迟;小模型低精度,低延迟,模型的选择需要根据你的项目需求进行选择。
查看原文: Tensorflow Lite介绍
