

原文链接:www.baeldung.com/spring-boot…
作者: Alejandro Ugarte
译者:Jack
1.概述
Spring Boot和Angular形成了一个功能强大的串联,非常适合开发具有最小占用空间的Web应用程序。
在本教程中,我们将使用Spring Boot实现RESTful后端,使用Angular创建基于JavaScript的前端。
2. Spring Boot应用程序
我们的演示Web应用程序的功能确实非常简单。它只是缩小到从内存H2数据库中获取和显示JPA实体列表,并通过纯HTML表单持久保存新实体。
2.1 Maven依赖
这是我们的Spring Boot项目的依赖项:
<dependency>
    <groupId>org.springframework.boot</groupId>
    <artifactId>spring-boot-starter-web</artifactId>
</dependency>
<dependency>
    <groupId>org.springframework.boot</groupId>
    <artifactId>spring-boot-starter-data-jpa</artifactId>
</dependency>
<dependency>
    <groupId>com.h2database</groupId>
    <artifactId>h2</artifactId>
    <version>1.4.197</version>
    <scope>runtime</scope>
</dependency>
请注意,我们将spring-boot-starter-web包括在内,因为我们将使用它来创建REST服务,
并使用spring-boot-starter-jpa来实现持久层。另外,让我们确保在Maven Central上检查最新版本的H2数据库。
我将会实现Where子句。
2.2 JPA实体类
为了快速构建应用程序的域层原型,让我们定义一个简单的JPA实体类,它将负责为用户建模:
@Entity
public class User {

    @Id
    @GeneratedValue(strategy = GenerationType.AUTO)
    private long id;
    private final String name;
    private final String email;

    // standard constructors / setters / getters / toString
}
2.3 该UserRepository接口
由于我们在User实体上需要基本的CRUD功能,因此我们还必须定义UserRepository接口:
@Repository
public interface UserRepository extends CrudRepository<User, Long>{}
2.4 REST控制器
现在,让我们实现REST API。在这种情况下,它只是一个简单的REST控制器。
@RestController
@CrossOrigin(origins = "http://localhost:4200")
public class UserController {

    // standard constructors

    private final UserRepository userRepository;

    @GetMapping("/users")
    public List<User> getUsers() {
        return (List<User>) userRepository.findAll();
    }

    @PostMapping("/users")
    void addUser(@RequestBody User user) {
        userRepository.save(user);
    }
}
UserController类的定义中没有任何固有的复杂性。
当然,这里值得注意的唯一实现细节是使用@CrossOrigin注释。顾名思义,注释在服务器上启用跨源资源共享(CORS)。
此步骤并非总是必要的。由于我们将Angular前端部署到http:// localhost:4200并将我们的Boot后端部署到http:// localhost:8080,否则浏览器将拒绝从一个到另一个的请求。
关于控制器方法,getUser()从数据库中提取所有用户实体。类似地,addUser()方法在数据库中保留一个新实体,该实体在请求主体中传递。
为了简单起见,我们故意忽略控制器实现,在持久化实体之前触发Spring Boot验证。然而,在生产中,我们不能信任用户输入,因此服务器端验证应该是必需的功能。
2.5 引导Spring Boot应用程序
最后,让我们创建一个标准的Spring Boot引导类,并使用一些User实体填充数据库:
@SpringBootApplication
public class Application {

    public static void main(String[] args) {
        SpringApplication.run(Application.class, args);
    }

    @Bean
    CommandLineRunner init(UserRepository userRepository) {
        return args -> {
            Stream.of("John", "Julie", "Jennifer", "Helen", "Rachel").forEach(name -> {
                User user = new User(name, name.toLowerCase() + "@domain.com");
                userRepository.save(user);
            });
            userRepository.findAll().forEach(System.out::println);
        };
    }
}
现在,让我们运行应用程序。正如预期的那样,我们应该在启动时看到打印到控制台的用户实体列表:
User{id=1, name=John, email=john@domain.com}
User{id=2, name=Julie, email=julie@domain.com}
User{id=3, name=Jennifer, email=jennifer@domain.com}
User{id=4, name=Helen, email=helen@domain.com}
User{id=5, name=Rachel, email=rachel@domain.com}
3. 角度应用
随着我们的演示Spring Boot应用程序的启动和运行,我们现在创建一个简单的Angular应用程序,它能够使用REST控制器API。
3.1 Angular CLI安装
我们将使用Angular CLI(一个功能强大的命令行实用程序)来创建我们的Angular应用程序。
Angular CLI是一个非常有价值的工具,因为它允许我们从头开始创建整个Angular项目,只需几个命令即可生成组件,服务,类和接口。
一旦我们安装了npm(节点包管理器),我们将打开一个命令控制台并输入命令:
npm install -g @angular/cli@1.7.4
而已。上面的命令将安装最新版本的Angular CLI。
3.2 使用Angular CLI的项目脚手架
事实上,我们可以从头开始生成Angular应用程序结构。但老实说,这是一个容易出错且耗时的任务,我们应该在所有情况下避免这些任务。
相反,我们将让Angular CLI为我们努力工作。所以,让我们打开一个命令控制台,然后导航到我们希望创建应用程序的文件夹并输入命令:
ng new angularclient
该新指令将产生内整个应用程序结构angularclient 目录。
3.3 角度应用程序的入口点
如果我们查看angularclient 文件夹,我们会看到Angular CLI已经为我们有效地创建了一个完整的项目。
Angular的应用程序文件使用TypeScript ,它是JavaScript的类型超集,可编译为纯JavaScript。但是,任何Angular应用程序的入口点都是一个普通的旧index.html文件。
让我们编辑这个文件,如下所示:
<!doctype html>
<html lang="en">
<head>
  <meta charset="utf-8">
  <title>Spring Boot - Angular Application</title>
  <base href="/">
  <meta name="viewport" content="width=device-width, initial-scale=1">
  <link rel="icon" type="image/x-icon" href="favicon.ico">
  <link rel="stylesheet"
    href="https://maxcdn.bootstrapcdn.com/bootstrap/4.0.0/css/bootstrap.min.css"
    integrity="sha384-Gn5384xqQ1aoWXA+058RXPxPg6fy4IWvTNh0E263XmFcJlSAwiGgFAW/dAiS6JXm"
    crossorigin="anonymous">
</head>
<body>
  <app-root></app-root>
</body>
</html>
正如我们在上面所看到的,我们包含了Bootstrap 4,因此我们可以为我们的应用程序UI组件提供更加精美的外观。当然,可以从那里可用的那一堆中获取另一个UI工具包。
请注意部分中的自定义 </ app-root>标记。乍一看,它们看起来很奇怪,因为 不是标准的HTML 5元素。
让我们保持正确,因为 是Angular用于呈现应用程序根组件的根选择器。
3.4 该app.component.ts根组件
为了更好地理解Angular如何将HTML模板绑定到组件,让我们转到src / app目录并编辑app.component.ts TypeScript文件 - 根组件:
import { Component } from '@angular/core';

@Component({
  selector: 'app-root',
  templateUrl: './app.component.html',
  styleUrls: ['./app.component.css']
})
export class AppComponent {

  title: string;

  constructor() {
    this.title = 'Spring Boot - Angular Application';
  }
}
出于显而易见的原因,我们不会深入学习TypeScript。即便如此,让我们注意该文件定义了一个AppComponent类,它声明了一个字符串类型为string(低级)的字段标题。确切地说,它是键入的JavaScript。
此外,构造函数使用字符串值初始化字段,这与我们在Java中的操作非常相似。
最相关的部分是所述@Component元数据标记或装饰,其定义了三个内容:
selector - 用于将组件绑定到HTML模板文件的HTML选择器
templateUrl - 与组件关联的HTML模板文件
styleUrls - 与组件关联的一个或多个CSS文件
正如所料,我们可以使用app.component.html和app.component.css文件来定义HTML模板和根组件的CSS样式。
最后,selector元素将整个组件绑定到index.html文件中包含的 选择器。
3.5 该app.component.html文件
由于app.component.html文件允许我们定义根组件的HTML模板 - AppComponent类 - 我们将使用它来创建带有两个按钮的基本导航栏。
如果我们单击第一个按钮,Angular将显示一个表,其中包含存储在数据库中的用户实体列表。同样,如果我们点击第二个,它将呈现一个HTML表单,我们可以使用它来向数据库添加新实体:
<div class="container">
  <div class="row">
    <div class="col-md-12">
      <div class="card bg-dark my-5">
        <div class="card-body">
          <h2 class="card-title text-center text-white py-3">{{ title }}</h2>
          <ul class="text-center list-inline py-3">
            <li class="list-inline-item"><a routerLink="/users" class="btn btn-info">List Users</a></li>
            <li class="list-inline-item"><a routerLink="/adduser" class="btn btn-info">Add User</a></li>
          </ul>
        </div>
      </div>
      <router-outlet></router-outlet>
    </div>
  </div>
</div>
该文件的大部分是标准HTML,需要注意一些注意事项。
第一个是{{title}}表达式。双花括号{{variable-name}}是Angular用于执行变量插值的占位符。
让我们记住,AppComponent类使用值Spring Boot - Angular Application初始化title字段。因此,Angular将在模板中显示此字段的值。同样,更改构造函数中的值将反映在模板中。
需要注意的第二件事是routerLink属性。
Angular使用此属性通过其路由模块路由请求(稍后将详细介绍)。现在,只需知道模块将向/ users路径发送请求到特定组件以及向/ adduser发送到另一个组件的请求就足够了。
在每种情况下,与匹配组件关联的HTML模板将在 </ router-outlet>占位符中呈现。
3.6 该用户类
由于我们的Angular应用程序将从数据库中获取并保留用户实体,因此我们使用TypeScript实现一个简单的域模型。
让我们打开一个终端控制台并创建一个模型目录:
ng generate class user
Angular CLI将生成一个空的User类。让我们用几个字段填充它:
export class User {
    id: string;
    name: string;
    email: string;
}
3.7 在UserService服务
我们已经设置了客户端域User类,现在让我们实现一个服务类,该服务类对http:// localhost:8080 / users端点执行GET和POST请求。
这将允许我们在单个类中封装对REST控制器的访问,我们可以在整个应用程序中重用它。
让我们打开一个控制台终端,然后创建一个服务目录,并在该目录中发出以下命令:
ng generate service user-service
现在,让我们打开Angular CLI刚刚创建的user.service.ts文件并重构它:
import { Injectable } from '@angular/core';
import { HttpClient, HttpHeaders } from '@angular/common/http';
import { User } from '../model/user';
import { Observable } from 'rxjs/Observable';

@Injectable()
export class UserService {

  private usersUrl: string;

  constructor(private http: HttpClient) {
    this.usersUrl = 'http://localhost:8080/users';
  }

  public findAll(): Observable<User[]> {
    return this.http.get<User[]>(this.usersUrl);
  }

  public save(user: User) {
    return this.http.post<User>(this.usersUrl, user);
  }
}
我们不需要在TypeScript上有扎实的背景来理解UserService类的工作原理。简而言之,它在可重用组件中封装了使用我们之前在Spring Boot中实现的REST控制器API所需的所有功能。
所述的findAll()方法执行GET HTTP请求发送到HTTP://本地主机:8080 /用户经由端点角的HttpClient的。该方法返回一个包含User对象数组的Observable实例。
同样,save()方法对http:// localhost:8080 / users端点执行POST HTTP请求。
通过在HttpClient的请求方法中指定User类型,我们可以更简单,更有效地使用后端响应。
最后,让我们注意使用@Injectable()元数据标记。这表示应该通过Angular的依赖注入器创建和注入服务。
3.8 该UserListComponent组件
在这种情况下,UserService类是REST服务和应用程序表示层之间的瘦中间层。因此,我们需要定义一个负责呈现数据库中持久存在的User实体列表的组件。
让我们打开一个终端控制台,然后创建一个用户列表目录并生成一个用户列表组件:
ng generate component user-list
Angular CLI将生成一个实现ngOnInit接口的空组件类 。接口声明了一个钩子 ngOnInit()方法,Angular在完成实例化实例化之后调用,并且在调用它的构造函数之后也是如此。
让我们重构类,以便它可以在构造函数中获取UserService实例:
import { Component, OnInit } from '@angular/core';
import { User } from '../model/user';
import { UserService } from '../service/user.service';

@Component({
  selector: 'app-user-list',
  templateUrl: './user-list.component.html',
  styleUrls: ['./user-list.component.css']
})
export class UserListComponent implements OnInit {

  users: User[];

  constructor(private userService: UserService) {
  }

  ngOnInit() {
    this.userService.findAll().subscribe(data => {
      this.users = data;
    });
  }
}
UserListComponent类的实现非常明显。它只是使用UserService的findAll()方法来获取数据库中持久存储的所有实体,并将它们存储在users字段中。
此外,我们需要编辑组件的HTML文件 user-list.component.html,以创建显示实体列表的表:
<div class="card my-5">
  <div class="card-body">
    <table class="table table-bordered table-striped">
      <thead class="thead-dark">
        <tr>
          <th scope="col">#</th>
          <th scope="col">Name</th>
          <th scope="col">Email</th>
        </tr>
      </thead>
      <tbody>
        <tr *ngFor="let user of users">
          <td>{{ user.id }}</td>
          <td>{{ user.name }}</td>
          <td><a href="mailto:{{ user.email }}">{{ user.email }}</a></td>
        </tr>
      </tbody>
    </table>
  </div>
</div>
注意使用* ngFor指令。该指令称为转发器,我们可以使用它来迭代变量的内容并迭代地呈现HTML元素。在这种情况下,我们使用它来动态渲染表的行。
此外,我们使用变量插值来显示每个用户的ID, 名称和电子邮件。
3.9 该UserFormComponent组件
同样,我们需要创建一个允许我们在数据库中持久保存新User对象的组件。
让我们创建一个用户表单目录并输入以下内容:
ng generate component user-form
接下来,让我们打开user-form.component.ts文件,并向UserFormComponent类添加一个用于保存 User对象的方法:
import { Component } from '@angular/core';
import { ActivatedRoute, Router } from '@angular/router';
import { UserService } from '../service/user.service';
import { User } from '../model/user';

@Component({
  selector: 'app-user-form',
  templateUrl: './user-form.component.html',
  styleUrls: ['./user-form.component.css']
})
export class UserFormComponent {

  user: User;

  constructor(private route: ActivatedRoute, private router: Router, private userService: UserService) {
    this.user = new User();
  }

  onSubmit() {
    this.userService.save(this.user).subscribe(result => this.gotoUserList());
  }

  gotoUserList() {
    this.router.navigate(['/users']);
  }
}
在这种情况下,UserFormComponent还在构造函数中获取UserService实例,onSubmit()方法使用该实例来保存提供的User对象。
由于我们需要在保留新实体后重新显示更新的实体列表,因此我们在插入后调用gotoUserList()方法,将用户重定向到/ users路径。
此外,我们需要编辑user-form.component.html文件并创建HTML表单以在数据库中保留新用户:
<div class="card my-5">
  <div class="card-body">
    <form (ngSubmit)="onSubmit()" #userForm="ngForm">
      <div class="form-group">
        <label for="name">Name</label>
        <input type="text" [(ngModel)]="user.name"
          class="form-control" id="name" name="name" placeholder="Enter your name"
          required #name="ngModel">
      </div>
      <div [hidden]="!name.pristine" class="alert alert-danger">Name is required</div>
      <div class="form-group">
        <label for="email">Email</label>
        <input type="text" [(ngModel)]="user.email"
          class="form-control" id="email" name="email" placeholder="Enter your email address"
          required #email="ngModel">
        <div [hidden]="!email.pristine" class="alert alert-danger">Email is required</div>
      </div>
      <button type="submit" [disabled]="!userForm.form.valid" class="btn btn-info">Submit</button>
    </form>
  </div>
</div>
一目了然,表格看起来非常标准。但它在幕后封装了很多Angular的功能。
让我们注意使用的ngSubmit指令,它调用 的onsubmit()当表单提交方法。
接下来,我们定义了模板变量#userForm,因此Angular会自动添加一个NgForm指令,这使我们可以跟踪整个表单。
所述NgForm指令认为我们用于与表单元素创建的控件ngModel指令和名称属性,并且还监视他们的特性,包括它们的状态。
该ngModel指令为我们提供了双向数据绑定表单控件和客户端的域模型之间的功能-的用户类。
这意味着在表单输入字段中输入的数据将流向模型 - 反之亦然。两个元素的变化将立即通过DOM操作反映出来。
此外,ngModel允许我们通过向每个控件添加不同的CSS类和DOM属性来跟踪每个表单控件的状态并执行客户端验证。
在上面的HTML文件中,我们使用应用于表单控件的属性仅在表单中的值更改时显示警告框。
3.10 该应用程序,routing.module.ts文件
虽然组件是独立运行的,但是当用户单击导航栏中的按钮时,我们仍然需要使用一种机制来调用它们。
这是RouterModule发挥作用的地方。因此,让我们打开app-routing.module.ts文件,并配置模块,以便它可以将请求分派给匹配的组件:
import { NgModule } from '@angular/core';
import { Routes, RouterModule } from '@angular/router';
import { UserListComponent } from './user-list/user-list.component';
import { UserFormComponent } from './user-form/user-form.component';

const routes: Routes = [
  { path: 'users', component: UserListComponent },
  { path: 'adduser', component: UserFormComponent }
];

@NgModule({
  imports: [RouterModule.forRoot(routes)],
  exports: [RouterModule]
})
export class AppRoutingModule { }
正如我们可以看到的上方,所述路由阵列指示当用户点击链接或指定一个URL到浏览器地址栏中显示哪个组件的路由器。
路线由两部分组成:
路径- 一个 字符串的URL在浏览器地址栏匹配
组件 - 路由处于活动状态时创建的组件(导航)
如果用户单击链接到/ users路径的列表用户按钮,或在浏览器地址栏中输入URL,路由器将在
占位符中呈现UserListComponent组件的模板文件。
同样,如果他们单击“ 添加用户”按钮,它将呈现UserFormComponent组件。
3.11 该app.module.ts文件
接下来,我们需要编辑app.module.ts文件,以便Angular可以导入所有必需的模块,组件和服务。
此外,我们需要指定我们将用于创建和注入UserService类的提供程序。否则,Angular将无法将其注入组件类:
import { BrowserModule } from '@angular/platform-browser';
import { NgModule } from '@angular/core';
import { AppRoutingModule } from './app-routing.module';
import { FormsModule } from '@angular/forms';
import { HttpClientModule } from '@angular/common/http';
import { AppComponent } from './app.component';
import { UserListComponent } from './user-list/user-list.component';
import { UserFormComponent } from './user-form/user-form.component';
import { UserService } from './service/user.service';

@NgModule({
  declarations: [
    AppComponent,
    UserListComponent,
    UserFormComponent
  ],
  imports: [
    BrowserModule,
    AppRoutingModule,
    HttpClientModule,
    FormsModule
  ],
  providers: [UserService],
  bootstrap: [AppComponent]
})
export class AppModule { }
4.运行应用程序
最后,我们准备运行我们的应用程序。
为了实现这一点,让我们首先运行Spring Boot应用程序,以便REST服务处于活动状态并监听请求。
启动Spring Boot应用程序后,让我们打开一个命令控制台并输入以下命令:
ng serve --open
这将启动Angular的实时开发服务器,并在http:// localhost:4200打开浏览器。
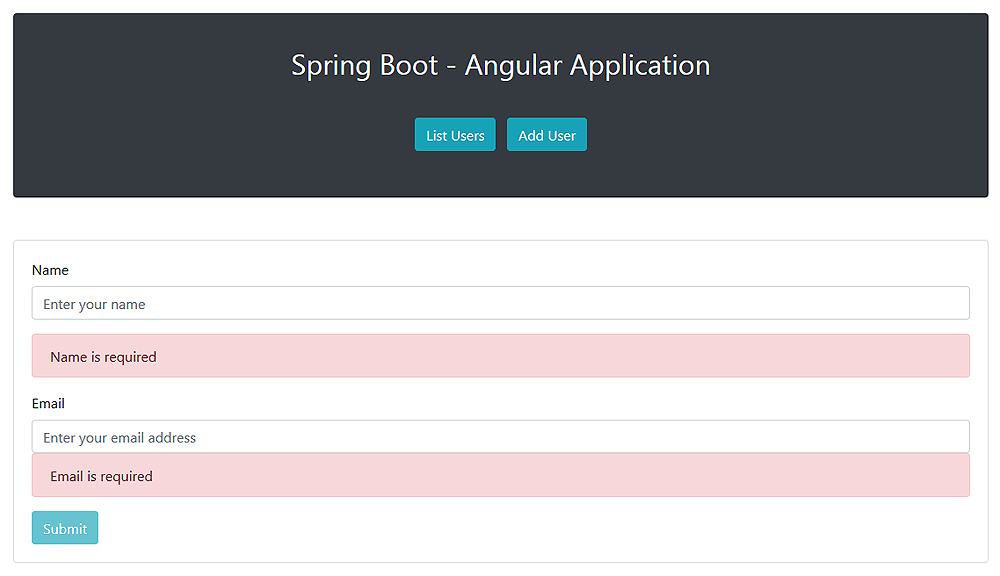
我们应该看到导航栏,其中包含用于列出现有实体和添加新实体的按钮。如果我们单击第一个按钮,我们应该在导航栏下方看到一个表,其中包含数据库中持久存储的实体列表: 同样,单击第二个按钮将显示用于保存新实体的HTML表单:
5.结论
在本教程中,我们学习了如何使用Spring Boot和Angular构建基本Web应用程序。
像往常一样,本教程中显示的所有代码示例都可以在GitHub
上获得。
