

前言
由于一直使用的是mybatis,而且之前使用的是一个叫tk.mapper的框架,而现在mybatis-plus这个框架比较火,就来学习一下;
使用
我的环境
- jdk1.8
- maven3.6
- MySQL5.7
- springboot2.1.0
数据结构
这是使用的mybatis-plus官网的数据结构及脚本
DROP TABLE IF EXISTS user;
CREATE TABLE user
(
	id BIGINT(20) NOT NULL COMMENT '主键ID',
	name VARCHAR(30) NULL DEFAULT NULL COMMENT '姓名',
	age INT(11) NULL DEFAULT NULL COMMENT '年龄',
	email VARCHAR(50) NULL DEFAULT NULL COMMENT '邮箱',
	PRIMARY KEY (id)
);
DELETE FROM user;

INSERT INTO user (id, name, age, email) VALUES
(1, 'Jone', 18, 'test1@baomidou.com'),
(2, 'Jack', 20, 'test2@baomidou.com'),
(3, 'Tom', 28, 'test3@baomidou.com'),
(4, 'Sandy', 21, 'test4@baomidou.com'),
(5, 'Billie', 24, 'test5@baomidou.com');
引包
pom文件导包,这里我使用了druid;也可以不用;注意,不用导入mybatis的包,和mybatis-spring的包;
<dependency>
			<groupId>org.springframework.boot</groupId>
			<artifactId>spring-boot-starter</artifactId>
		</dependency>

		<dependency>
			<groupId>org.springframework.boot</groupId>
			<artifactId>spring-boot-starter-test</artifactId>
			<scope>test</scope>
		</dependency>
		<!--mysql-->
		<dependency>
			<groupId>mysql</groupId>
			<artifactId>mysql-connector-java</artifactId>
		</dependency>
		<dependency>
			<groupId>com.baomidou</groupId>
			<artifactId>mybatis-plus-boot-starter</artifactId>
			<version>3.1.0</version>
		</dependency>
		<!-- druid的starter -->
		<dependency>
			<groupId>com.alibaba</groupId>
			<artifactId>druid-spring-boot-starter</artifactId>
			<version>1.1.10</version>
		</dependency>
项目结构
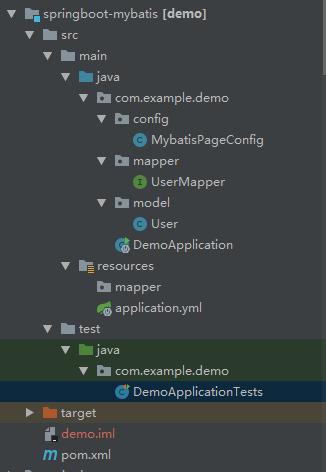
MybatisPageConfig代码: 这是mybatis的配置类,这里主要写了mybatis-plus的分页配置;如果不配置分页,可以将mapperscan注解写到项目的启动类上面去,将该类删除;这里为了方便阅读,就写在一起了;
@Configuration
@MapperScan("com.example.demo.mapper")
public class MybatisPageConfig {
    /**
     * mybatis-plus分页插件<br>
     */
    @Bean
    public PaginationInterceptor paginationInterceptor() {
        PaginationInterceptor paginationInterceptor = new PaginationInterceptor();
        return paginationInterceptor;
    }
}
UserMapper代码:
public interface UserMapper extends BaseMapper<User> {
}
User代码:
@TableName("user")
public class User implements Serializable {
    private static final long serialVersionUID = 8268426372054408603L;

    @TableId("id")
    private Long id;
    @TableField("name")
    private String name;
    @TableField("age")
    private Integer age;
    @TableField("email")
    private String email;
}
配置
配置文件,一下是我的基本配置,其中mybatis-plus还有很多配置,这里就不贴出来了;
其他的说明一下:
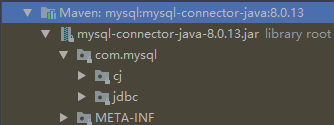
我把配置中的驱动给注释了,因为我在pom中没有指定数据库连接的版本,所以引入的是最新的8.0.13版本;而这个最新的版本结构图如下:
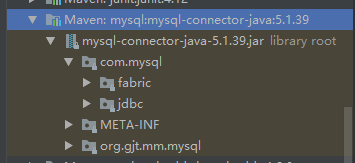
再来一张5.0版本的结构图:
如果引入的是高版本的MySQL连接,而配置中也写了驱动,会报这么一个提示:
Loading class `com.mysql.jdbc.Driver'. This is deprecated. The new driver class is `com.mysql.cj.jdbc.Driver'. The driver is automatically registered via the SPI and manual loading of the driver class is generally unnecessary.把驱动的配置注释就行了;因为新版本会自动帮我们选择哪一个驱动
spring:
  datasource:
    druid:
      url: jdbc:mysql://localhost:3306/test?useUnicode=true&characterEncoding=utf-8&useSSL=false
      username: ***
      password: ****
#      driver-class-name: com.mysql.jdbc.Driver
      initial-size: 5
      max-active: 30
      min-idle: 2
      max-wait: 1234
      pool-prepared-statements: true
      max-pool-prepared-statement-per-connection-size: 5
#    driver-class-name: com.mysql.jdbc.Driver
mybatis-plus:
#  config-location: classpath:/mapper/*.xml
  type-aliases-package: com.example.demo.model
这里我把config-location属性也注释掉了,因为我的项目在该路径下边没有xml文件,就注释了,不然会报错,找不到xml文件;
测试
DemoApplicationTests代码:
@RunWith(SpringRunner.class)
@SpringBootTest
public class DemoApplicationTests {
	@Resource
	private UserMapper userMapper;
	@Test
	public void contextLoads() {
		User user=new User();
		user.setName("jack");
		//条件查询
		System.out.println("条件查询");
		List<User> userList = userMapper.selectList(new QueryWrapper<>(user));
		userList.forEach(one-> System.out.println(one.toString()));
		//分页
		Page page=new Page(3,2);
		IPage iPage = userMapper.selectPage(page, null);
		List records = iPage.getRecords();
		System.out.println("分页");
		records.forEach(one-> System.out.println(one.toString()));
	}
}
结果:
条件查询
User{id=2, name='Jack', age=20, email='test2@baomidou.com'}
分页
User{id=5, name='Billie', age=24, email='test5@baomidou.com'}
总结
本篇文章主要写入门配置,后续主要写一篇mybatis-plus的一些其他的属性的配置的文章
