

第一篇我们讲了关于Class和Category的api,第二篇讲了关于Method的api,这一篇来讲关于Ivar和Property。这一篇干货比较多,有部分地方是分析源码,请大家耐心的看下去。
4.objc_ivar or Ivar
首先,我们还是先找到能打印出Ivar信息的函数:
const char * _Nullable
ivar_getName(Ivar _Nonnull v)
OBJC_AVAILABLE(10.5, 2.0, 9.0, 1.0, 2.0);
这个是通过传入对应的Ivar,获得Ivar的名字。
我们写到一个方法里面,以便于调用:
-(void)logIvarName:(Ivar)ivar { if (ivar) { const char* name = ivar_getName(ivar); NSLog(@"name = %s",name); } else { NSLog(@"ivar为null"); } }
那么知道了如何获得名字,那么怎么获得Ivar呢?
Ivar _Nullable
class_getInstanceVariable(Class _Nullable cls, const char * _Nonnull name)
OBJC_AVAILABLE(10.0, 2.0, 9.0, 1.0, 2.0);

Ivar _Nullable
class_getClassVariable(Class _Nullable cls, const char * _Nonnull name)
OBJC_AVAILABLE(10.5, 2.0, 9.0, 1.0, 2.0);
class_getInstanceVariable是在cls类里,名字为name的实例变量。
class_getClassVariable是在cls类里,名字为name的类变量,由于在OC语法里面,并不存在类变量这个概念,所以,这个方法并没有什么用,那我们就验证class_getInstanceVariable这个方法。
我们新建一个Cat类,添加一个成员变量int _age和一个属性@property(nonatomic,copy)NSString* name,众所周知,属性会自动生成一个前面带_的成员变量(name生成_name)。
-(void)getIvar {
    Ivar ivar = class_getInstanceVariable(objc_getClass("Cat"), "_name");
    Ivar ivar1 = class_getInstanceVariable(objc_getClass("Cat"), "_age");
    [self logIvarName:ivar];
    [self logIvarName:ivar1];
}
运行结果:
2019-02-26 11:42:38.646792+0800 Runtime-Demo[59730:4976606] name = _name
2019-02-26 11:42:38.646845+0800 Runtime-Demo[59730:4976606] name = _age
打印出来了,也确实是成员变量。 那么如何获得一个类的所有成员变量呢?就用下面这个方法:
Ivar _Nonnull * _Nullable
class_copyIvarList(Class _Nullable cls, unsigned int * _Nullable outCount)
OBJC_AVAILABLE(10.5, 2.0, 9.0, 1.0, 2.0);
为了增加可靠性,我们在Cat.m文件里面加一个成员变量BOOL _sex和@property(nonatomic, strong)Person* master,下面我们把Car类里面所有的成员变量打印下:
-(void)copyIvarList {
    unsigned int count;
    Ivar* ivars =class_copyIvarList(objc_getClass("Cat"), &count);
    for (unsigned int i = 0; i < count; i++) {
        Ivar ivar = ivars[i];
        [self logIvarName:ivar];
    }
    free(ivars);
}
运行结果:
2019-02-26 11:50:51.090761+0800 Runtime-Demo[59875:4979802] name = _age
2019-02-26 11:50:51.090799+0800 Runtime-Demo[59875:4979802] name = _sex
2019-02-26 11:50:51.090809+0800 Runtime-Demo[59875:4979802] name = _name
2019-02-26 11:50:51.090817+0800 Runtime-Demo[59875:4979802] name = _master
如果你要获得成员变量的类型,就可以用下面这个方法:
const char * _Nullable
ivar_getTypeEncoding(Ivar _Nonnull v)
OBJC_AVAILABLE(10.5, 2.0, 9.0, 1.0, 2.0);
我们试着获得下_name的类型:
-(void)getTypeEncoding {
    Ivar ivar = class_getInstanceVariable(objc_getClass("Cat"), "_name");
    const char* type = ivar_getTypeEncoding(ivar);
    NSLog(@"type = %s",type);
}
运行结果:
type = @"NSString"
name确实是NSString类型的。
下面我们看的三个方法是给ivar赋值或者取值。
id _Nullable
object_getIvar(id _Nullable obj, Ivar _Nonnull ivar)
OBJC_AVAILABLE(10.5, 2.0, 9.0, 1.0, 2.0);

void
object_setIvar(id _Nullable obj, Ivar _Nonnull ivar, id _Nullable value)
OBJC_AVAILABLE(10.5, 2.0, 9.0, 1.0, 2.0);

void
object_setIvarWithStrongDefault(id _Nullable obj, Ivar _Nonnull ivar,
                                id _Nullable value)
OBJC_AVAILABLE(10.12, 10.0, 10.0, 3.0, 2.0);
object_getIvar这个方法是给ivar取值的函数。我们测试下:
-(void)getIvarValue {
    Cat* cat = [Cat new];
    Ivar ivar = class_getInstanceVariable(objc_getClass("Cat"), "_name");
    NSString* name = object_getIvar(cat, ivar);
    NSLog(@"赋值前:%@",name);
    cat.name = @"jack";
    NSString* name2 = object_getIvar(cat, ivar);
    NSLog(@"赋值后:%@",name2);
}
运行结果:
2019-02-26 15:44:11.758498+0800 Runtime-Demo[63973:5079569] 赋值前:(null)
2019-02-26 15:44:11.758541+0800 Runtime-Demo[63973:5079569] 赋值后:jack
后面我就要仔细说说object_setIvar和object_setIvarWithStrongDefault,这两个函数都和内存管理有关系。先说下它们的共同点,如果内存管理属于已知的内存管理方式(成员变量或属性属于ARC,strong或者weak),它们都没有区别。不同点就是如果是属于未知的内存管理方式,object_setIvar会把该实例变量被分配为unsafe_unretain,而object_setIvarWithStrongDefault会把该实例变量被分配为strong。
首先我们要清楚3个概念,strong,weak和unsafe_unretain。
strong是强引用指向并拥有那个对象,根据retainCount是否为0来确定是否释放内存
weak是弱引用指向但并不拥有那个对象。释放空间时会自动将指针设置成nil。
unsafe_unretain和weak类似,只是释放空间时不会将指针设置成nil,所以会有野指针的危害。
所以,在ARC下,这两个方法的作用几乎一模一样。
新增2个属性,@property(nonatomic, copy)NSString* style和@property(nonatomic, copy)NSString *breed。
-(void)setIvar {
    Cat* cat = [Cat new];
    Ivar ivar = class_getInstanceVariable(objc_getClass("Cat"), "_breed");
    Ivar ivar2 = class_getInstanceVariable(objc_getClass("Cat"), "_style");
    object_setIvar(cat, ivar,@"英短");
    object_setIvar(cat, ivar2,@"活泼");
    NSLog(@"breed = %@",cat.breed);
    NSLog(@"style = %@",cat.style);
}
运行结果:
2019-02-26 17:53:10.013361+0800 Runtime-Demo[66371:5132652] breed = 英短
2019-02-26 17:53:10.013430+0800 Runtime-Demo[66371:5132652] style = 活泼
赋值功能完全好用。 下面这个方法是获得实例变量的偏移量,也就是内存的偏移位置,我们就可以看到变量的内存地址。
ptrdiff_t
ivar_getOffset(Ivar _Nonnull v)
OBJC_AVAILABLE(10.5, 2.0, 9.0, 1.0, 2.0);
我们测试下Cat类,先看下Cat类的属性和变量分布:
Cat.h
@interface Cat : NSObject
{
    @public
    int _age;

}
@property(nonatomic, copy)NSString* name;

@property(nonatomic, copy)NSString *breed;

@property(nonatomic, copy)NSString* style;

@end

Cat.m
@interface Cat()
{
    BOOL _sex;
}
@property(nonatomic, strong)Person* master;
@end
@implementation Cat

@end
我们看到Cat类里面有4个属性,2个成员变量,现在我们通过获取变量列表,逐个打印每个变量的ptrdiff_t
-(void)getOffset {
    unsigned int count;
    Ivar* ivars =class_copyIvarList(objc_getClass("Cat"), &count);
    for (unsigned int i = 0; i < count; i++) {
        Ivar ivar = ivars[i];
        ptrdiff_t offset = ivar_getOffset(ivar);
        NSLog(@"%s = %td",ivar_getName(ivar),offset);
    }
    free(ivars);
    NSLog(@"Cat总字节 = %lu",class_getInstanceSize(objc_getClass("Cat")));
}
运行结果:
2019-02-26 20:09:16.296160+0800 Runtime-Demo[17275:490666] _age = 8
2019-02-26 20:09:16.296274+0800 Runtime-Demo[17275:490666] _sex = 12
2019-02-26 20:09:16.296364+0800 Runtime-Demo[17275:490666] _name = 16
2019-02-26 20:09:16.296452+0800 Runtime-Demo[17275:490666] _breed = 24
2019-02-26 20:09:16.296525+0800 Runtime-Demo[17275:490666] _style = 32
2019-02-26 20:09:16.296666+0800 Runtime-Demo[17275:490666] _master = 40
2019-02-26 20:09:16.296765+0800 Runtime-Demo[17275:490666] Cat总字节 = 48
分析下打印的数据,看下顺序,最先打印的是h文件的实例变量,其次是m文件的实例变量,然后是h文件的属性,最后打印m文件的属性。看下地址和大小,Cat总共48字节,_age从第8字节开始,占4个字节,然后第12字节开始是_sex,占4个字节,到第16位是_name,占8个字节,到24字节是_breed,占8个字节,到32字节是_style,占8个字节,到40字节是_master,占8个字节。它们所占内存是由本身类型和内存对齐共同决定的。
下面这个函数是为动态类增加变量的,什么是动态类呢?我们在第一篇的时候讲了,动态创建类可以用objc_allocateClassPair函数去创建,而class_addIvar函数就必须要在objc_allocateClassPair后objc_registerClassPair前去新增变量。
BOOL
class_addIvar(Class _Nullable cls, const char * _Nonnull name, size_t size,
              uint8_t alignment, const char * _Nullable types)
OBJC_AVAILABLE(10.5, 2.0, 9.0, 1.0, 2.0);
我们来看看参数,cls是你要加实例变量的类,size是所占内存的字节数,types是实例变量的类型,alignment指的是对齐,官方文档有个公式log2(sizeof(pointer_type))。下面我们测试下:
-(void)addIvar {
    Class class = objc_allocateClassPair(objc_getClass("NSObject"), "Dog", 0);
    float alignment = log2f(sizeof(int));
    class_addIvar(class, "age", sizeof(int), alignment, "int");
    objc_registerClassPair(class);
    Ivar ivar = class_getInstanceVariable(class, "age");
    NSLog(@"name = %s",ivar_getName(ivar));
    NSLog(@"size = %zu",class_getInstanceSize(objc_getClass("Dog")));
}
运行结果:
2019-02-26 20:44:46.198155+0800 Runtime-Demo[19229:519808] name = age
2019-02-26 20:44:46.198295+0800 Runtime-Demo[19229:519808] size = 16
能打印出来新建类的实例变量。
下面四个方法和变量布局有关系,这是我感觉最难理解的方法。IvarLayout这个概念在runtime.h里面并没有进行说明。
const uint8_t * _Nullable
class_getIvarLayout(Class _Nullable cls)
OBJC_AVAILABLE(10.5, 2.0, 9.0, 1.0, 2.0);

const uint8_t * _Nullable
class_getWeakIvarLayout(Class _Nullable cls)
OBJC_AVAILABLE(10.5, 2.0, 9.0, 1.0, 2.0);

void
class_setIvarLayout(Class _Nullable cls, const uint8_t * _Nullable layout)
OBJC_AVAILABLE(10.5, 2.0, 9.0, 1.0, 2.0);

void
class_setWeakIvarLayout(Class _Nullable cls, const uint8_t * _Nullable layout)
OBJC_AVAILABLE(10.5, 2.0, 9.0, 1.0, 2.0);
这四个函数从字面意思,我们可以看到是关于weak或者strong的Ivar的布局,知道这些,我们先写一个例子,创建一个新类Lion,新建两个变量,__weak NSString* weak1和__strong NSString* strong1。
@interface Lion : NSObject
{
    __weak NSString* weak1;
    __weak NSString* weak2;
    __strong NSString* strong1;
    __strong NSString* strong2;
    __weak NSString* weak3;
}
-(void)test {
    const uint8_t *strongLayout =   class_getIvarLayout(objc_getClass("Lion"));
    printf("strongLayout = #%02x\n",*strongLayout);
    const uint8_t *weakLayout =   class_getWeakIvarLayout(objc_getClass("Lion"));
    printf("weakLayout = #%02x\n",*weakLayout);
}
运行结果:
strongLayout = #22
weakLayout = #02
完全不懂这个含义,那么,我们就要从源码看看有没有相关的信息。
void fixupCopiedIvars(id newObject, id oldObject)
{
    for (Class cls = oldObject->ISA(); cls; cls = cls->superclass) {
        if (cls->hasAutomaticIvars()) {
            // Use alignedInstanceStart() because unaligned bytes at the start
            // of this class's ivars are not represented in the layout bitmap.
            size_t instanceStart = cls->alignedInstanceStart();

            const uint8_t *strongLayout = class_getIvarLayout(cls);
            if (strongLayout) {
                id *newPtr = (id *)((char*)newObject + instanceStart);
                unsigned char byte;
                while ((byte = *strongLayout++)) {
                    unsigned skips = (byte >> 4);
                    unsigned scans = (byte & 0x0F);
                    newPtr += skips;
                    while (scans--) {
                        // ensure strong references are properly retained.
                        id value = *newPtr++;
                        if (value) objc_retain(value);
                    }
                }
            }

            const uint8_t *weakLayout = class_getWeakIvarLayout(cls);
            // fix up weak references if any.
            if (weakLayout) {
                id *newPtr = (id *)((char*)newObject + instanceStart), *oldPtr = (id *)((char*)oldObject + instanceStart);
                unsigned char byte;
                while ((byte = *weakLayout++)) {
                    unsigned skips = (byte >> 4);
                    unsigned weaks = (byte & 0x0F);
                    newPtr += skips, oldPtr += skips;
                    while (weaks--) {
                        objc_copyWeak(newPtr, oldPtr);
                        ++newPtr, ++oldPtr;
                    }
                }
            }
        }
    }
}
这段是runtime源码里面一段对weakLayout和strongLayout操作,里面的weakLayout和strongLayout也是用class_getWeakIvarLayout和class_getIvarLayout方法获得的,先看下strongLayout,我们截取出来:
            if (strongLayout) {
                id *newPtr = (id *)((char*)newObject + instanceStart);
                unsigned char byte;
                while ((byte = *strongLayout++)) {
                    unsigned skips = (byte >> 4);
                    unsigned scans = (byte & 0x0F);
                    newPtr += skips;
                    while (scans--) {
                        // ensure strong references are properly retained.
                        id value = *newPtr++;
                        if (value) objc_retain(value);
                    }
                }
            }
我们来分析一下这一段,while ((byte = *strongLayout++))这是一段循环,其中byte = *strongLayout++是将strongLayout里的值取出来赋值给byte,并且下次循环的时候,指针地址+1,那么,我们可以知道strongLayout所指向是一个uint8_t的数组(uint8_t在源码中解释为typedef unsigned char uint8_t;,占1个字节,相当于2位16进制),也就是strongLayout存有多段layout。unsigned skips = (byte >> 4)是位移操作,二进制向右移动4位,也相当于16进制向右移动一位,那么,skips也就是取byte左边那一位。unsigned scans = (byte & 0x0F)正好相反,和0F相与,取byte的右边那一位。newPtr += skips这一句说明newPtr向后skips个地址是不需要的,直接跳过。while (scans--)是又循环了scans次,循环里面就是取新地址的值并且进行其他操作,scans是我们需要的。同样的原理同学们可以自己分析weakLayout的那段代码。
根据源码,应该有多段layout,所以,我们改下代码:
-(void)getIvarLayout {
    const uint8_t *strongLayout =   class_getIvarLayout(objc_getClass("Lion"));
    if (!strongLayout) {
        return;
    }
    uint8_t byte;
    while ((byte = *strongLayout++)) {
        printf("strongLayout = #%02x\n",byte);
    }

    const uint8_t *weakLayout =   class_getWeakIvarLayout(objc_getClass("Lion"));
    if (!weakLayout) {
        return;
    }
    while ((byte = *weakLayout++)) {
        printf("weakLayout = #%02x\n",byte);
    }
}
再运行一下:
strongLayout = #22
weakLayout = #02
weakLayout = #21
那么,我们来分析一下:
已知先有2个weak变量,再有2个strong变量,最后还有1个weak变量。
strongLayout的最低位是2,因为是scan值,所以,这是strong类型的数量。而最高位也是2,这是skip值,是strong的变量前面的weak变量的数量。但是,为什么只有一段呢,因为后面已经没有strong变量,我们已经知道了strongLayout的所有布局了(所有strong变量的位置)。
weakLayout的第一段中最低位是2,是scan值,所以应该是weak类型的数量,最高位是0,这是skip值,说明weak变量前面没有strong变量,确实也如此。
似乎,我们找到了规律。每段layout我们都会打印出来#xy,在strongLayout中,y就是连续strong变量的数目,x就是strong变量前面的连续weak变量的数目。在weakLayout中,y就是连续weak变量的数目,x就是weak变量前面的连续strong变量的数目。
我们用一张图来解释:
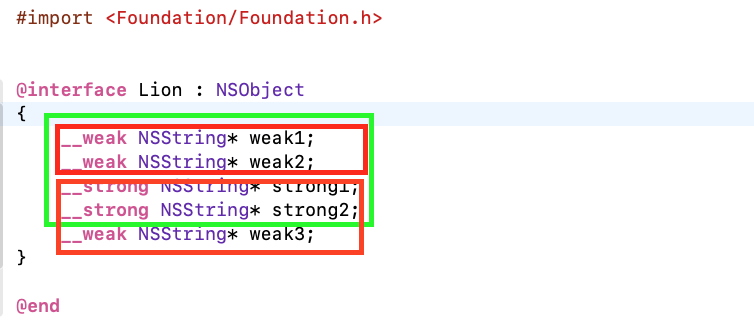 屏幕快照 2019-02-27 下午5.13.25.png
绿色的代表
strongLayout的第一段layout,里面包含strong的变量,数目为2,strong变量前面还有weak的变量,所以是22(第一个2是指weak的2,第二个2指的是strong的2)。红色是代表
weakLayout的第一段layout,里面包含weak的变量,数目为2,weak变量前面没有其他的变量,所以是02,橙色的代表weakLayout的第二段layout,里面包含1个weak变量,weak前面有2个连续的strong变量,所以是21。这样看是不是清晰很多。
突然我灵光一闪,打印的是十六进制的值,如果先出现17个weak的变量会怎么样呢?
那我们来尝试下:
@interface Lion : NSObject
{
    __weak NSString* weak1;
    __weak NSString* weak2;
    __weak NSString* weak3;
    __weak NSString* weak4;
    __weak NSString* weak5;
    __weak NSString* weak6;
    __weak NSString* weak7;
    __weak NSString* weak8;
    __weak NSString* weak9;
    __weak NSString* weak10;
    __weak NSString* weak11;
    __weak NSString* weak12;
    __weak NSString* weak13;
    __weak NSString* weak14;
    __weak NSString* weak15;
    __weak NSString* weak16;
    __weak NSString* weak17;
    __strong NSString* strong1;
    __strong NSString* strong2;
    __strong NSString* strong3;
    __weak NSString* weak18;
    __strong NSString* strong4;
    __strong NSString* strong5;
}
运行结果:
strongLayout = #f0
strongLayout = #23
strongLayout = #12
weakLayout = #0f
weakLayout = #02
weakLayout = #31
我们可以看到分成3段layout,前17个weak变量中的前15个被拆出来,被当成第一段layout,第17个和后面的拼成一段layout,所以,我们得到结论,每段layout的weak变量或者strong变量不会超过15个。
4.objc_property or objc_property_t
属性应该是我们最熟悉的了,相当于给实例变量加了修饰符,自动生成set和get方法,用起来很方便。
runtime里面关于属性的结构体是objc_property或者objc_property_t,这个我们并不知道里面的结构,但是官方告诉我们另外一个:
typedef struct {
    const char * _Nonnull name;           /**< The name of the attribute */
    const char * _Nonnull value;          /**< The value of the attribute (usually empty) */
} objc_property_attribute_t;
我们可以通过objc_property_attribute_t来间接获得关于属性的一些信息。
而这个方法property_copyAttributeList方法就是通过传入objc_property_t来获得objc_property_attribute_t
objc_property_attribute_t * _Nullable
property_copyAttributeList(objc_property_t _Nonnull property,
                           unsigned int * _Nullable outCount)
OBJC_AVAILABLE(10.7, 4.3, 9.0, 1.0, 2.0);
我们写个方法来封装下这个方法:
-(void)logProperty:(objc_property_t)property {
    NSLog(@"-------------------");
    unsigned int count;
    objc_property_attribute_t* attributeList = property_copyAttributeList(property, &count);
    for (unsigned int i = 0; i < count; i++) {
       objc_property_attribute_t attribute = attributeList[i];
        NSLog(@"name = %s",attribute.name);
        NSLog(@"value = %s",attribute.value);
    }
}
后面我们就用这个方法来打印属性相关的信息。那怎么获得objc_property_t呢?
objc_property_t _Nullable
class_getProperty(Class _Nullable cls, const char * _Nonnull name)
OBJC_AVAILABLE(10.5, 2.0, 9.0, 1.0, 2.0);
我们还是以Cat类为例,我们从上面可知有4个属性@property(nonatomic, copy)NSString* name,@property(nonatomic, copy)NSString *breed,@property(nonatomic, copy)NSString* style,@property(nonatomic, strong)Person* master。
下面我们分别获取name这个属性。
-(void)getProperty {
    objc_property_t property = class_getProperty(objc_getClass("Cat"), "name");
    [self logProperty:property];
}
打印结果:
2019-02-27 09:37:17.172874+0800 Runtime-Demo[72525:5355290] name = T
2019-02-27 09:37:17.172916+0800 Runtime-Demo[72525:5355290] value = @"NSString"
2019-02-27 09:37:17.172929+0800 Runtime-Demo[72525:5355290] name = C
2019-02-27 09:37:17.172950+0800 Runtime-Demo[72525:5355290] value =
2019-02-27 09:37:17.172965+0800 Runtime-Demo[72525:5355290] name = N
2019-02-27 09:37:17.172975+0800 Runtime-Demo[72525:5355290] value =
2019-02-27 09:37:17.172985+0800 Runtime-Demo[72525:5355290] name = V
2019-02-27 09:37:17.172995+0800 Runtime-Demo[72525:5355290] value = _name
我们可以看到有value是的name为T和V,T代表type,属性的类型,V代表ivar,代表属性的ivar的是_name。其他没有值的代表,那些修饰符,C代表copy,N代表nonatomic。由此我们可以总结出来:
| name | value | 含义 |
|---|---|---|
| T | 有 | 属性的类型 |
| V | 有 | 属性所生成的实例变量的名称 |
| C | 无 | copy |
| N | 无 | nonatomic |
| W | 无 | weak |
| & | 无 | 对象类型处于默认状态是用&,比方strong和readwrite |
| R | 无 | readonly |
注:如果没有N,就说明是atomic。
同样也可以获得一个类的属性列表。为了打印方便,我们这次只打印属性的名字,就要用到property_getName这个方法:
const char * _Nonnull
property_getName(objc_property_t _Nonnull property)
OBJC_AVAILABLE(10.5, 2.0, 9.0, 1.0, 2.0);
下面我们打印下列表的名字:
objc_property_t _Nonnull * _Nullable
class_copyPropertyList(Class _Nullable cls, unsigned int * _Nullable outCount)
OBJC_AVAILABLE(10.5, 2.0, 9.0, 1.0, 2.0);
还是以Cat为例:
-(void)copyPropertyList {
    unsigned int count;
    objc_property_t* propertyList = class_copyPropertyList(objc_getClass("Cat"), &count);
    for (unsigned int i = 0; i < count; i++) {
        objc_property_t property = propertyList[i];
        NSLog(@"name = %s",property_getName(property));
    }
    free(propertyList);
}
运行结果:
2019-02-27 10:30:33.006299+0800 Runtime-Demo[73443:5379227] name = master
2019-02-27 10:30:33.006338+0800 Runtime-Demo[73443:5379227] name = name
2019-02-27 10:30:33.006348+0800 Runtime-Demo[73443:5379227] name = breed
2019-02-27 10:30:33.006357+0800 Runtime-Demo[73443:5379227] name = style
把属性名字都打印出来了,这里要和ivar区分一下,如果通过已知属性去找ivar,那么找到的是带有下划线的。
之前我们可以打印出一个property的所有属性,系统还提供了2个方法:
const char * _Nullable
property_getAttributes(objc_property_t _Nonnull property)
OBJC_AVAILABLE(10.5, 2.0, 9.0, 1.0, 2.0);

char * _Nullable
property_copyAttributeValue(objc_property_t _Nonnull property,
                            const char * _Nonnull attributeName)
OBJC_AVAILABLE(10.7, 4.3, 9.0, 1.0, 2.0);
我们先测试property_getAttributes这个函数
-(void)getAttributes {
    objc_property_t property = class_getProperty(objc_getClass("Cat"), "name");
    const char* attributes = property_getAttributes(property);
    NSLog(@"attributes = %s",attributes);
}
运行结果:
attributes = T@"NSString",C,N,V_name
打印的结果和之前是一样的,这次是以字符串的形式打印。
再看下property_copyAttributeValue这个方法,这是通过attributeName获得单独的value。
-(void)copyAttributeValue {
    objc_property_t property = class_getProperty(objc_getClass("Cat"), "name");
    //V我们已知是属性所代表的ivar的名字,看打印是否是ivar
    char* value = property_copyAttributeValue(property,"V");
    NSLog(@"value = %s",value);
}
运行结果:
value = _name
从之前打印结果,这个打印结果是正确的。 下面这两个方法是动态添加或者替换属性
BOOL
class_addProperty(Class _Nullable cls, const char * _Nonnull name,
                  const objc_property_attribute_t * _Nullable attributes,
                  unsigned int attributeCount)
OBJC_AVAILABLE(10.7, 4.3, 9.0, 1.0, 2.0);

void
class_replaceProperty(Class _Nullable cls, const char * _Nonnull name,
                      const objc_property_attribute_t * _Nullable attributes,
                      unsigned int attributeCount)
OBJC_AVAILABLE(10.7, 4.3, 9.0, 1.0, 2.0);
我们还是以Cat为例,为他增加Property,目标:增加一个@property(nonatomic, copy,readonly)NSString* mood形式的属性。
传参需要传objc_property_attribute_t的列表,分析一下,T和V是必有的,T的value是NSString,V的value是_mood,然后nonatomic代表有N,copy代表有C,readonly代表有R,所以我们可以获知attribute有T,V,C,N,R。好了,我们写代码吧!
-(void)addProperty {
    unsigned int count = 5;
    objc_property_attribute_t attributeList[count];
    objc_property_attribute_t attribute1 ;
    attribute1.name = "T";
    attribute1.value = "NSString";
    objc_property_attribute_t attribute2 ;
    attribute2.name = "V";
    attribute2.value = "_mood";
    objc_property_attribute_t attribute3 ;
    attribute3.name = "N";
    attribute3.value = "";
    objc_property_attribute_t attribute4 ;
    attribute4.name = "C";
    attribute4.value = "";
    objc_property_attribute_t attribute5 ;
    attribute5.name = "R";
    attribute5.value = "";
    attributeList[0] = attribute1;
    attributeList[1] = attribute2;
    attributeList[2] = attribute3;
    attributeList[3] = attribute4;
    attributeList[4] = attribute5;

    BOOL isSuccess = class_addProperty(objc_getClass("Cat"), "mood", (const objc_property_attribute_t *)&attributeList, count);
    NSLog(@"新增%@",isSuccess?@"成功":@"失败");

    [self copyPropertyList];

    objc_property_t property = class_getProperty(objc_getClass("Cat"), "mood");
    const char* attributes = property_getAttributes(property);
    NSLog(@"attributes = %s",attributes);
}
运行结果:
2019-02-27 11:52:49.325561+0800 Runtime-Demo[74832:5417422] 新增成功
2019-02-27 11:52:49.325614+0800 Runtime-Demo[74832:5417422] name = mood
2019-02-27 11:52:49.325632+0800 Runtime-Demo[74832:5417422] name = master
2019-02-27 11:52:49.325650+0800 Runtime-Demo[74832:5417422] name = name
2019-02-27 11:52:49.325662+0800 Runtime-Demo[74832:5417422] name = breed
2019-02-27 11:52:49.325674+0800 Runtime-Demo[74832:5417422] name = style
2019-02-27 11:52:49.325709+0800 Runtime-Demo[74832:5417422] attributes = TNSString,V_mood,N,C,R
新增成功,并且打印的属性列表也有mood。打印出来的attributes也是没问题的。
再看看class_replaceProperty我打算把name这个属性的属性名改成catName。
同样我们还是先分析下objc_property_attribute_t的列表,name的属性是@property(nonatomic, copy)NSString* name,只改变名字的话,T,C,N都不变,变得是V,V的value变成_catName。所以代码就是:
-(void)replaceProperty {
    unsigned int count = 4;
    objc_property_attribute_t attributeList[count];
    objc_property_attribute_t attribute1 ;
    attribute1.name = "T";
    attribute1.value = "NSString";
    objc_property_attribute_t attribute2 ;
    attribute2.name = "V";
    attribute2.value = "_mood";
    objc_property_attribute_t attribute3 ;
    attribute3.name = "N";
    attribute3.value = "";
    objc_property_attribute_t attribute4 ;
    attribute4.name = "C";
    attribute4.value = "";
    attributeList[0] = attribute1;
    attributeList[1] = attribute2;
    attributeList[2] = attribute3;
    attributeList[3] = attribute4;

    class_replaceProperty(objc_getClass("Cat"), "name", (const objc_property_attribute_t*)&attributeList, count);
    [self copyPropertyList];

    objc_property_t property = class_getProperty(objc_getClass("Cat"), "name");
    const char* attributes = property_getAttributes(property);
    NSLog(@"attributes = %s",attributes);

}
运行结果:
2019-02-27 11:58:46.341930+0800 Runtime-Demo[74939:5421075] name = master
2019-02-27 11:58:46.341970+0800 Runtime-Demo[74939:5421075] name = name
2019-02-27 11:58:46.341980+0800 Runtime-Demo[74939:5421075] name = breed
2019-02-27 11:58:46.341988+0800 Runtime-Demo[74939:5421075] name = style
2019-02-27 11:58:46.342016+0800 Runtime-Demo[74939:5421075] attributes = TNSString,V_mood,N,C
打印结果完全出乎我的意料,打印出来的属性完全没有catName,但是打印attributes却是改变的attributes。为什么呢?我们要从源码看起来了:
struct property_t {
    const char *name;
    const char *attributes;
};
property_t的结构体分为name和attributes。
BOOL
class_addProperty(Class cls, const char *name,
                  const objc_property_attribute_t *attrs, unsigned int n)
{
    return _class_addProperty(cls, name, attrs, n, NO);
}

void
class_replaceProperty(Class cls, const char *name,
                      const objc_property_attribute_t *attrs, unsigned int n)
{
    _class_addProperty(cls, name, attrs, n, YES);
}
class_addProperty和class_replaceProperty的底层都调用了_class_addProperty方法,只是里面的布尔值传的不一样。我们再看下_class_addProperty这个方法,
static bool
_class_addProperty(Class cls, const char *name,
                   const objc_property_attribute_t *attrs, unsigned int count,
                   bool replace)
{
    if (!cls) return NO;
    if (!name) return NO;

    property_t *prop = class_getProperty(cls, name);
    if (prop  &&  !replace) {
        // already exists, refuse to replace
        return NO;
    }
    else if (prop) {
        // replace existing
        rwlock_writer_t lock(runtimeLock);
        try_free(prop->attributes);
        prop->attributes = copyPropertyAttributeString(attrs, count);
        return YES;
    }
    else {
        rwlock_writer_t lock(runtimeLock);

        assert(cls->isRealized());

        property_list_t *proplist = (property_list_t *)
            malloc(sizeof(*proplist));
        proplist->count = 1;
        proplist->entsizeAndFlags = sizeof(proplist->first);
        proplist->first.name = strdupIfMutable(name);
        proplist->first.attributes = copyPropertyAttributeString(attrs, count);

        cls->data()->properties.attachLists(&proplist, 1);

        return YES;
    }
}
里面这一句property_t *prop = class_getProperty(cls, name);是取出要替换的属性,接着后面就是一系列判断,因为prop存在,并且replace为YES,所以会走到下面这一段:
else if (prop) {
        // replace existing
        rwlock_writer_t lock(runtimeLock);
        try_free(prop->attributes);
        prop->attributes = copyPropertyAttributeString(attrs, count);
        return YES;
    }
从这一段我们可以看到这一部分只改变了 prop->attributes。也没有改变 prop->name。所以,我们打印属性的name自然没有改变。那么,class_replaceProperty的用途最好是修改类型或者修饰符。`
