

vuex用来做什么?
- 答:vuex为存储我们共享数据的一个仓库
安装
在vue-cli 3框架中使用
vue add vuex
在vue-cli 2中使用
npm install vuex -save
引入vue项目
*使用时记得要将store.js文件引入到main.js中才可使用
import store from './store';
new Vue({
    'el': '#app',
    router,
    store,
    'template': '<App/>',
    'components': {App},
});
组成结构
*在vue-cli 2中需要自己手动添加该文件
*在安装完成后,vue-cli3会自动在你的项目中增加store.js文件,文件中内容如下:
import Vue from 'vue'
import Vuex from 'vuex'

Vue.use(Vuex)

export default new Vuex.Store({
    strict: true,
    state: {
        //公共数据池,在项目的任何组件中都可以拿到数据池中的内容并可进行更改
    },
    getters: {
        //相当于vue中计算属性computed的作用
    },
    mutations: {
        //当strict为true,v在外面直接更改state数据池里的值会报错,需要在此设置回掉函数进行更改
    },
    actions: {
        //处理异步
    }
})
strict
- true为开启严格模式
- 严格模式下,不是由mutation函数引起的数据池里数据改变,都会报错
- 不要在发布环境下启用严格模式!!!
state
export defalut new Vuex.Store({
    state: {
        //公共数据池,在项目的任何组件中都可以拿到数据池中的内容并且可进行更改
        name : 'Angelababy',
        age : 18,
        look : 'beautiful'
    }
})
在组件中取公共数据池中的name值
this.$store.state.name
mapState
取公共数据池中多个值
//首先引入mapState
import { mapState } from 'vuex'

//将要取出的数据在computed里取出,如下storeName、storeAge、storeLook即为取出的值
export default {
    computed: mapState({
        storeName: state => state.name,
        storeAge: state => state.age,
        storeLook: state => state.look
    })
}
完美方法
*上述方法缺点为computed无法写其他的逻辑,所以采用扩展对象的方式,如下:
export default {
    computed: {
        ...mapState(['name','age','look'])
        //或者
        ...mapState({
            storeName: state => state.name,
            storeAge: state => state.age,
            storeLook: state => state.look
        }),
        //其他业务逻辑
        gender () {
            return 'female'
        }
    }
}
getter
export defalut new Vuex.Store({
    getters: {
        //相当于组件中的计算属性computed的作用
        newAge (state) {
            return state.name + 1
        }
    }
})
在组件中取公共数据池中的name值
this.$store.getters.newAge
mapGetters
与state中的mapState相同
//引入
import { mapGetters } from 'vuex'

export default {
    computed: {
        ...mapGetters(['newAge'])
        //或者
        ...mapGetters({
            babyNewAge: 'newAge'
        }),
        //其他业务逻辑
        gender () {
            return 'female'
        }
    }
}
mutation
export defalut new Vuex.Store({
     mutations: {
        //组件中调用改变state中内容的方法
        changeName (state,name) {
            state.name = name;
        }
    },
})
组件中使用
//第一个参数为调用mutations中的方法
//第二个参数传入改变的值
this.$store.commit('changeName','Zhao Wei')
*当传入第三个参数时,会失效,所以传入的值大于一个时,使用对象形式传入
export defalut new Vuex.Store({
     mutations: {
        //组件中调用改变state中内容的方法
        changeNameAndAge (state,{name,age}) {
            state.name = name;
            state.age = age;
        }
    },
})
this.$store.commit('changeNameAndAge',{name:'Zhao Wei';age:20})
action
export defalut new Vuex.Store({
    action: {

    }
})
*若想在上述changeNameAndAge函数里加入定时器,让该函数隔一秒再执行改数据,会发现报错,此时就用到action
*action用来处理异步函数
*Action 函数接受一个与 store 实例具有相同方法和属性的 context 对象,简写为ctx
export defalut new Vuex.Store({
    action: {
        //ctx相当于state
        changeNameAndAge (ctx,{name,age}) {
            setTimeout ( () => {
                //该changeNameAndAge为mutation中的函数方法
                ctx.commit('changeNameAndAge',{name,age})
            },1000)
        }
    }
})
触发action里的函数
this.$store.dispatch('changeNameAndAge',{name:'Zhao Wei',age:20})
mapActions
*同mapState使用方法相同
//引入
import { mapActions } from 'vuex'

export default {
    methods: {
        ...mapActions(['changeNameAndAge'])
    }
}
可以在其他地方直接使用changeNameAndAge方法
<div @cilck="changeNameAndAge({name:'Zhao Wei',age: 20})"></div>
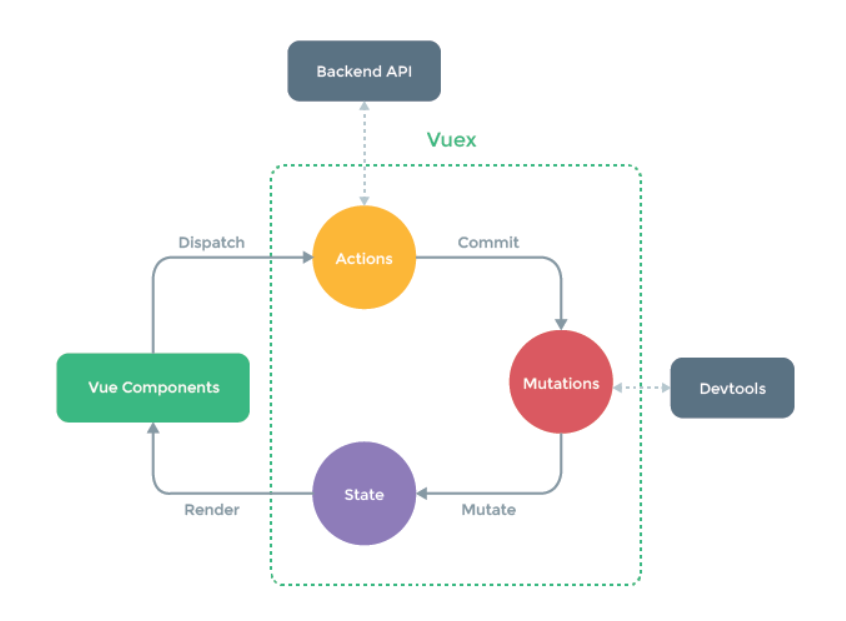
模块关系总图
上述基础学习完成后,官网的该图也可以清晰明了的看懂啦~嘻嘻~
在掘金发布的第一篇文章,初来乍到,前端初学者,请多指教~😁
