

容器启动过程
Spring官方关于容器启动的科普性图示:
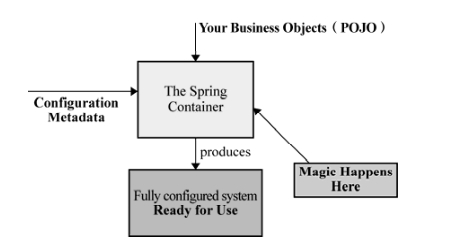
其中The Spring Container节点对容器进行了初始化,产生直接可用的Fully configured system。
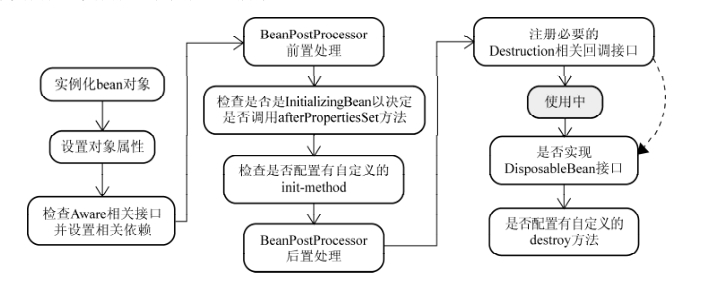
下图是容器启动的各个阶段图示:

其中提到的相关接口和类的关系如下图:
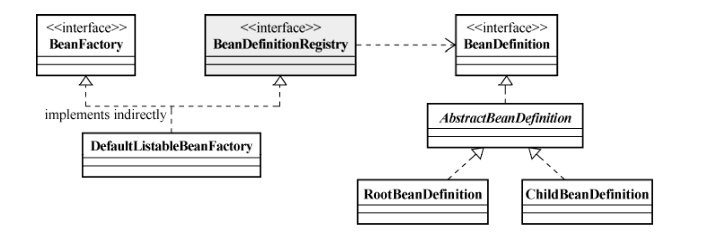
以上类图中BeanDefinitionRegistry依赖BeanDefinition,其他都是实现关系。
BeanFactoryPostProcessor容器扩展机制(第一阶段后)
该机制允许我们在容器实例化相应对象之前,对注册到容器的 BeanDefinition 所保存的信息做相应的修改。也就是在容 器实现的第一阶段最后加入一道工序。

BeanFactoryPostProcessor注册方式
BeanFactory硬编码注册BeanFactoryPostProcessor:
// 声明将被后处理的BeanFactory实例
ConfigurableListableBeanFactory beanFactory = new XmlBeanFactory(new ClassPathResource("..."));
// 声明要使用的BeanFactoryPostProcessor
PropertyPlaceholderConfigurer propertyPostProcessor = new PropertyPlaceholderConfigurer();
propertyPostProcessor.setLocation(new ClassPathResource("..."));
// 执行后处理操作
propertyPostProcessor.postProcessBeanFactory(beanFactory);
ApplicationContext配置文件注册BeanFactoryPostProcessor:
    <bean class="org.springframework.beans.factory.config.PropertyPlaceholderConfigurer">
        <property name="locations">
            <list>
                <value>conf/jdbc.properties</value>
                <value>conf/mail.properties</value>
            </list>
        </property>
    </bean>
各常用实现类说明
1. PropertyPlaceholderConfigurer
将XML配置文件与具体参数property分离,在XML中使用占位符匹配properties文件中的具体参数,如以下形式:
    //XML数据源配置
    <bean id="dataSource" class="org.apache.commons.dbcp.BasicDataSource">
        <property name="url">
            <value>${jdbc.url}</value>
        </property>
        <property name="driverClassName">
            <value>${jdbc.driver}</value>
        </property>
        <property name="username">
            <value>${jdbc.username}</value>
        </property>
        <property name="password">
            <value>${jdbc.password}</value>
        </property>
    </bean>
//properties文件对应参数
jdbc.url=jdbc:mysql://server/MAIN?useUnicode=true&characterEncoding=ms932&failOverReadOnly=false&roundRobinLoadBalance=true
jdbc.driver=com.mysql.jdbc.Driver
jdbc.username=your username=your password jdbc.password
PropertyPlaceholderConfigurer还会检查Java的System类中的Properties,可以通过setSystemPropertiesMode()或者setSystemPropertiesModeName()来控制是否加载或者覆盖System相应Properties的行为。其提供三种模式:
public class PropertyPlaceholderConfigurer extends PlaceholderConfigurerSupport {
    //不使用System的Properties配置项
    public static final int SYSTEM_PROPERTIES_MODE_NEVER = 0;
    //默认模式。properties中找不到对应参数(配置项),则去System的Properties找。
    public static final int SYSTEM_PROPERTIES_MODE_FALLBACK = 1;
    //优先使用System的Properties配置项
    public static final int SYSTEM_PROPERTIES_MODE_OVERRIDE = 2;
    }
2. PropertyOverrideConfigurer
可以通过PropertyOverrideConfigurer 对容器中配置的任何你想处理的bean定义的property信息(不需要使用占位符)进行覆盖替换。
例如,对于上文的XML数据源配置,作如下配置:
注册PropertyOverrideConfigurer:
    <bean class="org.springframework.beans.factory.config.PropertyOverrideConfigurer">
        <property name="location" value="pool-adjustment.properties"/>
    </bean>
pool-adjustment.properties内容:
#键参数值对格式为:beanName.propertyName=value
dataSource.minEvictableIdleTimeMillis=1000
dataSource.maxActive=50
即可替换dataSource的对应参数。
未使用PropertyOverrideConfigurer进行设置的参数依旧使用bean定义中的参数;多个参数对同一个property值进行设置时,以最后一个为准
3. CustomEditorConfigurer
通过XML定义的bean以及其property都需要由String转换成对应的各式类型对象,这个工作即是由JavaBean的PropertyEditor来完成(Spring也提供了自身实现的一些PropertyEditor,大多位于org.springframework.beans.propertyeditors)。
部分PropertyEditor(容器默认加载):
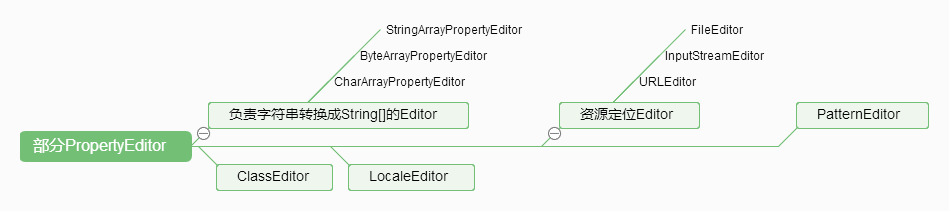
- StringArrayPropertyEditor:将符合CSV格式的字符串转换成
String[]数组的形式,默认是以逗号(,)分隔的字符串。 - ClassEditor:根据
String类型的class名称,直接将其转换成相应的Class对象。 - FileEditor:对应
java.io.File类型的PropertyEditor,负责资源定位。 - LocaleEditor:针对
java.util.Locale类型的PropertyEditor。 - PatternEditor:针对Java SE 1.4之后才引入的
java.util.regex.Pattern的PropertyEditor。
自定义PropertyEditor:
两种方式:
- 直接实现
java.beans.PropertyEditor - 继承
java.beans.PropertyEditorSupport,只需要实现setAsText(String)方法。
如下为定制日期格式的PropertyEditorSupport实现:
public class DatePropertyEditor extends PropertyEditorSupport {
    private String datePattern;

    @Override
    public void setAsText(String text) throws IllegalArgumentException {
        DateTimeFormatter dateTimeFormatter = DateTimeFormat.forPattern(getDatePattern());
        Date dateValue = dateTimeFormatter.parseDateTime(text).toDate();
        setValue(dateValue);
    }

    public String getDatePattern() {
        return datePattern;
    }

    public void setDatePattern(String datePattern) {
        this.datePattern = datePattern;
    }

    public DatePropertyEditor(String datePattern){
        this.datePattern = datePattern;
    }
}
通过CustomEditorConfigurer注册自定义的PropertyEditor
- 容器为
BeanFactory时,硬编码注册:
XmlBeanFactory beanFactory = new XmlBeanFactory(new ClassPathResource("……"));
CustomEditorConfigurer ceConfigurer = new CustomEditorConfigurer();

Map customerEditors = new HashMap();
customerEditors.put(java.util.Date.class, new DatePropertyEditor("yyyy/MM/dd"));
ceConfigurer.setCustomEditors(customerEditors);

ceConfigurer.postProcessBeanFactory(beanFactory);
- 容器为
ApplicationContext时,作为bean注册:
    <bean class="org.springframework.beans.factory.config.CustomEditorConfigurer">
        //Spring2.0前使用customEditors
        <property name="customEditors">
            <map>
                <entry key="java.util.Date">
                    <ref bean="datePropertyEditor"/>
                </entry>
            </map>
        </property>
    </bean>

    <bean id="datePropertyEditor" class="...DatePropertyEditor">
        <property name="datePattern">
            <value>yyyy/MM/dd</value>
        </property>
    </bean>
Spring2.0后提倡使用propertyEditorRegistrars属性来指定自定义的PropertyEditor:
需额外实现PropertyEditorRegistrar:
public class DatePropertyEditorRegistrar implements PropertyEditorRegistrar {
    private PropertyEditor propertyEditor;

    public void registerCustomEditors(PropertyEditorRegistry peRegistry) {
        peRegistry.registerCustomEditor(java.util.Date.class, getPropertyEditor());
    }

    public PropertyEditor getPropertyEditor() {
        return propertyEditor;
    }

    public void setPropertyEditor(PropertyEditor propertyEditor) {
        this.propertyEditor = propertyEditor;
    }
}
此时的bean注册:
    <bean class="org.springframework.beans.factory.config.CustomEditorConfigurer">
        <property name="propertyEditorRegistrars">
            //多个PropertyEditorRegistrar可以在list里一一指定
            <list>
                <ref bean="datePropertyEditorRegistrar"/>
            </list>
        </property>
    </bean>
    //Spring2.0后提倡使用DatePropertyEditor
    <bean id="datePropertyEditorRegistrar" class="...DatePropertyEditorRegistrar">
        <property name="propertyEditor">
            <ref bean="datePropertyEditor"/>
        </property>
    </bean>
    <bean id="datePropertyEditor" class="...DatePropertyEditor">
        <property name="datePattern">
            <value>yyyy/MM/dd</value>
        </property>
    </bean>
BeanFactoryPostProcessor工作机制类图:
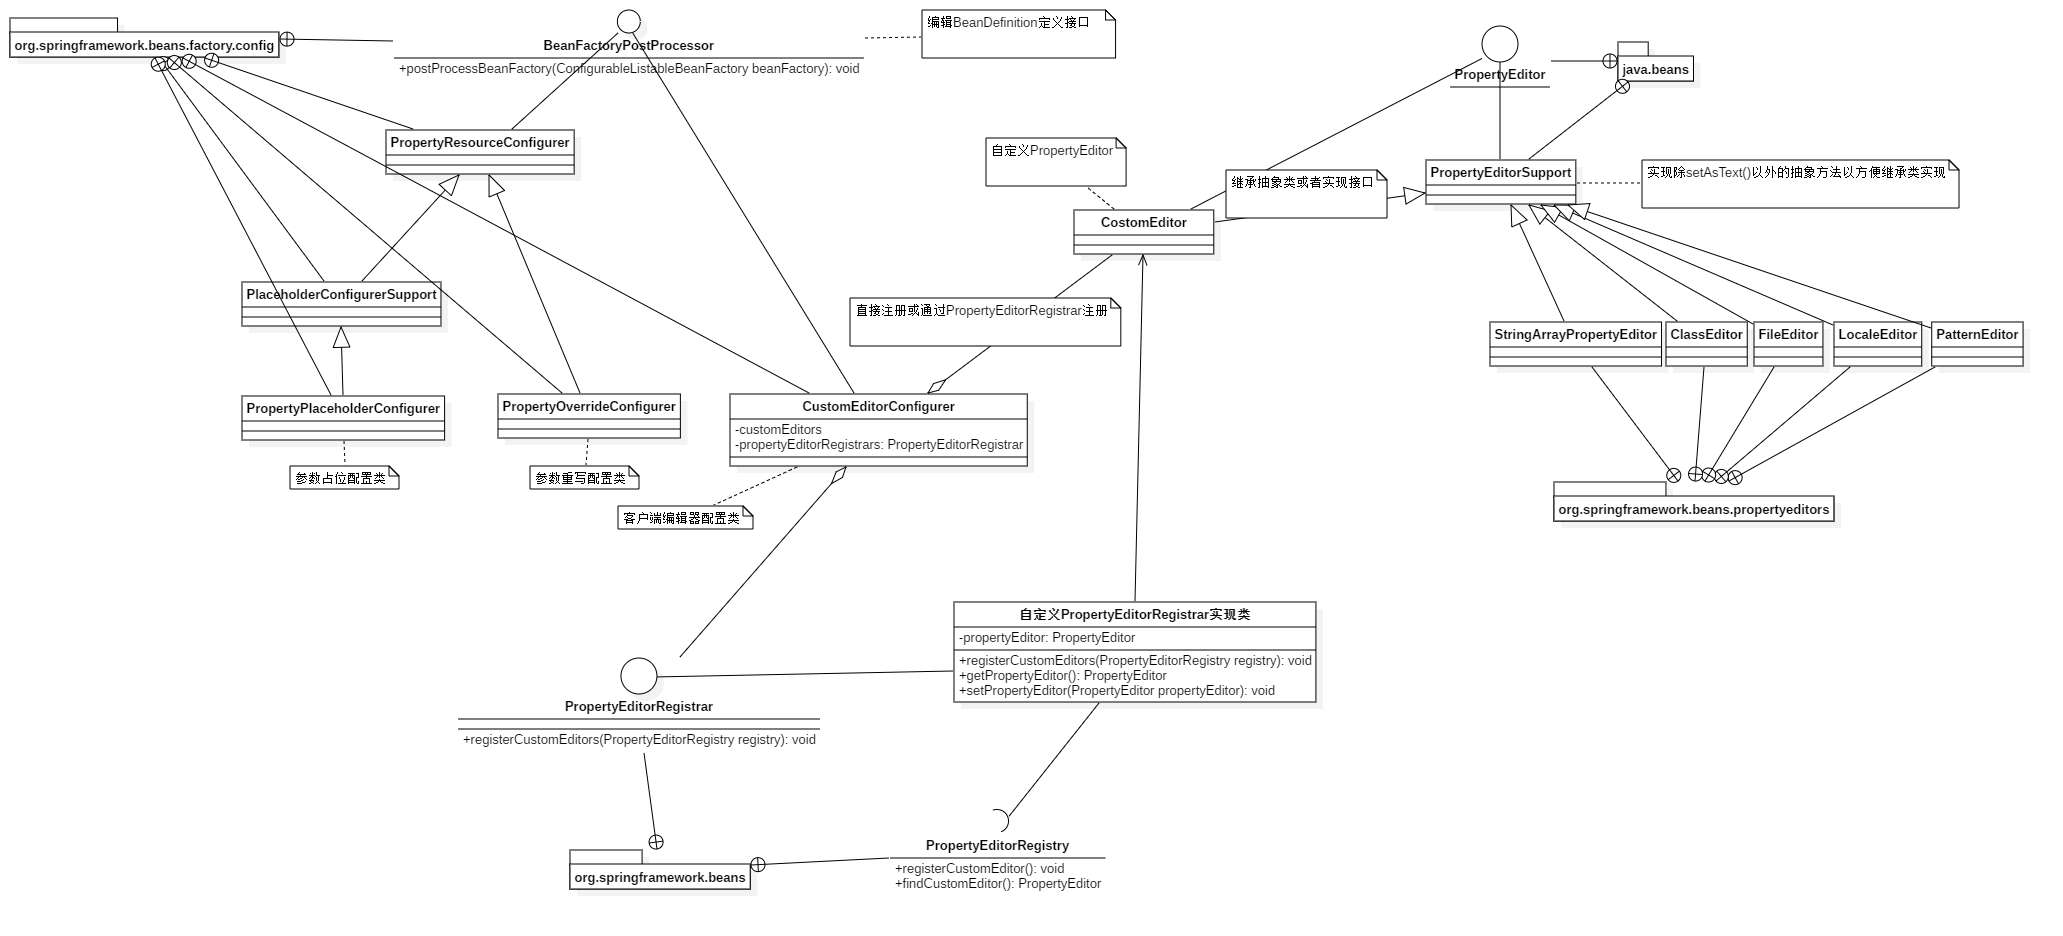
BeanFactoryPostProcessor及其子类,右侧为`PropertyEditor及其子类,下方为自定义CostomEditor注册机制实现。
bean生命周期(第二阶段)
当请求方通过BeanFactory的getBean()方法来请求某个对象实例的时候,才有可能触发Bean实例化阶段的活动。
- 客户端对象显式调用
- 容器内部隐式调用
- 对于 BeanFactory 来说,对象实例化默认采用延迟初始化。当初始化A对象时,会隐式初始化A的依赖对象B。
- ApplicationContext 启动之后会实例化所有的bean定义。当初始化A对象时,会隐式初始化A的依赖对象B。
bean实例化过程:
org.springframework.beans.factory.support.AbstractBeanFactory查看getBean();org.springframework.beans.factory.support.AbstractAutowireCapableBeanFactory查看createBean();
getBean()大致逻辑:(待阅源码)
Bean的实例化与 BeanWrapper
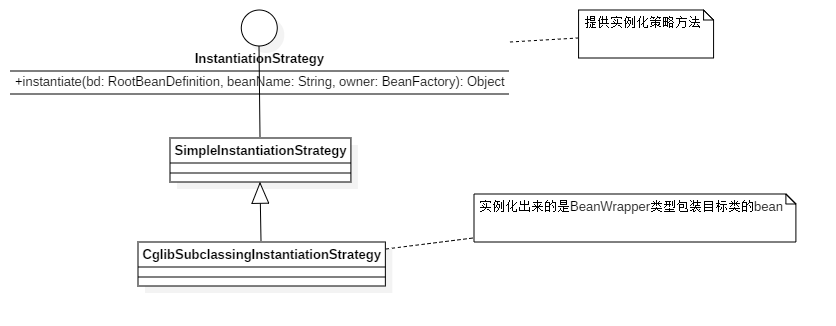
可以通过反射或者CGLIB动态字节码生成来初始化相应的bean实例或者动态生成其子类。
spring默认使用CglibSubclassingInstantiationStrategy生产被BeanWrapperImpl包装的目标类的bean。
InstantiationStrategy类图:
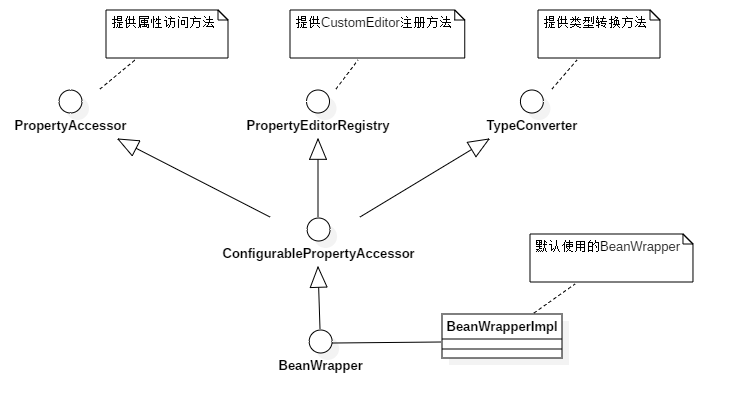
BeanWrapper和他的爸爸们:
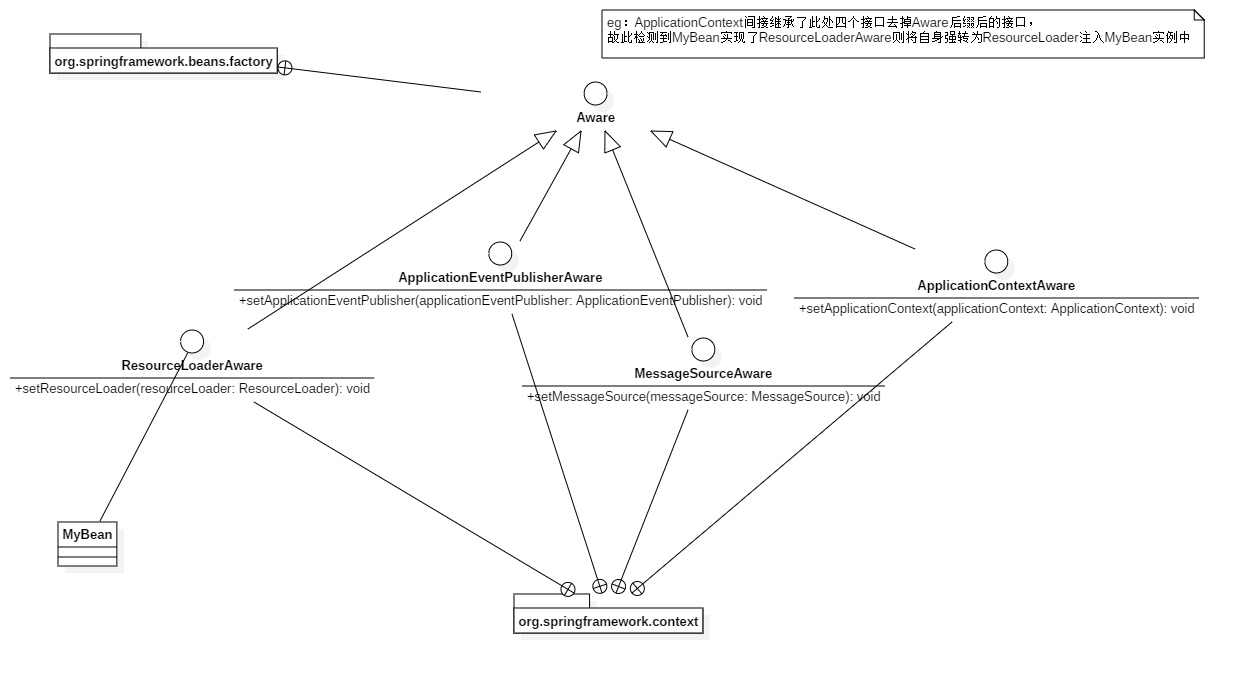
各色的 Aware 接口
当对象实例化完成并且相关属性以及依赖设置完成之后,Spring容器会检查当前对象实例是否实现了一系列的以 Aware 命名结尾的接口定义。如果是,则将这些 Aware 接口定义中规定的依赖注入给当前对象实例。
BeanFactory对应的Aware:

ApplicationContext对应的Aware:
BeanPostProcessor
BeanPostProcessor存在于对象实例化阶段。
接口定义如下:
package org.springframework.beans.factory.config;
public interface BeanPostProcessor {

    //实例化前执行
	@Nullable
	default Object postProcessBeforeInitialization(Object bean, String beanName) throws BeansException {
		return bean;
	}
	//实例化后执行
	@Nullable
	default Object postProcessAfterInitialization(Object bean, String beanName) throws BeansException {
		return bean;
	}
}
例如ApplicationContextAwareProcessor,则是对ApplicationContext对应的Aware进行检测执行对应操作的BeanPostProcessor实现类,其postProcessBeforeInitialization方法如下:
	public Object postProcessBeforeInitialization(final Object bean, String beanName) throws BeansException {
		AccessControlContext acc = null;

        //检测此bean是否实现以下Aware中的一个或多个
		if (System.getSecurityManager() != null &&
				(bean instanceof EnvironmentAware || bean instanceof EmbeddedValueResolverAware ||
						bean instanceof ResourceLoaderAware || bean instanceof ApplicationEventPublisherAware ||
						bean instanceof MessageSourceAware || bean instanceof ApplicationContextAware)) {
			//获取当前applicationContext的AccessControlContext
			acc = this.applicationContext.getBeanFactory().getAccessControlContext();
		}

		if (acc != null) {
			AccessController.doPrivileged((PrivilegedAction<Object>) () -> {
				invokeAwareInterfaces(bean);
				return null;
			}, acc);
		}
		else {
			invokeAwareInterfaces(bean);
		}

		return bean;
	}
自定义 BeanPostProcessor
- 标注需要进行处理的实现类(可定义并实现标记接口(Aware))
- 实现相应的
BeanPostProcessor对符合条件的Bean实例进行处理 - 将自定义的
BeanPostProcessor注册到容器,注册方式如下:
- 对于 BeanFactory 类型的容器,采用硬编码
ConfigurableBeanFactory beanFactory = new XmlBeanFactory(new ClassPathResource(...));
beanFactory.addBeanPostProcessor(new CustomPostProcessor());
- 对于 ApplicationContext 容器,直接XML注册
<beans>
    <bean id="customPostProcessor" class="package.name.CustomPostProcessor">
    <!--如果需要,注入必要的依赖-->
    </bean>
    ...
</beans>
InitializingBean 和 init-method
org.springframework.beans.factory.InitializingBean是容器内部广泛使用的一个对象生命周期标识接口,用于在BeanPostProcessor的前置处理执行后进一步编辑实现该接口的bean,如下:
public interface InitializingBean {

	/**
	 * Invoked by the containing {@code BeanFactory} after it has set all bean properties
	 * and satisfied {@link BeanFactoryAware}, {@code ApplicationContextAware} etc.
	 * <p>This method allows the bean instance to perform validation of its overall
	 * configuration and final initialization when all bean properties have been set.
	 * @throws Exception in the event of misconfiguration (such as failure to set an
	 * essential property) or if initialization fails for any other reason
	 */
	void afterPropertiesSet() throws Exception;

}
实际开发中使用 <bean> 的 init-method 属性来代替上述方式。一般用于集成第三方库。
DisposableBean 与 destroy-method
与InitializingBean和init-method对应,用于执行singleton类型的对象销毁操作。
为该实例注册一个用于对象销毁的回调(Callback),以便在这些singleton类型的对象实例销毁之前,执行销毁逻辑。
例如Spring注册的数据库连接池:
    <!--销毁方法为BasicDataSource自定义的close方法-->
    <bean id="dataSource" class="org.apache.commons.dbcp.BasicDataSource"
          destroy-method="close">
        <property name="url">
            <value>${jdbc.url}</value>
        </property>
        <property name="driverClassName">
            <value>${jdbc.driver}</value>
        </property>
        <property name="username">
            <value>${jdbc.username}</value>
        </property>
        <property name="password">
            <value>${jdbc.password}</value>
        </property>
        ...
    </bean>
对BeanFactory:
应在程序退出或者其他业务场景调用ConfigurableBeanFactory的destroySingletons()方法(处理所有实现DisposableBean接口和注册了destroy-method方法的类)销毁容器管理的所有singleton类型的对象实例。
/**
 * BeanFactory销毁单例实例方法调用。
 */
public class ApplicationLauncher {
    public static void main(String[] args) {
        BasicConfigurator.configure();
        BeanFactory container = new XmlBeanFactory(new ClassPathResource("..."));
        BusinessObject bean = (BusinessObject) container.getBean("...");
        bean.doSth();
        ((ConfigurableListableBeanFactory) container).destroySingletons();
        // 应用程序退出,容器关闭
    }
}
对ApplicationContext:
AbstractApplicationContext为我们提供了registerShutdownHook()方法,该方法底层使用标准的Runtime类的addShutdownHook()方式来调用相应bean对象的销毁逻辑。
/**
 * 使用 registerShutdownHook() 方法注册并触发对象销毁逻辑回调行为
 */
public class ApplicationLauncher {
    public static void main(String[] args) {
        BasicConfigurator.configure();
        BeanFactory container = new ClassPathXmlApplicationContext("...");
        ((AbstractApplicationContext) container).registerShutdownHook();
        BusinessObject bean = (BusinessObject) container.getBean("...");
        bean.doSth();
        // 应用程序退出,容器关闭
    }
}
