
微信公众号:深广大数据Club关注可了解更多大数据相关的资讯。问题或建议,请公众号留言;如果你觉得深广大数据Club对你有帮助,转发朋友圈推荐关注
2018年最后两天,本文也是2018年最后一篇文章。2019年将会给大家带来更多的精彩内容。
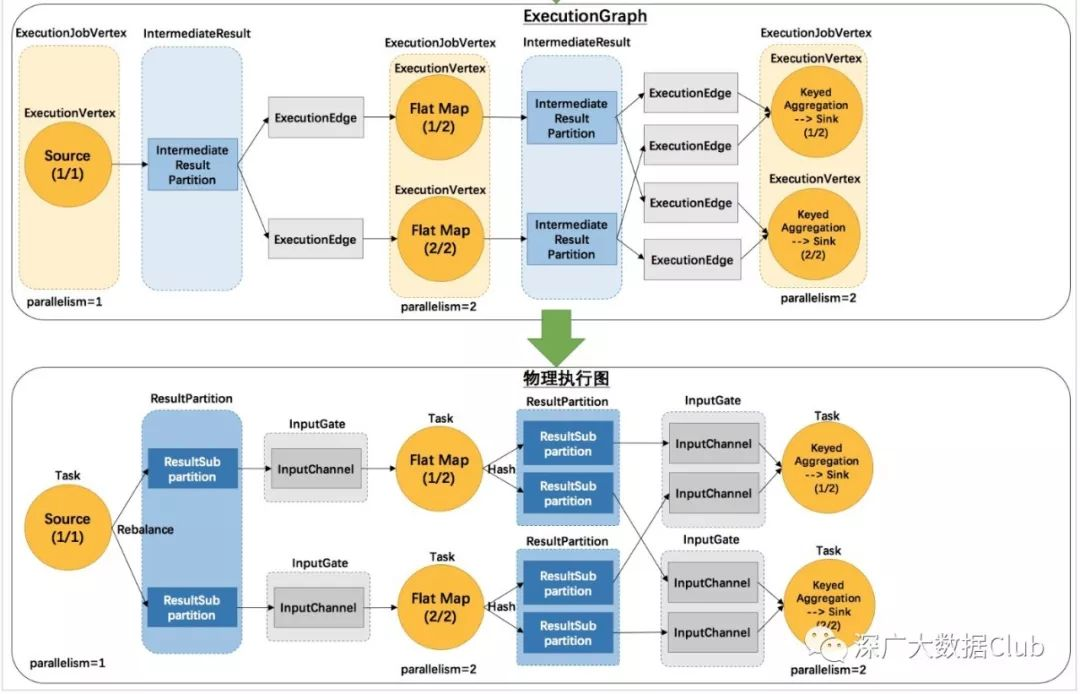
本文主要讲解Flink四层Graph的最后一层,物理Graph。其实此处的物理Graph是TaskManager在部署Task后形成的“图”,并不是具体的数据结构。
建议看本篇文章之前先查询前面的几篇文章。
物理执行层的的调度执行与ExcetionGraph的生成一样分为Local模式以及集群模式。我们二话不说,先上流程图。

Task调度入口
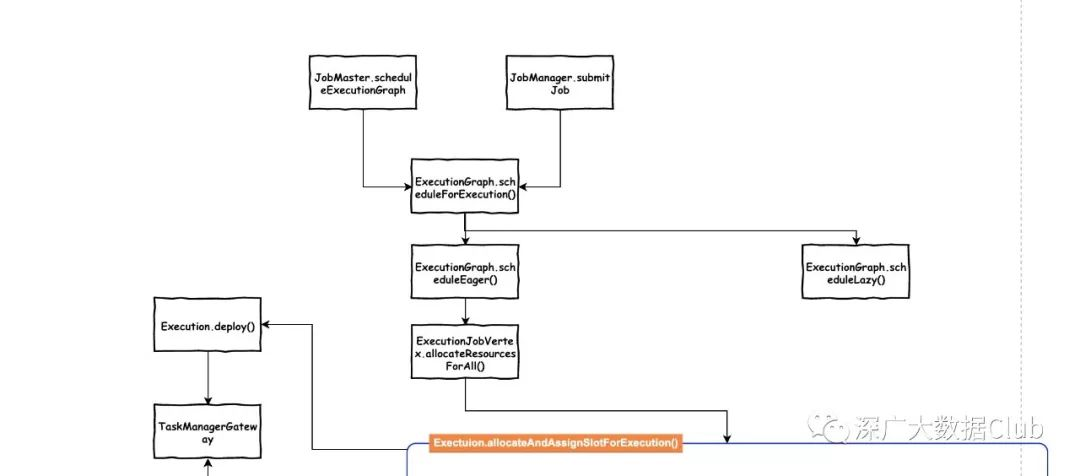
总的流程入口是在ExecutionGraph.scheduleForExecution()方法。从上图可以看出调用该方法的地方有两处:
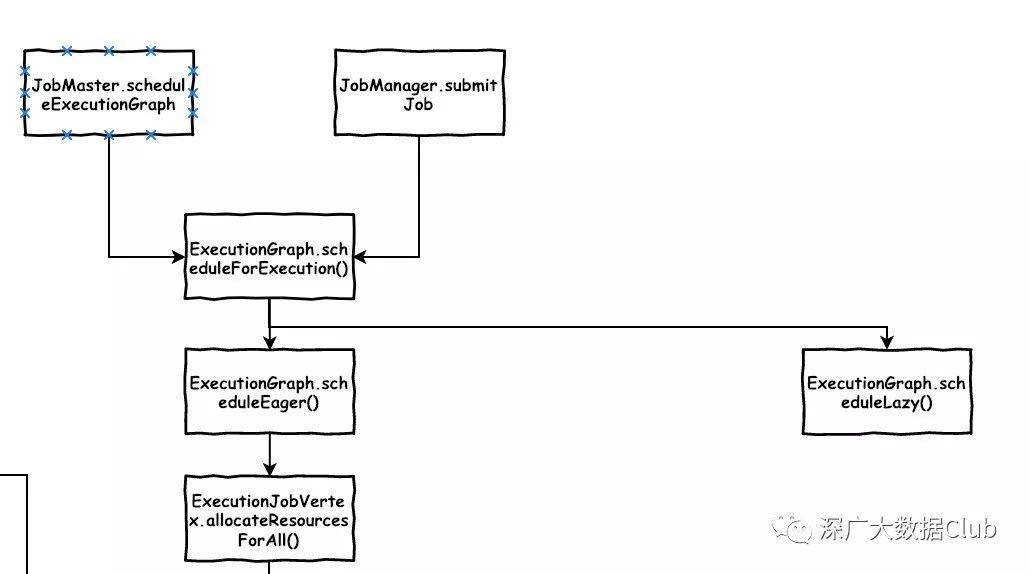
Local模式
JobMaster.scheduleExecutionGraph()
private void scheduleExecutionGraph() { checkState(jobStatusListener == null); // register self as job status change listener jobStatusListener = new JobManagerJobStatusListener(); executionGraph.registerJobStatusListener(jobStatusListener); try { executionGraph.scheduleForExecution(); } catch (Throwable t) { executionGraph.failGlobal(t); } }集群模式
JobManager.submitJob()
private def submitJob(jobGraph: JobGraph, jobInfo: JobInfo, isRecovery: Boolean = false): Unit = { ...executionGraph.scheduleForExecution() ...}分别对应的local模式和集群模式.
scheduleForExecution
public void scheduleForExecution-->() throws JobException { final long currentGlobalModVersion = globalModVersion; if (transitionState(JobStatus.CREATED, JobStatus.RUNNING)) { final CompletableFuture<Void> newSchedulingFuture; switch (scheduleMode) { case LAZY_FROM_SOURCES: newSchedulingFuture = scheduleLazy(slotProvider); break; case EAGER: newSchedulingFuture = scheduleEager(slotProvider, allocationTimeout); break; default: throw new JobException("Schedule mode is invalid."); } ... } ... }在之前的文章中我们就提到flink的调度模式包含两种:LAZY_FROM_SOURCES和EAGER。流式的调度模式是EAGER。所以代码路线是scheduleForExecution()-->scheduleEager()
scheduleEager
scheduleEager()方法主要的内容有两个部分,计算所有的ExecutionVertex总数,以及为每个ExecutionVertex分配一个Slot。
private CompletableFuture<Void> scheduleEager(SlotProvider slotProvider, final Time timeout) { ... final boolean queued = allowQueuedScheduling; final ArrayList<CompletableFuture<Execution>> allAllocationFutures = new ArrayList<>(getNumberOfExecutionJobVertices()); final Set<AllocationID> allPreviousAllocationIds = Collections.unmodifiableSet(computeAllPriorAllocationIdsIfRequiredByScheduling()); for (ExecutionJobVertex ejv : getVerticesTopologically()) { Collection<CompletableFuture<Execution>> allocationFutures = ejv.allocateResourcesForAll( slotProvider, queued, LocationPreferenceConstraint.ALL, allPreviousAllocationIds, timeout); allAllocationFutures.addAll(allocationFutures); } final ConjunctFuture<Collection<Execution>> allAllocationsFuture = FutureUtils.combineAll(allAllocationFutures); ... }}代码循环调用ExecutionJobVertex.allocateResourcesForAll(),通过Exectuion.allocateAndAssignSlotForExecution()来为每一个ExecutionVertex绑定slot。
SlotProvider实现
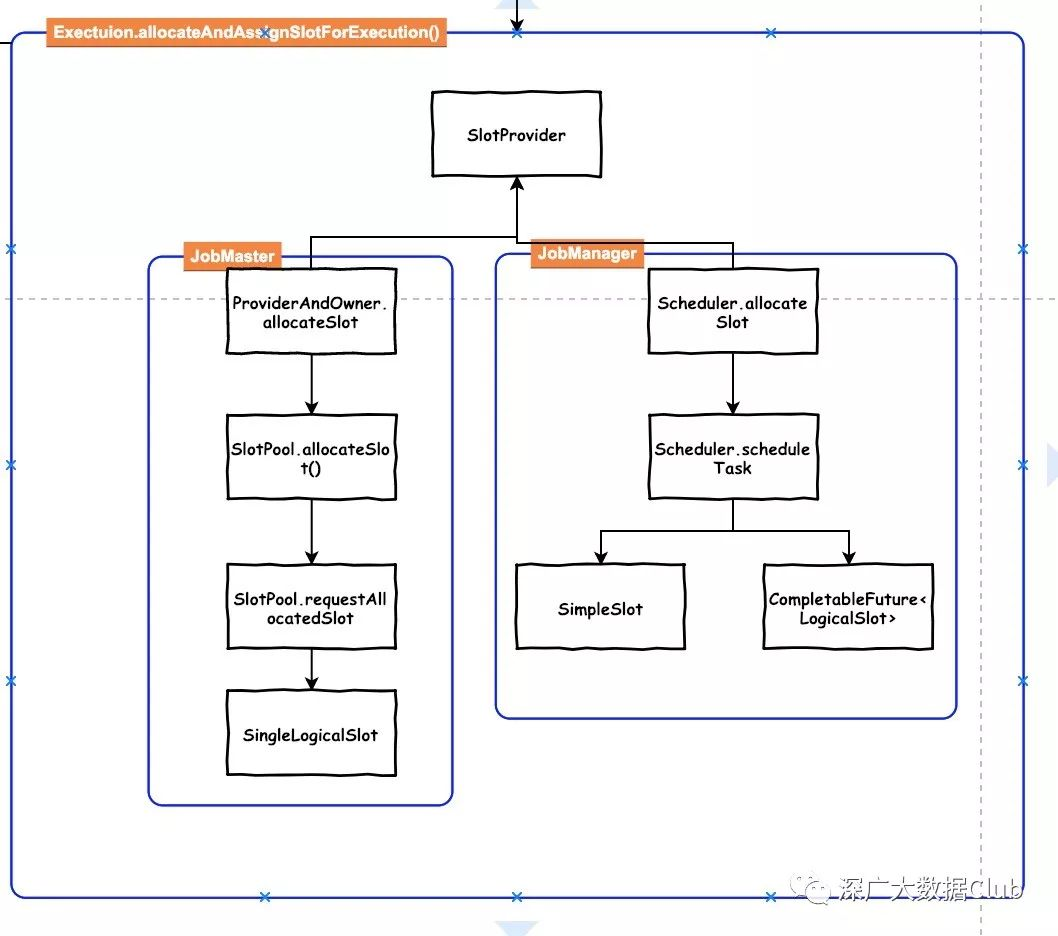
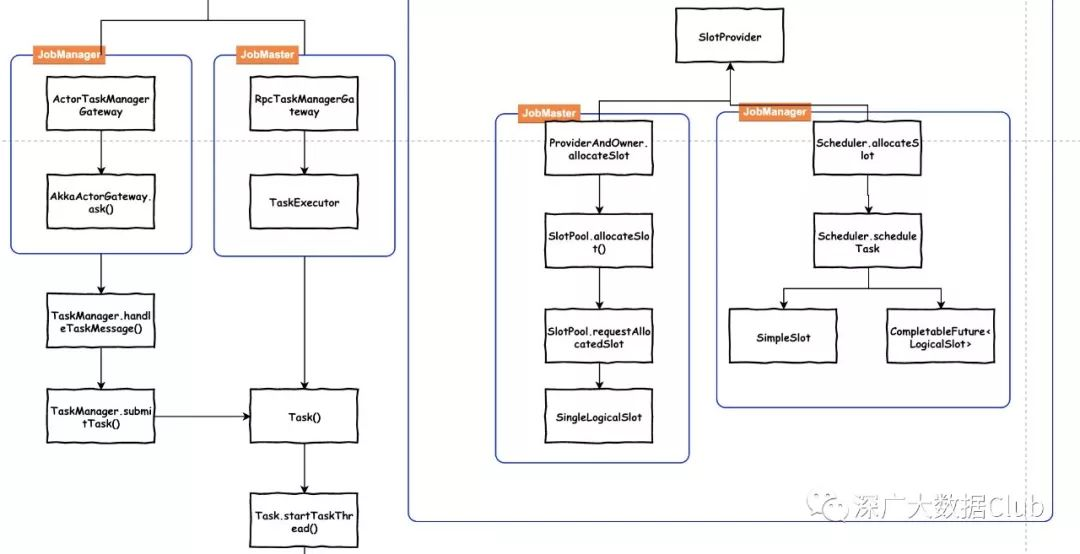
Slot由SlotProvider接口的实现类allocateSlot()生成。此处同样也分为本地方式与集群方式。
Local模式
本地方式是ProviderAndOwner
ProviderAndOwner.allocateSlot --> SlotPool.allocateSlot() --> SlotPool.requestAllocatedSlot return SingleLogicalSlot集群模式
Scheduler.allocateSlot --> Scheduler.scheduleTask return SimpleSlot/CompletableFuture<LogicalSlot>SlotProvider接口allocateSlot()的返回信息是 CompletableFuture<LogicalSlot>
LogicalSlot实现
LogicalSlot的实现同样分为Local和集群实现,本地实现是SingleLogicalSlot,集群实现是SimpleSlot/CompletableFuture 。
Local模式
private CompletableFuture<LogicalSlot> allocateSingleSlot( SlotRequestId slotRequestId, SlotProfile slotProfile, boolean allowQueuedScheduling, Time allocationTimeout) { // request an allocated slot to assign a single logical slot to CompletableFuture<SlotAndLocality> slotAndLocalityFuture = requestAllocatedSlot( slotRequestId, slotProfile, allowQueuedScheduling, allocationTimeout); return slotAndLocalityFuture.thenApply( (SlotAndLocality slotAndLocality) -> { final AllocatedSlot allocatedSlot = slotAndLocality.getSlot(); final SingleLogicalSlot singleTaskSlot = new SingleLogicalSlot( slotRequestId, allocatedSlot, null, slotAndLocality.getLocality(), providerAndOwner); if (allocatedSlot.tryAssignPayload(singleTaskSlot)) { return singleTaskSlot; } else { final FlinkException flinkException = new FlinkException("Could not assign payload to allocated slot " + allocatedSlot.getAllocationId() + '.'); releaseSingleSlot(slotRequestId, flinkException); throw new CompletionException(flinkException); } }); }代码最终封装成CompletableFuture 返回。
集群模式
@Overridepublic CompletableFuture<LogicalSlot> allocateSlot( SlotRequestId slotRequestId, ScheduledUnit task, boolean allowQueued, SlotProfile slotProfile, Time allocationTimeout) { try { final Object ret = scheduleTask(task, allowQueued, slotProfile.getPreferredLocations()); if (ret instanceof SimpleSlot) { return CompletableFuture.completedFuture((SimpleSlot) ret); } else if (ret instanceof CompletableFuture) { @SuppressWarnings("unchecked") CompletableFuture<LogicalSlot> typed = (CompletableFuture<LogicalSlot>) ret; return FutureUtils.orTimeout(typed, allocationTimeout.toMilliseconds(), TimeUnit.MILLISECONDS); } else { // this should never happen, simply guard this case with an exception throw new RuntimeException(); } } catch (NoResourceAvailableException e) { return FutureUtils.completedExceptionally(e); }}集群模式的核心方法是scheduleTask,方法中包含两种场景:包含共享槽组方式以及非共享方式。
Execution.deploy()
接下来我们接着讲scheduleEager方法的后半段内容,
final CompletableFuture<Void> currentSchedulingFuture = allAllocationsFuture .thenAccept( (Collection<Execution> executionsToDeploy) -> { for (Execution execution : executionsToDeploy) { try { execution.deploy(); } catch (Throwable t) { throw new CompletionException( new FlinkException( String.format("Could not deploy execution %s.", execution), t)); } } })代码内容循环对execution执行deploy()方法。
public void deploy() throws JobException { ... final TaskDeploymentDescriptor deployment = vertex.createDeploymentDescriptor( attemptId, slot, taskRestore, attemptNumber); // null taskRestore to let it be GC'ed taskRestore = null; final TaskManagerGateway taskManagerGateway = slot.getTaskManagerGateway(); final CompletableFuture<Acknowledge> submitResultFuture = taskManagerGateway.submitTask(deployment, rpcTimeout); ...}ExecutionVertex.createDeploymentDescriptor方法中,包含了从Execution Graph到真正物理执行图的转换。如将IntermediateResultPartition转化成ResultPartitionDeploymentDescriptor,ExecutionEdge转成InputGateDeploymentDescriptor,最终返回TaskDeploymentDescriptor(最终会在执行时转化成InputGate)。
之后通过TaskManagerGateway提交submitTask信息。此处的TaskManagerGateway在Local模式和集群模式也有不同的实现。
TaskManagerGateway

Local
Local模式的通讯方式是通过RPC的方式:RpcTaskManagerGateway
@Overridepublic CompletableFuture<Acknowledge> submitTask(TaskDeploymentDescriptor tdd, Time timeout) { return taskExecutorGateway.submitTask(tdd, jobMasterId, timeout);}此处的taskExecutorGateway是一个TaskExecutorGateway接口实现类TaskExecutor的实例。在TaskExecutor的submitTask方法中对Task进行实例化以及startTaskThread()
集群模式
集群模式与TaskManager的通讯方式是通过akka来实现:ActorTaskManagerGateway
@Overridepublic CompletableFuture<Acknowledge> submitTask(TaskDeploymentDescriptor tdd, Time timeout) { Preconditions.checkNotNull(tdd); Preconditions.checkNotNull(timeout); scala.concurrent.Future<Acknowledge> submitResult = actorGateway.ask( new TaskMessages.SubmitTask(tdd), new FiniteDuration(timeout.getSize(), timeout.getUnit())) .mapTo(ClassTag$.MODULE$.<Acknowledge>apply(Acknowledge.class)); return FutureUtils.toJava(submitResult);}集群模式通过actorGateway.ask将任务提交给TaskManager做处理。actorGateway为AkkaActorGateway实例对象。
Task task = new Task( jobInformation, taskInformation, tdd.getExecutionAttemptId(), tdd.getAllocationId(), tdd.getSubtaskIndex(), tdd.getAttemptNumber(), tdd.getProducedPartitions(), tdd.getInputGates(), tdd.getTargetSlotNumber(), taskExecutorServices.getMemoryManager(), taskExecutorServices.getIOManager(), taskExecutorServices.getNetworkEnvironment(), taskExecutorServices.getBroadcastVariableManager(), taskStateManager, taskManagerActions, inputSplitProvider, checkpointResponder, blobCacheService, libraryCache, fileCache, taskManagerConfiguration, taskMetricGroup, resultPartitionConsumableNotifier, partitionStateChecker, getRpcService().getExecutor()); ... task.startTaskThread();在Task构造函数中,会根据输入的参数,创建InputGate, ResultPartition, ResultPartitionWriter等。
TaskManager通过handleTaskMessage()方法接收传递的信息并进行消息处理。与本地模式类似,方法内部也是会对Task进行实例化以及startTaskThread()
有所不同的是TaskExecution用TaskSlotTable来保存Task。而TaskManager用HashMap 来存储ExecutionAttemptID及Task信息的映射关系。
Task的实现
startTaskThread方法执行executingThread.start,从而调用Task.run方法
@Overridepublic void run() { ... userCodeClassLoader = createUserCodeClassloader(); ... //env环境参数配置 ... // now load and instantiate the task's invokable code invokable = loadAndInstantiateInvokable(userCodeClassLoader, nameOfInvokableClass, env); // run the invokable invokable.invoke(); ...}方法主体代码较长,最核心的代码就是以上两行代码。loadAndInstantiateInvokable包含三个参数,userCodeClassLoader,nameOfInvokableClass和env。userCodeClassLoader通过createUserCodeClassloader方法创建。之后省略的代码部分主要包含了构建env所需的参数信息。
nameOfInvokableClass是在Task构造方法中赋值的。
this.nameOfInvokableClass = taskInformation.getInvokableClassName();而具体是什么,我们跟着代码往上推,最终可以定位到我们在讲解StreamGraph生成过程的时候所讲到的StreamGraph.addOperator
if (operatorObject instanceof StoppableStreamSource) { addNode(vertexID, slotSharingGroup, coLocationGroup, StoppableSourceStreamTask.class, operatorObject, operatorName);} else if (operatorObject instanceof StreamSource) { addNode(vertexID, slotSharingGroup, coLocationGroup, SourceStreamTask.class, operatorObject, operatorName);} else { addNode(vertexID, slotSharingGroup, coLocationGroup, OneInputStreamTask.class, operatorObject, operatorName);}TypeSerializer<IN> inSerializer = inTypeInfo != null && !(inTypeInfo instanceof MissingTypeInfo) ? inTypeInfo.createSerializer(executionConfig) : null;TypeSerializer<OUT> outSerializer = outTypeInfo != null && !(outTypeInfo instanceof MissingTypeInfo) ? outTypeInfo.createSerializer(executionConfig) : null;setSerializers(vertexID, inSerializer, null, outSerializer);nameOfInvokableClass反射过来的具体类包含:StoppableSourceStreamTask、SourceStreamTask、OneInputStreamTask。
addNode方法创建StreamNode对象,添加到streamNodes中。通过setSerializers方法配置node的序列化和反序列化信息。
StreamGraph:StreamNode.vertexClass -->JobGraph:JobVertex.invokableClass --> ExecutionGraph:ExecutionJobVertex.TaskInformation.invokableClassName -->Task整个传递流程如上述代码所示。
我们回到StreamGraph生成的时候,StreamGraph通过StreamGraphGenerator.generate(this, transformations)生成,而此处的transformations最终会映射成一个个的Task(此处为StreamTask)。
OneInputStreamTask的基类StreamTask,包含了headOperator和operatorChain。当Task调用invoke方法的时候,会调用自身的 run方法,此处是一个抽象方法,最终会运行其派生类的run方法。
SocketWindowWordCount中所使用到的flatMap映射成Task,其实就是一个OneInputStreamTask。OneInputStreamTask.run()代码如下:
@Override protected void run() throws Exception { // cache processor reference on the stack, to make the code more JIT friendly final StreamInputProcessor<IN> inputProcessor = this.inputProcessor; while (running && inputProcessor.processInput()) { // all the work happens in the "processInput" method } }实际执行用户代码逻辑的是inputProcessor.processInput()。此处的inputProcessor在OneInputStreamTask.init()方法中进行实例化。
@Override public void init() throws Exception { StreamConfig configuration = getConfiguration(); TypeSerializer<IN> inSerializer = configuration.getTypeSerializerIn1(getUserCodeClassLoader()); int numberOfInputs = configuration.getNumberOfInputs(); if (numberOfInputs > 0) { InputGate[] inputGates = getEnvironment().getAllInputGates(); inputProcessor = new StreamInputProcessor<>( inputGates, inSerializer, this, configuration.getCheckpointMode(), getCheckpointLock(), getEnvironment().getIOManager(), getEnvironment().getTaskManagerInfo().getConfiguration(), getStreamStatusMaintainer(), this.headOperator, getEnvironment().getMetricGroup().getIOMetricGroup(), inputWatermarkGauge); } headOperator.getMetricGroup().gauge(MetricNames.IO_CURRENT_INPUT_WATERMARK, this.inputWatermarkGauge); // wrap watermark gauge since registered metrics must be unique getEnvironment().getMetricGroup().gauge(MetricNames.IO_CURRENT_INPUT_WATERMARK, this.inputWatermarkGauge::getValue); }最后来看下StreamInputProcessor.processInput()方法的内容
public boolean processInput() throws Exception { ... while (true) { if (currentRecordDeserializer != null) { ... if (result.isFullRecord()) { StreamElement recordOrMark = deserializationDelegate.getInstance(); if (recordOrMark.isWatermark()) { // 处理watermark statusWatermarkValve.inputWatermark(recordOrMark.asWatermark(), currentChannel); continue; } else if (recordOrMark.isStreamStatus()) { // 处理Stream状态 statusWatermarkValve.inputStreamStatus(recordOrMark.asStreamStatus(), currentChannel); continue; } else if (recordOrMark.isLatencyMarker()) { // 处理latency marker synchronized (lock) { streamOperator.processLatencyMarker(recordOrMark.asLatencyMarker()); } continue; } else { // 此处才是处理真正的用户逻辑的地方 StreamRecord<IN> record = recordOrMark.asRecord(); synchronized (lock) { numRecordsIn.inc(); streamOperator.setKeyContextElement1(record); streamOperator.processElement(record); } return true; } } } ...}processElement()方法才是真正处理用户业务逻辑的地方。streamOperator是OneInputStreamOperator接口派生类的实例,以FlatMap为例,对应的OneInputStreamOperator接口派生类是StreamFlatMap。
@Overridepublic void processElement(StreamRecord<IN> element) throws Exception { collector.setTimestamp(element); userFunction.flatMap(element.getValue(), collector);}总结
到此处,Flink四层Graph的源码解析就讲完了。本文讲述了Flink最后一层物理Graph,也就是Task的调度执行。
对两种模式下(Local模式,集群模式)的Task调度执行做了详细的讲解。虽说分为两种模式,但是最终还是统一为Task的形式执行。最终执行用户业务逻辑是通过对应的Operator.processElement()方法调用userFuction执行。
系列相关文章
Flink源码解析 | 从Example出发理解Flink-Flink启动
Flink源码解析 | 从Example出发:读懂本地任务执行流程
Flink源码解析 | 从Example出发:读懂集群任务执行流程
Flink源码解析 | 从Example出发:读懂Flink On Yarn任务执行流程
Flink源码解析 | 从Example出发:读懂start-start-shell.sh任务执行流程
Flink源码解析 | 从Example出发:理解StreamGraph的生成过程
Flink源码解析 | 从Example出发:理解JobGraph的生成过程
Flink源码解析 | 从Example出发:理解ExecutionGraph的生成过程
关注公众号