

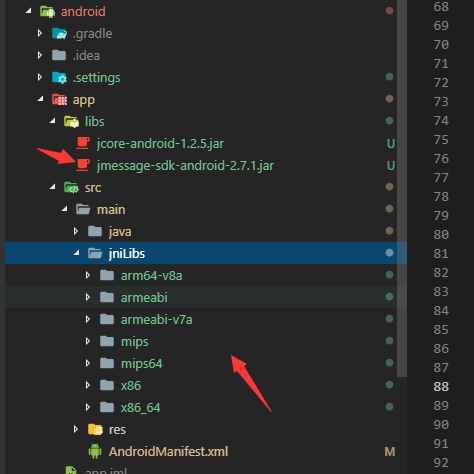
我最近在学习flutter,想做一个聊天的软件,但是没有现成的Im(即时通讯),搞得很是头大,于是想着自己去封装一个,今天学习跨平台的第三天,前端小白,本人是java不懂,Android不懂,凭官网的代码很难去自己封装一个sdk,于是我慢慢摸索,终于今天封装了sdk的一些小功能,给大家分享下。 1.下载官网的sdk,将其中的Libs放到app下,so文件放到src/min/jniLibs里面,如图
<manifest xmlns:android="http://schemas.android.com/apk/res/android"
    package="com.example.wechat">

    <!-- The INTERNET permission is required for development. Specifically,
         flutter needs it to communicate with the running application
         to allow setting breakpoints, to provide hot reload, etc.
    -->
    <permission
        android:name="com.wx.liu.permission.JPUSH_MESSAGE"
        android:protectionLevel="signature"/>
    <uses-permission android:name="com.wx.liu.permission.JPUSH_MESSAGE" />
    <uses-permission android:name="android.permission.INTERNET"/>
    <uses-permission android:name="com.wx.liu.permission.JPUSH_MESSAGE" />
    <uses-permission android:name="android.permission.RECEIVE_USER_PRESENT" />
    <uses-permission android:name="android.permission.WAKE_LOCK" />
    <uses-permission android:name="android.permission.READ_PHONE_STATE" />
    <uses-permission android:name="android.permission.WRITE_EXTERNAL_STORAGE" />
    <uses-permission android:name="android.permission.READ_EXTERNAL_STORAGE" />
    <uses-permission android:name="android.permission.VIBRATE" />
    <!--<uses-permission android:name="android.permission.MOUNT_UNMOUNT_FILESYSTEMS" />-->
    <!--<uses-permission android:name="android.permission.WRITE_SETTINGS" />-->
    <uses-permission android:name="android.permission.ACCESS_NETWORK_STATE" />

    <uses-permission android:name="android.permission.ACCESS_WIFI_STATE" />

    <!-- Optional. Required for location feature -->
    <uses-permission android:name="android.permission.ACCESS_COARSE_LOCATION" />
    <uses-permission android:name="android.permission.CHANGE_WIFI_STATE" />
    <uses-permission android:name="android.permission.ACCESS_FINE_LOCATION" />
    <uses-permission android:name="android.permission.ACCESS_LOCATION_EXTRA_COMMANDS" />
    <uses-permission android:name="android.permission.CHANGE_NETWORK_STATE" />
    <uses-permission android:name="android.permission.GET_TASKS" />
    <!-- io.flutter.app.FlutterApplication is an android.app.Application that
         calls FlutterMain.startInitialization(this); in its onCreate method.
         In most cases you can leave this as-is, but you if you want to provide
         additional functionality it is fine to subclass or reimplement
         FlutterApplication and put your custom class here. -->
    <uses-permission android:name="android.permission.SYSTEM_ALERT_WINDOW" />
    <uses-permission android:name="android.permission.ACCESS_COARSE_LOCATION" />
    <uses-permission android:name="android.permission.ACCESS_FINE_LOCATION" />
    <uses-permission android:name="android.permission.ACCESS_LOCATION_EXTRA_COMMANDS" />
    <uses-permission android:name="android.permission.CHANGE_WIFI_STATE" />
    <uses-permission android:name="android.permission.CHANGE_NETWORK_STATE" />
    <uses-permission android:name="android.permission.GET_TASKS" />
    <application
        android:name="io.flutter.app.FlutterApplication"
        android:label="wechat"
        android:icon="@mipmap/weixin2">
        <!-- Required SDK 核心功能-->
        <!-- 可配置android:process参数将PushService放在其他进程中 -->
        <service
            android:name="cn.jpush.android.service.PushService"
            android:enabled="true"
            android:exported="false">
            <intent-filter>
                <action android:name="cn.jpush.android.intent.REGISTER" />
                <action android:name="cn.jpush.android.intent.REPORT" />
                <action android:name="cn.jpush.android.intent.PushService" />
                <action android:name="cn.jpush.android.intent.PUSH_TIME" />
            </intent-filter>
        </service>

        <!-- Required SDK核心功能-->
        <receiver
            android:name="cn.jpush.android.service.PushReceiver"
            android:enabled="true"
            android:exported="false">
            <intent-filter android:priority="1000">
                <action android:name="cn.jpush.android.intent.NOTIFICATION_RECEIVED_PROXY" />
                <category android:name="com.wx.liu" />
            </intent-filter>
            <intent-filter>
                <action android:name="android.intent.action.USER_PRESENT" />
                <action android:name="android.net.conn.CONNECTIVITY_CHANGE" />
            </intent-filter>
            <!-- Optional -->
            <intent-filter>
                <action android:name="android.intent.action.PACKAGE_ADDED" />
                <action android:name="android.intent.action.PACKAGE_REMOVED" />

                <data android:scheme="package" />
            </intent-filter>
        </receiver>

        <!-- Required SDK核心功能-->
        <receiver
            android:name="cn.jpush.android.service.AlarmReceiver"
            android:exported="false" />

        <!-- Required since JCore 1.1.7. SDK 核心功能-->
        <provider
            android:name="cn.jpush.android.service.DataProvider"
            android:authorities="com.wx.liu.DataProvider"
            android:exported="false" />

        <!-- Required since JMessage 2.7.0 SDK 核心功能-->
        <provider
            android:name="cn.jpush.im.android.helpers.ipc.IMProvider"
            android:authorities="com.wx.liu.IMProvider"
            android:exported="false" />

        <!-- Required JMessage SDK核心功能-->
        <receiver
            android:name="cn.jpush.im.android.helpers.IMReceiver"
            android:enabled="true"
            android:exported="false">
        </receiver>

        <!-- Required. For publish channel feature -->
        <!-- JPUSH_CHANNEL 是为了方便开发者统计APK分发渠道。-->
        <!-- 例如: -->
        <!-- 发到 Google Play 的APK可以设置为 google-play; -->
        <!-- 发到其他市场的 APK 可以设置为 xxx-market。 -->
        <!-- 目前这个渠道统计功能的报表还未开放。-->
        <meta-data
            android:name="JPUSH_CHANNEL"
            android:value="developer-default" />

        <!-- Required. AppKey copied from Portal -->
        <meta-data
            android:name="JPUSH_APPKEY"
            android:value="c4f4ddf94d1482353cf3d495" />
        <activity
            android:name=".MainActivity"
            android:launchMode="singleTop"
            android:theme="@style/LaunchTheme"
            android:configChanges="orientation|keyboardHidden|keyboard|screenSize|locale|layoutDirection|fontScale|screenLayout|density"
            android:hardwareAccelerated="true"
            android:windowSoftInputMode="adjustResize">
            <!-- This keeps the window background of the activity showing
                 until Flutter renders its first frame. It can be removed if
                 there is no splash screen (such as the default splash screen
                 defined in @style/LaunchTheme). -->
            <meta-data
                android:name="io.flutter.app.android.SplashScreenUntilFirstFrame"
                android:value="true" />
            <intent-filter>
                <action android:name="android.intent.action.MAIN"/>
                <category android:name="android.intent.category.LAUNCHER"/>
            </intent-filter>
        </activity>
    </application>
</manifest>
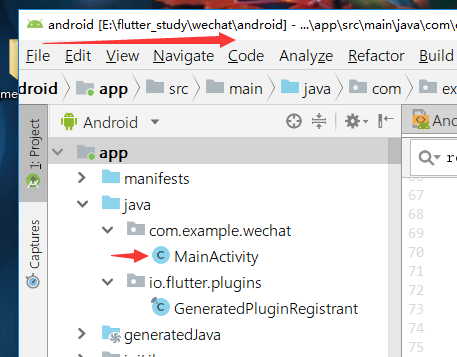
3.用Android Studio 打开我们的项目,打开Android项目哦!
dart
1>添加通道
static const MethodChannel _channel = const MethodChannel('jmessage');
2>初始化以及注册
  void initState() {
    super.initState();
    initJmessage();
  }
  // 初始化
   Future<void> initJmessage() async {
        _channel.invokeMethod('initJmessage');
   }
  // 登陆
   Future loginJmessage() async {
      var message = await _channel.invokeMethod('loginJmessage',{ 'userName': '177xxxxxxx', 'password': '177xxxxxx' },);
   }
java
package com.example.wechat;

import android.content.Context;
import android.os.Bundle;
import android.util.Log;

import java.util.Map;

import cn.jpush.im.android.api.JMessageClient;
import io.flutter.app.FlutterActivity;
import io.flutter.plugin.common.MethodCall;
import io.flutter.plugin.common.MethodChannel;
import io.flutter.plugins.GeneratedPluginRegistrant;
import cn.jpush.im.api.BasicCallback;

public class MainActivity extends FlutterActivity {
  private static final String CHANEL = "jmessage";
  private static final String TAG = "RegisterActivity";
  private static Context context;
  String loginMessage = null;
  @Override
  public void onCreate(Bundle savedInstanceState) {
    super.onCreate(savedInstanceState);
    GeneratedPluginRegistrant.registerWith(this);
    new MethodChannel(getFlutterView(),CHANEL).setMethodCallHandler(new MethodChannel.MethodCallHandler() {
      @Override
      public void onMethodCall(MethodCall methodCall,final MethodChannel.Result result) {

        if(methodCall.method.equals("initJmessage")){
          initJmessage();
          result.success("");
        }
        if(methodCall.method.equals("loginJmessage")){
        final Map<String,Object> arg = methodCall.arguments();
        String userName = (String) arg.get("userName");
          Log.i(TAG,userName);
        String passWord = (String) arg.get("password");
         loginJmessage(userName, passWord, new Callback() {
           @Override
           public void callback(String message) {
             Log.i(TAG,message);
             result.success(loginMessage);
           }
         });


        }
      }
    });
  }
    public interface Callback {
        void callback(String message);
    }
   private void initJmessage(){
     JMessageClient.setDebugMode(true);
     JMessageClient.init(this);
  }

  private void loginJmessage(String userName, String password, final Callback callback){
    this.loginMessage = loginMessage;
    JMessageClient.register(userName, password, null, new BasicCallback() {
      public void gotResult(int responseCode, String registerDesc) {
          Log.i(TAG, "JMessageClient.register " + ", responseCode = " + responseCode + " ; registerDesc = " + registerDesc);
        if (responseCode == 0) {
          loginMessage = "注册成功";
          callback.callback(loginMessage);
        } else {
          loginMessage = "JMessageClient.register " + ", responseCode = " + responseCode + " ; registerDesc = " + registerDesc;
          callback.callback(loginMessage);
        }
      }

    });


  };

}
目前只是写了初始化和登陆但是主要逻辑都差不多,基本按照官网思路去做就可以一步一步去写。 遇到的问题: 初始化很简单,只需要掉用initJmessage方法就行了,但是在登陆的时候,因为夸平台本来就是异步的,但是在我们的java代码中它也是一个异步函数,需要我们去请求极光。 java的回调(重点):
public interface Callback {
        void callback(String message);
    }
在注册的时候
callback.callback(loginMessage);
向平台发起请求
if(methodCall.method.equals("loginJmessage")){
        final Map<String,Object> arg = methodCall.arguments();
        String userName = (String) arg.get("userName");
         String passWord = (String) arg.get("password");
         loginJmessage(userName, passWord, new Callback() {
           @Override
           public void callback(String message) {
             Log.i(TAG,message);
             result.success(loginMessage);
           }
         });
    }
我们需要将其内容回调给flutter。 5.测试结果


其实语言差不多,但是里面的方法实现还是很麻烦的,比如类找不到,在写sdk的时候边看官方的demo能收获许多。其实每个sdk都是这样子开发的,其实你也可以使用Stream来与java通信,希望大家能收获一些东西吧!
