

前颜(yan)
在前端项目的开发过程中,往往后端会给到一份数据接口(本文简称api),为了减少后期的维护以及出错成本,我的考虑是希望能够找到这么一种方法,可以将所有的api以某种方式统一的管理起来,并且很方便的进行维护,比如当后端修改了api名,我可以很快的定位到该api进行修改,或者当后端添加了新的api,我可以很快的知道具体是一个api写漏了。
于是,我有了构建Api Tree的想法。
一、前后端分离(Resful api)
在前后端分离的开发模式中,前后端的交互点主要在于各个数据接口,也就是说后端把每个功能封装成了api,供前端调用。
举个例子,假设后端提供了关于user的以下3个api:
1 http(s)://www.xxx.com/api/v1/user/{ id }
2 http(s)://www.xxx.com/api/v1/user/getByName/{ name }
3 http(s)://www.xxx.com/api/v1/user/getByAge/{ age }
对应的api描述如下(为了方便理解,这里只考虑get请求):
 1 获取用户id的用户数据
 2 获取用户名为name的用户信息
 3 获取年龄为age的用户列表
二、在Component中调用api接口获取数据
目前各大前端框架比如angular、vue以及react等,都有提供相关HttpClient,用来发起http请求,比如get、post、put、delete等,由于本人比较熟悉angular,下面代码以angular进行举例(其他框架做法类似),代码统一使用typescript语法。
在app.component.ts中调用api:
import { Component } from '@angular/core';
import { HttpClient } from '@angular/common/http';

@Component({
  selector: 'app-root',
  templateUrl: './app.component.html',
  styleUrls: ['./app.component.scss']
})
export class AppComponent {

  userInfo;

  constructor(private http: HttpClient) {
    this.getUserById(1);
  }

  async getUserById(userId) {
    const url = `https://www.xxx.com/api/v1/user/${userId}`;
    this.userInfo = await this.http.get(url).toPromise();
  }

}
三、封装UserHttpService
在项目中,由于多个页面可能需要调用同一个api,为了减少代码的冗余以及方便维护,比较好的方式是将所有的api封装到一个Service中,然后将这个Service实例化成单例模式,为所有的页面提供http服务。
angular提供了依赖注入的功能,可以将Service注入到Module中,并且在Module中的各个Component共享同一个Service,因此不需要手动去实现Service的单例模式。
代码如下:
user.http.service.ts
import { Injectable } from '@angular/core';
import { HttpClient } from '@angular/common/http';

const HOST_URL = `https://www.xxx.com/api/v1`;

@Injectable()
export class UserHttpService {

  constructor(private http: HttpClient) { }

  async getUserById(userId) {
    const url = `${HOST_URL}/user/${userId}`;
    return this.http.get(url).toPromise();
  }

  async getUserByName(name) {
    const url = `${HOST_URL}/user/getByName/${name}`;
    return this.http.get(url).toPromise();
  }

  async getUserByAge(age) {
    const url = `${HOST_URL}/user/getByAge/${age}`;
    return this.http.get(url).toPromise();
  }

}
app.component.ts
import { Component } from '@angular/core';
import { UserHttpService } from './user.http.service';
@Component({
  selector: 'app-root',
  templateUrl: './app.component.html',
  styleUrls: ['./app.component.scss']
})
export class AppComponent {

  constructor(private userHttpService: UserHttpService) {
    this.getUserById(1);
  }

  async getUserById(userId) {
    const userInfo = await this.userHttpService.getUserById(userId);
    console.log(userInfo);
  }

  async getUserByName(name) {
    const userInfo = await this.userHttpService.getUserByName(name);
    console.log(userInfo);
  }

  async getUserByAge(age) {
    const userInfoList = await this.userHttpService.getUserByAge(age);
    console.log(userInfoList);
  }

}
这样的好处在于:
1、团队合作:
可以将前端项目分为HttpService层和Component层,由不同的人进行分开维护
2、减少代码的冗余:
在多个Component中调用同一个api时,不需要写多份代码
3、降低维护和扩展成本:
当后端增加或修改接口时,由于所有的user api都在UserHttpService里,所以能够很容易的进行接口调整,并且不影响Component层的代码
但以上方案还存在一个缺点,即url使用字符串拼接的形式:
const url = `${HOST_URL}/user/getByName/${name}`;
这样容易出现以下问题:
1、接口名拼接出错,并且由于是字符串拼接,不会有语法提示(ts)
2、没有一份完整的映射后端的api表,出现问题时,不容易排查 因此,接下来进入本文的主题:构建Api Tree。
四、手动构建Api Tree
什么是Api Tree呢,我把它定义为将所有的api以节点的形式挂在一个树上,最后形成了一棵包含所有api的树形结构。
对api tree的构建初步想法(手动构建)如下:
/**
 * 手动构建 api tree
 */
const APITREE = {
  domain1: {
    api: {
      v1: {
        user: {
          getByName: 'https://www.xxx.com/api/v1/user/getByName',
          getByAge: 'https://www.xxx.com/api/v1/user/getByAge'
        },
        animal: {
          getByType: 'https://www.xxx.com/api/v1/animal/getByType',
          getByAge: 'https://www.xxx.com/api/v1/animal/getByAge'
        }
      }
    }
  },
  domain2: {
    api: {
      car: {
        api1: 'https://xxx.xxx.cn/api/car/api1',
        api2: 'https://xxx.xxx.cn/api/car/api2'
      }
    }
  },
  domain3: {}
};
export { APITREE };
有了api tree,我们就可以采用如下方式来从api树上摘取各个api节点的url,代码如下:
// 获取url:https://www.xxx.com/api/v1/user/getByName
const getByNameUrl = APITREE.domain1.api.v1.user.getByName;

// 获取url:https://xxx.xxx.cn/api/car/api1
const carApi1Url = APITREE.domain2.api.car.api1;
但是以上构建api tree的方式存在两个缺点:
1、需要在各个节点手动拼接全路径
2、只能摘取子节点的url:getByName和getByAge,无法摘取父节点的url,比如我想获取https://www.xxx.com/api/v1/user,无法通过APITREE.domain1.api.v1.user获取
const APITREE = {
  domain1: {
    api: {
      v1: {
        // user为父节点
        // 缺点一:无法通过APITREE.domain1.api.v1.user获取
        //        https://www.xxx.com/api/v1/user
        user: {
          // 缺点二:在getByName和getByAge节点中手动写入全路径拼接
          getByName: 'https://www.xxx.com/api/v1/user/getByName',
          getByAge: 'https://www.xxx.com/api/v1/user/getByAge'
        }
      }
    }
  }
};
五、Api Tree生成器(ApiTreeGenerator)
针对手动构建Api Tree的问题,我引入了两个概念:apiTreeConfig(基本配置)和apiTreeGenerator(生成器)。
通过apiTreeGenerator对apiTreeConfig进行处理,最终生成真正的apiTree。
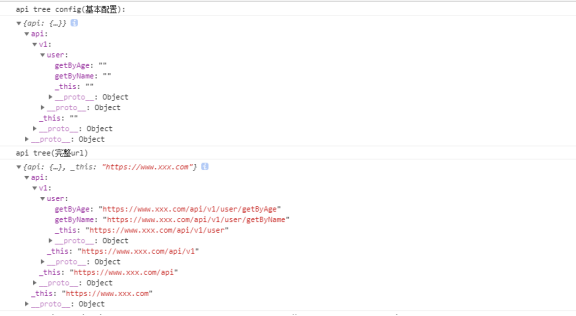
1、apiTreeConfig我把它称之为基本配置,apiTreeConfig具有一定的配置规则,要求每个节点名(除了域名)必须与api url中的每一节点名一致,因为apiTreeGenerator是根据apiTreeConfig的各个节点名进行生成, api tree config配置如下:
/**
 * api tree config
 * _this可以省略不写,但是不写的话,在ts就没有语法提示
 * 子节点getByName,getByAge以及_this可以为任意值,因为将会被apiTreeGenerator重新赋值
 */
const APITREECONFIG = {
  api: {
    v1: {
      user: {
        getByName: '',
        getByAge: '',
        _this: ''
      }
    },
    _this: ''
  }
 };

export { APITREECONFIG };
2、apiTreeGenerator我把它称之为生成器,具有如下功能:
1) 遍历apiTreeConfig,处理apiTreeConfig的所有子节点,并根据该节点的所有父节点链生成完整的url,并且作为该节点的value,比如:
APITREECONFIG.api.v1.user.getByName -> https://www.xxx.com/api/v1/user/getByName
2) 遍历apiTreeConfig,处理apiTreeConfig的所有父节点,在每个父节点中添加_this子节点指向父节点的完整url。
apiTreeGenerator(生成器)的代码如下:
(由于项目中只用到一个后端的数据,这里只实现了单域名的apiTreeGenerator,关于多域名的apiTreeGenerator,大家可以自行修改实现。)
import { APITREECONFIG } from './api-tree.config';

const APITREE = APITREECONFIG;
const HOST_URL = `https://www.xxx.com`;

/**
 * 为api node chain添加HOST_URL前缀
 */

const addHost = (apiNodeChain: string) => {
  return apiNodeChain ? `${HOST_URL}/${apiNodeChain.replace(/^\//, '')}` : HOST_URL;
};

/**
 * 根据api tree config 生成 api tree:
 * @param apiTreeConfig api tree config
 * @param parentApiNodeChain parentApiNode1/parentApiNode2/parentApiNode3
 */
const apiTreeGenerator = (apiTreeConfig: string | object, parentApiNodeChain?: string) => {
  for (const key of Object.keys(apiTreeConfig)) {
    const apiNode = key;
    const prefixChain = parentApiNodeChain ? `${parentApiNodeChain}/` : '';
    if (Object.prototype.toString.call(apiTreeConfig[key]) === '[object Object]') {
      apiTreeGenerator(apiTreeConfig[key], prefixChain + apiNode);
    } else {
      apiTreeConfig[key] = parentApiNodeChain
        ? addHost(prefixChain + apiTreeConfig[key])
        : addHost(apiTreeConfig[key]);
    }
  }
  // 创建_this节点 (这里需要放在上面的for之后)
  apiTreeConfig['_this'] = parentApiNodeChain
    ? addHost(`${parentApiNodeChain}`)
    : addHost('');
};

apiTreeGenerator(APITREECONFIG);

export { APITREE };
结果:
import { Injectable } from '@angular/core';
import { HttpClient } from '@angular/common/http';
import { APITREE } from './api-tree';

@Injectable()
export class UserHttpService {

  constructor(private http: HttpClient) { }

  async getUserById(userId) {
    const url = APITREE.api.v1.user._this + '/' + userId;
    return this.http.get(url).toPromise();
  }

  async getUserByName(name) {
    const url = APITREE.api.v1.user.getByName + '/' + name;
    return this.http.get(url).toPromise();
  }

  async getUserByAge(age) {
    const url = APITREE.api.v1.user.getByAge + '/' + age;
    return this.http.get(url).toPromise();
  }

}
六、总结
通过api tree,能带来如下好处:
1、能够通过树的形式来获取api,关键是有语法提示
APITREE.api.v1.user.getByName
2、apiTreeConfig配置文件与后端的api接口一 一对应,方便维护
3、当后端修改api名时,apiTreeConfig可以很方便的进行调整
七、demo
github代码: github.com/SimpleCodeC…
