

由于GIL的存在,导致Python多线程性能甚至比单线程更糟。
GIL: 全局解释器锁(英语:Global Interpreter Lock,缩写GIL),是计算机程序设计语言解释器用于同步线程的一种机制,它使得任何时刻仅有一个线程在执行。[1]即便在多核心处理器上,使用 GIL 的解释器也只允许同一时间执行一个线程。
于是出现了协程(Coroutine)这么个东西。
协程: 协程,又称微线程,纤程,英文名Coroutine。协程的作用,是在执行函数A时,可以随时中断,去执行函数B,然后中断继续执行函数A(可以自由切换)。但这一过程并不是函数调用(没有调用语句),这一整个过程看似像多线程,然而协程只有一个线程执行.
协程由于由程序主动控制切换,没有线程切换的开销,所以执行效率极高。对于IO密集型任务非常适用,如果是cpu密集型,推荐多进程+协程的方式。
在Python3.4之前,官方没有对协程的支持,存在一些三方库的实现,比如gevent和Tornado。3.4之后就内置了asyncio标准库,官方真正实现了协程这一特性。
而Python对协程的支持,是通过Generator实现的,协程是遵循某些规则的生成器。因此,我们在了解协程之前,我们先要学习生成器。
生成器(Generator)
我们这里主要讨论yield和yield from这两个表达式,这两个表达式和协程的实现息息相关。
方法中包含yield表达式后,Python会将其视作generator对象,不再是普通的方法。
yield表达式的使用
我们先来看该表达式的具体使用:
def test():
    print("generator start")
    n = 1
    while True:
        yield_expression_value = yield n
        print("yield_expression_value = %d" % yield_expression_value)
        n += 1


# ①创建generator对象
generator = test()
print(type(generator))

print("\n---------------\n")

# ②启动generator
next_result = generator.__next__()
print("next_result = %d" % next_result)

print("\n---------------\n")

# ③发送值给yield表达式
send_result = generator.send(666)
print("send_result = %d" % send_result)
执行结果:
<class 'generator'>

---------------

generator start
next_result = 1

---------------

yield_expression_value = 666
send_result = 2
方法说明:
-
__next__()方法: 作用是启动或者恢复generator的执行,相当于send(None) -
send(value)方法:作用是发送值给yield表达式。启动generator则是调用send(None)
执行结果的说明:
-
①创建generator对象:包含yield表达式的函数将不再是一个函数,调用之后将会返回generator对象
-
②启动generator:使用生成器之前需要先调用
__next__或者send(None),否则将报错。启动generator后,代码将执行到yield出现的位置,也就是执行到yield n,然后将n传递到generator.__next__()这行的返回值。(注意,生成器执行到yield n后将暂停在这里,直到下一次生成器被启动) -
③发送值给yield表达式:调用send方法可以发送值给yield表达式,同时恢复生成器的执行。生成器从上次中断的位置继续向下执行,然后遇到下一个
yield,生成器再次暂停,切换到主函数打印出send_result。
理解这个demo的关键是:生成器启动或恢复执行一次,将会在yield处暂停。上面的第②步仅仅执行到了yield n,并没有执行到赋值语句,到了第③步,生成器恢复执行才给yield_expression_value赋值。
生产者和消费者模型
上面的例子中,代码中断-->切换执行,体现出了协程的部分特点。
我们再举一个生产者、消费者的例子,这个例子来自廖雪峰的Python教程:
传统的生产者-消费者模型是一个线程写消息,一个线程取消息,通过锁机制控制队列和等待,但一不小心就可能死锁。
现在改用协程,生产者生产消息后,直接通过
yield跳转到消费者开始执行,待消费者执行完毕后,切换回生产者继续生产,效率极高。
def consumer():
    print("[CONSUMER] start")
    r = 'start'
    while True:
        n = yield r
        if not n:
            print("n is empty")
            continue
        print("[CONSUMER] Consumer is consuming %s" % n)
        r = "200 ok"


def producer(c):
    # 启动generator
    start_value = c.send(None)
    print(start_value)
    n = 0
    while n < 3:
        n += 1
        print("[PRODUCER] Producer is producing %d" % n)
        r = c.send(n)
        print('[PRODUCER] Consumer return: %s' % r)
    # 关闭generator
    c.close()


# 创建生成器
c = consumer()
# 传入generator
producer(c)
执行结果:
[CONSUMER] start
start
[PRODUCER] producer is producing 1
[CONSUMER] consumer is consuming 1
[PRODUCER] Consumer return: 200 ok
[PRODUCER] producer is producing 2
[CONSUMER] consumer is consuming 2
[PRODUCER] Consumer return: 200 ok
[PRODUCER] producer is producing 3
[CONSUMER] consumer is consuming 3
[PRODUCER] Consumer return: 200 ok
注意到
consumer函数是一个generator,把一个consumer传入produce后:
- 首先调用
c.send(None)启动生成器;
- 然后,一旦生产了东西,通过
c.send(n)切换到consumer执行;
consumer通过yield拿到消息,处理,又通过yield把结果传回;
produce拿到consumer处理的结果,继续生产下一条消息;
produce决定不生产了,通过c.close()关闭consumer,整个过程结束。
整个流程无锁,由一个线程执行,
produce和consumer协作完成任务,所以称为“协程”,而非线程的抢占式多任务。
yield from表达式
Python3.3版本新增yield from语法,新语法用于将一个生成器部分操作委托给另一个生成器。此外,允许子生成器(即yield from后的“参数”)返回一个值,该值可供委派生成器(即包含yield from的生成器)使用。并且在委派生成器中,可对子生成器进行优化。
我们先来看最简单的应用,例如:
# 子生成器
def test(n):
    i = 0
    while i < n:
        yield i
        i += 1

# 委派生成器
def test_yield_from(n):
    print("test_yield_from start")
    yield from test(n)
    print("test_yield_from end")


for i in test_yield_from(3):
    print(i)
输出:
test_yield_from start
0
1
2
test_yield_from end
这里我们仅仅给这个生成器添加了一些打印,如果是正式的代码中,你可以添加正常的执行逻辑。
如果上面的test_yield_from函数中有两个yield from语句,将串行执行。比如将上面的test_yield_from函数改写成这样:
def test_yield_from(n):
    print("test_yield_from start")
    yield from test(n)
    print("test_yield_from doing")
    yield from test(n)
    print("test_yield_from end")
将输出:
test_yield_from start
0
1
2
test_yield_from doing
0
1
2
test_yield_from end
在这里,yield from起到的作用相当于下面写法的简写形式
for item in test(n):
    yield item
看起来这个yield from也没做什么大不了的事,其实它还帮我们处理了异常之类的。具体可以看stackoverflow上的这个问题:In practice, what are the main uses for the new “yield from” syntax in Python 3.3?
协程(Coroutine)
- Python3.4开始,新增了asyncio相关的API,语法使用
@asyncio.coroutine和yield from实现协程 - Python3.5中引入
async/await语法,参见PEP492
我们先来看Python3.4的实现。
@asyncio.coroutine
Python3.4中,使用@asyncio.coroutine装饰的函数称为协程。不过没有从语法层面进行严格约束。
对装饰器不了解的小伙伴可以看我的上一篇博客--《理解Python装饰器》
对于Python原生支持的协程来说,Python对协程和生成器做了一些区分,便于消除这两个不同但相关的概念的歧义:
- 标记了
@asyncio.coroutine装饰器的函数称为协程函数,iscoroutinefunction()方法返回True - 调用协程函数返回的对象称为协程对象,
iscoroutine()函数返回True
举个栗子,我们给上面yield from的demo中添加@asyncio.coroutine:
import asyncio

...

@asyncio.coroutine
def test_yield_from(n):
    ...

# 是否是协程函数
print(asyncio.iscoroutinefunction(test_yield_from))
# 是否是协程对象
print(asyncio.iscoroutine(test_yield_from(3)))
毫无疑问输出结果是True。
可以看下@asyncio.coroutine的源码中查看其做了什么,我将其源码简化下,大致如下:
import functools
import types
import inspect

def coroutine(func):
    # 判断是否是生成器
    if inspect.isgeneratorfunction(func):
        coro = func
    else:
        # 将普通函数变成generator
        @functools.wraps(func)
        def coro(*args, **kw):
            res = func(*args, **kw)
            res = yield from res
            return res
    # 将generator转换成coroutine
    wrapper = types.coroutine(coro)
    # For iscoroutinefunction().
    wrapper._is_coroutine = True
    return wrapper
将这个装饰器标记在一个生成器上,就会将其转换成coroutine。
然后,我们来实际使用下@asyncio.coroutine和yield from:
import asyncio

@asyncio.coroutine
def compute(x, y):
    print("Compute %s + %s ..." % (x, y))
    yield from asyncio.sleep(1.0)
    return x + y

@asyncio.coroutine
def print_sum(x, y):
    result = yield from compute(x, y)
    print("%s + %s = %s" % (x, y, result))

loop = asyncio.get_event_loop()
print("start")
# 中断调用,直到协程执行结束
loop.run_until_complete(print_sum(1, 2))
print("end")
loop.close()
执行结果:
start
Compute 1 + 2 ...
1 + 2 = 3
end
print_sum这个协程中调用了子协程compute,它将等待compute执行结束才返回结果。
这个demo点调用流程如下图:
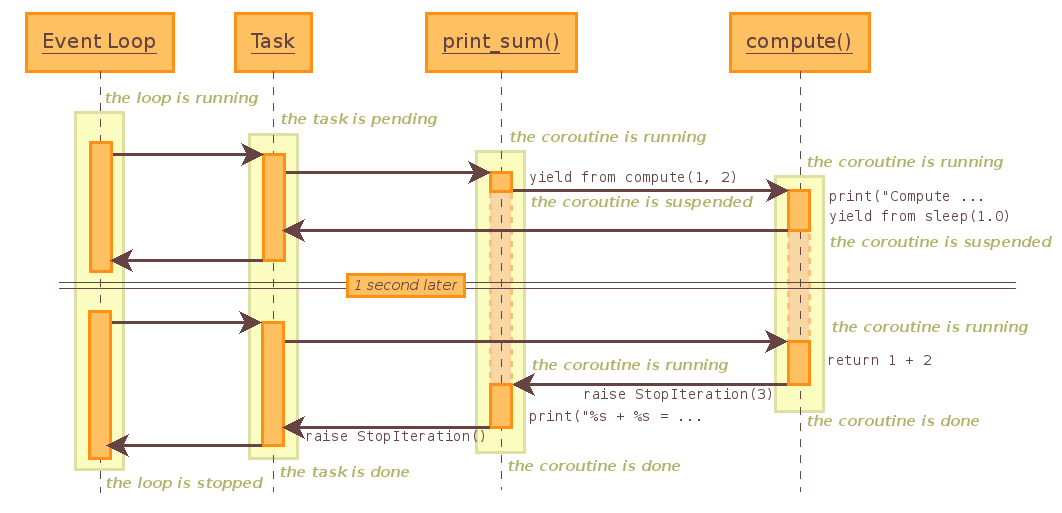
EventLoop将会把print_sum封装成Task对象
流程图展示了这个demo的控制流程,不过没有展示其全部细节。比如其中“暂停”的1s,实际上创建了一个future对象, 然后通过BaseEventLoop.call_later()在1s后唤醒这个任务。
值得注意的是,@asyncio.coroutine将在Python3.10版本中移除。
async/await
Python3.5开始引入async/await语法(PEP 492),用来简化协程的使用并且便于理解。
async/await实际上只是@asyncio.coroutine和yield from的语法糖:
- 把
@asyncio.coroutine替换为async - 把
yield from替换为await
即可。
比如上面的例子:
import asyncio


async def compute(x, y):
    print("Compute %s + %s ..." % (x, y))
    await asyncio.sleep(1.0)
    return x + y


async def print_sum(x, y):
    result = await compute(x, y)
    print("%s + %s = %s" % (x, y, result))


loop = asyncio.get_event_loop()
print("start")
loop.run_until_complete(print_sum(1, 2))
print("end")
loop.close()
我们再来看一个asyncio中Future的例子:
import asyncio

future = asyncio.Future()


async def coro1():
    print("wait 1 second")
    await asyncio.sleep(1)
    print("set_result")
    future.set_result('data')


async def coro2():
    result = await future
    print(result)


loop = asyncio.get_event_loop()
loop.run_until_complete(asyncio.wait([
    coro1()
    coro2()
]))
loop.close()
输出结果:
wait 1 second
(大约等待1秒)
set_result
data
这里await后面跟随的future对象,协程中yield from或者await后面可以调用future对象,其作用是:暂停协程,直到future执行结束或者返回result或抛出异常。
而在我们的例子中,await future必须要等待future.set_result('data')后才能够结束。将coro2()作为第二个协程可能体现得不够明显,可以将协程的调用改成这样:
loop = asyncio.get_event_loop()
loop.run_until_complete(asyncio.wait([
    # coro1(),
    coro2(),
    coro1()
]))
loop.close()
输出的结果仍旧与上面相同。
其实,async这个关键字的用法不止能用在函数上,还有async with异步上下文管理器,async for异步迭代器. 对这些感兴趣且觉得有用的可以网上找找资料,这里限于篇幅就不过多展开了。
总结
本文就生成器和协程做了一些学习、探究和总结,不过并没有做过多深入深入的研究。权且作为入门到一个笔记,之后将会尝试自己实现一下异步API,希望有助于理解学习。
参考链接
Python协程 https://thief.one/2017/02/20/Python%E5%8D%8F%E7%A8%8B/
