

这一章可能比较长,因为这一章我会把生命周期,transaction,setState放到一起说明.
组件的生命周期分为二个部分
- 组件的挂载
- 组件的更新
组件的挂载
在上一章对于组件的挂载已经做了详细的说明,但是涉及到组件生命周期部分被略过.接下来我将对其深入解析. 组件的挂载涉及到二个比较重要的生命周期方法componentWillMount和componentDidMount.
componentWillMount
对于componentWillMount这个函数玩过React的都知道他是组件render之前的触发. 但是如果我再具体点呢. 是在实例之前?还是实例之后?还是构建成真实dom之前?还是构建成真实dom之前,渲染之前?估计很多人不知道吧.所以在面试的时候无论你对React有多熟,还是尽量不要说"精通"二字.(大佬除外)
componentWillMount是组件更新之前触发,所以直接从ReactCompositeComponent.mountComponent里面找
// this.performInitialMount

if (inst.componentWillMount) {
    debugger
    if ("development" !== "production") {
        measureLifeCyclePerf(
            function() {
                return inst.componentWillMount();
            },
            debugID,
            "componentWillMount"
        );
    } else {
        inst.componentWillMount();
    }
    // When mounting, calls to `setState` by `componentWillMount` will set
    // `this._pendingStateQueue` without triggering a re-render.
    if (this._pendingStateQueue) {
        inst.state = this._processPendingState(
            inst.props,
            inst.context
        );
    }
}
代码在performInitialMount函数里面,所以在实例之后,虚拟dom构建真实dom之前触发的
componentDidMount
直接看代码吧
var markup;
if (inst.unstable_handleError) {
    markup = this.performInitialMountWithErrorHandling(
        renderedElement,
        hostParent,
        hostContainerInfo,
        transaction,
        context
    );
} else {
    markup = this.performInitialMount(
        renderedElement,
        hostParent,
        hostContainerInfo,
        transaction,
        context
    );
}
if (inst.componentDidMount) {
        if ("development" !== "production") {
            transaction
                .getReactMountReady()
                .enqueue(function() {
                    measureLifeCyclePerf(
                        function() {
                            return inst.componentDidMount();
                        },
                        _this._debugID,
                        "componentDidMount"
                    );
                });
        } else {
            transaction
                .getReactMountReady()
                .enqueue(
                    inst.componentDidMount,
                    inst
                );
        }
    }
它是出现在markup(真实dom)之后.但是肯定不会在这里面执行,因为在markup还没插入到container里面呢。回顾一下上一章的内容MountComponentIntoNode方法mountComponent之后还有个setInnerHTML(container, markup)只有这个函数执行完之后componentDidMount才能执行.
注意performInitialMount方法
看看下面的代码
class A extends React.Component {
    render(){
        return <K />
    }
}
<App>
    <A />
</App>
this.componentDidMount的执行顺序是K-->A--->App. 因为APP执行到 this.performInitialMount就开始深度遍历了.然后执行A,A又遍历执行K. K执行完才向上执行. 了解了他们的执行顺序我们看看
transaction
    .getReactMountReady()
    .enqueue(function() {
        measureLifeCyclePerf(
            function() {
                return inst.componentDidMount();
            },
            _this._debugID,
            "componentDidMount"
        );
    });
再看看这个transaction是在哪里生成的
var transaction = ReactUpdates.ReactReconcileTransaction.getPooled(
    /* useCreateElement */
    !shouldReuseMarkup &&
        ReactDOMFeatureFlags.useCreateElement
);
transaction.perform(
    mountComponentIntoNode,
    null,
    componentInstance,
    container,
    transaction,
    shouldReuseMarkup,
    context
);
transaction是React里面一个非常核心的功能. 出现在很多个地方,不搞清楚transtion源代码是没办法读下去的.
事务和队列
看看官方给出的流程图
 * <pre>
*                       wrappers (injected at creation time)
*                                      +        +
*                                      |        |
*                    +-----------------|--------|--------------+
*                    |                 v        |              |
*                    |      +---------------+   |              |
*                    |   +--|    wrapper1   |---|----+         |
*                    |   |  +---------------+   v    |         |
*                    |   |          +-------------+  |         |
*                    |   |     +----|   wrapper2  |--------+   |
*                    |   |     |    +-------------+  |     |   |
*                    |   |     |                     |     |   |
*                    |   v     v                     v     v   | wrapper
*                    | +---+ +---+   +---------+   +---+ +---+ | invariants
* perform(anyMethod) | |   | |   |   |         |   |   | |   | | maintained
* +----------------->|-|---|-|---|-->|anyMethod|---|---|-|---|-|-------->
*                    | |   | |   |   |         |   |   | |   | |
*                    | |   | |   |   |         |   |   | |   | |
*                    | |   | |   |   |         |   |   | |   | |
*                    | +---+ +---+   +---------+   +---+ +---+ |
*                    |  initialize                    close    |
*                    +-----------------------------------------+
 * </pre>
var TransactionImpl = {
  reinitializeTransaction: function () {
    this.transactionWrappers = this.getTransactionWrappers();
    if (this.wrapperInitData) {
      this.wrapperInitData.length = 0;
    } else {
      this.wrapperInitData = [];
    }
    this._isInTransaction = false;
  },

  _isInTransaction: false,

  getTransactionWrappers: null,

  isInTransaction: function () {
    return !!this._isInTransaction;
  },

  perform: function (method, scope, a, b, c, d, e, f) {
    !!this.isInTransaction() ? process.env.NODE_ENV !== 'production' ? invariant(false, 'Transaction.perform(...): Cannot initialize a transaction when there is already an outstanding transaction.') : _prodInvariant('27') : void 0;
    var errorThrown;
    var ret;
    try {
      this._isInTransaction = true;
      errorThrown = true;
      this.initializeAll(0);
      ret = method.call(scope, a, b, c, d, e, f);
      errorThrown = false;
    } finally {
      try {
        if (errorThrown) {
          try {
            this.closeAll(0);
          } catch (err) {}
        } else {
          this.closeAll(0);
        }
      } finally {
        this._isInTransaction = false;
      }
    }
    return ret;
  },

  initializeAll: function (startIndex) {
    var transactionWrappers = this.transactionWrappers;
    for (var i = startIndex; i < transactionWrappers.length; i++) {
      var wrapper = transactionWrappers[i];
      try {
        this.wrapperInitData[i] = OBSERVED_ERROR;
        this.wrapperInitData[i] = wrapper.initialize ? wrapper.initialize.call(this) : null;
      } finally {
        if (this.wrapperInitData[i] === OBSERVED_ERROR) {
          try {
            this.initializeAll(i + 1);
          } catch (err) {}
        }
      }
    }
  },

  closeAll: function (startIndex) {
    !this.isInTransaction() ? process.env.NODE_ENV !== 'production' ? invariant(false, 'Transaction.closeAll(): Cannot close transaction when none are open.') : _prodInvariant('28') : void 0;
    var transactionWrappers = this.transactionWrappers;
    for (var i = startIndex; i < transactionWrappers.length; i++) {
      var wrapper = transactionWrappers[i];
      var initData = this.wrapperInitData[i];
      var errorThrown;
      try {
        errorThrown = true;
        if (initData !== OBSERVED_ERROR && wrapper.close) {
          wrapper.close.call(this, initData);
        }
        errorThrown = false;
      } finally {
        if (errorThrown) {
          try {
            this.closeAll(i + 1);
          } catch (e) {}
        }
      }
    }
    this.wrapperInitData.length = 0;
  }
};

module.exports = TransactionImpl;
Transaction的主要作用就是包装一个函数,函数的执行交给Transaction,同时Transaction会在函数执行前后执行被注入的Wrappers,一个Wrapper有二个方法initialize和close。Wrapper是通过getTransactionWrappers方法注入的
代码很简单,很容易看明白我就具体说明下每个函数和关键属性的作用
perform执行注入的函数fn和wrappers,执行顺序为initializeAll-->fn-->closeAllinitializeAll执行所有Wrapper的initialize方法closeAll执行所有Wrapper的close方法reinitializeTransaction初始化isInTransaction判断事务是否在执行
了解了Transaction我们再来仔细分析下上面的代码
var transaction = ReactUpdates.ReactReconcileTransaction.getPooled(
    /* useCreateElement */
    !shouldReuseMarkup &&
        ReactDOMFeatureFlags.useCreateElement
);
ReactReconcileTransaction对transition做了一成包装
ReactReconcileTransaction
 var TRANSACTION_WRAPPERS = [
    SELECTION_RESTORATION,
    EVENT_SUPPRESSION,
    ON_DOM_READY_QUEUEING
];

if ("development" !== "production") {
    TRANSACTION_WRAPPERS.push({
        initialize:
            ReactInstrumentation.debugTool.onBeginFlush,
        close: ReactInstrumentation.debugTool.onEndFlush
    });
}

function ReactReconcileTransaction(useCreateElement) {
    this.reinitializeTransaction();
    this.renderToStaticMarkup = false;
    this.reactMountReady = CallbackQueue.getPooled(
        null
    );
    this.useCreateElement = useCreateElement;
}
var Mixin = {
    getTransactionWrappers: function() {
        return TRANSACTION_WRAPPERS;
    },
    getReactMountReady: function() {
        return this.reactMountReady;
    },
    getUpdateQueue: function() {
        return ReactUpdateQueue;
    },
    checkpoint: function() {
        // reactMountReady is the our only stateful wrapper
        return this.reactMountReady.checkpoint();
    },
    rollback: function(checkpoint) {
        this.reactMountReady.rollback(checkpoint);
    },
    destructor: function() {
        CallbackQueue.release(this.reactMountReady);
        this.reactMountReady = null;
    }
};
getTransactionWrappers方法里面返回的是TRANSACTION_WRAPPERS他的值有4个也就是说注入了四个Wrapper。具体看看ON_DOM_READY_QUEUEING这个Wraper;
 var ON_DOM_READY_QUEUEING = {
    /**
     * Initializes the internal `onDOMReady` queue.
     */
    initialize: function() {
        this.reactMountReady.reset();
    },

    /**
     * After DOM is flushed, invoke all registered `onDOMReady` callbacks.
     */
    close: function() {
        this.reactMountReady.notifyAll();
    }
};
this.reactMountReady是一个队列, 在组件构建真实dom之后
transaction
    .getReactMountReady()
    .enqueue(function() {
        measureLifeCyclePerf(
            function() {
                return inst.componentDidMount();
            },
            _this._debugID,
            "componentDidMount"
        );
    });
会将componentDidMount方法push进入队列里面. 而mountComponentIntoNode(插入到了document中了)执行完毕之后会执行ON_DOM_READY_QUEUEING.close方法也就是this.reactMountReady.notifyAll()方法,释放队列中所有的元素。
componentDidMount是通过一个队列来维护的,因为队列是先进先出的.而最里层的组件是最新执行!
组件的更新this.setState
先看看下面二段代码, console.log(this.props.name, this.state.k)输入结果是什么?会输出二次吗?为什么?
class Child extends React.Component {
    state = {
        k:null
    }
    render(){
        console.log(this.props.name, this.state.k)
        return (<div onClick={() => {
            this.setState({ k:12})             // (1)
            this.props.onChange("leiwuyier");  // (2)
        }}>
            child
        </div>)
    }
}
class App extends React.Component {
    state = {
        name:"leiwuyi"
    }
    render(){
        return (
            <div>
                <Child name={this.state.name} onChange={(name) => {
                    this.setState({
                        name
                    })
                }}></Child>
            </div>
        )
    }
}
如果把(1)和(2)调换位置呢?输出的结果又什么怎么样的呢?
答案就是只会输出一次"leiwuyi",12.
- 因为
setState()是异步的,所以(1)和(2)调换位置没什么区别. - 只更新一次原因是App先更新,更新的过程中会将
Child实例(指的是instance)属性的updateBatchNumber设置为null所以Child组件不会独自更新一次;
带着这二个问题来看this.setState()的代码
ReactComponent.prototype.setState = function(partialState,callback) {
    ...
    ...
    this.updater.enqueueSetState(this, partialState);

};
this.updater是在实例的时候被赋值的.
 function ReactComponent(props, context, updater) {
    this.props = props;
    this.context = context;
    this.refs = emptyObject;
    // We initialize the default updater but the real one gets injected by the
    // renderer.
    this.updater = updater || ReactNoopUpdateQueue;
}
上一章说过. 实例是执行在ReactCompositeComponent.mountComponent
var updateQueue = transaction.getUpdateQueue();
    // Initialize the public class
    var doConstruct = shouldConstruct(Component);
    var inst = this._constructComponent(
        doConstruct,
        publicProps,
        publicContext,
        updateQueue
    );
最终追踪到getUpdateQueue方法是在ReactUpdateQueue类里面
enqueueSetState: function( publicInstance,partialState ) {
    if ("development" !== "production") {
        ReactInstrumentation.debugTool.onSetState();
        "development" !== "production"
            ? warning(
                  partialState != null,
                  "setState(...): You passed an undefined or null state object; " +
                      "instead, use forceUpdate()."
              )
            : void 0;
    }

    var internalInstance = getInternalInstanceReadyForUpdate(
        publicInstance,
        "setState"
    );

    if (!internalInstance) {
        return;
    }

    var queue =
        internalInstance._pendingStateQueue ||
        (internalInstance._pendingStateQueue = []);
    queue.push(partialState);

    enqueueUpdate(internalInstance);
},
首先拿到实例internalInstance(上一章说到过的具有mountComponent方法的那个实例) 然后将state存到一个队列queue里面. 接下来看看enqueueUpdate方法
var ReactDefaultBatchingStrategy = {
    isBatchingUpdates: false,
    batchedUpdates: function(callback, a, b, c, d, e) {
        var alreadyBatchingUpdates =
            ReactDefaultBatchingStrategy.isBatchingUpdates;
        ReactDefaultBatchingStrategy.isBatchingUpdates = true;
        if (alreadyBatchingUpdates) {
            return callback(a, b, c, d, e);
        } else {
            return transaction.perform();
        }
    }
};

function enqueueUpdate(component) {
    ensureInjected();
    if (!batchingStrategy.isBatchingUpdates) {
        batchingStrategy.batchedUpdates(
            enqueueUpdate,
            component
        );
        return;
    }
    dirtyComponents.push(component);
    if (component._updateBatchNumber == null) {
        component._updateBatchNumber =
            updateBatchNumber + 1;
    }
}
batchingStrategy.isBatchingUpdates是控制组件的更新. 合成事件那块有时间我会新开一个章详细讲解。
onClick={() => {this.setState({});console.log(1)}}
点击之后其实会执行batchingStrategy.batchedUpdates()方法,由于isBatchingUpdates为false所以最终执行的是
transaction.perform(() => {this.setState({}));console.log(1)})
执行之后.isBatchingUpdates被设置为true
前面对事务说的很清楚了.
// 这是注入的二个warpper
var RESET_BATCHED_UPDATES = {
    initialize: emptyFunction,
    close: function() {
        ReactDefaultBatchingStrategy.isBatchingUpdates = false;
    }
};
var FLUSH_BATCHED_UPDATES = {
    initialize: emptyFunction,
    close: ReactUpdates.flushBatchedUpdates.bind(
        ReactUpdates
    )
};
// 所以执行顺序是
 FLUSH_BATCHED_UPDATES.initialize()
 RESET_BATCHED_UPDATES.initialize()
 this.setState({});console.log(1);
 FLUSH_BATCHED_UPDATES.close()
 RESET_BATCHED_UPDATES.close()
isBatchingUpdates为true了所以this.setState执行的dirtyComponents.push(component),push之后 this.setState({})也就执行完了,然后执行console.log(1);最后通过FLUSH_BATCHED_UPDATES.close更新组件.
在事件函数里面的
this.setState()的isBatchingUpdates为true,所以只会放入dirtyComponents,函数执行完毕,才会更新组件。这就是解释了this.setState为什么是异步的原因
updateComponent
// 有了dirtyComponents之后
for (var i = 0; i < len; i++) {
    var component = dirtyComponents[i];
    ReactReconciler.performUpdateIfNecessary(
        component,
        transaction.reconcileTransaction,
        updateBatchNumber
    );
    ==>
    performUpdateIfNecessary: function(internalInstance, transaction, updateBatchNumber) {
        // 作了一层判断,为什么Child不会独自更新一次,原因就在这里
        if ( internalInstance._updateBatchNumber !== updateBatchNumber) {
            return;
        }
        internalInstance.performUpdateIfNecessary(
            transaction
        );
    }
    ==>
    updateComponent(){
        // 执行componentWillReceiveProps方法
        if (
            willReceive &&
            inst.componentWillReceiveProps
        ) {
            if ("development" !== "production") {
                measureLifeCyclePerf(
                    function() {
                        return inst.componentWillReceiveProps(
                            nextProps,
                            nextContext
                        );
                    },
                    this._debugID,
                    "componentWillReceiveProps"
                );
            } else {
                inst.componentWillReceiveProps(
                    nextProps,
                    nextContext
                );
            }
        }

        // 合并state
        var nextState = this._processPendingState(
            nextProps,
            nextContext
        );

        // 执行shouldComponentUpdate
        var shouldUpdate = true;
        if (!this._pendingForceUpdate) {
            if (inst.shouldComponentUpdate) {
                if ("development" !== "production") {
                    shouldUpdate = measureLifeCyclePerf(
                        function() {
                            return inst.shouldComponentUpdate(
                                nextProps,
                                nextState,
                                nextContext
                            );
                        },
                        this._debugID,
                        "shouldComponentUpdate"
                    );
                } else {
                    shouldUpdate = inst.shouldComponentUpdate(
                        nextProps,
                        nextState,
                        nextContext
                    );
                }
            }
            ..
        }
        // 更新组件
        if (shouldUpdate) {
            this._performComponentUpdate(
                nextParentElement,
                nextProps,
                nextState,
                nextContext,
                transaction,
                nextUnmaskedContext
            );
        }
    }
}
注意合并
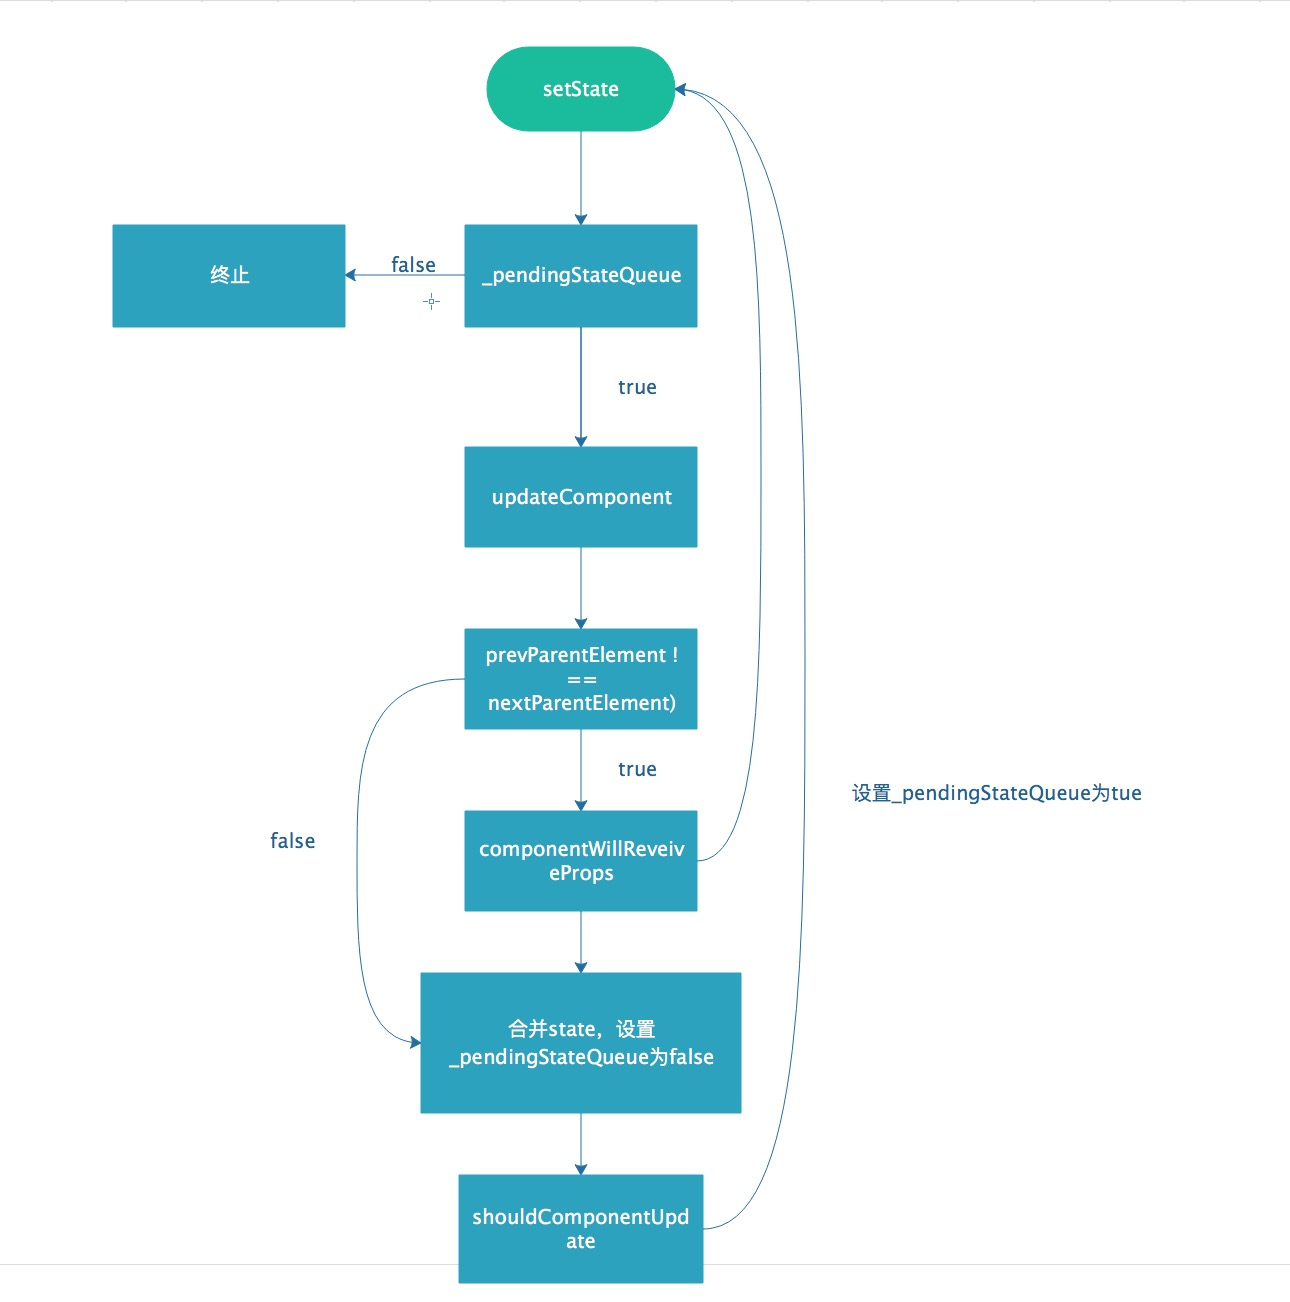
state是在什么时候,是在componentWillReceiveProps之后shouldComponentUpdate之前进行的. 合并state之后是不能再进行setState()操作的.因为合并之的后_pendingStateQueue为null,再这之后使用setState()会将_pendingStateQueue设置为true,_pendingStateQueue为true就会又一次执行updateComponent无限循环下去, 这解释了shouldComponentUpdate, componentWillUpdate, render, componentDidUpdate里面不能做this.setState操作.
那为什么在componentWillReceiveProps里面可以进行setState()操作componentWillReceiveProps的时候不也是为true吗?因为componentWillReceiveProps有做
// 组件内部的this.setState,prevParentElement与nextParentElement是相等的. 所以willReceive为false不会再循环执行componentWillReceiveProps了
if (prevParentElement !== nextParentElement) {
    willReceive = true;
}
流程图如下
处理了componentWillReceiveProps和shouldComponentUpdate这二个生命周期之后然后对组件进行更新this._performComponentUpdate
this._performComponentUpdate
if (inst.componentWillUpdate) {
        if ("development" !== "production") {
            measureLifeCyclePerf(
                function() {
                    return inst.componentWillUpdate(
                        nextProps,
                        nextState,
                        nextContext
                    );
                },
                this._debugID,
                "componentWillUpdate"
            );
        } else {
            inst.componentWillUpdate(
                nextProps,
                nextState,
                nextContext
            );
        }
    }
this._updateRenderedComponent(
    transaction,
    unmaskedContext
);

if (hasComponentDidUpdate) {
    if ("development" !== "production") {
        transaction
            .getReactMountReady()
            .enqueue(function() {
                measureLifeCyclePerf(
                    inst.componentDidUpdate.bind(
                        inst,
                        prevProps,
                        prevState,
                        prevContext
                    ),
                    _this2._debugID,
                    "componentDidUpdate"
                );
            });
    } else {
        transaction
            .getReactMountReady()
            .enqueue(
                inst.componentDidUpdate.bind(
                    inst,
                    prevProps,
                    prevState,
                    prevContext
                ),
                inst
            );
    }
}
是不是感到非常眼熟,跟组件的挂载非常类似, 先执行componentWillUpdate方法然后通过_updateRenderedComponent递归的更新组件,更新完成之后执行transaction里面的Wrapper中的close方法, close将释放componentDidUpdate的队列.
说到这里,组件的生命周期也就是讲完了. 还有三个比较核心的点.
diff算法 (同级之间的比较,更新前后的虚拟dom到底是如何对比的)- 事件系统, (
React合成系统到底是什么?) fiber架构 (React16版本革命性的变革)
