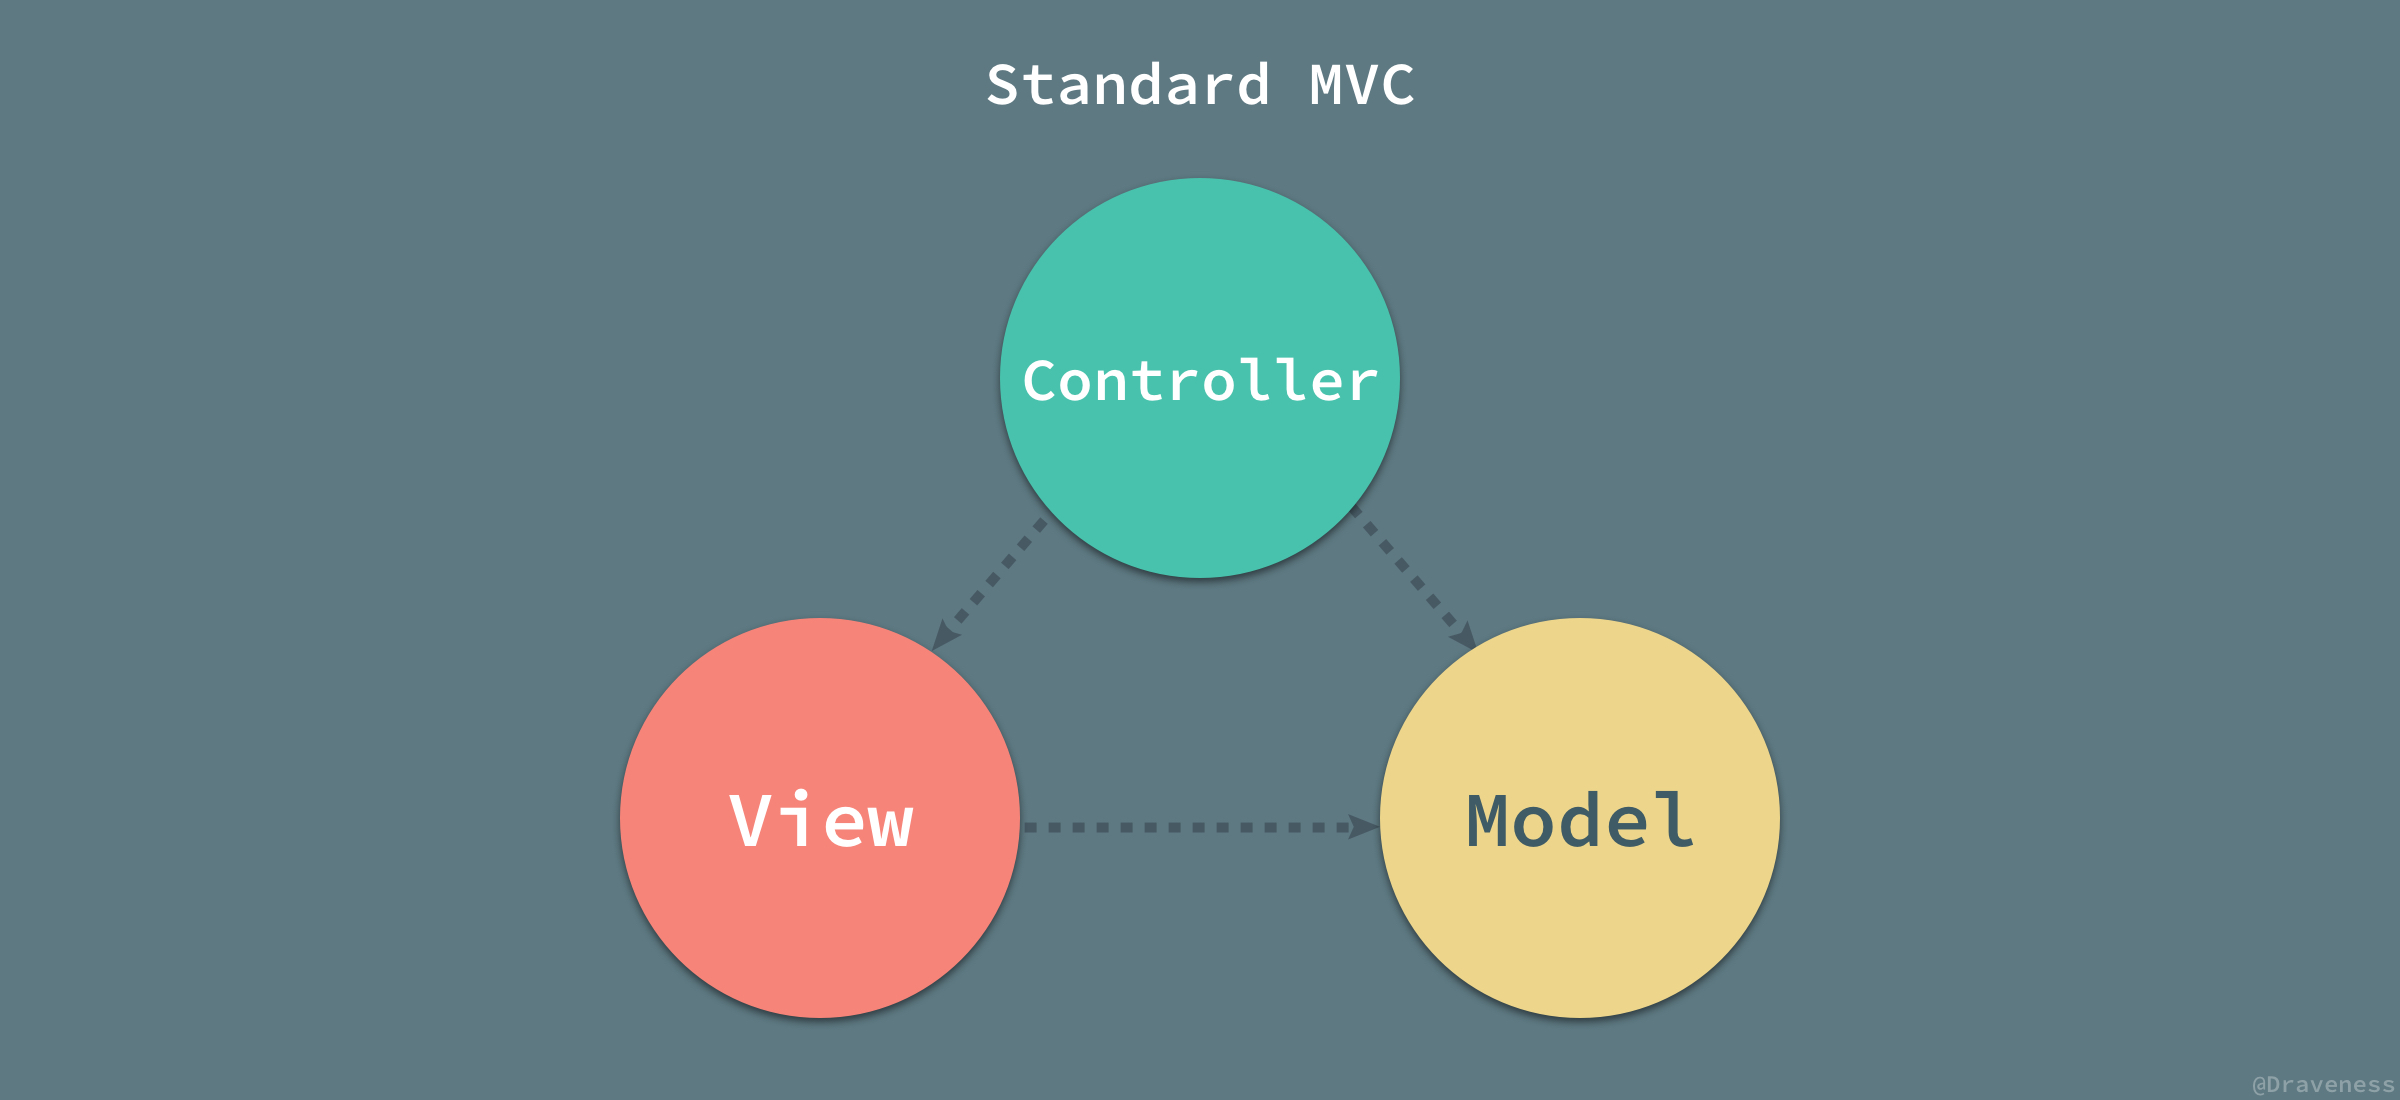
mvvm概念理解与简单实现

170 阅读5分钟
原文链接: blog.sunsly.cn

MVCMVVM

MVC是一种架构模式,相对来说最有名、应用最广。但是没有一个明确的定义,不同的框架的实现也稍有出入,但有一些共通地方。

扩展阅读1

扩展阅读2

将整个应用分为Model(模型)、View(视图)、Controller(控制器)三部分,职责如下:

  • 视图:可视化的部分,模型数据的可视化
  • 模型:数据部分,包含数据对象和基础的操作方法
  • 控制器:作用在模型和视图上,处理具体的逻辑。控制模型数据的改变,并通知视图需要作出改变。使视图和模型分离。

MVC

  • 控制器是核心,负责对模型中的数据进行更新,通知视图需要更新
  • 视图使用模型数据进行更新
  • 模型很被动,负责安静的维护数据,提供一组接口来响应数据的请求和更新

只是一种组织的方式,目的是为了每层的职责明确,减少不同层次之间的耦合。并不一定得是这样才算是MVC模式

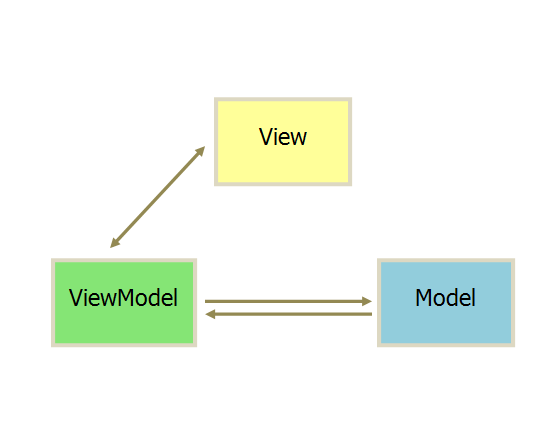
一种更智能,当然约束也更大的方式,MVVM。把模型和视图进行了绑定,出现了VM,用VM的改变来驱动视图变化,同时也更新模型。

MVVM

  • View和Model变得相对更独立,没有互相依赖
  • View只负责渲染页面,没有业务逻辑,称为“被动视图”
  • VM将Model的数据适配(绑定)到View,自动更新
  • VM和View实现双向绑定

VM做了很多事情,来实现一个吧

实现如下bindViewToData方法,并一步一步优化:

1
2
3
4
5
6
7
8
9
10
11
12
13
14
15
16
17
18
19
20
21
22
23
24
25
26
27
28
29
30
31
32
<section id='app' class="">
<div>
<p>
My name is {{ firstName + ' ' + lastName }}, I am {{age}} years old.
</p>
<ul>
<li>{{ friends }}</li>
</ul>
</div>
</section>

<script src="./index.js"></script>
<script>
const appData = {
firstName: 'Lucy',
lastName: 'Green',
age: 13,
friends: ['a', 'b', 'c']
}
bindViewToData(document.getElementById('app'), appData)

// div 里面的 p 元素的内容为
// My name is Lucy Green, I am 13 years old.

setTimeout(() => {
appData.firstName = 'Jerry'
appData.age = 16
}, 3000)

// div 里面的 p 元素的内容自动变为
// My name is Jerry Green, I am 16 years old.
</script>

模板解析、渲染

用数据渲染指定节点

1. 遍历找出需要渲染的节点

1
2
3
4
5
6
7
8
9
10
11
/**
* 深度遍历所有DOM节点,并对每个节点执行回调
*/
function DOMComb (oParent, oCallback) {
if (oParent.hasChildNodes()) {
for (var oNode = oParent.firstChild; oNode; oNode = oNode.nextSibling) {
DOMComb(oNode, oCallback)
}
}
oCallback.call(oParent)
}
1
2
3
4
5
6
7
8
9
10
11
12
const bindViewToData = (el, data) => {
DOMComb(el, function () {
// nodeType === 3 为Text Node
if (
this.nodeType === 3 &&
this.nodeValue &&
this.nodeValue.match(/\{\{.*\}\}/)
) {
// TODO 用数据渲染节点
}
})
}

扩展阅读:

遍历出来的节点,需要解析其中的特殊格式,并用数据替换。

2. 节点中的文本替换为数据

问题变为:将字符串变成可执行的js代码,eval 和 new Function

1
2
3
4
5
6
7
8
9
10
11
12
13
14
15
16
17
18
19
20
function Node (node, data) {
this.data = data
// DOM Node
this.Node = node
// 原始模板
this.nodeTmpl = node.nodeValue
}
Node.prototype = {
render: function () {
this.Node.nodeValue = this.nodeTmpl.replace(/\{\{(.*?)\}\}/g, (match, p1, offset, string) => {
return this.execute(p1)
})
},
execute: function (exp) {
return new Function(
...Object.keys(this.data),
`return ${exp}`
)(...Object.values(this.data))
}
}

扩展阅读:

补齐上文bindViewToData的TODO部分

1
2
3
4
5
6
7
8
9
10
11
12
13
14
const bindViewToData = (el, data) => {
DOMComb(el, function () {
// nodeType === 3 为Text Node
if (
this.nodeType === 3 &&
this.nodeValue &&
this.nodeValue.match(/\{\{.*\}\}/)
) {
+ const node = new Node(this, data)

+ node.render()
}
})
}

初步实现用data渲染el内特殊格式文本的功能。

模型和视图绑定

在数据有变化时,重新渲染视图

1. 简单粗暴的全量重新渲染

1
2
3
4
5
6
7
8
9
10
11
12
13
14
15
16
// 收集依赖,并在有需要的时候通知更新
function Dep () {
// 一个订阅者Node的数组
this.subs = []
}
Dep.prototype = {
addSub: function (node) {
if (this.subs.includes(node)) return false
return this.subs.push(node)
},
notify: function () {
this.subs.forEach(function (node) {
node.update()
})
}
}
1
2
3
4
5
6
7
8
// Node添加update方法
Node.prototype = {
render: ...
execute: ...
+ update: function () {
+ this.render()
+ }
}
1
2
3
4
5
6
7
8
9
10
11
12
13
14
15
16
17
18
// 在第一次渲染时,建立节点对数据的依赖关系
const bindViewToData = (el, data) => {
+ const dep = new Dep()

DOMComb(el, function () {
// nodeType === 3 为Text Node
if (
this.nodeType === 3 &&
this.nodeValue &&
this.nodeValue.match(/\{\{.*\}\}/)
) {
const node = new Node(this, data)

node.render()
+ dep.addSub(node)
}
})
}
1
2
3
4
5
6
7
8
9
10
11
12
13
14
15
16
// 在数据更新时,根据依赖关系触发视图更新
function defineReactive (obj, key, val = null, dep) {
val = obj[key]

Object.defineProperty(obj, key, {
get: function () {
return val
},
set: function (_val) {
if (val === _val) return false

val = _val
dep.notify()
}
})
}
1
2
3
4
5
6
7
8
9
10
11
12
13
14
15
16
17
18
19
20
21
22
// 添加数据绑定逻辑
const bindViewToData = (el, data) => {
const dep = new Dep()

DOMComb(el, function () {
// nodeType === 3 为Text Node
if (
this.nodeType === 3 &&
this.nodeValue &&
this.nodeValue.match(/\{\{.*\}\}/)
) {
const node = new Node(this, data)

node.render()
dep.addSub(node)
}
})

+ for (let prop in data) {
+ defineReactive(data, prop, data[prop], dep)
+ }
}

实现了数据更新后,自动通知视图重新渲染。但效率很低,全量更新。

2. 按需重新渲染

当数据有更新时,只重新渲染使用了该数据的节点。

需要更详细的数据绑定:当渲染某个节点时,获取的数据即可绑定到该节点,在数据更新时,只单独更新绑定的节点即可。

需要作出如下修改:

  1. 将前文数据绑定到所有节点,改为每个数据绑定使用该数据的节点(相关修改:Dep.target,Dep.depend(), Node.bind(), defineReactive()里属性的getter)
  2. 在数据有更新时,仅重新渲染使用该数据的节点(相关修改:defineReactive()里属性的setter)

修改后的代码如下:

1
2
3
4
5
6
7
8
9
10
11
12
13
14
15
16
17
18
19
20
21
22
23
24
25
26
27
28
29
30
31
32
33
34
35
36
37
38
39
40
41
42
43
44
45
46
47
48
49
50
51
52
// Node 相关

/* Node dom节点的包装,可以直接触发用数据重新渲染该节点 */
function Node (node, data) {
this.data = data
// DOM Node
this.Node = node
// 原始模板
this.nodeTmpl = node.nodeValue
+ // 依赖的数据
+ this.deps = []
}
Node.prototype = {
+ // 绑定数据,并使用数据渲染页面
+ bind: function () {
+ // 设置target为当前节点
+ pushTarget(this)
+ this.render()
+ // 取消设置当前节点为target
+ popTarget()
+ },
// 数据更新时,回调的方法
update: function () {
this.render()
},
// 使用数据渲染节点
render: function () {
this.Node.nodeValue = this.nodeTmpl.replace(
/\{\{(.*?)\}\}/g,
(match, p1, offset, string) => {
return this.execute(p1)
})
},
// with数据,执行表达式
execute: function (exp) {
return new Function(
- ...Object.keys(this.data),
- `return ${exp}`
- )(...Object.values(this.data))
+ 'data',
+ `with(data) {
+ return ${exp}
+ }`
+ )(this.data)
},
+ // 添加依赖的数据
+ addDep: function (dep) {
+ if (this.deps.includes(dep)) return false
+
+ return this.deps.push(dep)
+ },
}

扩展阅读:
with MDN

1
2
3
4
5
6
7
8
9
10
11
12
13
14
15
16
17
18
19
20
21
22
23
24
25
26
27
28
29
30
31
32
33
34
35
36
37
38
39
40
41
42
43
44
45
46
47
48
49
50
51
52
53
54
55
56
57
58
59
60
61
62
63
64
// 数据绑定,Dep

/**
* observer 观察者
* - 数据获取时,绑定对应关系
* - 数据有变化,通知改变
*/
function defineReactive (obj, key, val = null) {
// 数据每个值,对应一个dep实例,用于记录依赖,通知更新
+ const dep = new Dep(key)
val = obj[key]

Object.defineProperty(obj, key, {
get: function () {
+ if (Dep.target) {
+ // 建立数据和Node的依赖关系
+ dep.depend()
+ }
return val
},
set: function (_val) {
if (val === _val) return false

val = _val
dep.notify()
}
})
}
function Dep (name) {
// 记录下数据名字 - key
this.name = name
// 一个Node的数组
this.subs = []
}
Dep.prototype = {
+ // 将会指向一个Node
+ // 同一时间只会有一个Node被用来处理依赖关系
+ // 将会用在获取数据和Node的对应关系
+ target: null,
+ // 让当前指向的那个Node,依赖Dep关联的数据
+ depend: function () {
+ if (Dep.target && Dep.target.addDep(this)) {
+ this.addSub(Dep.target)
+ }
+ },
addSub: function (node) {
if (this.subs.includes(node)) return false
return this.subs.push(node)
},
notify: function () {
this.subs.forEach(function (node) {
node.update()
})
}
}
+Dep.target = null
+const targetStack = []
+function pushTarget (_target) {
+ if (Dep.target) targetStack.push(Dep.target)
+ Dep.target = _target
+}
+function popTarget () {
+ Dep.target = targetStack.pop()
+}
1
2
3
4
5
6
7
8
9
10
11
12
13
14
15
16
17
18
19
20
21
22
23
const bindViewToData = (el, data) => {
- const dep = new Dep()

for (let prop in data) {
- defineReactive(data, prop, data[prop], dep)
+ defineReactive(data, prop)
}

DOMComb(el, function () {
// nodeType === 3 为Text Node
if (
this.nodeType === 3 &&
this.nodeValue &&
this.nodeValue.match(/\{\{.*\}\}/)
) {
const node = new Node(this, data)

- node.render()
- dep.addSub(node)
+ node.bind()
}
})
}

致此,基本实现数据绑定节点,并用数据更新驱动页面节点重新渲染。

继续优化

1. 短时间多次重复渲染同一节点

发现问题:

  • 一个节点里包含多个数据字段,短时间多次更改字段数据,会频繁重新渲染节点
  • 多次修改同一数据字段值,会频繁重新渲染节点
1
2
3
4
5
6
7
8
9
10
11
12
13
14
15
// 工具方法
/**
* 防抖,合并多次操作,最终一次执行
*/
function debounce (fn, ms) {
'use strict'
let timer

return function () {
timer && clearTimeout(timer)
timer = setTimeout(() => {
fn.call(this, ...arguments)
}, ms)
}
}
1
2
3
4
5
6
7
8
9
// Node update方法debounce处理
Node.prototype = {
- update: function () {
- this.render()
- },
+ update: debounce(function () {
+ this.render()
+ }, 400),
}