

nginx的安装
yum install pcre pcre-devel
cd /usr/local/src/
wget http://nginx.org/download/nginx-1.4.2.tar.gz
tar zxvf nginx-1.4.2.tar.gz
cd nginx-1.4.2
./configure --prefix=/usr/local/nginx
make && make install
cd /ulsr/local/nginx,看到如下4个目录
./
....conf配置文件
... html网页文件
...logs日志文件
...sbin主要二进制程序
[root@localhost nginx]# ./sbin/nginx
nginx: [emerg] bind() to 0.0.0.0:80 failed (98: Address already in use)
....
nginx: [emerg] bind() to 0.0.0.0:80 failed (98: Address already in use)
nginx: [emerg] still could not bind()
(有时是自己装了apache,nginx等,还有更多情况是操作系统自带了apache并作为服务启动)
Nginx
TERM, INT | Quick shutdown |
QUIT | Graceful shutdown 优雅的关闭进程 , 即等请求结束后再关闭 |
HUP | Configuration reload ,Start the new worker processes with a new configuration Gracefully shutdown the old worker processes 改变配置文件, 平滑的重读配置文件 |
USR1 | Reopen the log files 重读日志 , 在日志按月 / 日分割时有用 |
USR2 | Upgrade Executable on the fly 平滑的升级 |
WINCH | Gracefully shutdown the worker processes 优雅关闭旧的进程 ( 配合 USR2 来进行升级 ) |
Kill -信号选项nginx的主进程号
Kill -HUP 4873
Kill -信号控制`cat /xxx/path/log/nginx.pid`
Kil; -USR1 `cat /xxx/path/log/nginx.pid`
Nginx配置段
//全局区
worker_processes 1; //有1个工作的子进程,可以自行修改,但太大无益,因为要争夺CPU,一般设置为CPU数*核数
Event {
//一般是配置nginx连接的特性
//如1个word能同时允许多少连接
worker_connections 1024; //这是指 一个子进程最大允许连1024个连接 }
http { //这是配置http服务器的主要段
Server1 { //这是虚拟主机段
Location { //定位,把特殊的路径或文件再次定位,如image目录单独处理
} ///如.php单独处理
}
Server2 {
}
}
server {
listen 80; #监听端口
server_name a.com; #监听域名
location / {
root /var/www/a.com; #根目录定位
index index.html;
}
}
server {
listen 8080;
server_name 192.168.1.204;
location / {
root /var/www/html8080;
index index.html;
}
}
#access_log logs/host.access.log main;
main格式是什么?
log_format main '$remote_addr - $remote_user [$time_local] "$request" '
# '$status $body_bytes_sent "$http_referer" '
# '"$http_user_agent" "$http_x_forwarded_for"';
main格式是我们定义好一种日志的格式,并起个名字,便于引用.
1:日志格式 是指记录哪些选项
log_format main '$remote_addr - $remote_user [$time_local] "$request" '
'$status $body_bytes_sent "$http_referer" '
'"$http_user_agent" "$http_x_forwarded_for"';
http-user-agent用户代理/蜘蛛,被转发的请求的原始IP
http_x_forwarded_for:在经过代理时,代理把你的本来IP加在此头信息中,传输你的原始IP
2:声明一个独特的log_format并命名
log_format mylog '$remote_addr- "$request" '
'$status $body_bytes_sent "$http_referer" '
'"$http_user_agent" "$http_x_forwarded_for"';
access_log logs/access_8080.log mylog;
#!/bin/bash
base_path='/usr/local/nginx/logs'
log_path=$(date -d yesterday +"%Y%m")
day=$(date -d yesterday +"%d")
mkdir -p $base_path/$log_path
mv $base_path/access.log $base_path/$log_path/access_$day.log
#echo $base_path/$log_path/access_$day.log
kill -USR1 `cat /usr/local/nginx/logs/nginx.pid`
Crontab编辑定时任务
01 00 * * * /xxx/path/b.sh每天0时1分(建议在02-04点之间,系统负载小)
location语法
location有”定位”的意思,根据Uri来进行不同的定位.
location的语法
location [=|~|~*|^~] patt {
}
location = patt {} [精准匹配]
location patt{} [一般匹配]
location ~ patt{} [正则匹配]
location = patt {
config A
}
location = / {
root /var/www/html/;
index index.htm index.html;
}
location / {
root /usr/local/nginx/html;
index index.html index.htm;
}
1:精准匹配中 ”/” ,得到index页为 index.htm
2:再次访问/index.htm ,此次内部转跳uri已经是”/index.htm” ,根目录为/usr/local/nginx/html
3:最终结果,访问了/usr/local/nginx/html/index.htm
再来看,正则也来参与.
location / {
root /usr/local/nginx/html;
index index.html index.htm;
}
location ~ image {
root /var/www/image;
index index.html;
}
location / {
root /usr/local/nginx/html;
index index.html index.htm;
}
location /foo {
root /var/www/html;
index index.html;
}
rewrite重写
if (条件) {}设定条件,再进行重写
set #设置变量
return #返回状态码
break #跳出rewrite
rewrite #重写
If语法格式
If空格(条件) {重写模式}
1: “=”来判断相等,用于字符串比较
2: “~”用正则来匹配(此处的正则区分大小写)~*不区分大小写的正则
3: -f -d -e来判断是否为文件,为目录,是否存在.
if ($remote_addr = 192.168.1.100) {
return 403;
}
if ($http_user_agent ~ MSIE) {
rewrite ^.*$ /ie.htm;
break; #(不break会循环重定向)
}
if (!-e $document_root$fastcgi_script_name) {
rewrite ^.*$ /404.html break;
}
set是设置变量用的,可以用来达到多条件判断时作标志用.
如下:
if ($http_user_agent ~* msie) {
set $isie 1;
}
if ($fastcgi_script_name = ie.html) {
set $isie 0;
}
if ($isie 1) {
rewrite ^.*$ ie.html;
}
Rewrite语法
Rewrite正则表达式 定向后的位置 模式
Goods-3.html ---->Goods.php?goods_id=3
goods-([\d]+)\.html ---> goods.php?goods_id =$1
location /ecshop {
index index.php;
rewrite goods-([\d]+)\.html$ /ecshop/goods.php?id=$1;
rewrite article-([\d]+)\.html$ /ecshop/article.php?id=$1;
rewrite category-(\d+)-b(\d+)\.html /ecshop/category.php?id=$1&brand=$2;
rewrite category-(\d+)-b(\d+)-min(\d+)-max(\d+)-attr([\d\.]+)\.html /ecshop/category.php?id=$1&brand=$2&price_min=$3&price_max=$4&filter_attr=$5;
rewrite category-(\d+)-b(\d+)-min(\d+)-max(\d+)-attr([\d+\.])-(\d+)-([^-]+)-([^-]+)\.html /ecshop/category.php?id=$1&brand=$2&price_min=$3&price_max=$4&filter_attr=$5&page=$6&sort=$7&order=$8;
}
nginx+php的编译
apache一般是把php当做自己的一个模块来启动的.
因此,为apache所编译的php,是不能用于nginx的.
./configure --prefix=/usr/local/fastphp \
--with-mysql=mysqlnd \
--enable-mysqlnd \
--with-gd \
--enable-gd-native-ttf \
--enable-gd-jis-conv
--enable-fpm
1:nginx+php的配置比较简单,核心就一句话----把请求的信息转发给9000端口的PHP进程,让PHP进程处理 指定目录下的PHP文件.
location ~ \.php$ {
root html;
fastcgi_pass 127.0.0.1:9000;
fastcgi_index index.php;
fastcgi_param SCRIPT_FILENAME $document_root$fastcgi_script_name;
include fastcgi_params;
}
1:碰到php文件,
2:把根目录定位到html,
3:把请求上下文转交给9000端口PHP进程,
4:并告诉PHP进程,当前的脚本是$document_root$fastcgi_scriptname(注:PHP会去找这个脚本并处理,所以脚本的位置要指对)
请求:
Accept-Encoding:gzip,deflate,sdch
响应:
Content-Encoding:gzip
Content-Length:36093
浏览器---请求---->声明可以接受gzip压缩 或deflate压缩 或compress或sdch压缩从http协议的角度看--请求头 声明acceopt-encoding: gzip deflate sdch (是指压缩算法,其中sdch是google倡导的一种压缩方式,目前支持的服务器尚不多)服务器-->回应---把内容用gzip方式压缩---->发给浏览器浏览<-----解码gzip-----接收gzip压缩内容----推算一下节省的带宽:
2*10^8 * 9*10^4字节
2*10^8 * 9 * 10^4 * 10^-9 = 12*K*G = 18T
节省的带宽是非常惊人的
gzip配置的常用参数
gzip on|off; #是否开启gzip
gzip_buffers 32 4K| 16 8K #缓冲(压缩在内存中缓冲几块?每块多大?)
gzip_comp_level [1-9] #推荐6压缩级别(级别越高,压的越小,越浪费CPU计算资源)
gzip_disable #正则匹配UA什么样的Uri不进行gzip
gzip_min_length 200 #开始压缩的最小长度(再小就不要压缩了,意义不在)
gzip_http_version 1.0|1.1 #开始压缩的http协议版本(可以不设置,目前几乎全是1.1协议)
gzip_proxied #设置请求者代理服务器,该如何缓存内容
gzip_types text/plain application/xml #对哪些类型的文件用压缩 如txt,xml,html ,css
gzip_vary on|off #是否传输gzip压缩标志
因为压缩率比较小,比如100->80字节,而且压缩也是耗费CPU资源的.
expires 30m;
expires 2h;
expires 30d;
(注意:服务器的日期要准确,如果服务器的日期落后于实际日期,可能导致缓存失效)
原理是:服务器响应文件内容是,同时响应etag标签(内容的签名,内容一变,他也变),和last_modified_since 2个标签值浏览器下次去请求时,头信息发送这两个标签,服务器检测文件有没有发生变化,如无,直接头信息返回etag,last_modified_since
(自行预习nginx第3方模块的安装,以安装ngx_http_upstream_consistent_hash为例)
1:在虚拟机上装3个端口的nginx服务器
2:装ecshop/discuz,并做url重写
3:利用3个端口的服务器,来实现简单的负载均衡.
下周实验:
1:数据 企业名称/电话/简介 等信息 约2500-3000万条
2:服务器4台, 2G/4核(1) 8G/双核(3)
3:目标3000PV
设计:服务器的架构图,包括nginx/mysql/php/memcached的分布.
Nginx具体的压缩配置
gzip on|off
gzip_buffers 4K|8K缓冲(和硬盘块相当)
gzip_comp_level [1-9]推荐6
gzip_disable正则匹配如User-Agent,针对古老浏览器不压缩
gzip_min_length 200
gzip_http_version 1.0|1.1
gzip_types text/plain , application/xml (各mime之间,一定要加空格,不是逗号)
gzip_vary on|off
Vary的作用:
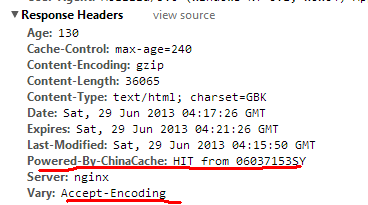
Vary是用来标志缓存的依据.
1:如果2个人,一个浏览器支持gzip,一个浏览器不支持gzip2个同时请求同个页面, chinaCache缓存压缩后,还是未压缩的?
2:如果1人,再次请求页面,chinaCache返回压缩后的缓存内容,还是压缩前的缓存内容?
location ~ \.(jpg|jpeg|png|gif)$ {
expires 1d;
}
location ~ \.js$ {
expires 1h;
}
304比起上面的expires指令多了1次请求,但是比200状态,少了传输内容.
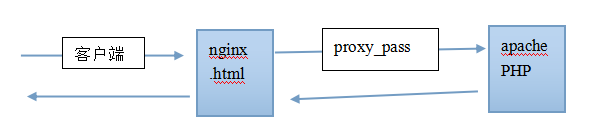
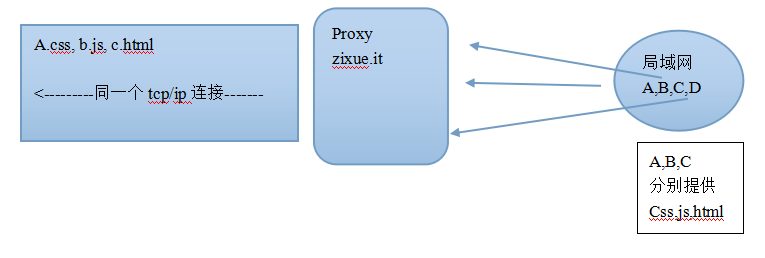
Nginx反向代理与负载均衡正向代理


注意:负载均衡是一种方案,实现办法有DNS轮询,如下图,DNS服务器允许一个域名有多个A记录,那么在用户访问时,一般按地域返回一个较近的解析记录.这样,全国不同的地区的用户,看到的163的主页,来自不同的服务器.

1:硬件上做负载均衡, F5 BIG-IP ,硬件负载均衡(很贵).直接从TCP/IP的底层协议上,直接做数据包的中转.
2:软件负载均衡, LVS
3:反向代理+负载均衡
Nginx反向代理设置
location ~ \.(jpg|jpeg|png|gif)$ {
proxy_pass http://192.168.1.204:8080;
expires 1d;
}
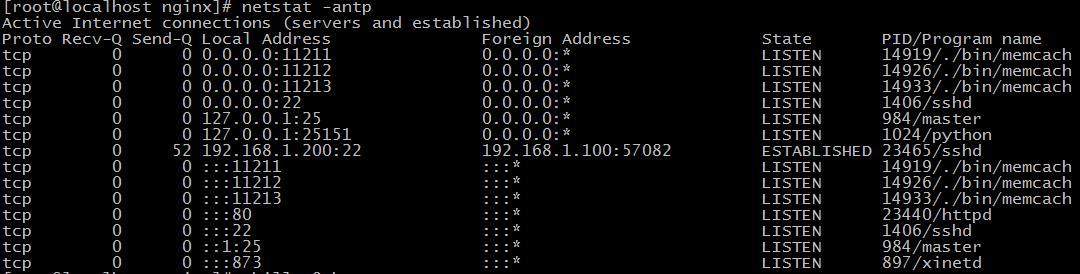
nginx与memcached的组合
用法: nginx响应请求时,直接请求memcached,如果没有相应的内容,再回调PHP页面,去查询database,并写入memcached.
分析: memcached是k/v存储, key-->value,nginx请求memecached时,用什么做key?
一般用uri arg做key,如/abc.php?id=3
Nginx第三方模块的安装以ngx_http_php_memcache_standard_balancer-master为例
1:解压到path/ngx_module
配置:
./configure --prefix=/xxx/xxx --add_module=/path/ngx_module
Make && make instal
upstream memserver { 把用到的memcached节点,声明在一个组里
hash_key $request_uri; // hash计算时的依据,以uri做依据来hash
server localhost:11211;
server localhost:11212;
}
Location里
location / {
# root html;
set $memcached_key $uri;
memcached_pass memserver; // memserver为上面的memcache节点的名称error_page 404 /writemem.php;
index index.php index.html index.htm;
}
默认的负载均衡的算法:
Nginx.conf中
upstream memserver {
consistent_hash $request_uri;
server localhost:11211;
server localhost:11212;
}
memcache.hash_strategy = consistent
