

写在前面
本文主要是NexT主题配置以及页面的样式优化,参考了许多大佬的文章以及配置文件。
本文参考的文章都会直接给出原文链接或者以注脚的形式标记出处,但 Google 参考了实在太多太多了,如有遗漏,欢迎指出。
前期整个博客优化配置过程中收藏了许多很好的博客,回头可以贴个友情链接大家可以去看看。
本文内容会在后续的优化中慢慢补充完整:
新建日期: 2018-10-16更新日期: 2018-10-17- 更新日期: 2018-10-19
致谢大佬
本文吸收了以下大佬的内容,搭建博客容易,后续的补充功能、优化繁琐至极,下面的几篇文章都是比较全面,有很大的参考意义 :
基本定义
在 Hexo 中有两份主要的配置文件,其名称都是 _config.yml。 其中,一份位于站点根目录下,主要包含 Hexo 本身的配置;另一份位于主题目录下,这份配置由主题作者提供,主要用于配置主题相关的选项。
为了描述方便,在以下说明中,将前者称为 站点配置文件, 后者称为 主题配置文件。
~/hexo/_config.yml
~/hexo/themes/next/_config.yml
博客搭建
博客的搭建方式可参考这篇博文【Hexo 搭建自己的个性博客】
初级 基础功能篇
站点配置文件
最权威的当然是先看Hexo官方文档
下面是我在用的配置文件:
## 站点设置
title: 雜言非語
subtitle: 成為一個厲害得普通人
description: 小人物,码农
keywords:
author: Sun XY
language: zh-Hans
timezone:

#主题设置
theme: next

# 博客地址
## If your site is put in a subdirectory, set url as 'http://yoursite.com/child' and root as '/child/'
url: https://sun-xyu.github.io/
root: /
permalink: :year/:month/:day/:title/
permalink_defaults:

# Directory
source_dir: source
public_dir: public
tag_dir: tags
archive_dir: archives
category_dir: categories
code_dir: downloads/code
i18n_dir: :lang
skip_render:

# 写作文章设置
new_post_name: :title.md # File name of new posts
default_layout: post
titlecase: false # Transform title into titlecase
external_link: true # Open external links in new tab
filename_case: 0
render_drafts: false
post_asset_folder: false
relative_link: false
future: true
highlight:
  enable: true
  line_number: true
  auto_detect: false
  tab_replace:

# Home page setting
# path: Root path for your blogs index page. (default = '')
# per_page: Posts displayed per page. (0 = disable pagination)
# order_by: Posts order. (Order by date descending by default)
index_generator:
  path: ''
  per_page: 5
  order_by: -date

# Category & Tag
default_category: uncategorized
category_map:
tag_map:

# 日期格式/时间格式
date_format: YYYY-MM-DD
time_format: HH:mm:ss

# 分页设置
## Set per_page to 0 to disable pagination
per_page: 10
pagination_dir: page

#RSS订阅是设置
plugin: hexo-generator-feed
#Feed Atom
feed:
type: atom
path: atom.xml
limit: 20


# 发布部署地址设置
## Docs: https://hexo.io/docs/deployment.html
deploy:
  type: git
  repo: https://gitee.com/Sun_xy/blog.git
  branch: master

# 博客搜索功能配置
search:
  path: search.xml
  field: post
  format: html
  limit: 10000

# 文章推荐功能,需要安装插件
recommended_posts:
  server: https://api.truelaurel.com #后端推荐服务器地址
  timeoutInMillis: 10000 #服务时长,超过此时长,则使用离线推荐模式
  internalLinks: 3 #内部文章数量
  externalLinks: 1 #外部文章数量
  fixedNumber: false
  autoDisplay: false #自动在文章底部显示推荐文章
  excludePattern: []
  titleHtml: <h1>推荐文章</h1> #自定义标题
主题配置文件
最权威的当然是先看NexT使用文档
下面是我在用的配置文件:
配置文件参考了[reuixiy](https://reuixiy.github.io/)大佬的配置
# ---------------------------------------------------------------
# Theme Core Configuration Settings
# ---------------------------------------------------------------

# 主题更新设置相关,参考:
# https://github.com/iissnan/hexo-theme-next/issues/328
override: false

# ---------------------------------------------------------------
# Site Information Settings
# ---------------------------------------------------------------

# 站点图标啦,直接去 https://realfavicongenerator.net
# 选项弄好后,下载压缩包,解压复制粘贴
# 建议放在 hexo-site/source/images/ 里(没有自己建)
# 这样可以避免更新 NexT 主题的时候遇到麻烦
# 最后记得要稍微改下文件名,与下面的保持一致
favicon:
  small: /images/favicon-16x16-next.png
  medium: /images/favicon-32x32-next.png
  apple_touch_icon: /images/apple-touch-icon-next.png
  safari_pinned_tab: /images/logo.svg
  #android_manifest: /images/manifest.json
  #ms_browserconfig: /images/browserconfig.xml

# Set default keywords (Use a comma to separate)
# 站点关键字,利于 SEO 大概,记得用英文逗号分隔
keywords: hexo,博客,生活,技术,代码

# Set rss to false to disable feed link.
# Leave rss as empty to use site's feed link.
# Set rss to specific value if you have burned your feed already.
# RSS,节站点配置文件里面的注释配置
# 则无需在这添加任何东西
rss: /atom.xml

# 页脚
footer:
  # 建站年份
  since: 2018

  # 年份后面的图标,为 Font Awesome 图标
  # 自己去纠结 https://fontawesome.com/v4.7.0/
  # 然后更改名字就行,下面的有关图标的设置都一样
  icon: sun-o

   # 如果不定义,默认用站点配置文件的 author 名
  copyright:
  # -------------------------------------------------------------
  # 是否显示Hexo link
  powered: false

  theme:
    # Theme & scheme info link (Theme - NexT.scheme).
    enable: false
    # Version info of NexT after scheme info (vX.X.X).
    version: true
  # -------------------------------------------------------------
  # Any custom text can be defined here.
  # custom_text: Hosted by <a target="_blank" href="https://pages.github.com">GitHub Pages</a>

# ---------------------------------------------------------------
# SEO Settings
# ---------------------------------------------------------------
canonical: true

# Change headers hierarchy on site-subtitle (will be main site description) and on all post/pages titles for better SEO-optimization.
seo: false

# If true, will add site-subtitle to index page, added in main hexo config.
# subtitle: Subtitle
index_with_subtitle: false


# ---------------------------------------------------------------
# Menu Settings
# ---------------------------------------------------------------
# 菜单设置 || 菜单图标设置(图标上面说了,不重复)
# 项目换行可以更改显示顺序
# 如果这个项前会显示 .menu
# 解决方法:编辑 ~/blog/themes/next/languages 下的相应文件
# 比如添加一个“留言”菜单,站点配置文件的 language 是 zh-Hans
# 则编辑 zh-Hans.yml,在 menu: 项内添加一行 留言: 留言
# 注意空格,且符号 : 为英文字符!
menu:
  home: / || home
  about: /about/ || user
  tags: /tags/ || tags
  categories: /categories/ || th
  archives: /archives/ || archive
  # schedule: /schedule/ || calendar
  # sitemap: /sitemap.xml || sitemap
  # commonweal: /404/ || heartbeat

# 是否开启菜单图标
menu_icons:
  enable: true


# ---------------------------------------------------------------
# Scheme Settings
# ---------------------------------------------------------------
# 设计板式,都长啥样,去 README 里面的链接里看看
# https://github.com/iissnan/hexo-theme-next#live-preview
# Schemes
scheme: Muse
# scheme: Mist
# scheme: Pisces
# scheme: Gemini


# ---------------------------------------------------------------
# Sidebar Settings
# ---------------------------------------------------------------
# 侧栏社交链接设置,与上面菜单差不多,要生效记得把前面的 # 去掉
social:
  GitHub: https://github.com/Sun-xyu || github
  E-Mail: mailto:sun64146458@gmail.com || envelope
  #Google: https://plus.google.com/yourname || google
  #Twitter: https://twitter.com/yourname || twitter
  #FB Page: https://www.facebook.com/yourname || facebook
  #VK Group: https://vk.com/yourname || vk
  #StackOverflow: https://stackoverflow.com/yourname || stack-overflow
  #YouTube: https://youtube.com/yourname || youtube
  #Instagram: https://instagram.com/yourname || instagram
  #Skype: skype:yourname?call|chat || skype

# 侧栏社交链接图标设置
social_icons:
  enable: true
  icons_only: true
  transition: true

# Blog rolls
# 侧栏友链设置
links_icon: list
links_title: 近期文章
links_layout: block
#links_layout: inline
links:
  Hexo+NexT 打造一个炫酷博客: https://sun-xyu.github.io/2018/10/16/hexo_next_blog/
  Hexo 搭建个人博客: https://sun-xyu.github.io/2018/10/14/hexo_create_blog/

# Sidebar Avatar
# in theme directory(source/images): /images/avatar.gif
# in site  directory(source/uploads): /uploads/avatar.gif
# 侧栏头像设置
# 建议放在 hexo-site/source/uploads/ 里(没有自己建)
# 这样可以避免更新 NexT 主题的时候遇到麻烦
avatar: /images/xiaorenwu.jpg

# 侧栏文章目录设置
toc:
  enable: true

  # 自动加数字序号
  number: true

  # 如果标题太长,则放到下一行继续显示
  # 开启后可能要在 custom.styl 里加代码
  wrap: false

# Creative Commons 4.0 International License.
# http://creativecommons.org/
# Available: by | by-nc | by-nc-nd | by-nc-sa | by-nd | by-sa | zero
#creative_commons: by-nc-sa
#creative_commons:

sidebar:
  # Sidebar Position, available value: left | right (only for Pisces | Gemini).
  # 侧栏位置设置,可用值:左 | 右(只对 Pisces 和 Gemini 设计版式有效!)
  # position: left
  position: right

  # Sidebar Display, available value (only for Muse | Mist):
  # 侧栏显示方式,post 代表只有点进一篇文章内
  # 且文章有目录,侧栏才会弹出显示
  #  - post    expand on posts automatically. Default.
  #  - always  expand for all pages automatically
  #  - hide    expand only when click on the sidebar toggle icon.
  #  - remove  Totally remove sidebar including sidebar toggle.
  display: post
  #display: always
  #display: hide
  #display: remove

  # 只对 Pisces 和 Gemini 设计版式有效!
  offset: 12

  # 只对 Pisces 和 Gemini 设计版式有效
  b2t: false

  # 在回到顶部按钮里显示阅读百分比
  scrollpercent: true

  # Enable sidebar on narrow view (only for Muse | Mist).
  # 移动端显示侧栏,只对 Muse 和 Mist 设计版式有效!
  onmobile: true


# ---------------------------------------------------------------
# Post Settings
# ---------------------------------------------------------------

# Automatically scroll page to section which is under <!-- more --> mark.
# 点击 [Read More],页面自动滚动到 <!-- more --> 标记处
scroll_to_more: false

# Automatically saving scroll position on each post/page in cookies.
# 用 cookies 保存浏览的位置信息,意味着重新打开这个页面后
# 页面就会自动滚动到上次的位置,除非读者清理浏览器 cookies
save_scroll: false

# Automatically excerpt description in homepage as preamble text.
# 将每篇文章 Front-matter 里 description 的文字作为页面显示的文章摘要
excerpt_description: false

# Automatically Excerpt. Not recommend.
# Please use <!-- more --> in the post to control excerpt accurately.
# 按字数自动加入 [Read More],不建议!
# 建议在文章中加入 <!-- more -->
# 自定义 [Read More] 按钮之前要显示的内容!
auto_excerpt:
  enable: false
  length: 150

# Post meta display settings
# 文章顶部显示的文章元数据设置
post_meta:
  item_text: true
  created_at: true
  updated_at: false
  categories: true

# Post wordcount display settings
# Dependencies: https://github.com/willin/hexo-wordcount
# 显示统计字数和估计阅读时长
# 注意:这个要安装插件,先进入站点文件夹根目录
# 然后:npm install hexo-wordcount --save
post_wordcount:
  item_text: true
  wordcount: true
  min2read: true
  totalcount: true
  separated_meta: true

# Recommended posts
# Dependency: https://github.com/huiwang/hexo-recommended-posts

# Wechat Subscriber
# 文章末尾显示微信二维码
wechat_subscriber:
  enabled: false
  qcode: /uploads/wechat-qcode.jpg
  description: 订阅博客

# Reward
# 文章末尾显示打赏功能
#reward_comment: Donate comment here
#wechatpay: /images/wechatpay.jpg
#alipay: /images/alipay.jpg
#bitcoin: /images/bitcoin.png

# 转载声明
post_copyright:
  enable: true
  license: CC BY-NC-SA 3.0
  license_url: https://creativecommons.org/licenses/by-nc-sa/3.0/


# ---------------------------------------------------------------
# Misc Theme Settings
# ---------------------------------------------------------------

# Reduce padding / margin indents on devices with narrow width.
# 移动端把页面两边留白去除,个人不建议
mobile_layout_economy: false

# Android Chrome header panel color ($black-deep).
# Android 上 Chrome 浏览器顶部颜色设置
android_chrome_color: "#222"

# Custom Logo.
# !!Only available for Default Scheme currently.
# Options:
#   enabled: [true/false] - Replace with specific image
#   image: url-of-image   - Images's url
custom_logo:
  enabled: false
  image:

# Code Highlight theme
# Available value:
#    normal | night | night eighties | night blue | night bright
# https://github.com/chriskempson/tomorrow-theme
# 代码高亮主题设置
# 都长啥样自己点开上面的链接查看
highlight_theme: normal


# ---------------------------------------------------------------
# Font Settings
# - Find fonts on Google Fonts (https://www.google.com/fonts)
# - All fonts set here will have the following styles:
#     light, light italic, normal, normal italic, bold, bold italic
# - Be aware that setting too much fonts will cause site running slowly
# - Introduce in 5.0.1
# ---------------------------------------------------------------
# CAUTION! Safari Version 10.1.2 bug: https://github.com/iissnan/hexo-theme-next/issues/1844
# To avoid space between header and sidebar in Pisces / Gemini themes recommended to use Web Safe fonts for `global` (and `logo`):
# Arial | Tahoma | Helvetica | Times New Roman | Courier New | Verdana | Georgia | Palatino | Garamond | Comic Sans MS | Trebuchet MS
# ---------------------------------------------------------------
# 字体设置
font:
  enable: true

  # Uri of fonts host. E.g. //fonts.googleapis.com (Default).
  host: https://fonts.cat.net

  # Font options:
  # `external: true` will load this font family from `host` above.
  # `family: Times New Roman`. Without any quotes.
  # `size: xx`. Use `px` as unit.

  # Global font settings used on <body> element.
  global:
    external: true
    family: Roboto Slab
    size:

  # Font settings for Headlines (h1, h2, h3, h4, h5, h6).
  # Fallback to `global` font settings.
  headings:
    external: true
    family:
    size:

  # Font settings for posts.
  # Fallback to `global` font settings.
  posts:
    external: true
    family:

  # Font settings for Logo.
  # Fallback to `global` font settings.
  logo:
    external: true
    family:
    size:

  # Font settings for <code> and code blocks.
  codes:
    external: true
    family: Roboto Mono
    size:


# ---------------------------------------------------------------
# Third Party Services Settings
# ---------------------------------------------------------------

# MathJax Support
mathjax:
  enable: false
  per_page: false
  cdn: //cdn.bootcss.com/mathjax/2.7.1/latest.js?config=TeX-AMS-MML_HTMLorMML

# Han Support docs: https://hanzi.pro/
han: false

# Swiftype Search API Key
#swiftype_key:

# Baidu Analytics ID
# 百度站点统计
baidu_analytics: a452b4c4a1cd7c9a9f62d952a88dc832

# Duoshuo ShortName
#duoshuo_shortname:

# Disqus
disqus:
  enable: false
  shortname:
  count: true

# Hypercomments
#hypercomments_id:

# changyan
changyan:
  enable: false
  appid:
  appkey:

# 评论系统
# Valine.
# You can get your appid and appkey from https://leancloud.cn
# more info please open https://valine.js.org
valine:
  enable: false
  appid:  # your leancloud application appid
  appkey:  # your leancloud application appkey
  notify: false # mail notifier , https://github.com/xCss/Valine/wiki
  verify: false # Verification code
  placeholder: Just go go # comment box placeholder
  avatar: mm # gravatar style
  guest_info: nick,mail,link # custom comment header
  pageSize: 10 # pagination size


# Support for youyan comments system.
# You can get your uid from http://www.uyan.cc
#youyan_uid: your uid

# Support for LiveRe comments system.
# You can get your uid from https://livere.com/insight/myCode (General web site)
#livere_uid: your uid

# Gitment
# Introduction: https://imsun.net/posts/gitment-introduction/
# You can get your Github ID from https://api.github.com/users/<Github username>
gitment:
  enable: false
  mint: true # RECOMMEND, A mint on Gitment, to support count, language and proxy_gateway
  count: true # Show comments count in post meta area
  lazy: false # Comments lazy loading with a button
  cleanly: false # Hide 'Powered by ...' on footer, and more
  language: # Force language, or auto switch by theme
  github_user: # MUST HAVE, Your Github ID
  github_repo: # MUST HAVE, The repo you use to store Gitment comments
  client_id: # MUST HAVE, Github client id for the Gitment
  client_secret: # EITHER this or proxy_gateway, Github access secret token for the Gitment
  proxy_gateway: # Address of api proxy, See: https://github.com/aimingoo/intersect
  redirect_protocol: # Protocol of redirect_uri with force_redirect_protocol when mint enabled

# Baidu Share
# Available value:
#    button | slide
# Warning: Baidu Share does not support https.
# baidushare:
#  type: slide

# Share
# This plugin is more useful in China, make sure you known how to use it.
# And you can find the use guide at official webiste: http://www.jiathis.com/.
# Warning: JiaThis does not support https.
# jiathis:
#   uid: Get this uid from http://www.jiathis.com/
# add_this_id:

# Share
# duoshuo_share: true

# NeedMoreShare2
# This plugin is a pure javascript sharing lib which is useful in China.
# See: https://github.com/revir/need-more-share2
# Also see: https://github.com/DzmVasileusky/needShareButton
# iconStyle: default | box
# boxForm: horizontal | vertical
# position: top / middle / bottom + Left / Center / Right
# networks: Weibo,Wechat,Douban,QQZone,Twitter,Linkedin,Mailto,Reddit,
#           Delicious,StumbleUpon,Pinterest,Facebook,GooglePlus,Slashdot,
#           Technorati,Posterous,Tumblr,GoogleBookmarks,Newsvine,
#           Evernote,Friendfeed,Vkontakte,Odnoklassniki,Mailru
# 文章分享功能
needmoreshare2:
  enable: true
  postbottom:
    enable: true
    options:
      iconStyle: default
      boxForm: horizontal
      position: bottomCenter
      networks: Weibo,Wechat,Douban,QQZone,Twitter,Facebook
  float:
    enable: true
    options:
      iconStyle: default
      boxForm: vertical
      position: topRight
      networks: Weibo,Wechat,Douban,QQZone,Twitter,Facebook

# Google Webmaster tools verification setting
# See: https://www.google.com/webmasters/
#google_site_verification:

# Google Analytics
#google_analytics:

# Bing Webmaster tools verification setting
# See: https://www.bing.com/webmaster/
#bing_site_verification:

# Yandex Webmaster tools verification setting
# See: https://webmaster.yandex.ru/
#yandex_site_verification:

# CNZZ count
#cnzz_siteid:

# Application Insights
# See https://azure.microsoft.com/en-us/services/application-insights/
# application_insights:

# Make duoshuo show UA
# user_id must NOT be null when admin_enable is true!
# you can visit http://dev.duoshuo.com get duoshuo user id.
duoshuo_info:
  ua_enable: true
  admin_enable: false
  user_id: 0
  #admin_nickname: Author

# Post widgets & FB/VK comments settings.
# ---------------------------------------------------------------
# Facebook SDK Support.
# https://github.com/iissnan/hexo-theme-next/pull/410
facebook_sdk:
  enable:       false
  app_id:       #<app_id>
  fb_admin:     #<user_id>
  like_button:  #true
  webmaster:    #true

# Facebook comments plugin
# This plugin depends on Facebook SDK.
# If facebook_sdk.enable is false, Facebook comments plugin is unavailable.
facebook_comments_plugin:
  enable:       false
  num_of_posts: 10    # min posts num is 1
  width:        100%  # default width is 550px
  scheme:       light # default scheme is light (light or dark)

# VKontakte API Support.
# To get your AppID visit https://vk.com/editapp?act=create
vkontakte_api:
  enable:       false
  app_id:       #<app_id>
  like:         true
  comments:     true
  num_of_posts: 10

# Star rating support to each article.
# To get your ID visit https://widgetpack.com
rating:
  enable: false
  id:     #<app_id>
  color:  fc6423
# ---------------------------------------------------------------

# Show number of visitors to each article.
# You can visit https://leancloud.cn get AppID and AppKey.
# 可以显示每篇文章的阅读量
# 然后可以通过阅读量建立 TopX 页面,教程链接:
# https://www.jianshu.com/p/702a7aec4d00
leancloud_visitors:
  enable: false
  app_id: #<app_id>
  app_key: #<app_key>

# Another tool to show number of visitors to each article.
# visit https://console.firebase.google.com/u/0/ to get apiKey and projectId
# visit https://firebase.google.com/docs/firestore/ to get more information about firestore
firestore:
  enable: false
  collection: articles #required, a string collection name to access firestore database
  apiKey: #required
  projectId: #required
  bluebird: false #enable this if you want to include bluebird 3.5.1(core version) Promise polyfill

# Show PV/UV of the website/page with busuanzi.
# Get more information on http://ibruce.info/2015/04/04/busuanzi/
# 不蒜子统计,用于在页脚显示总访客数和总浏览量,将 false 改为 true 就能直接使用
busuanzi_count:
  # count values only if the other configs are false
  enable: true
  # custom uv span for the whole site
  site_uv: true
  site_uv_header: <i class="fa fa-user"></i>
  site_uv_footer:
  # custom pv span for the whole site
  site_pv: true
  site_pv_header: <i class="fa fa-eye"></i>
  site_pv_footer:
  # custom pv span for one page only
  # 页面浏览量,不建议开启,建议用上面的 leancloud_visitors
  # 首先 leancloud 更稳定,其次 leancloud 便于管理
  # 最后,可以利用 leancloud 的 api 建立 TopX 页面
  page_pv: false
  page_pv_header: <i class="fa fa-eye"></i>
  page_pv_footer:


# Tencent analytics ID
# tencent_analytics:

# Tencent MTA ID
# tencent_mta:


# Enable baidu push so that the blog will push the url to baidu automatically which is very helpful for SEO
baidu_push: false

# Google Calendar
# Share your recent schedule to others via calendar page
#
# API Documentation:
# https://developers.google.com/google-apps/calendar/v3/reference/events/list
calendar:
  enable: false
  calendar_id: <required>
  api_key: <required>
  orderBy: startTime
  offsetMax: 24
  offsetMin: 4
  timeZone:
  showDeleted: false
  singleEvents: true
  maxResults: 250

# Algolia Search
algolia_search:
  enable: false
  hits:
    per_page: 10
  labels:
    input_placeholder: Search for Posts
    hits_empty: "We didn't find any results for the search: ${query}"
    hits_stats: "${hits} results found in ${time} ms"

# Local search
# Dependencies: https://github.com/flashlab/hexo-generator-search
# 要安装插件才能使用,先进入站点文件夹根目录
# 然后:npm install hexo-generator-searchdb --save
local_search:
  enable: true
  # if auto, trigger search by changing input
  # if manual, trigger search by pressing enter key or search button
  trigger: auto
  # show top n results per article, show all results by setting to -1
  top_n_per_article: 1


# ---------------------------------------------------------------
# Tags Settings
# ---------------------------------------------------------------

# External URL with BASE64 encrypt & decrypt.
# Usage: {% exturl text url "title" %}
# Alias: {% extlink text url "title" %}
# 用法见:
# https://github.com/iissnan/hexo-theme-next/pull/1438
exturl: false

# Note tag (bs-callout).
# 主题的标签样式,有 note、label、tabs 三种
note:
  # Note tag style values:
  #  - simple    bs-callout old alert style. Default.
  #  - modern    bs-callout new (v2-v3) alert style.
  #  - flat      flat callout style with background, like on Mozilla or StackOverflow.
  #  - disabled  disable all CSS styles import of note tag.
  # 风格
  style: flat
  # 要不要图标
  icons: false
  # 圆角矩形
  border_radius: 3
  # Offset lighter of background in % for modern and flat styles (modern: -12 | 12; flat: -18 | 6).
  # Offset also applied to label tag variables. This option can work with disabled note tag.
  light_bg_offset: 0

# Label tag.
label: true

# Tabs tag.
tabs:
  enable: true
  transition:
    tabs: false
    labels: true
  border_radius: 0


#! ---------------------------------------------------------------
#! DO NOT EDIT THE FOLLOWING SETTINGS
#! UNLESS YOU KNOW WHAT YOU ARE DOING
#! ---------------------------------------------------------------

# Use velocity to animate everything.
motion:
  enable: true
  async: false
  transition:
    # Transition variants:
    # fadeIn | fadeOut | flipXIn | flipXOut | flipYIn | flipYOut | flipBounceXIn | flipBounceXOut | flipBounceYIn | flipBounceYOut
    # swoopIn | swoopOut | whirlIn | whirlOut | shrinkIn | shrinkOut | expandIn | expandOut
    # bounceIn | bounceOut | bounceUpIn | bounceUpOut | bounceDownIn | bounceDownOut | bounceLeftIn | bounceLeftOut | bounceRightIn | bounceRightOut
    # slideUpIn | slideUpOut | slideDownIn | slideDownOut | slideLeftIn | slideLeftOut | slideRightIn | slideRightOut
    # slideUpBigIn | slideUpBigOut | slideDownBigIn | slideDownBigOut | slideLeftBigIn | slideLeftBigOut | slideRightBigIn | slideRightBigOut
    # perspectiveUpIn | perspectiveUpOut | perspectiveDownIn | perspectiveDownOut | perspectiveLeftIn | perspectiveLeftOut | perspectiveRightIn | perspectiveRightOut
    post_block: fadeIn
    post_header: slideDownIn
    post_body: slideDownIn
    coll_header: slideLeftIn
    # Only for Pisces | Gemini.
    sidebar: slideUpIn

# Fancybox
fancybox: true

# Progress bar in the top during page loading.
# 页面顶部加载条
pace: true
# Themes list:
#pace-theme-big-counter
#pace-theme-bounce
#pace-theme-barber-shop
#pace-theme-center-atom
#pace-theme-center-circle
#pace-theme-center-radar
#pace-theme-center-simple
#pace-theme-corner-indicator
#pace-theme-fill-left
#pace-theme-flash
#pace-theme-loading-bar
#pace-theme-mac-osx
#pace-theme-minimal
# For example
# pace_theme: pace-theme-center-simple
pace_theme: pace-theme-minimal

# 动态效果
# Canvas-nest
canvas_nest: false

# three_waves
three_waves: false

# canvas_lines
canvas_lines: false

# canvas_sphere
canvas_sphere: false

# Only fit scheme Pisces
# Canvas-ribbon
# size: The width of the ribbon.
# alpha: The transparency of the ribbon.
# zIndex: The display level of the ribbon.
canvas_ribbon:
  enable: false
  size: 300
  alpha: 0.6
  zIndex: -1

# Script Vendors.
# Set a CDN address for the vendor you want to customize.
# For example
#    jquery: https://ajax.googleapis.com/ajax/libs/jquery/2.2.0/jquery.min.js
# Be aware that you should use the same version as internal ones to avoid potential problems.
# Please use the https protocol of CDN files when you enable https on your site.
# 相关内容用 CDN 地址取代,加速网站访问,注意版本尽可能要一致
vendors:
  # Internal path prefix. Please do not edit it.
  _internal: lib

  # Internal version: 2.1.3
  jquery:

  # Internal version: 2.1.5
  # See: http://fancyapps.com/fancybox/
  fancybox:
  fancybox_css:

  # Internal version: 1.0.6
  # See: https://github.com/ftlabs/fastclick
  fastclick:

  # Internal version: 1.9.7
  # See: https://github.com/tuupola/jquery_lazyload
  lazyload:

  # Internal version: 1.2.1
  # See: http://VelocityJS.org
  velocity:

  # Internal version: 1.2.1
  # See: http://VelocityJS.org
  velocity_ui:

  # Internal version: 0.7.9
  # See: https://faisalman.github.io/ua-parser-js/
  ua_parser:

  # Internal version: 4.6.2
  # See: http://fontawesome.io/
  fontawesome:

  # Internal version: 1
  # https://www.algolia.com
  algolia_instant_js:
  algolia_instant_css:

  # Internal version: 1.0.2
  # See: https://github.com/HubSpot/pace
  # Or use direct links below:
  # pace: //cdn.bootcss.com/pace/1.0.2/pace.min.js
  # pace_css: //cdn.bootcss.com/pace/1.0.2/themes/blue/pace-theme-flash.min.css
  pace:
  pace_css:

  # Internal version: 1.0.0
  # https://github.com/hustcc/canvas-nest.js
  canvas_nest:

  # three
  three:

  # three_waves
  # https://github.com/jjandxa/three_waves
  three_waves:

  # three_waves
  # https://github.com/jjandxa/canvas_lines
  canvas_lines:

  # three_waves
  # https://github.com/jjandxa/canvas_sphere
  canvas_sphere:

  # Internal version: 1.0.0
  # https://github.com/zproo/canvas-ribbon
  canvas_ribbon:

  # Internal version: 3.3.0
  # https://github.com/ethantw/Han
  han:

  # needMoreShare2
  # https://github.com/revir/need-more-share2
  needMoreShare2:


# Assets
css: css
js: js
images: images

# Theme version
version: 5.1.4
进阶 网页样式篇
需要了解的
浏览器按 F12 即可,建议用Google Chrome 浏览器调试。
自定义样式文件 : themes\next\source\css\_custom\custom.styl
修改文件后直接保存,刷新页面即可查看效果。
修改文章页宽
打开themes/next/source/css/_variables/base.styl,找到以下字段并修改为合适的宽度:
- $content-desktop-large          = 900px
+ $content-desktop-large          = 1000px
修改小型代码块颜色
修改\themes\next\source\css\ _variables\base.styl文件,加入自定义颜色:
$black-deep   = #222
$red          = #ff2a2a
$blue-bright  = #87daff
$blue         = #0684bd
$blue-deep    = #262a30
$orange       = #fc6423
// 自定义的颜色
+ $my-code-foreground = #dd0055  // 用``围出的代码块字体颜色
+ $my-code-background = #eee  // 用``围出的代码块背景颜色
修改$code-background和$code-foreground的值:
// Code & Code Blocks
$code-font-family               = $font-family-monospace
$code-font-size                 = 13px
$code-font-size                 = unit(hexo-config('font.codes.size'), px) if hexo-config('font.codes.size') is a 'unit'
$code-border-radius             = 4px
- $code-foreground                = $black-light
- $code-background                = $gainsboro
+ $code-background                = $my-code-background
+ $code-foreground                = $my-code-foreground
修改themes\next\source\css\_custom\custom.styl文件,加入自定义样式
// 文章``代码块的自定义样式
code {
    margin: 0px 3px;
    border: 1px solid #999;
}
修改链接文字样式
修改themes\next\source\css\_custom\custom.styl文件,加入自定义样式
//文章内链接文本样式
.post-body p a{
  color: #0593d3;
  border-bottom: none;
  border-bottom: 1px solid #0593d3;
  &:hover {
    color: #fc6423;
    border-bottom: none;
    border-bottom: 1px solid #fc6423;
  }
}
修改[Read More]按钮样式
修改themes\next\source\css\_custom\custom.styl文件,加入自定义样式
// [Read More]按钮样式
.post-button .btn {
    color: #555 !important;
    background-color: rgb(255, 255, 255);
    border-radius: 3px;
    font-size: 15px;
    box-shadow: inset 0px 0px 10px 0px rgba(0, 0, 0, 0.35);
    border: none !important;
    transition-property: unset;
    padding: 0px 15px;
}

.post-button .btn:hover {
    color: rgb(255, 255, 255) !important;
    border-radius: 3px;
    font-size: 15px;
    box-shadow: inset 0px 0px 10px 0px rgba(0, 0, 0, 0.35);
    background-image: linear-gradient(90deg, #a166ab 0%, #ef4e7b 25%, #f37055 50%, #ef4e7b 75%, #a166ab 100%);
}
修改标签云(tagcloud)的颜色
修改themes/next/layout/page.swig文件,加入自定义样式:
- {{ tagcloud({min_font: 12, max_font: 30, amount: 300, color: true, start_color: '#ccc', end_color: '#111'}) }}
+ {{ tagcloud({min_font: 13, max_font: 31, amount: 1000, color: true, start_color: '#9733EE', end_color: '#FF512F'}) }}
修改对应参数值即可,参数说明见 Hexo官方文档
修改文章底部#号标签,改为图标
修改模板/themes/next/layout/_macro/post.swig,搜索 rel="tag">#,将 # 换成<i class="fa fa-tag"></i>
头像设置圆形,停留旋转效果
修改themes\next\source\css\_common\components\sidebar\sidebar-author.styl,新增以下代码:
.site-author-image {
  display: block;
  margin: 0 auto;
  padding: $site-author-image-padding;
  max-width: $site-author-image-width;
  height: $site-author-image-height;
  border: $site-author-image-border-width solid $site-author-image-border-color;
  //设置圆形
+  border-radius: 50%;
+  transition: 2s all;
}
   //旋转
+ .site-author-image:hover{
+   transform: rotate(360deg);
+ }
隐藏底部"强力驱动"内容
修改themes/next/_config.yml文件,将powered和enable设置为false
# 页脚
footer:
  # Specify the date when the site was setup.
  # If not defined, current year will be used.
  since: 2018

  # Icon between year and copyright info.
  # icon: user
  icon: sun-o

  # If not defined, will be used `author` from Hexo main config.
  copyright:
  # -------------------------------------------------------------
  # Hexo link (Powered by Hexo).
-  powered: true
+  powered: false
  theme:
    # Theme & scheme info link (Theme - NexT.scheme).
-    enable: true
+    enable: false
    # Version info of NexT after scheme info (vX.X.X).
    version: true
文章末尾添加"本文结束"标记
修改在themes/next/layout/_macro/post.swig中,在wechat-subscriber.swig之前添加如下代码:
+ <div style="text-align:center;color: #ccc;font-size:14px;">---------------- The End ----------------</div>
    {% if theme.wechat_subscriber.enabled and not is_index %}
      <div>
        {% include 'wechat-subscriber.swig' %}
      </div>
    {% endif %}
文章末尾追加版权信息
增加版权有两种方式
- 修改主题
配置文件,搜索post_copyright
post_copyright:
- enable: false
+ enable: true
  license: CC BY-NC-SA 3.0
  license_url: https://creativecommons.org/licenses/by-nc-sa/3.0/
- 如果觉得默认不好看,则可以自定义样式,找到
themes/next/layout/_macro/post.swig,在footer之前添加如下代码(添加之前确保已添加样式):
<div>
	  <p id="div-border-left-red">
	   <b>本文基于<a target="_blank" title="Creative Commons Attribution-ShareAlike 4.0 International (CC BY-SA 4.0)" href="http://creativecommons.org/licenses/by-sa/4.0/"> 知识共享署名-相同方式共享 4.0 </a>国际许可协议发布</b><br/>
	    <span>
	    <b>本文地址:</b><a href="{{ url_for(page.path) }}" title="{{ page.title }}">{{ page.permalink }}</a><br/><b>转载请注明出处,谢谢!</b>
	    </span>
	  </p>
</div>
添加背景图片
通过 jquery-backstretch,具体操作呢,编辑文件/themes/next/layout/_layout.swig:
+  <script src="https://cdnjs.cloudflare.com/ajax/libs/jquery-backstretch/2.0.4/jquery.backstretch.min.js"></script>;
+  <script>
+  $("body").backstretch("https://背景图.jpg");
+  </script>
</body>
加入到文件最后面前面即可。
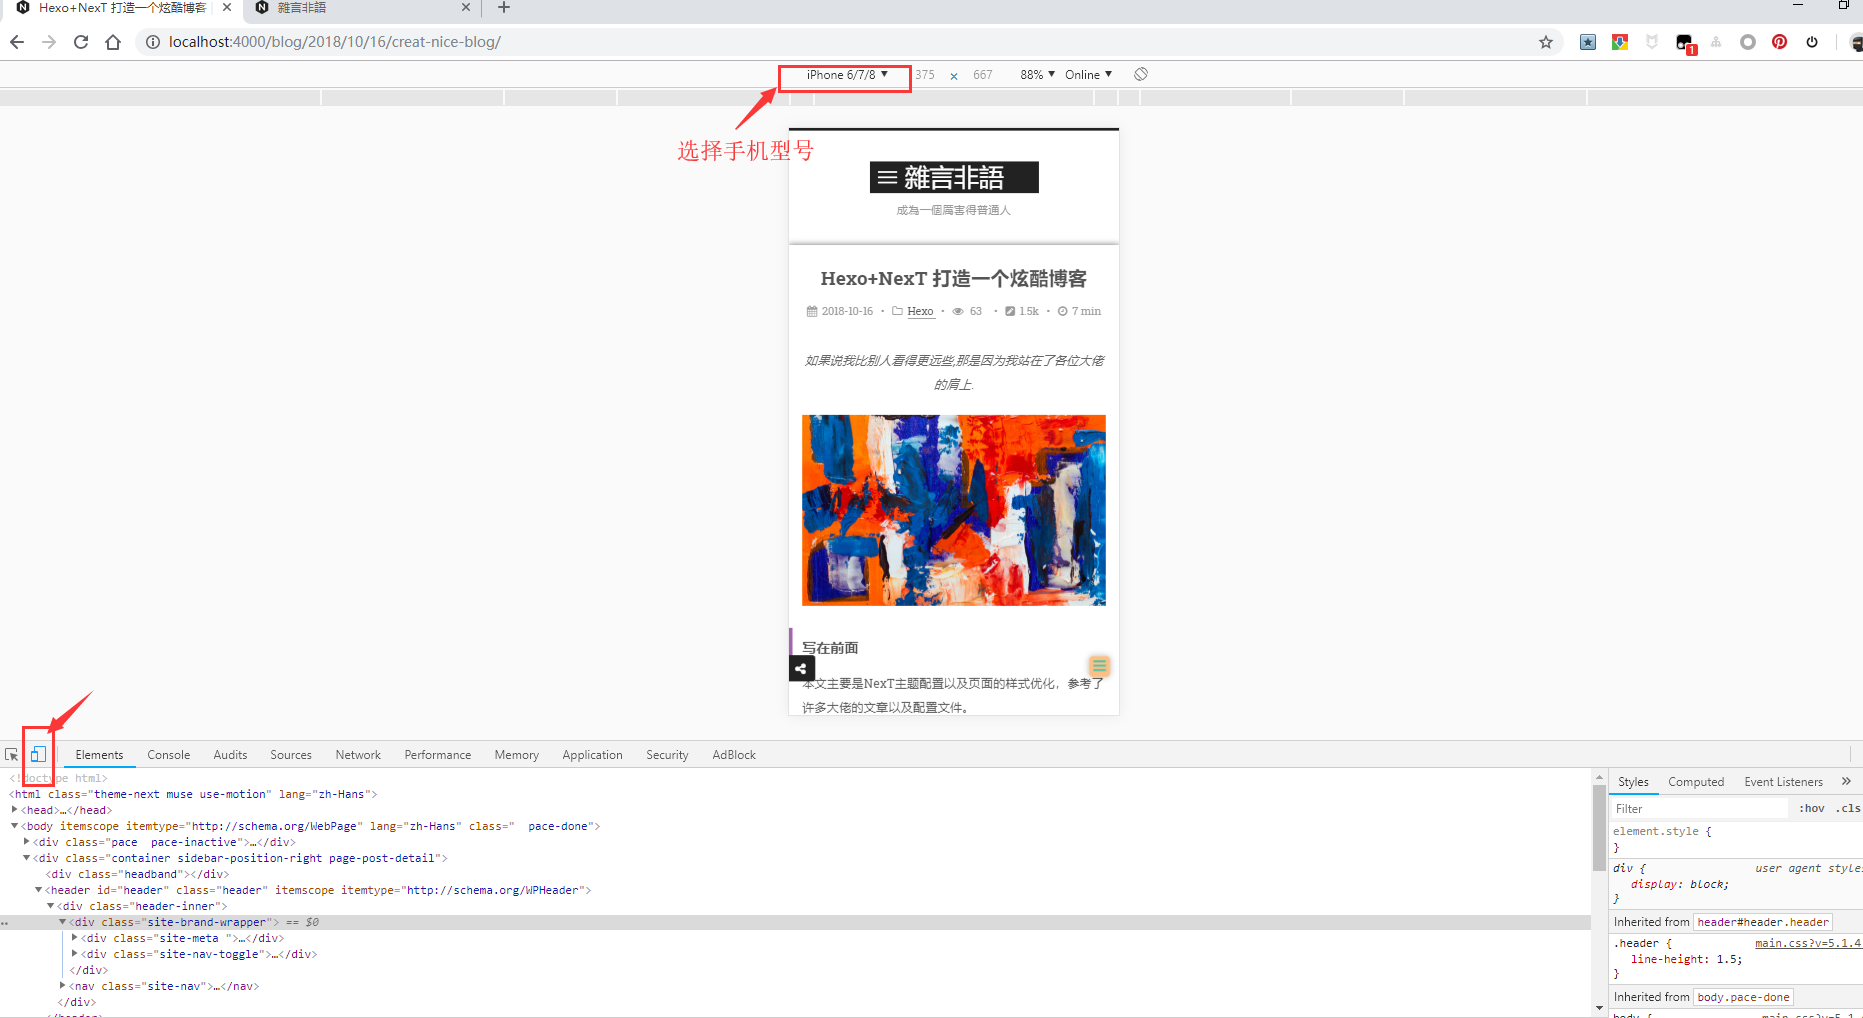
移动端显示 back-to-top 按钮和侧栏
具体手机显示可用手机访问我的博客
我的博客主题是Muse,主题的设计模版是 Muse 或 Mist,就可以直接在主题配置文件中配置:
修改主题配置themes/next/_config.yml
# Enable sidebar on narrow view
onmobile: true
如何调试手机样式页面,请参照下图
页面调试好之后将代码复制到:themes\next\source\css\_custom\custom.styl
具体可参考我的custom.styl样式文件
附上我的custom.styl样式文件
不建议全部复制粘贴使用,最好是F12打开,根据关键ID找到对应的样式,复制到自己的文件中
样式文件参考了[reuixiy](https://reuixiy.github.io/)大佬的配置
// Custom styles.
/*******************首页样式*****************************/
// 顶栏宽度
.container .header-inner {
    width: 100%;
}

// .headband {
//     height: 1.5px;
//     background-image: linear-gradient(90deg, #F79533 0%, #F37055 15%, #EF4E7B 30%, #A166AB 44%, #5073B8 58%, #1098AD 72%, #07B39B 86%, #6DBA82 100%);
// }

// 页面顶部行高
.header {
    line-height: 1.5;
}

// // 页面背景色
// .container {
//     background-color: rgba(0, 0, 0, 0.75);
// }

// 页面留白更改
.header-inner {
    padding-top: 35px;
    padding-bottom: 0px;
}
.posts-expand {
    padding-top: 50px;
}
.posts-expand .post-meta {
    margin: 5px 0px 0px 0px;
}
.post-button {
    margin-top: 0px;
}
// 顶栏宽度
.container .header-inner {
    width: 100%;
}
// 渐变菜带,CSS代码copy自https://githubuniverse.com
// .site-meta {
//     background-image: linear-gradient(90deg, #F79533 0%, #F37055 15%, #EF4E7B 30%, #A166AB 44%, #5073B8 58%, #1098AD 72%, #07B39B 86%, #6DBA82 100%);
// }

//缩略图指定宽度值显示。
img.img-topic {
    width: 75%;
}


/*******************文章样式*****************************/
// 文章
.post {
    margin-bottom: 50px;
    padding: 45px 36px 36px 36px;
    box-shadow: 0px 0px 10px 0px rgba(0, 0, 0, 0.5);
    background-color: rgb(255, 255, 255);
}

// 文章标题字体
.posts-expand .post-title {
    font-size: 26px;
    font-weight: 700;
}
// 文章标题动态效果
.posts-expand .post-title-link::before {
    background-image: linear-gradient(90deg, #a166ab 0%, #ef4e7b 25%, #f37055 50%, #ef4e7b 75%, #a166ab 100%);
}
// 文章元数据(meta)留白更改
.posts-expand .post-meta {
    margin: 10px 0px 20px 0px;
}
// 文章的描述description
.posts-expand .post-meta .post-description {
    font-style: italic;
    font-size: 14px;
    margin-top: 30px;
    margin-bottom: 0px;
    color: #666;
}
// [Read More]按钮样式
.post-button .btn {
    color: #555 !important;
    background-color: rgb(255, 255, 255);
    border-radius: 3px;
    font-size: 15px;
    box-shadow: inset 0px 0px 10px 0px rgba(0, 0, 0, 0.35);
    border: none !important;
    transition-property: unset;
    padding: 0px 15px;
}

.post-button .btn:hover {
    color: rgb(255, 255, 255) !important;
    border-radius: 3px;
    font-size: 15px;
    box-shadow: inset 0px 0px 10px 0px rgba(0, 0, 0, 0.35);
    background-image: linear-gradient(90deg, #a166ab 0%, #ef4e7b 25%, #f37055 50%, #ef4e7b 75%, #a166ab 100%);
}
// 去除在页面文章之间的分割线
.posts-expand .post-eof {
    margin: 0px;
    background-color: rgba(255, 255, 255, 0);
}
// 去除页面底部页码上面的横线
.pagination {
    border: none;
    margin: 0px;
}

// 文章内标题样式(左边的竖线)
.post-body h2, h3, h4, h5, h6 {
    border-left: 4px solid rgb(161, 102, 171);
    margin-left: -36px;
    padding-left: 32px;
}
// 去掉图片边框
.posts-expand .post-body img {
    border: none;
    padding: 0px;
}
// 文章``代码块的自定义样式
code {
    margin: 0px 3px;
    border: 1px solid #999;
}

// 文章```代码块顶部样式
.highlight figcaption {
    margin: 0em;
    padding: 0.5em;
    background: #eee;
    border-bottom: 1px solid #e9e9e9;
}
.highlight figcaption a {
    color: rgb(80, 115, 184);
}
// 文章```代码块diff样式
pre .addition {
    background: #e6ffed;
}
pre .deletion {
    background: #ffeef0;
}

//文章内链接文本样式
.post-body p a{
  color: #0593d3;
  border-bottom: none;
  border-bottom: 1px solid #0593d3;
  &:hover {
    color: #fc6423;
    border-bottom: none;
    border-bottom: 1px solid #fc6423;
  }
}

// 自定义的文章摘要图片样式
img.img-topic {
    width: 100%;
}

/*************************侧栏样式****************************/
// 自定义的侧栏时间样式
#days {
    display: block;
    color: rgb(7, 179, 155);
    font-size: 13px;
    margin-top: 15px;
}
// 右下角侧栏按钮样式
.sidebar-toggle {
    right: 10px;
    bottom: 43px;
    background-color: rgba(247, 149, 51, 0.75);
    border-radius: 5px;
    box-shadow: 0px 0px 10px 0px rgba(0, 0, 0, 0.35);
}
.page-post-detail .sidebar-toggle-line {
    background: rgb(7, 179, 155);
}
// 右下角返回顶部按钮样式
.back-to-top {
    line-height: 1.5;
    right: 10px;
    padding-right: 5px;
    padding-left: 5px;
    padding-top: 2.5px;
    padding-bottom: 2.5px;
    background-color: rgba(247, 149, 51, 0.75);
    border-radius: 5px;
    box-shadow: 0px 0px 10px 0px rgba(0, 0, 0, 0.35);
}

// 侧栏
.sidebar {
    box-shadow: inset 0px 0px 10px 0px rgba(0, 0, 0, 0.5);
    background-color: rgba(0, 0, 0, 0.75);
}
.sidebar-inner {
    margin-top: 30px;
}
// 侧栏顶部文字
.sidebar-nav li {
    font-size: 15px;
    font-weight: bold;
    color: rgb(7, 179, 155);
}
.sidebar-nav li:hover {
    color: rgb(161, 102, 171);
}
.sidebar-nav .sidebar-nav-active {
    color: rgb(7, 179, 155);
    border-bottom-color: rgb(161, 102, 171);
    border-bottom-width: 1.5px;
}
.sidebar-nav .sidebar-nav-active:hover {
    color: rgb(7, 179, 155);
}
// 侧栏站点作者名
.site-author-name {
    display: none;
}
// 侧栏站点描述
.site-description {
    letter-spacing: 5px;
    font-size: 15px;
    font-weight: bold;
    margin-top: 15px;
    margin-left: 13px;
    color: rgb(243, 112, 85);
}
// 侧栏站点文章、分类、标签
.site-state {
    line-height: 1.3;
    margin-left: 12px;
}
.site-state-item {
    padding: 0px 15px;
    border-left: 1.5px solid rgb(161, 102, 171);
}
// 侧栏RSS按钮样式
.feed-link {
    margin-top: 15px;
    margin-left: 7px;
}
.feed-link a {
    color: rgb(255, 255, 255);
    border: 1px solid rgb(158, 158, 158) !important;
    border-radius: 15px;
}
.feed-link a:hover {
    background-color: rgb(161, 102, 171);
}
.feed-link a i {
    color: rgb(255, 255, 255);
}
// 侧栏社交链接
.links-of-author {
    margin-top: 0px;
}
// 侧栏友链标题
.links-of-blogroll-title {
    margin-bottom: 10px;
    margin-top: 15px;
    color: rgba(7, 179, 155, 0.75);
    margin-left: 6px;
    font-size: 15px;
    font-weight: bold;
}
// 侧栏超链接样式(友链的样式)
.sidebar a {
    color: #ccc;
    border-bottom: none;
}
.sidebar a:hover {
    color: rgb(255, 255, 255);
}
// 自定义的侧栏时间样式
#days {
    display: block;
    color: rgb(7, 179, 155);
    font-size: 13px;
    margin-top: 15px;
}
// 侧栏目录链接样式
.post-toc ol a {
    color: rgb(7, 179, 155);
    border-bottom: 1px solid rgb(96, 125, 139);
}
.post-toc ol a:hover {
    color: rgb(161, 102, 171);
    border-bottom-color: rgb(161, 102, 171);
}
// 侧栏目录链接样式之当前目录
.post-toc .nav .active > a {
    color: rgb(161, 102, 171);
    border-bottom-color: rgb(161, 102, 171);
}
.post-toc .nav .active > a:hover {
    color: rgb(161, 102, 171);
    border-bottom-color: rgb(161, 102, 171);
}
/* 修侧栏目录bug,如果主题配置文件_config.yml的toc是wrap: true */
.post-toc ol {
    padding: 0px 10px 5px 10px;
}
/* 侧栏目录默认全展开,已注释
.post-toc .nav .nav-child {
    display: block;
}
*/

/************************移动端样式*******************************/
@media (max-width: 1023px) {
    .container {
        background-color: rgba(0, 0, 0, 0);
    }
    .sidebar {
        // box-shadow: 0px 0px 10px 0px rgba(0, 0, 0, 0.5);
        border-top-left-radius: 5px;
        border-bottom-left-radius: 5px;
    }
    .feed-link {
        display: none !important;
    }
}
@media (max-width: 767px) {
    .main {
        padding-bottom: 120px;
    }
    .posts-expand {
        margin: 0px;
        padding-top: 10px;
    }
    .posts-expand .post-title {
        font-size: 22px;
    }
    .posts-expand .post-meta {
        font-size: 10px;
    }
    .post {
        margin-bottom: 30px !important;
        padding: 20px 15px 15px 15px !important;
    }
    .post-body h2, h3, h4, h5, h6 {
        margin-left: -15px;
        padding-left: 11px;
    }
    .posts-expand .post-tags {
        margin-top: 10px;
    }
    .post-widgets {
        margin-top: 10px;
    }
    .comments {
        margin: 40px 0px 40px 0px !important;
    }
    .footer {
        // box-shadow: 0px -5px 10px 0px rgba(0, 0, 0, 0.5);
    }
}
.sidebar-active #sidebar-dimmer {
    opacity: 0;
}
// 移动端左上角菜单按钮
.site-nav-toggle {
    top: 35px;
    left: 91px;
    // background-color: #222;
}
.btn-bar {
    background-color: rgb(255, 255, 255);
}
// 移动端菜单
@media (max-width: 767px) {
    .menu {
        text-align: center;
        // box-shadow: 0px 5px 10px 0px rgba(0, 0, 0, 0.5);
    }
    .site-nav {
        top: initial;
        background-color: rgba(255, 255, 255, 0.75);
        border-top: none;
        border-bottom: none;
        position: relative;
        z-index: 1024;
    }
}
//移动端顶部
@media (max-width: 767px) {
    .site-title {
        font-size: 28px !important;
        letter-spacing: 0px !important;
    }
    .site-subtitle{
        letter-spacing: 0px !important;
        padding-bottom: 0px !important;
    }
    .site-meta {
        // box-shadow: 0px 5px 10px 0px rgba(0, 0, 0, 0.5);
    }
    .menu .menu-item {
        margin: 0px 10px !important;
    }
}
进阶 高级功能配置
设置动态title
themes/next/source/js/src下创建dytitle.js:
var OriginTitile = document.title;
var titleTime;
document.addEventListener('visibilitychange', function () {
    if (document.hidden) {
        $('[rel="shortcut icon"]').attr('href', "/TEP.png");
        document.title = 'w(゚Д゚)w 出BUG啦!!!!';
        clearTimeout(titleTime);
    }
    else {
        $('[rel="shortcut icon"]').attr('href', "/favicon.png");
        document.title = '♪(^∇^*)又好了。。。 ' + OriginTitile;
        titleTime = setTimeout(function () {
            document.title = OriginTitile;
        }, 2000);
    }
});
修改themes/next/layout/layout.swing,在 之前添加:
<script type="text/javascript" src="/js/src/dytitle.js"></script>
侧栏加入已运行的时间
修改文件:themes/next/layout/_custom/sidebar.swig,加入一下代码:
BirthDay=new Date("05/27/2017 15:13:14"); 日期修改为自己的
<div id="days"></div>
<script>
function show_date_time(){
window.setTimeout("show_date_time()", 1000);
BirthDay=new Date("05/27/2017 15:13:14");
today=new Date();
timeold=(today.getTime()-BirthDay.getTime());
sectimeold=timeold/1000
secondsold=Math.floor(sectimeold);
msPerDay=24*60*60*1000
e_daysold=timeold/msPerDay
daysold=Math.floor(e_daysold);
e_hrsold=(e_daysold-daysold)*24;
hrsold=setzero(Math.floor(e_hrsold));
e_minsold=(e_hrsold-hrsold)*60;
minsold=setzero(Math.floor((e_hrsold-hrsold)*60));
seconds=setzero(Math.floor((e_minsold-minsold)*60));
document.getElementById('days').innerHTML="已运行"+daysold+"天"+hrsold+"小时"+minsold+"分"+seconds+"秒";
}
function setzero(i){
if (i<10)
{i="0" + i};
return i;
}
show_date_time();
</script>
修改文件themes/next/layout/_macro/sidebar.swig
{# Blogroll #}
{% if theme.links %}
<div class="links-of-blogroll motion-element {{ "links-of-blogroll-" + theme.links_layout | default('inline') }}">
<div class="links-of-blogroll-title">
<i class="fa fa-fw fa-{{ theme.links_icon | default('globe') | lower }}"></i>
{{ theme.links_title }}
<i class="fa fa-fw fa-{{ theme.links_icon | default('globe') | lower }}"></i>
</div>
<ul class="links-of-blogroll-list">
{% for name, link in theme.links %}
<li class="links-of-blogroll-item">
<a href="{{ link }}" title="{{ name }}" target="_blank">{{ name }}</a>
</li>
{% endfor %}
</ul>
+ {% include '../_custom/sidebar.swig' %}
</div>
{% endif %}
- {% include '../_custom/sidebar.swig' %}
点击出现爱心效果
在/themes/next/source/js/love.js下新建文件love.js,接着把该链接下的代码拷贝粘贴到love.js文件中
!function (e, t, a) { function n() { c(".heart{width: 10px;height: 10px;position: fixed;background: #f00;transform: rotate(45deg);-webkit-transform: rotate(45deg);-moz-transform: rotate(45deg);}.heart:after,.heart:before{content: '';width: inherit;height: inherit;background: inherit;border-radius: 50%;-webkit-border-radius: 50%;-moz-border-radius: 50%;position: fixed;}.heart:after{top: -5px;}.heart:before{left: -5px;}"), o(), r() } function r() { for (var e = 0; e < d.length; e++)d[e].alpha <= 0 ? (t.body.removeChild(d[e].el), d.splice(e, 1)) : (d[e].y-- , d[e].scale += .004, d[e].alpha -= .013, d[e].el.style.cssText = "left:" + d[e].x + "px;top:" + d[e].y + "px;opacity:" + d[e].alpha + ";transform:scale(" + d[e].scale + "," + d[e].scale + ") rotate(45deg);background:" + d[e].color + ";z-index:99999"); requestAnimationFrame(r) } function o() { var t = "function" == typeof e.onclick && e.onclick; e.onclick = function (e) { t && t(), i(e) } } function i(e) { var a = t.createElement("div"); a.className = "heart", d.push({ el: a, x: e.clientX - 5, y: e.clientY - 5, scale: 1, alpha: 1, color: s() }), t.body.appendChild(a) } function c(e) { var a = t.createElement("style"); a.type = "text/css"; try { a.appendChild(t.createTextNode(e)) } catch (t) { a.styleSheet.cssText = e } t.getElementsByTagName("head")[0].appendChild(a) } function s() { return "rgb(" + ~~(255 * Math.random()) + "," + ~~(255 * Math.random()) + "," + ~~(255 * Math.random()) + ")" } var d = []; e.requestAnimationFrame = function () { return e.requestAnimationFrame || e.webkitRequestAnimationFrame || e.mozRequestAnimationFrame || e.oRequestAnimationFrame || e.msRequestAnimationFrame || function (e) { setTimeout(e, 1e3 / 60) } }(), n() }(window, document);
在\themes\next\layout\_layout.swig文件末尾添加:
{% include '_third-party/exturl.swig' %}
</body>
</html>
+ <!-- 页面点击小红心 -->
+ <script type="text/javascript" src="/js/src/love.js"></script>
点击头像回到博客首页
修改文件/themes/next/layout/_macro/sidebar.swig,增加以下代码:
+        <a href="/">
          <img class="site-author-image" itemprop="image"
               src="{{ url_for( theme.avatar | default(theme.images + '/avatar.gif') ) }}"
               alt="{{ theme.author }}" />
+        </a>
增加内容分享服务
修改themes/next/_config.yml主题配置文件,搜索关键字needmoreshare2,找到如下代码并做以下修改:
# 文章分享功能
needmoreshare2:
  enable: true
  postbottom:
    enable: true
    options:
      iconStyle: default
      boxForm: horizontal
      position: bottomCenter
      networks: Weibo,Wechat,Douban,QQZone,Twitter,Facebook
  float:
    enable: true
    options:
      iconStyle: default
      boxForm: vertical
      position: topRight
      networks: Weibo,Wechat,Douban,QQZone,Twitter,Facebook
关于分享中的微信二维码图片加载失败,感谢[Qcmoke](https://www.qcmoke.site)大佬的解决方案
next 5.1.4版本中微信加载不出二维码,应该是封装好的微信分享链接失效了。我是通过老版本的仓库 github.com/iissnan/hex… 安装的,所以有这个问题,而新版本的next是没有这个问题的。新版本仓库已经搬迁到了https://github.com/theme-next
输入以下命令:
rm -rf themes/next/source/lib/needsharebutton
git clone https://github.com/theme-next/theme-next-needmoreshare2 themes/next/source/lib/needsharebutton
增加站内文章搜索功能
安装插件hexo-generator-searchdb,执行以下命令:
npm install hexo-generator-searchdb --save
修改hexo/_config.yml站点配置文件,末尾新增以下代码:
search:
  path: search.xml
  field: post
  format: html
  limit: 10000
修改themes/next/_config.yml主题配置文件,搜索关键字local_search找到如下代码,将enable设置为true,如下:
local_search:
  enable: true
增加文章字数统计及阅读时常功能
安装插件hexo-wordcount,执行以下命令:
npm install hexo-wordcount --save
修改themes/next/_config.yml主题配置文件,搜索关键字post_wordcount,修改如下:
post_wordcount:
  item_text: true
  wordcount: true #单篇文章字数
  min2read: true #单篇阅读时长
  totalcount: true #站点总字数
  separated_meta: true
增加站点访问统计功能
next主题默认集成了第三方访问统计插件。
修改themes/next/_config.yml主题配置文件,搜索关键字busuanzi_count:
# 不蒜子统计,用于在页脚显示总访客数和总浏览量,将 false 改为 true 就能直接使用
busuanzi_count:
  # count values only if the other configs are false
  enable: true
  # custom uv span for the whole site
  site_uv: true
  site_uv_header: <i class="fa fa-user"></i>
  site_uv_footer:
  # custom pv span for the whole site
  site_pv: true
  site_pv_header: <i class="fa fa-eye"></i>
  site_pv_footer:
  # custom pv span for one page only
  # 页面浏览量,不建议开启,建议用上面的 leancloud_visitors
  # 首先 leancloud 更稳定,其次 leancloud 便于管理
  # 最后,可以利用 leancloud 的 api 建立 TopX 页面
  page_pv: false
  page_pv_header: <i class="fa fa-eye"></i>
  page_pv_footer:
目前不蒜子『dn-lbstatics.qbox.me』域名过期,更换域名到『busuanzi.ibruce.info』!故你可能需要修改>以下文件相关信息:
修改themes/next/layout/_third-party/analytics/busuanzi-counter.swig文件,找到dn-lbstatics.qbox.me,修改代码:
> <script async src="https://busuanzi.ibruce.info/busuanzi/2.3/busuanzi.pure.mini.js"></script>
>
文章置顶功能
移除默认安装的插件:
npm uninstall hexo-generator-index --save
安装新插件:
npm install hexo-generator-index-pin-top --save
最后编辑有这需求的相关文章时,在Front-matter(文件最上方以---分隔的区域)加上一行:
top: true
如果你置顶了多篇,怎么控制顺序呢?设置top的值(大的在前面),比如:
# Post a.md
title: a
top: 1

# Post b.md
title: b
top: 10
文章 b 便会显示在文章 a 的前面。
LeanCloud统计文章阅读数
已有大佬提供,具体详情请戳进 [Hexo博客-NexT主题:使用leancloud进行页面访客统计](https://lfwen.site/2016/05/31/add-count-for-hexo-next/)
文章底部添加打分系统
我是一个搬运工,具体详情请戳进 [超深度优化-5.6小节](https://reuixiy.github.io/technology/computer/computer-aided-art/2017/06/09/hexo-next-optimization.html/)
添加 TopX 页面
懒了懒了,具体详情请戳进 [超深度优化-5.8小节](https://reuixiy.github.io/technology/computer/computer-aided-art/2017/06/09/hexo-next-optimization.html#%E6%B7%BB%E5%8A%A0-TopX-%E9%A1%B5%E9%9D%A2)
评论系统
如果上面你已经注册了LeanCloud(没有注册的点这里),那么只要把appid和appkey设置下即可,修改主题配置文件:
# 评论系统
# Valine.
# You can get your appid and appkey from https://leancloud.cn
# more info please open https://valine.js.org
valine:
  enable: true
  appid:  #your id
  appkey:  #your key
  notify: false # mail notifier , https://github.com/xCss/Valine/wiki
  verify: false # Verification code
  placeholder: Just go go # comment box placeholder
  avatar: mm # gravatar style
  guest_info: nick,mail,link # custom comment header
  pageSize: 10 # pagination size
关于主题更新升级
对于升级主题,我们需要重新配置主题配置文件,那么每次升级都要这么干吗?超麻烦!
NexT作者给我们的建议就是使用[Data Files](https://hexo.io/zh-cn/docs/data-files.html),具体详情请戳进 [Theme configurations using Hexo data files #328](https://github.com/iissnan/hexo-theme-next/issues/328)
贴出以下总结:
- 请先确保你所使用的 Hexo 版本在 3 以上
- 在站点的 source/_data 目录下新建 next.yml 文件(_data目录可能需要新建)
- 迁移站点配置文件和主题配置文件中的配置到 next.yml 中
所有主题相关的配置都可以写到 next.yml 文件中。 主题目录下的 _config.yml 可以不用做任何修改。
若你是新安装的,可以将主题的 _config.yml 里面的内容整个拷贝过去,然后修改即可
若是之前有将配置写在站点的 _config.yml 里,把这个文件里主题相关的配置剪切到 next.yml 里去;同时将主题下 _config.yml 里面的配置也拷贝过去,相当于是全部合并到 next.yml 中去了。
每次修改 _next.yml 需要重启 hexo server 才能生效。
进阶 搜索引擎篇
博客文章写好之后总是无人问津,那是因为搜索引擎并未收录我们的文章
想要搜索引擎收录文章,首先得拥有自己的域名,如何购买域名可参考这篇文章
参考这篇[【域名绑定篇】](http://yangbingdong.com/2017/build-blog-hexo-advanced/#%E5%9F%9F%E5%90%8D%E7%BB%91%E5%AE%9A%E7%AF%87)大佬的配置
关于如何优化请直接参考这篇[【搜索优化】Hexo-next百度和谷歌搜索优化](http://www.ehcoo.com/seo.html)大佬的配置
上一篇好像要翻墙才能访问,看这篇也行[【搜索优化】hexo高阶教程:想让你的博客被更多的人在搜索引擎中搜到吗?](https://blog.csdn.net/sunshine940326/article/details/70936988)大佬的配置
进阶 写作篇
文章模板功能
文章模板功能主要用于通过命令新建文章时,初始化文章设置,参见 Hexo 官方文档的 Front-matter 和页面变量,总结如下:
/* !!!!!!!!!!
** 每一项的 : 后面均有一个空格
** 且 : 为英文符号
** !!!!!!!!!!
*/

title:
/* 文章标题,可以为中文 */

date:
/* 建立日期,如果自己手动添加,请按固定格式
** 就算不写,页面每篇文章顶部的发表于……也能显示
** 只要在主题配置文件中,配置了 created_at 就行
** 那为什么还要自己加上?
** 自定义文章发布的时间
*/

updated:
/* 更新日期,其它与上面的建立日期类似
** 不过在页面每篇文章顶部,是更新于……
** 在主题配置文件中,是 updated_at
*/

permalink:
/* 若站点配置文件下的 permalink 配置了 title
** 则可以替换文章 URL 里面的 title(文章标题)
*/

categories:
/* 分类,支持多级,比如:
- technology
- computer
- computer-aided-art
则为technology/computer/computer-aided-art
(不适用于 layout: page)
*/

tags:
/* 标签
** 多个可以这样写[标签1,标签2,标签3]
** (不适用于 layout: page)
*/

description:
/* 文章的描述,在每篇文章标题下方显示
** 并且作为网页的 description 元数据
** 如果不写,则自动取 <!-- more -->
** 之前的文字作为网页的 description 元数据
** 建议每篇文章都务必加上!
*/

keywords:
/* 关键字,并且作为网页的 keywords 元数据
** 如果不写,则自动取 tags 里的项
** 作为网页的 keywords 元数据
*/

comments:
/* 是否开启评论
** 默认值是 true
** 要关闭写 false
*/

layout:
/* 页面布局,默认值是 post,默认值可以在
** 站点配置文件中修改 default_layout
** 另:404 页面可能用到,将其值改为 false
*/

type:
/* categories,目录页面
** tags,标签页面
** picture,用来生成 group-pictures
** quote?
** https://reuixiy.github.io/uncategorized/2010/01/01/test.html
*/

photos:
/* Gallery support,用来支持画廊 / 相册,用法如下:
- photo_url_1
- photo_url_2
- photo_url_3
https://reuixiy.github.io/uncategorized/2010/01/01/test.html
*/

link:
/* 文章的外部链接
** https://reuixiy.github.io/uncategorized/2010/01/01/test.html
*/

image:
/* 自定义的文章摘要图片,只在页面展示,文章内消失
** 此项只有参考本文 5.14 节配置好,否则请勿添加!
*/

sticky:
/* 文章置顶
** 此项只有参考本文 5.15 节配置好,否则请勿添加!
*/

password:
/* 文章密码,此项只有参考教程:
** http://shenzekun.cn/hexo的next主题个性化配置教程.html
** 第 24 节,配置好,否则请勿添加!
** 发现还是有 bug 的,就是右键在新标签中打开
** 然后无论是否输入密码,都能看到内容
*/
我参考了reuixiy的模板设置:
---
title: {{ title }}
date: {{ date }}
permalink:
categories:
tags: []
description:
image:
---

<img src="https://" alt="" style="width:100%" />

<!-- more -->

##

##

##

<hr />
使用Markdown
Markdown 对程序员实在是太友好了,用了这个语言都喜欢写文档了,基本放弃了鼠标操作。实现了易读易写,刚接触也许会记不住命令,相信我,写上两三篇博文就熟练了。
Markdown 教程:
添加音乐和视频
直接参考这个吧
好玩的写作样式
先在themes/next/source/css/_custom/custom.styl中添加以下样式:
// 按钮样式(为emoji特设)
.btn {
    color: #fff !important;
    text-decoration: none !important;
    border: 2px solid #222 !important;
}
.btn:hover {
    color: #222 !important;
}
// 下载样式
a#download {
display: inline-block;
padding: 0 10px;
color: #000;
background: transparent;
border: 2px solid #000;
border-radius: 2px;
transition: all .5s ease;
font-weight: bold;
&:hover {
background: #000;
color: #fff;
}
}
/ /颜色块-黄
span#inline-yellow {
display:inline;
padding:.2em .6em .3em;
font-size:80%;
font-weight:bold;
line-height:1;
color:#fff;
text-align:center;
white-space:nowrap;
vertical-align:baseline;
border-radius:0;
background-color: #f0ad4e;
}
// 颜色块-绿
span#inline-green {
display:inline;
padding:.2em .6em .3em;
font-size:80%;
font-weight:bold;
line-height:1;
color:#fff;
text-align:center;
white-space:nowrap;
vertical-align:baseline;
border-radius:0;
background-color: #5cb85c;
}
// 颜色块-蓝
span#inline-blue {
display:inline;
padding:.2em .6em .3em;
font-size:80%;
font-weight:bold;
line-height:1;
color:#fff;
text-align:center;
white-space:nowrap;
vertical-align:baseline;
border-radius:0;
background-color: #2780e3;
}
// 颜色块-紫
span#inline-purple {
display:inline;
padding:.2em .6em .3em;
font-size:80%;
font-weight:bold;
line-height:1;
color:#fff;
text-align:center;
white-space:nowrap;
vertical-align:baseline;
border-radius:0;
background-color: #9954bb;
}
// 左侧边框红色块级
p#div-border-left-red {
display: block;
padding: 10px;
margin: 10px 0;
border: 1px solid #ccc;
border-left-width: 5px;
border-radius: 3px;
border-left-color: #df3e3e;
}
// 左侧边框黄色块级
p#div-border-left-yellow {
display: block;
padding: 10px;
margin: 10px 0;
border: 1px solid #ccc;
border-left-width: 5px;
border-radius: 3px;
border-left-color: #f0ad4e;
}
// 左侧边框绿色块级
p#div-border-left-green {
display: block;
padding: 10px;
margin: 10px 0;
border: 1px solid #ccc;
border-left-width: 5px;
border-radius: 3px;
border-left-color: #5cb85c;
}
// 左侧边框蓝色块级
p#div-border-left-blue {
display: block;
padding: 10px;
margin: 10px 0;
border: 1px solid #ccc;
border-left-width: 5px;
border-radius: 3px;
border-left-color: #2780e3;
}
// 左侧边框紫色块级
p#div-border-left-purple {
display: block;
padding: 10px;
margin: 10px 0;
border: 1px solid #ccc;
border-left-width: 5px;
border-radius: 3px;
border-left-color: #9954bb;
}
// 右侧边框红色块级
p#div-border-right-red {
display: block;
padding: 10px;
margin: 10px 0;
border: 1px solid #ccc;
border-right-width: 5px;
border-radius: 3px;
border-right-color: #df3e3e;
}
// 右侧边框黄色块级
p#div-border-right-yellow {
display: block;
padding: 10px;
margin: 10px 0;
border: 1px solid #ccc;
border-right-width: 5px;
border-radius: 3px;
border-right-color: #f0ad4e;
}
// 右侧边框绿色块级
p#div-border-right-green {
display: block;
padding: 10px;
margin: 10px 0;
border: 1px solid #ccc;
border-right-width: 5px;
border-radius: 3px;
border-right-color: #5cb85c;
}
// 右侧边框蓝色块级
p#div-border-right-blue {
display: block;
padding: 10px;
margin: 10px 0;
border: 1px solid #ccc;
border-right-width: 5px;
border-radius: 3px;
border-right-color: #2780e3;
}
// 右侧边框紫色块级
p#div-border-right-purple {
display: block;
padding: 10px;
margin: 10px 0;
border: 1px solid #ccc;
border-right-width: 5px;
border-radius: 3px;
border-right-color: #9954bb;
}
// 上侧边框红色
p#div-border-top-red {
display: block;
padding: 10px;
margin: 10px 0;
border: 1px solid #ccc;
border-top-width: 5px;
border-radius: 3px;
border-top-color: #df3e3e;
}
// 上侧边框黄色
p#div-border-top-yellow {
display: block;
padding: 10px;
margin: 10px 0;
border: 1px solid #ccc;
border-top-width: 5px;
border-radius: 3px;
border-top-color: #f0ad4e;
}
// 上侧边框绿色
p#div-border-top-green {
display: block;
padding: 10px;
margin: 10px 0;
border: 1px solid #ccc;
border-top-width: 5px;
border-radius: 3px;
border-top-color: #5cb85c;
}
// 上侧边框蓝色
p#div-border-top-blue {
display: block;
padding: 10px;
margin: 10px 0;
border: 1px solid #ccc;
border-top-width: 5px;
border-radius: 3px;
border-top-color: #2780e3;
}
// 上侧边框紫色
p#div-border-top-purple {
display: block;
padding: 10px;
margin: 10px 0;
border: 1px solid #ccc;
border-top-width: 5px;
border-radius: 3px;
border-top-color: #9954bb;
}
文字增加背景色块
站点配置文件,主题配置文件
<span id="inline-blue">站点配置文件</span>,
<span id="inline-purple">主题配置文件</span>
引用边框变色
如果没有安装成功,那可能就是墙的原因。建议下载 `Node.js` 直接安装。
关于更多基本操作和基础知识,请查阅 [Hexo](https://hexo.io/zh-cn/) 与 [NexT](http://theme-next.iissnan.com/) 官方文档.
<p id="div-border-left-red">如果没有安装成功,那可能就是墙的原因。建议下载 `Node.js` 直接安装。</p>
<p id="div-border-top-blue">关于更多基本操作和基础知识,请查阅 [Hexo](https://hexo.io/zh-cn/) 与 [NexT](http://theme-next.iissnan.com/) 官方文档.</p>
主题自带样式
NexT 主题自带的标签样式,请点击:theme-next.iissnan.com/tag-plugins…
文本居中引用
效果: {% cq %} 人生乃是一面镜子, 从镜子里认识自己, 我要称之为头等大事, 也只是我们追求的目的! {% endcq %}
代码:
{% cq %}
人生乃是一面镜子,
从镜子里认识自己,
我要称之为头等大事,
也只是我们追求的目的!
{% endcq %}
引用块
效果: {% blockquote David Levithan, Wide Awake %} Do not just seek happiness for yourself. Seek happiness for all. Through kindness. Through mercy. {% endblockquote %}
代码:
{% blockquote David Levithan, Wide Awake %}
Do not just seek happiness for yourself. Seek happiness for all. Through kindness. Through mercy.
{% endblockquote %}
效果: {% blockquote @DevDocs twitter.com/devdocs/sta… %} NEW: DevDocs now comes with syntax highlighting. devdocs.io {% endblockquote %}
代码:
{% blockquote @DevDocs https://twitter.com/devdocs/status/356095192085962752 %}
NEW: DevDocs now comes with syntax highlighting. http://devdocs.io
{% endblockquote %}
主题自带样式 note 标签
default
<div class="note default"><p>default</p></div>
primary
<div class="note primary"><p>primary</p></div>
success
<div class="note success"><p>success</p></div>
info
<div class="note info"><p>info</p></div>
warning
<div class="note warning"><p>warning</p></div>
danger
<div class="note danger"><p>danger</p></div>
<div class="note danger no-icon"><p>danger no-icon</p></div>
可以在 主题配置文件 中需要配置下:
# Note tag (bs-callout).
note:
  # 风格
  style: flat
  # 要不要图标
  icons: true
  # 圆角矩形
  border_radius: 3
  light_bg_offset:
主题自带样式 label 标签
可以在 主题配置文件 中需要配置下:
# Label tag.
label: true
效果如下(@ 前面的是label的名字,后面的是要显示的文字):
- {% label default@default %}
{% label default@default %}
可以将default换成primary,success,info,warning,danger,试试效果吧!
主题自带样式 tabs 标签
可以在 主题配置文件 中需要配置下:
# Tabs tag.
tabs:
  enable: true
  transition:
    tabs: true
    labels: true
  border_radius: 0
效果: {% tabs 选项卡, 2 %}
这是选项卡 1 呵呵哈哈哈哈哈哈哈哈呵呵哈哈哈哈哈哈哈哈呵呵哈哈哈哈哈哈哈哈呵呵哈哈哈哈哈哈哈哈呵呵哈哈哈哈哈哈哈哈呵呵哈哈哈哈哈哈哈哈……
这是选项卡 2
这是选项卡 3 哇,你找到我了!φ(≧ω≦*)♪~
{% endtabs %} 源码:
{% tabs 选项卡, 2 %}
<!-- tab -->
**这是选项卡 1** 呵呵哈哈哈哈哈哈哈哈呵呵哈哈哈哈哈哈哈哈呵呵哈哈哈哈哈哈哈哈呵呵哈哈哈哈哈哈哈哈呵呵哈哈哈哈哈哈哈哈呵呵哈哈哈哈哈哈哈哈……
<!-- endtab -->
<!-- tab -->
**这是选项卡 2**
<!-- endtab -->
<!-- tab -->
**这是选项卡 3** 哇,你找到我了!φ(≧ω≦*)♪~
<!-- endtab -->
{% endtabs %}
说明:源码中, 2表示一开始在第二个选项卡,非必须,若数值为-1则隐藏选项卡内容。更多用法请查看这个页面。
主题自带样式 按钮
源码:
{% btn https://www.baidu.com, 点击下载百度, download fa-lg fa-fw %}
效果: {% btn www.baidu.com, 点击下载百度, download fa-lg fa-fw %}
关于按钮的更多使用可以前往这个页面查看。
<a id="download" href="https://git-scm.com/download/win"><i class="fa fa-download"></i><span> Download Now</span>
</a>
效果: Download Now
这也是调用了Font Awesome的方法。
在文档中增加图标
- 支持Markdown Hexo 支持 GitHub Flavored Markdown 的所有功能,甚至可以整合 Octopress 的大多数插件。
- 一件部署 只需一条指令即可部署到Github Pages,或其他网站
- 丰富的插件 Hexo 拥有强大的插件系统,安装插件可以让 Hexo 支持 Jade, CoffeeScript。
- <i class="fa fa-pencil"></i>支持Markdown
<i>Hexo 支持 GitHub Flavored Markdown 的所有功能,甚至可以整合 Octopress 的大多数插件。</i>
- <i class="fa fa-cloud-upload"></i>一件部署
<i>只需一条指令即可部署到Github Pages,或其他网站</i>
- <i class="fa fa-cog"></i>丰富的插件
<i>Hexo 拥有强大的插件系统,安装插件可以让 Hexo 支持 Jade, CoffeeScript。</i>
<i class="fa fa-github"></i>
<i class="fa fa-github fa-lg"></i>
<i class="fa fa-github fa-2x"></i>
采用的是Font Awesome的图标。
自定义样式引用
需加入themes/next/source/css/_custom/custom.styl的代码:
// 自定义的引用样式
blockquote.question {
    color: #555;#颜色
    border-left: 4px solid rgb(16, 152, 173);#边框粗细
    background-color: rgb(227, 242, 253);#背景色
    border-top-right-radius: 3px;
    border-bottom-right-radius: 3px;
    margin-bottom: 20px;
}
效果:
内容
<blockquote class="question">内容</blockquote>
自定义样式 数字块
需加入themes/next/source/css/_custom/custom.styl的代码:
// 自定义的数字块
span#inline-toc {
    display: inline-block;
    border-radius: 80% 100% 90% 20%;
    background-color: rgb(227, 242, 253);
    color: #555;
    padding: 0.05em 0.4em;
    margin: 2px 5px 2px 0px;
    line-height: 1.5;
}
效果: 1.
<span id="inline-toc">1.</span>
写在最后
太累了~~,虽然这篇文章自己写的很少,大部分都是参考大佬的,但是文中的所有配置我都用到了自己博客中,算是都试了个遍,然后重新排版。如果对文中的功能有不清楚的也可以留言。文章最后贴出了参考的文章,Google的实在太多了,如有遗漏请见谅~
已经打造了一副好皮囊,接下来的任务就是赋予它一个有趣的灵魂了。
搭建博客的原因就是为了能让自己保持不断地思考,将所学所得持续输出,保持好奇,学无止境~各位共勉!
参考:
