

本文讨论LSTM网络的Pytorch实现,兼论Pytorch库的代码组织方式和架构设计。
LSTM
LSTM是一种循环神经网络,适用于对序列化的输入建模。Chris Olah的这篇文章细致地解释了一个LSTM单元的运作方式,建议阅读。
两个想法
Gate:信息流动的闸门
i t = s i g m o i d ( W x i x t + W h i h t − 1 + b i )" role="presentation">it=sigmoid(Wxixt+Whiht−1+bi) i t = s i g m o i d ( W x i x t + W h i h t − 1 + b i )f t = s i g m o i d ( W x f x t + W h f h t − 1 + b f )" role="presentation">ft=sigmoid(Wxfxt+Whfht−1+bf) f t = s i g m o i d ( W x f x t + W h f h t − 1 + b f )
o t = s i g m o i d ( W x o x t + W h o h t − 1 + b o )" role="presentation">ot=sigmoid(Wxoxt+Whoht−1+bo) o t = s i g m o i d ( W x o x t + W h o h t − 1 + b o )
x" role="presentation">
Cell:记忆池
c t = f t ⊙ c t − 1 + i t ⊙ t a n h ( W x c x t + W h c h t − 1 + b c ) h t = o t ⊙ t a n h ( c t )" role="presentation">ct=ft⊙ct−1+it⊙tanh(Wxcxt+Whcht−1+bc) ht=ot⊙tanh(ct) c t = f t ⊙ c t − 1 + i t ⊙ t a n h ( W x c x t + W h c h t − 1 + b c ) h t = o t ⊙ t a n h ( c t )h" role="presentation">
与普通RNN的对比
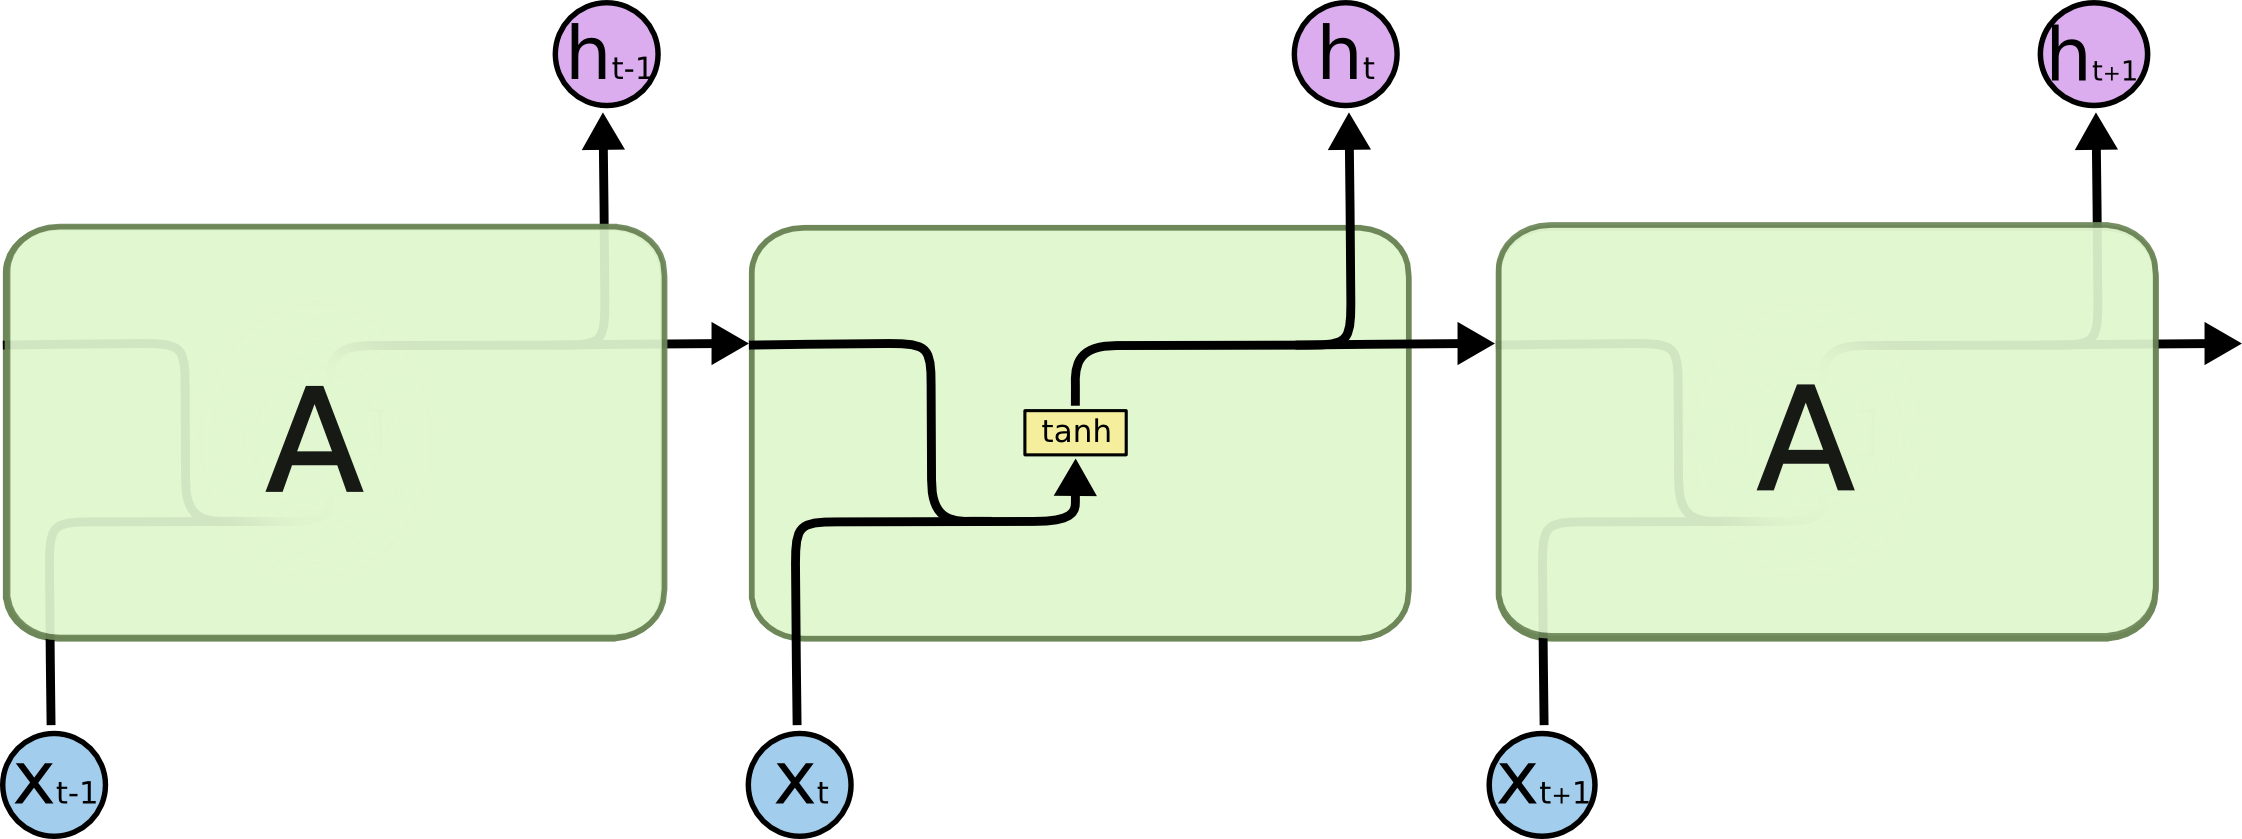
普通RNN只有一个自更新的隐藏状态单元。

LSTM增加了记忆池Cell,并通过几个Gate将信息有控制地更新在记忆池中,并通过记忆池中的信息来决定隐藏状态。
From Scratch
下面是手动实现LSTM的代码,继承了基类nn.Module。
import torch.nn as nn
import torch
from torch.autograd import Variable

class LSTM(nn.Module):
    def __init__(self, input_size, hidden_size, cell_size, output_size):
        super(LSTM, self).__init__()
        self.hidden_size = hidden_size
        self.cell_size = cell_size
        self.gate = nn.Linear(input_size + hidden_size, cell_size)
        self.output = nn.Linear(hidden_size, output_size)
        self.sigmoid = nn.Sigmoid()
        self.tanh = nn.Tanh()
        self.softmax = nn.LogSoftmax()

    def forward(self, input, hidden, cell):
        combined = torch.cat((input, hidden), 1)
        f_gate = self.gate(combined)
        i_gate = self.gate(combined)
        o_gate = self.gate(combined)
        f_gate = self.sigmoid(f_gate)
        i_gate = self.sigmoid(i_gate)
        o_gate = self.sigmoid(o_gate)
        cell_helper = self.gate(combined)
        cell_helper = self.tanh(cell_helper)
        cell = torch.add(torch.mul(cell, f_gate), torch.mul(cell_helper, i_gate))
        hidden = torch.mul(self.tanh(cell), o_gate)
        output = self.output(hidden)
        output = self.softmax(output)
        return output, hidden, cell

    def initHidden(self):
        return Variable(torch.zeros(1, self.hidden_size))

    def initCell(self):
        return Variable(torch.zeros(1, self.cell_size))
几个关键点:
- Tensor的大小
- 信息的传递顺序
Pytorch Module
Pytorch库本身对LSTM的实现封装了更多功能,类和函数的组织也非常有借鉴意义。我对其实现的理解基于以下两点展开:
- 胞(cell)、层(layer)、栈(stacked layer)的层次化解耦,每一层抽象处理一部分参数(结构)
- 函数句柄的传递:处理好参数后返回函数句柄
forward
下面开始按图索骥,源码见GitHub。
LSTM类
# nn/modules/rnn.py
class RNNBase(Module):
  def __init__(self, mode, input_size, output_size):
      pass
  def forward(self, input, hx=None):
      if hx is None:
          hx = torch.autograd.Variable()
      if self.mode == 'LSTM':
          hx = (hx, hx)
      func = self._backend.RNN() #!!!
      output, hidden = func(input, self.all_weights, hx) #!!!
      return output, hidden

class LSTM(RNNBase):
    def __init__(self, *args, **kwargs):
super(LSTM, self).__init__('LSTM', *args, **kwargs)LSTM类只是RNNBase类的一个装饰器。- 在基类
nn.Module中,把__call__()定义为调用forward()方法,因而真正的功能实现在_backend.RNN()中
AutogradRNN函数
下面寻找_backend.RNN。
文件:nn/backends/thnn.py
# nn/backends/thnn.py
def _initialize_backend():
from .._functions.rnn import RNN, LSTMCell原来,_backend也是索引。
终于找到RNN()函数。
文件:nn/_functions/rnn.py
# nn/_functions/rnn.py
def RNN(*args, **kwargs):
    def forward(input, *fargs, **fkwargs):
        func = AutogradRNN(*args, **kwargs)
        return func(input, *fargs, **fkwargs)
    return forward

def AutogradRNN(mode, input_size, hidden_size):
    cell = LSTMCell
    rec_factory = Recurrent
    layer = (rec_factory(cell),)
    func = StackedRNN(layer, num_layers)
    def forward(input, weight, hidden):
        nexth, output = func(input, hidden, weight)
        return output, nexth
return forwardRNN()是一个装饰器,根据是否有cudnn库决定调用AutogradRNN()还是CudnnRNN(),这里仅观察AutogradRNN()AutogradRNN()选用了LSTMCell,用Recurrent()函数处理了Cell构成Layer,再将Layer传入StackedRNN()函数RNN()和AutogradRNN()返回的都是其forward()函数句柄
下面是Recurrent()函数:
def Recurrent(inner):
    def forward(input, hidden, weight):
        output = []
        steps = range(input.size(0) - 1, -1, -1)
        for i in steps:
            hidden = inner(input[i], hidden, *weight)
            output.append(hidden[0])
        return hidden, output
return forwardRecurrent()函数实现了“递归”的结构,根据输入的大小组合Cell,完成了隐藏状态和参数的迭代。Recurrent()函数将Cell(inner)组合为Layer。
StackedRNN()函数
def StackedRNN(inners, num_layers):
    num_directions = len(inners)
    total_layers = num_layers * num_directions
    def forward(input, hidden, weight):
        next_hidden = []
        hidden = list(zip(*hidden))
        for i in range(num_layers):
          all_output = []
          for j, inner in enumerate(inners):
              hy, output = inner(input, hidden[l], weight[l])
              next_hidden.append(hy)
              all_output.append(output)
          input = torch.cat(all_output, input.dim() - 1)
        next_h, next_c = zip(*next_hidden)
        next_hidden = (torch.cat(next_h, 0).view(total_layers, *next_h[0].size()),
                  torch.cat(next_c, 0).view(total_layers, *next_c[0].size()))
        return next_hidden, input
return forwardStackedRNN()函数将Layer(inner)组合为栈
最后的最后,一个基本的LSTM单元内的计算由LSTMCell()函数实现。
LSTMCell()函数
def LSTMCell(input, hidden, w_ih, w_hh, b_ih=None, b_hh=None):
    if input.is_cuda:
        igates = F.linear(input, w_ih)
        hgates = F.linear(hidden[0], w_hh)
        state = fusedBackend.LSTMFused()
        return state(igates, hgates, hidden[1]) if b_ih is None else state(igates, hgates, hidden[1], b_ih, b_hh)

    hx, cx = hidden
    gates = F.linear(input, w_ih, b_ih) + F.linear(hx, w_hh, b_hh)

    ingate, forgetgate, cellgate, outgate = gates.chunk(4, 1)

    ingate = F.sigmoid(ingate)
    forgetgate = F.sigmoid(forgetgate)
    cellgate = F.tanh(cellgate)
    outgate = F.sigmoid(outgate)

    cy = (forgetgate * cx) + (ingate * cellgate)
    hy = outgate * F.tanh(cy)

    return hy, cy
观察上面的代码,即是LSTM的基本信息传递公式。至此,我们的旅程完成。
小结
没有什么是增加一层抽象不能解决的,如果不能,那就再加一层。
重复一下我对上述代码的理解:
- 胞(cell)、层(layer)、栈(stacked layer)的层次化解耦,每一层抽象处理一部分参数(结构)
- 函数句柄的传递:处理好参数后返回函数句柄
forward
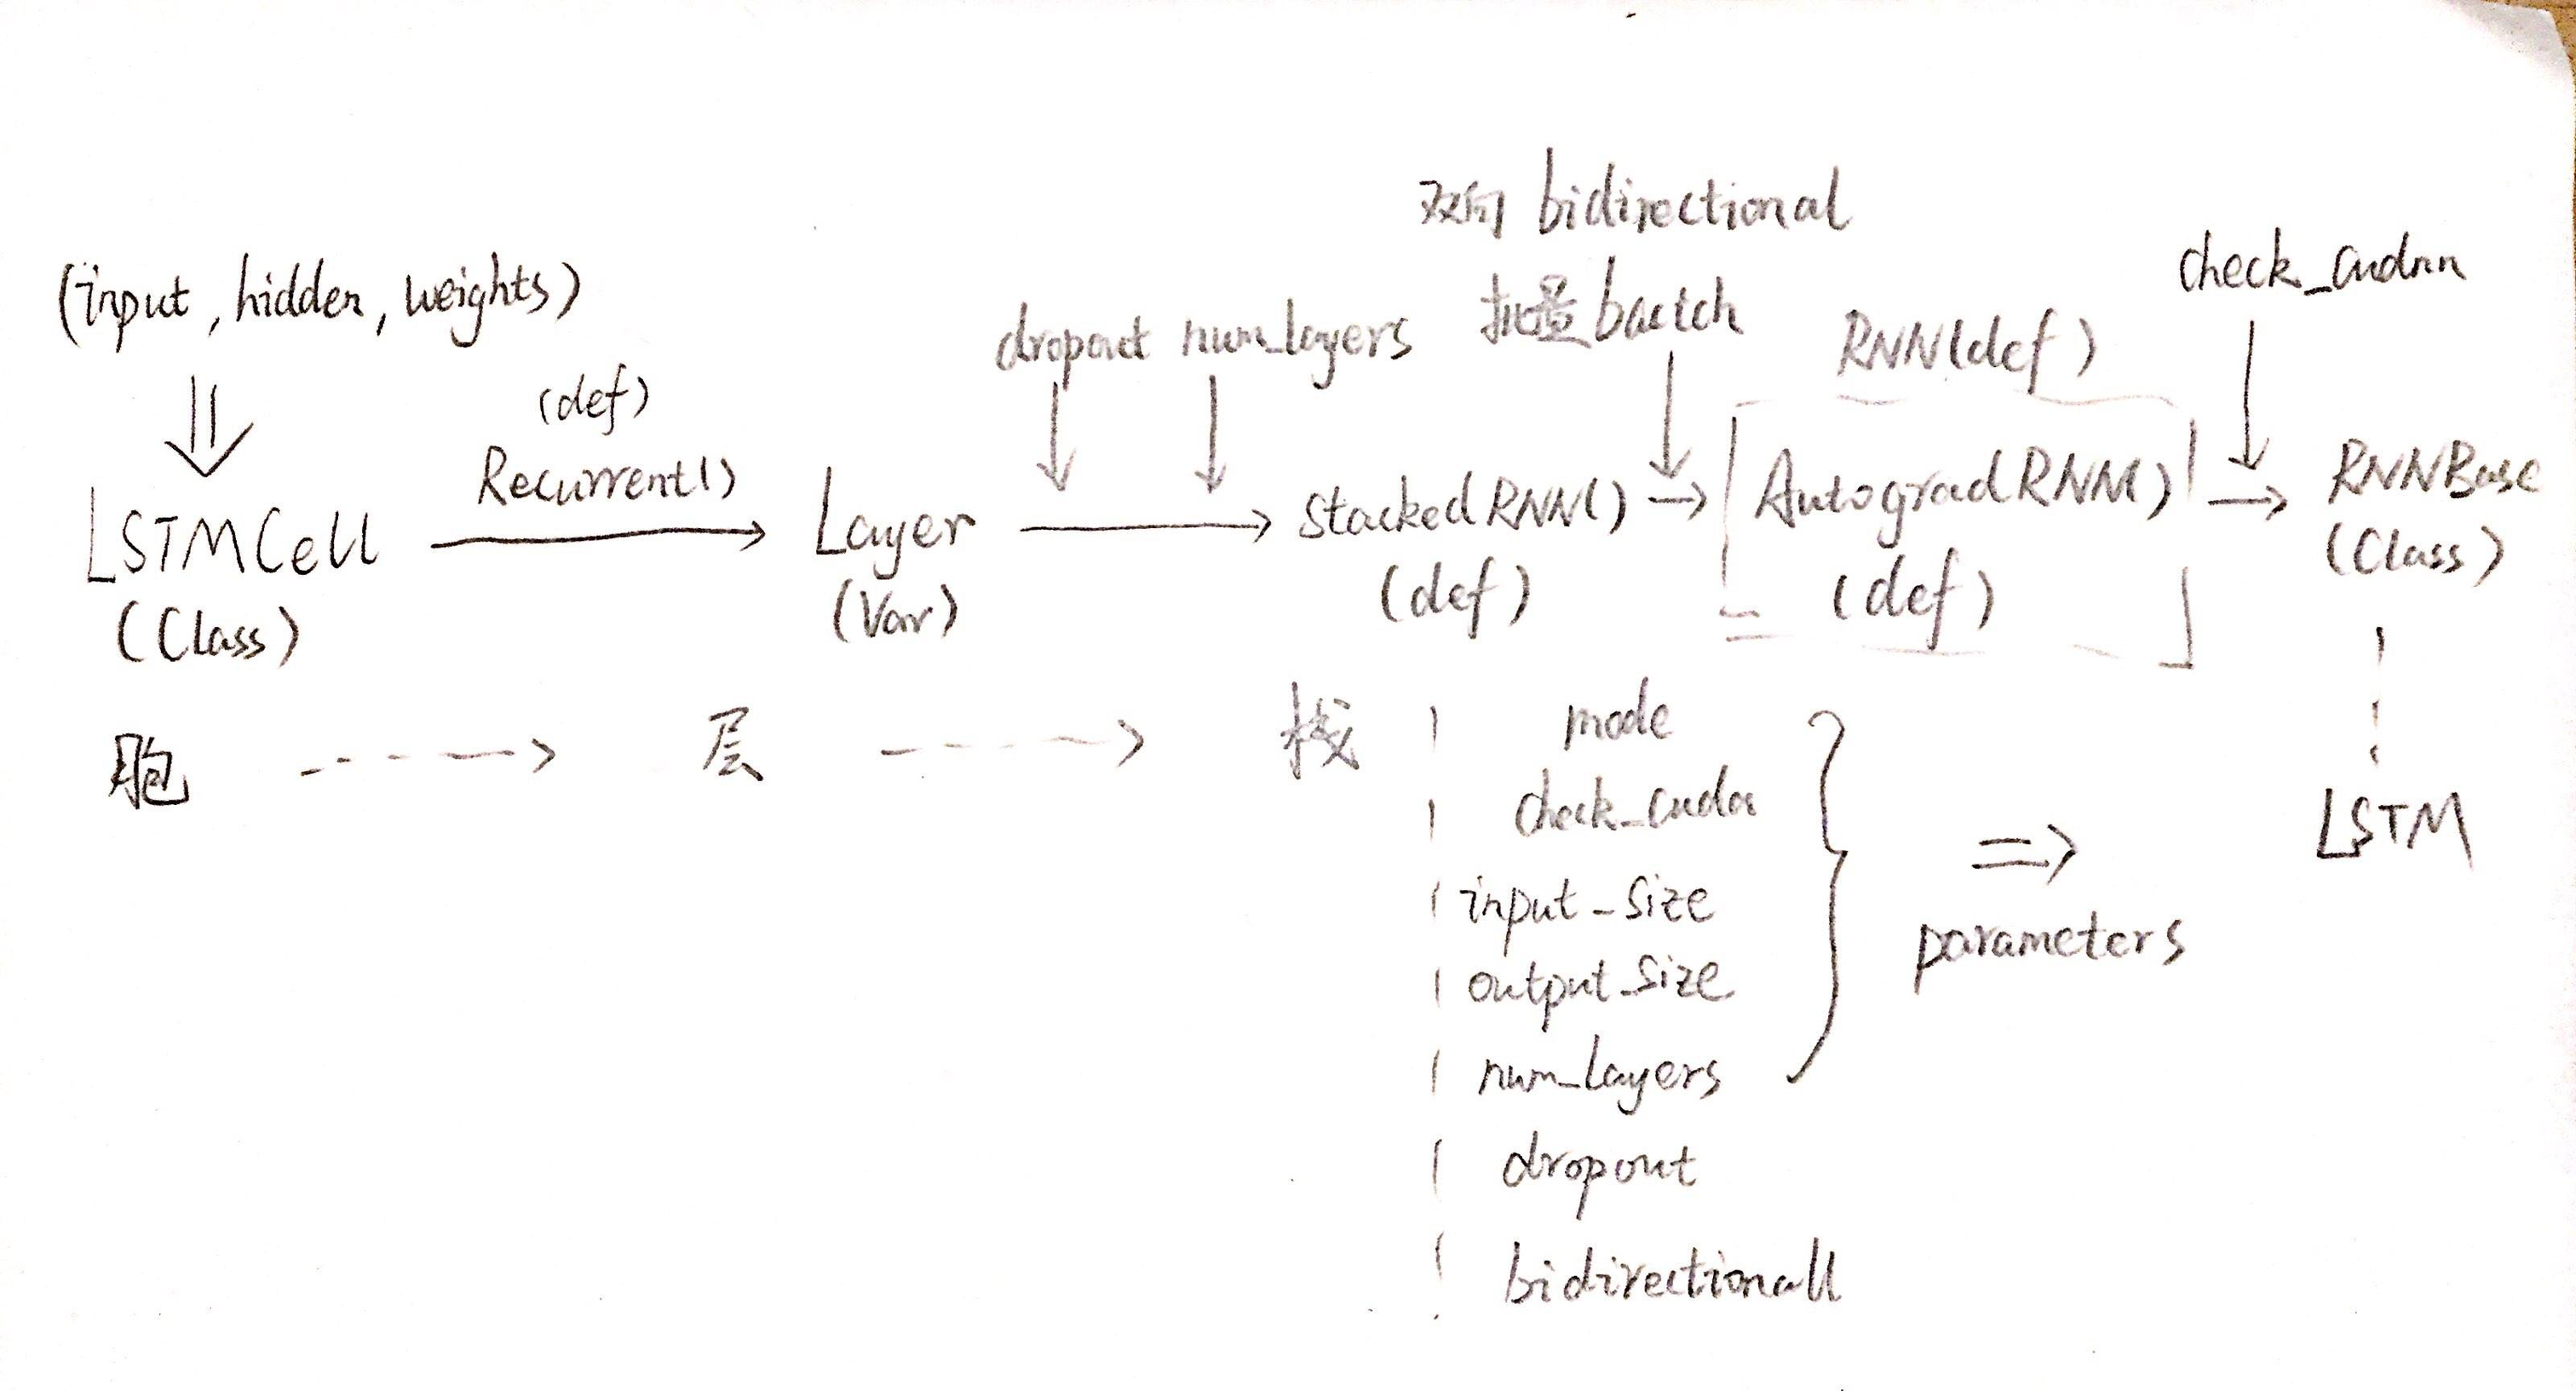
如洋葱一般,我们剥到最后,发现处理的信息正是输入、隐藏状态和LSTM单元几个控制门的参数。在一层一层的抽象之中,Pytorch在不同的层面处理了不同的参数,保证了扩展性和抽象层之间的解耦。
@ddlee
本文章遵从 Creative Commons Attribution-ShareAlike 4.0 International License。
这意味着您可以署名转载本文章,并附上此协议。
如果您想定期获得关于我的博客文章的更新,欢迎订阅东东月报。
本文链接: blog.ddlee.cn/posts/7b453…
