

Mutation
更改 Vuex 的 store 中的状态的唯一方法是提交 mutation。
需要调用 store.commit 方法来触发mutation
const store = new Vuex.Store({
  state: {
    count: 0
  },
  mutations: {
    add(state) {
      state.count++
    }
  }
})
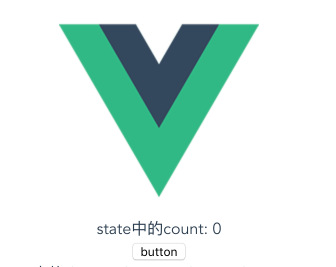
在组件中调用如下:
<div> state中的count: {{ count }}</div>
<button @click="btnClick">button</button>

 export default {
 // ...
 methods: {
      btnClick() {
         this.$store.commit('add')
      }
    }
 }
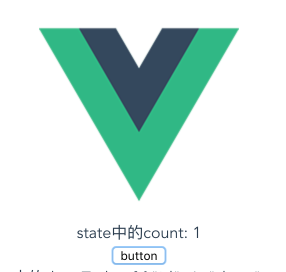
点击按钮效果如下:
传参:
mutations: {
    add(state, num) {
      state.count += num
    }
  }
 methods: {
      btnClick() {
         this.$store.commit('add',5)
      }
    }
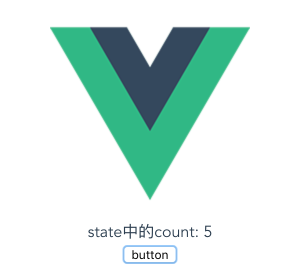
点击按钮效果入下:
注意Mutation 必须是同步函数.
Action
Action 提交的是 mutation,而不是直接变更状态
Action 可以包含任意异步操作。
const store = new Vuex.Store({
  state: {
    count: 0
  },
  mutations: {
    add(state) {
      state.count++;
    }
  },
  actions: {
    actionAdd({
      commit
    }) {
      commit('add')
    }
  }
})
在组件中通过store.dispatch触发actions
 methods: {
      btnClick() {
        this.$store.dispatch('actionAdd');
      }
    }
结果可以看到于count依然可以累加,最后看一个实战运用,我们调一个登陆接口获取username.
const store = new Vuex.Store({
  state: {
    userName: '请先登录'
  },

  mutations: {
    setName(state, name) {
      state.userName = name
    }
  },
  actions: {
    async login({
      commit
    }) {
      let data = {
        email: "jeff.sun@ocheng.me",
        password: "12345678"
      }
      let res = await axios.post(url, data)
      commit('setName', res.data.data.nickname)
      return res
    }
  }
})
组件中:
<div> 用户名: {{ userName }}</div>
<button @click="btnClick">登陆</button>

 export default {
    data() {
      return {
      };
    },
    computed: {
       ...mapState({
         userName: state => state.userName
       })
    },
    btnClick() {
         this.$store.dispatch('login')
      }
 }
效果如下:

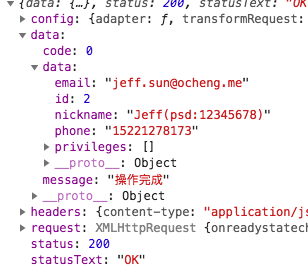
点击登陆按钮, 服务器返回json数据如下:
拿到数据后更新state中的属性,渲染到页面上:

Vuex基本的用法基本都介绍完了,在真正的项目中Store实例肯定不会直接写在mian.js中,我们可以创建一个store文件夹,将js模块都拆分出来,这里就不介绍了,有兴趣的可以了解一下.
├── index.html
├── main.js
├── components
│   ├── App.vue
│   └── ...
└── store
    ├── index.js          # 我们组装模块并导出 store 的地方
    ├── actions.js        # 根级别的 action
    ├── mutations.js      # 根级别的 mutation
    └── modules
        ├── cart.js       # 购物车模块
        └── products.js   # 产品模块
