

问题是什么
前段时间遇到了一个奇怪的问题,让我惊呆了。在搞清楚了原因之余,我决定顺藤摸瓜,把藤上的每只瓜撸清楚。这篇文章记录了整个过程。
直接来看个例子,先看代码:
public class DrawableCacheMainActivity extends AppCompatActivity {
    private ImageView mIvImg;
    private Button mBtnNextPage;
    @Override
    protected void onCreate(@Nullable Bundle savedInstanceState) {
        super.onCreate(savedInstanceState);
        setContentView(R.layout.activity_drawable_cache_main);
        setTitle("Drawable缓存验证");
        mIvImg = (ImageView) findViewById(R.id.iv_img);
        mBtnNextPage = (Button) findViewById(R.id.btn_next_page);
        mIvImg.setOnClickListener(new View.OnClickListener() {
            @Override
            public void onClick(View v) {
				mIvImg.setImageDrawable(getResources().getDrawable(R.drawable.ic_drawable_cache));
                Toast.makeText(DrawableCacheMainActivity.this, "refreshed", Toast.LENGTH_SHORT).show();
            }
        });
        mBtnNextPage.setOnClickListener(new View.OnClickListener() {
            @Override
            public void onClick(View v) {
                startActivity(new Intent(DrawableCacheMainActivity.this, DrawableCacheNextActivity.class));
            }
        });
    }
}
很简单的一个页面,有两个ImageView,分别加载了同样的一张图片。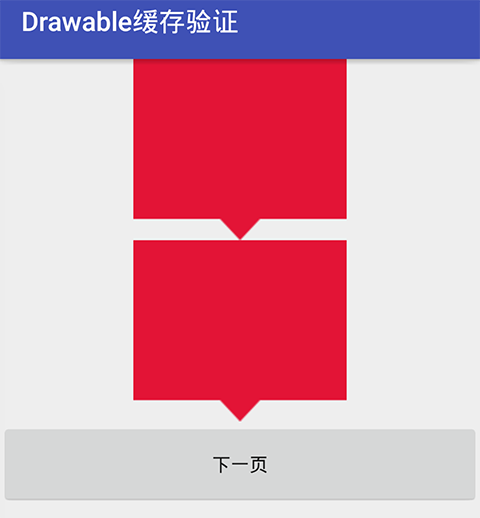
点击下一页按钮,打开了第二个页面:
public class DrawableCacheNextActivity extends AppCompatActivity {
    private ImageView mIvImg;
    @Override
    protected void onCreate(@Nullable Bundle savedInstanceState) {
        super.onCreate(savedInstanceState);
        setContentView(R.layout.activity_drawable_cache_next);
        setTitle("设置alpha值");
        mIvImg = (ImageView) findViewById(R.id.iv_img);
        mIvImg.getDrawable().setAlpha(128);
    }
}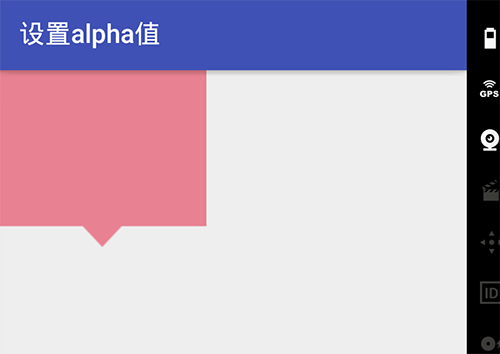
也很简单啊,这个页面同样加载了相同的一张资源图片,并且直接设置了alpha透明度。
这个时候,让我们返回到上个页面:
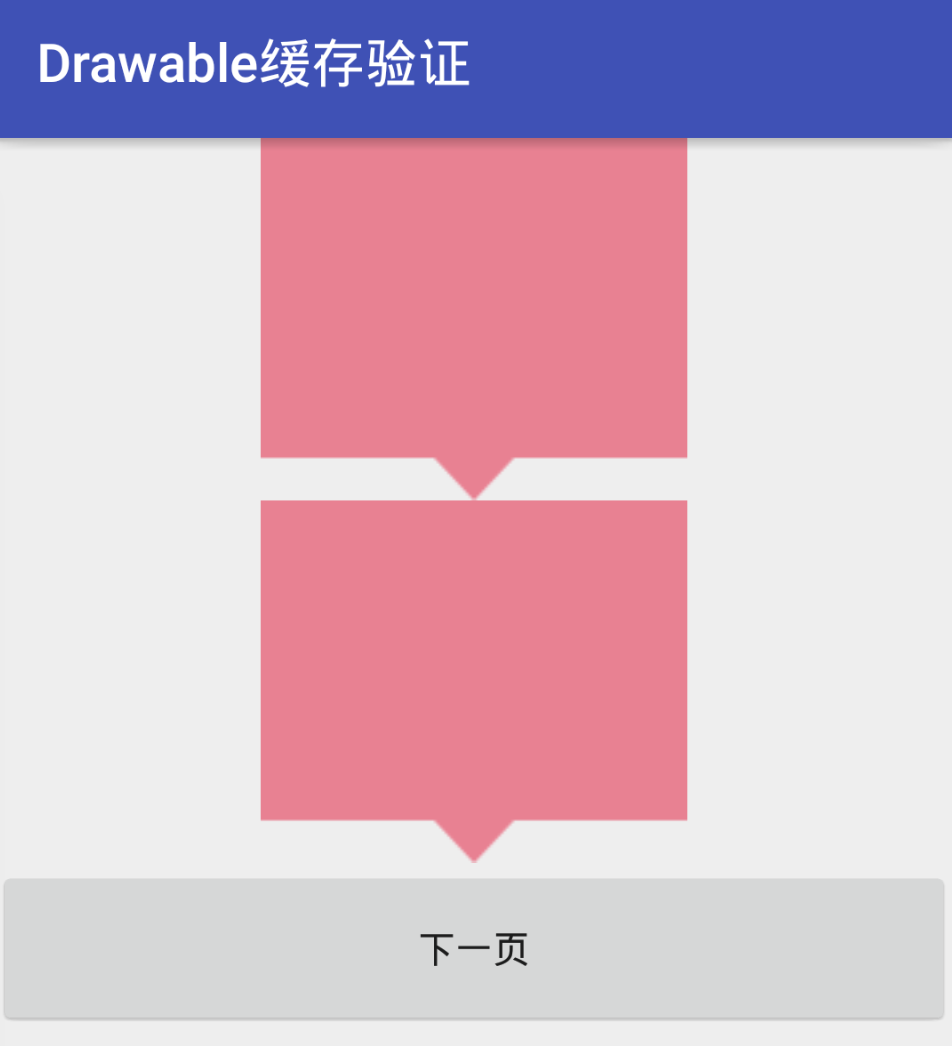
问题来了,好像全局的相同资源的图片的alpha值都自动被改掉了,看起来好像有缓存。基于这个问题,我们来摸一摸藤上的其他几只瓜。
藤上有这些瓜
- 当我们在xml里通过src属性为某个ImageView设置了资源图片,或者在代码里设置了drawable,图片具体是怎么生效的?
- 同一个资源加载而来的drawable对象好像真的有缓存,是真的吗,内部是怎么存储的?
- 有什么办法能做到对某个drawable单独设置alpha而不影响其他的drawable?
详细分析
问题1
先看代码设置drawable的方式。
ImageView.java
    /**
     * Sets a Bitmap as the content of this ImageView.
     * @param bm The bitmap to set
     */
    @android.view.RemotableViewMethod
    public void setImageBitmap(Bitmap bm) {
        // Hacky fix to force setImageDrawable to do a full setImageDrawable
        // instead of doing an object reference comparison
        mDrawable = null;
        if (mRecycleableBitmapDrawable == null) {
            mRecycleableBitmapDrawable = new BitmapDrawable(mContext.getResources(), bm);
        } else {
            mRecycleableBitmapDrawable.setBitmap(bm);
        }
        setImageDrawable(mRecycleableBitmapDrawable);
    }
ImageView.java
/**
* Sets a drawable as the content of this ImageView.
* @param drawable the Drawable to set, or {@code null} to clear the content
*/
public void setImageDrawable(@Nullable Drawable drawable) {
if (mDrawable != drawable) {
mResource = 0;
mUri = null;
final int oldWidth = mDrawableWidth;
final int oldHeight = mDrawableHeight;
updateDrawable(drawable);
if (oldWidth != mDrawableWidth || oldHeight != mDrawableHeight) {
requestLayout();
}
invalidate();
}
}从ImageView的源码里翻到了两个方法:setImageBitmap和setImageDrawable,可以看到setImageBitmap内部调用了setImageDrawable,而setImageDrawable内部调用了updateDrawable方法,来看看这个方法:
  private void updateDrawable(Drawable d) {
// 省略一坨代码
      mDrawable = d;
      if (d != null) {
          d.setCallback(this);
          // 省略一坨代码
          applyColorMod();
	// 。。。
      }
      // 省略一坨代码
  }
把当前ImageView作为入参设置给setCallback方法。这个方法很重要,我们先卖个关子。
把drawable赋值给ImageView内部的mDrawable对象。
再执行applyColorMod方法,这个方法也很重要,我们后面再讲。
回到setImageDrawable方法,在方法的末尾执行了invalidate,大家都知道这会触发View的重绘制,于是我们看下ImageView的onDraw方法:
  @Override
  protected void onDraw(Canvas canvas) {
      super.onDraw(canvas);
// 省略一坨代码
      if (mDrawMatrix == null && mPaddingTop == 0 && mPaddingLeft == 0) {
          mDrawable.draw(canvas);
      } else {
	// 省略一坨代码
          mDrawable.draw(canvas);
          // ...
      }
  }
其他我不管,反正我只看到了mDrawable.draw(canvas)这句话,这里就是drawable对象被设置到ImageView上的地方了。
好了,代码里设置drawable是怎么生效的我们明白了,接下来看下xml里通过src参数配置的drawable资源是如何生效的,让我们继续到源码海洋里游一圈。
我们知道,加载xml布局是LayoutInflater干的活,那就直接来看看这个类好了,最常用的inflate方法:
LayoutInflater.java
public View inflate(@LayoutRes int resource, @Nullable ViewGroup root, boolean attachToRoot) {
		final Resources res = getContext().getResources();
        // 省略几行代码
        final XmlResourceParser parser = res.getLayout(resource);
        // ...
            return inflate(parser, root, attachToRoot);
        // ...
    }
嗯,构建了一个Resource类,这个类挺重要,内部持有了一个ResourceImpl实现类,很多对资源的加载操作都是由他来进行的。
然后是inflate重载方法,其内部调用了createViewFromTag方法:
LayoutInflater.java
View createViewFromTag(View parent, String name, Context context, AttributeSet attrs, boolean ignoreThemeAttr) {
		// 省略一坨代码
        try {
            View view;
            // 先尝试从Factory来加载View,如果Factory存在的话
            if (mFactory2 != null) {
                view = mFactory2.onCreateView(parent, name, context, attrs);
            } else if (mFactory != null) {
                view = mFactory.onCreateView(name, context, attrs);
            } else {
                view = null;
            }
            if (view == null && mPrivateFactory != null) {
                view = mPrivateFactory.onCreateView(parent, name, context, attrs);
            }
			// 加载失败的话,再通过createView来加载
            if (view == null) {
                final Object lastContext = mConstructorArgs[0];
                mConstructorArgs[0] = context;
                try {
                    if (-1 == name.indexOf('.')) {
                        view = onCreateView(parent, name, attrs);
                    } else {
                        view = createView(name, null, attrs);
                    }
                } finally {
                    mConstructorArgs[0] = lastContext;
                }
            }
            return view;
        } catch (。。。) {
			// 省略一坨代码
        }
    }
这里提一点,Factory是很有用的类,可以实现全局替换某个View为自己的View,这里不展开讲。
onCreateView内部最终调用的是createView方法:
public final View createView(String name, String prefix, AttributeSet attrs)
            throws ClassNotFoundException, InflateException {
		// 省略一坨代码
        try {
        	// 省略一坨代码
        	clazz = mContext.getClassLoader().loadClass(
					prefix != null ? (prefix + name) : name).asSubclass(View.class);
			// ...
			constructor = clazz.getConstructor(mConstructorSignature);
			constructor.setAccessible(true);
			// ...
            Object[] args = mConstructorArgs;
            args[1] = attrs;
            final View view = constructor.newInstance(args);
			// 省略一坨代码
            return view;
        } catch (。。。) {
        // 省略一坨代码
        }
}
我们看到,最终inflate是通过反射并且传入从xml中解析出来的attrs参数来创建View对象的,那我们以ImageView为例,看看构造方法:
public ImageView(Context context, @Nullable AttributeSet attrs, int defStyleAttr,
            int defStyleRes) {
        super(context, attrs, defStyleAttr, defStyleRes);
        initImageView();
        final TypedArray a = context.obtainStyledAttributes(
                attrs, R.styleable.ImageView, defStyleAttr, defStyleRes);
        // 就是你啦
        final Drawable d = a.getDrawable(R.styleable.ImageView_src);
        if (d != null) {
            setImageDrawable(d);
        }
		// 省略一坨代码
        a.recycle();
    }
终于破案了,通过attrs构建TypedArray,再解出drawable资源,最终通过setImageDrawable设置到ImageView。
问题2
drawable到底有没有做缓存?要分析这个问题,我们可以直接看下drawable是怎么解析而来的。如果有缓存,那么一定会有从cache中取的操作,同时会有解析完成后写入cache的操作。那么就从drawable的加载这步入手吧。
上面我们提到,在ImageVIew的构造方法中由TypedArray解析出了src配置的drawable,跟踪下源码,发现调用了ResourcesImpl的loadDrawable方法:
@Nullable
Drawable loadDrawable(@NonNull Resources wrapper, @NonNull TypedValue value, int id,
        int density, @Nullable Resources.Theme theme)
        throws NotFoundException {
    // If the drawable's XML lives in our current density qualifier,
    // it's okay to use a scaled version from the cache. Otherwise, we
    // need to actually load the drawable from XML.
    final boolean useCache = density == 0 || value.density == mMetrics.densityDpi;
	// 。。。
    try {
		// 。。。
        final boolean isColorDrawable;
        final DrawableCache caches;
        final long key;
        if (value.type >= TypedValue.TYPE_FIRST_COLOR_INT
                && value.type <= TypedValue.TYPE_LAST_COLOR_INT) {
            isColorDrawable = true;
            caches = mColorDrawableCache;
            key = value.data;
        } else {
            isColorDrawable = false;
            caches = mDrawableCache;
            key = (((long) value.assetCookie) << 32) | value.data;
        }
        // First, check whether we have a cached version of this drawable
        // that was inflated against the specified theme. Skip the cache if
        // we're currently preloading or we're not using the cache.
        if (!mPreloading && useCache) {
            final Drawable cachedDrawable = caches.getInstance(key, wrapper, theme);
            if (cachedDrawable != null) {
                cachedDrawable.setChangingConfigurations(value.changingConfigurations);
                return cachedDrawable;
            }
        }
        // Next, check preloaded drawables. Preloaded drawables may contain
        // unresolved theme attributes.
        final Drawable.ConstantState cs;
        if (isColorDrawable) {
            cs = sPreloadedColorDrawables.get(key);
        } else {
            cs = sPreloadedDrawables[mConfiguration.getLayoutDirection()].get(key);
        }
        Drawable dr;
        boolean needsNewDrawableAfterCache = false;
        if (cs != null) {
            dr = cs.newDrawable(wrapper);
        } else if (isColorDrawable) {
            dr = new ColorDrawable(value.data);
        } else {
            dr = loadDrawableForCookie(wrapper, value, id, density, null);
        }
        // DrawableContainer' constant state has drawables instances. In order to leave the
        // constant state intact in the cache, we need to create a new DrawableContainer after
        // added to cache.
        if (dr instanceof DrawableContainer)  {
            needsNewDrawableAfterCache = true;
        }
        // Determine if the drawable has unresolved theme attributes. If it
        // does, we'll need to apply a theme and store it in a theme-specific
        // cache.
        final boolean canApplyTheme = dr != null && dr.canApplyTheme();
        if (canApplyTheme && theme != null) {
            dr = dr.mutate();
            dr.applyTheme(theme);
            dr.clearMutated();
        }
        // If we were able to obtain a drawable, store it in the appropriate
        // cache: preload, not themed, null theme, or theme-specific. Don't
        // pollute the cache with drawables loaded from a foreign density.
        if (dr != null) {
            dr.setChangingConfigurations(value.changingConfigurations);
            if (useCache) {
                cacheDrawable(value, isColorDrawable, caches, theme, canApplyTheme, key, dr);
                if (needsNewDrawableAfterCache) {
                    Drawable.ConstantState state = dr.getConstantState();
                    if (state != null) {
                        dr = state.newDrawable(wrapper);
                    }
                }
            }
        }
        return dr;
    } catch (Exception e) {
        // 。。。
    }
}
代码挺长的,总结一下,主要是这样的逻辑:
- 尝试从cache里取缓存,取到了的话就直接返回了;
- 如果没取到缓存,则加载资源并创建drawable;
- 把刚创建的drawable写入cache中;
到此我们可以断定,drawable的确实有缓存的了。
这里我们有必要先介绍下BitmapState这个类:
final static class BitmapState extends ConstantState {
	// ...
    Bitmap mBitmap = null;
    // ...
    BitmapState(Bitmap bitmap) {
	    mBitmap = bitmap;
	    // ...
	}

	BitmapState(BitmapState bitmapState) {
	    mBitmap = bitmapState.mBitmap;
	    // ...
	}

	public Drawable newDrawable() {
	    return new BitmapDrawable(this, null);
	}
	public Drawable newDrawable(Resources res) {
	    return new BitmapDrawable(this, res);
	}
    // ...
}
BitmapState是BitmapDrawable的内部类,他内部持有了bitmap对象,所以其实对于BitmapDrawable的各种配置本质上是由其内部的BitmapState对象来间接完成的。
再来看cache里存储的是啥?
这里的cache是DrawableCache类,从cache里取缓存数据用的是getInstance方法:
public Drawable getInstance(long key, Resources resources, Resources.Theme theme) {
    final Drawable.ConstantState entry = get(key, theme);
    if (entry != null) {
        return entry.newDrawable(resources, theme);
    }
    return null;
}
其实这里缓存的就是BitmapState对象了。
最后,相对应的存缓存调用的是ResourceImpl类的cacheDrawable方法,这里就不再详细介绍了。
问题3
看到这里,相信大家对drawable的缓存以及ImageView的drawable作用机制已经有了大致的了解了。我们来看最后一个问题:怎么样可以改变单个drawable的透明度而不影响全局?
答案是使用Drawable类的mutate方法:
@Override
public Drawable mutate() {
    if (!mMutated && super.mutate() == this) {
        mBitmapState = new BitmapState(mBitmapState);
        mMutated = true;
    }
    return this;
}
mutate内部通过构造方法copy了一个新的mBitmapState对象,是这么操作的:
BitmapState(BitmapState bitmapState) {
    mBitmap = bitmapState.mBitmap;
    ...
    mPaint = new Paint(bitmapState.mPaint);
    ...
}
这下明白了:mBitmap还是那个mBitmap,这个没变,只是构建了新的mPaint对象,copy了老的配置。我们对bitmap做的配置本质上是通过配置Paint来绘制出来的。
所以正确的代码是这样的:
mIvImg.getDrawable().mutate().setAlpha(128);然后我们来过一遍代码执行流程:
mutate方法上面已经看过了,接下来是setAlpha方法:
@Override
public void setAlpha(int alpha) {
    final int oldAlpha = mBitmapState.mPaint.getAlpha();
    if (alpha != oldAlpha) {
        mBitmapState.mPaint.setAlpha(alpha);
        invalidateSelf();
    }
}
嗯,配置了新的Paint的alpha值,继续:
public void invalidateSelf() {
    final Callback callback = getCallback();
    if (callback != null) {
        callback.invalidateDrawable(this);
    }
}
还记得在问题1里面我们卖的关子吗?就是这个Callback。ImageView在设置drawable的时候通过drawable.setCallback(this)把自己注册到了drawable中。这么做的目的就是当drawable发生变化需要刷新时,可以回调ImageView的刷新方法,这样就能实现ImageView的及时更新了。这里刷新是通过ImageView的onDraw来做的,内部调用了drawable的draw方法,一起来看下:
@Override
public void draw(Canvas canvas) {
    final Bitmap bitmap = mBitmapState.mBitmap;
    if (bitmap == null) {
        return;
    }
	final BitmapState state = mBitmapState;
	final Paint paint = state.mPaint;
    ...
    if (shader == null) {
		...
        canvas.drawBitmap(bitmap, null, mDstRect, paint);
		...
    } else {
		...
        canvas.drawRect(mDstRect, paint);
    }
}
代码很简单,取到BitmapState中的paint,然后通过canvas把bitmap重新绘制一把,让paint配置生效。
结语
遇到问题不用慌,翻源码,翻源码,翻源码。
