一、打开config下面的index.js
在module.exports里面加入library这段代码,vue、vue-router、vuex、axios等是你想要从vendor.js里面分离出来的插件。我这边分成两个写,是想分离出两个js(vue.dll.js和vueBucket.dll.js)
module.exports = {
    library: {
        "vue": ['vue'],
        "vueBucket": ['axios', 'vue-router', 'vuex', 'vue-swipe']
    },
    build: {
        env: require('./prod.env'),
        index: path.resolve(__dirname, '../dist/index.html'),
        assetsRoot: path.resolve(__dirname, '../dist'),
        assetsSubDirectory: 'static',
        assetsPublicPath: './',
        productionSourceMap: true,
        // Gzip off by default as many popular static hosts such as
        // Surge or Netlify already gzip all static assets for you.
        // Before setting to `true`, make sure to:
        // npm install --save-dev compression-webpack-plugin
        productionGzip: false,
        productionGzipExtensions: ['js', 'css'],
        // Run the build command with an extra argument to
        // View the bundle analyzer report after build finishes:
        // `npm run build --report`
        // Set to `true` or `false` to always turn it on or off
        bundleAnalyzerReport: process.env.npm_config_report
    },
    dev: {
        env: require('./dev.env'),
        port: 8080,
        autoOpenBrowser: true,
        assetsSubDirectory: 'static',
        assetsPublicPath: '/',
        proxyTable: {},
        // CSS Sourcemaps off by default because relative paths are "buggy"
        // with this option, according to the CSS-Loader README
        // (https://github.com/webpack/css-loader#sourcemaps)
        // In our experience, they generally work as expected,
        // just be aware of this issue when enabling this option.
        cssSourceMap: false
    }
}
二、新建webpack.dll.config.js
在build文件夹里面新建webpack.dll.config.js,并写入下面这段代码
var path = require('path');
var webpack = require('webpack');
var config = require('../config');

module.exports = {
    // 你想要打包的模块的数组,我这边是从一步骤中获取的,也可以直接写在这里
    entry: config.library,
    output: {
        path: path.resolve('./dist'), //文件输出的位置
        filename: '[name].dll.js', //文件名
        library: '[name]_library'
    },
    plugins: [
        new webpack.DllPlugin({
            path: path.resolve('./dist', '[name].manifest.json'),
            name: '[name]_library'
        }),
        // 压缩打包的文件
        new webpack.optimize.UglifyJsPlugin({
            compress: {
                warnings: false
            }
        })
    ]
};
三、打开webpack.prod.conf.js
打开build文件夹下面的webpack.prod.conf.js
下载插件add-asset-html-webpack-plugin并引入,该插件的作用是自动引入打包后分离出来的dll.js文件
var AddAssetHtmlPlugin = require('add-asset-html-webpack-plugin')
然后在plugins里面加入下面这段代码
...Object.keys(config.library).map(name => {
    return new webpack.DllReferencePlugin({
        context: '.',
        manifest: require(`./../dist/${name}.manifest.json`),//引入打包后生生成的manifest文件
    })
}),
new AddAssetHtmlPlugin(Object.keys(config.library).map(name => {

    //下面这一段是根据打包命令去区分引入js的路径,(如果你的项目代码中没有区分,可以不加,如果你想了解怎么去用命令去区分打包本地或测试或正式,请看我的上一遍文章)
    publicPath = "";
    getPublicPath = path.resolve(__dirname, `../dist/${name}.dll.js`);

    if (target == 'local') {
        publicPath = config.local.assetsPublicPath;
    } else if (target == 'pretest') {
        publicPath = config.pretest.assetsPublicPath;
    } else {
        publicPath = config.build.assetsPublicPath;
    }
    return {
        filepath: getPublicPath,
        publicPath: publicPath,
        includeSourcemap: false
    }
}))
我的上一遍文章
四、打开package.json
打开根目录下面的package.json文件,在scripts里面天机下面一段代码就ok啦
"scripts": {
    "build:dll": "webpack --config build/webpack.dll.config.js",
},
五、执行命令 npm run build:dll
npm run build:dll就可以看到dist文件夹下面出现了对应的js
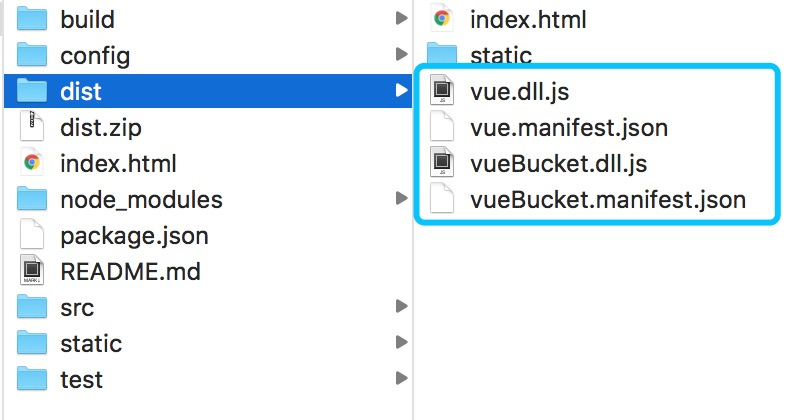
ok啦,你们可以试试啦