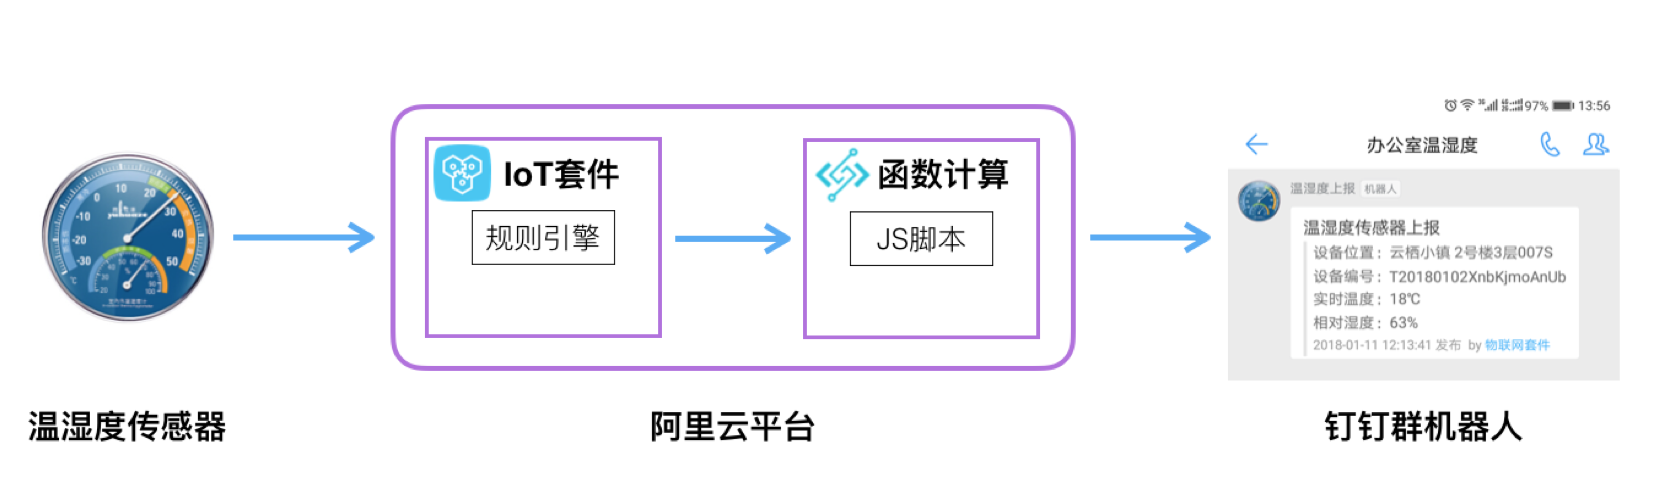
1.IoT云端开发
开通物联网套件 www.aliyun.com/product/iot
=>产品管理>创建产品
=>产品管理>产品详情>设备管理>添加设备
=>产品管理>产品详情>设备管理>添加自定义属性 tag,imei
属性名key |
属性值value |
描述 |
tag |
西溪园区 1-2-56 |
自定义设备位置 |
imei |
XIXI2018034532 |
自定义设备序列号 |
=>产品管理>产品详情>消息通信
Topic |
权限 |
描述 |
/productKey/${deviceName}/data |
发布 |
上报数据payload示例 {"temperature":23,"humidity":63} |
/productKey/${deviceName}/control |
订阅 |
下行指令payload示例 {"device": "iotLed","state": "on"} |
2. 函数计算开发
2.1 开通函数计算服务
开通FC函数计算服务www.aliyun.com/product/fc
2.2. 创建Nodejs函数
创建服务 IoT_Service
创建函数 pushData2Dingtalk
函数脚本如下:
复制代码
- const https = require('https');
- //钉钉群机器人token
- const accessToken = '此处是钉钉群机器人的token';
- module.exports.handler = function(event, context, callback) {
- var eventJson = JSON.parse(event.toString());
- const postData = JSON.stringify({
- "msgtype": "markdown",
- "markdown": {
- "title": "温湿度传感器",
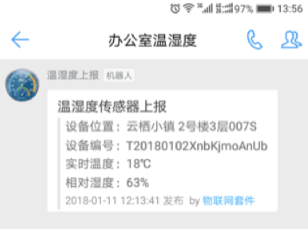
- "text": "#### 温湿度传感器上报\n" +
- "> 设备位置:" + eventJson.tag + "\n\n" +
- "> 设备编号:" + eventJson.imei+ "\n\n" +
- "> 实时温度:" + eventJson.temperature + "℃\n\n" +
- "> 相对湿度:" + eventJson.humidity + "%\n\n" +
- "> ###### " + eventJson.time + " 发布 by [物联网套件](https://www.aliyun.com/product/iot) \n"
- },
- "at": {
- "isAtAll": false
- }
- });
- const options = {
- hostname: 'oapi.dingtalk.com',
- port: 443,
- path: '/robot/send?access_token='+accessToken,
- method: 'POST',
- headers: {
- 'Content-Type': 'application/json',
- 'Content-Length': Buffer.byteLength(postData)
- }
- };
- const req = https.request(options, (res) => {
- res.setEncoding('utf8');
- res.on('data', (chunk) => {});
- res.on('end', () => {
- callback(null, 'success');
- });
- });
- req.on('error', (e) => {
- callback(e);
- });
- // 写入数据请求主体
- req.write(postData);
- req.end();
- };
3. IoT套件-规则引擎设置
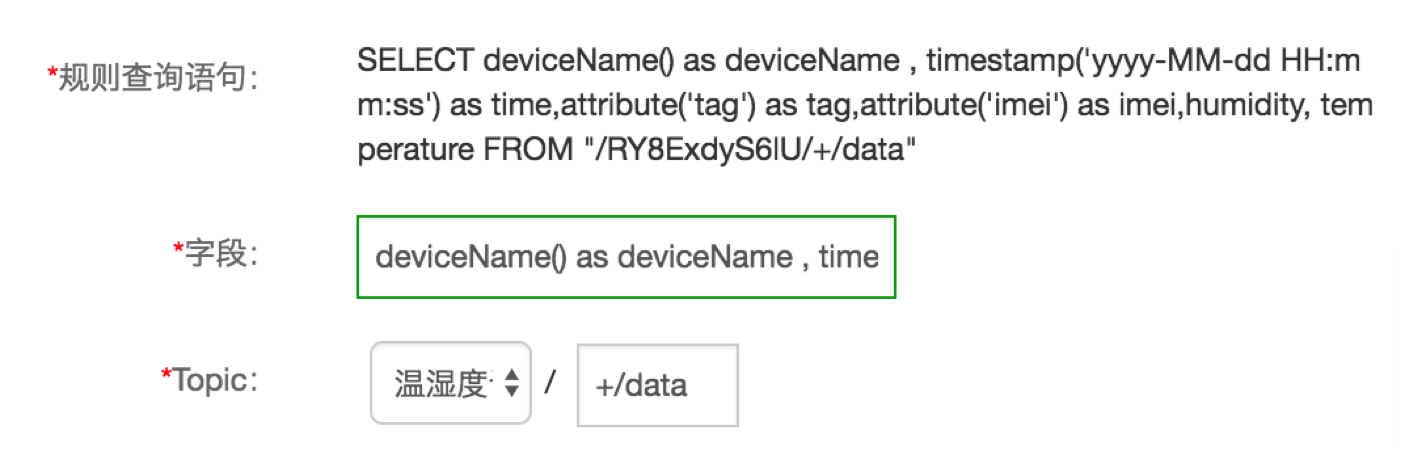
3.1 字段
复制代码
- deviceName() as deviceName ,
- timestamp('yyyy-MM-dd HH:mm:ss') as time,
- attribute('tag') as tag,attribute('imei') as imei,
- humidity, temperature
3.2 Topic
复制代码
- 产品/+/data +通配符,代表产品下全量设备都使用这个规则
3.3 完整数据操作
3.4 转发动作-函数计算
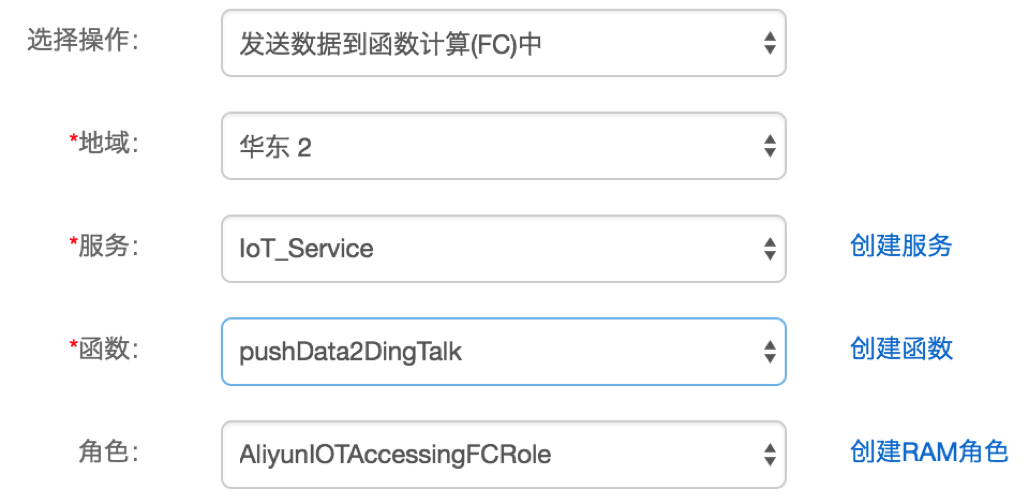
3.5 启动规则引擎
4. 设备端开发
4.1 模拟设备开发
模拟设备的nodejs脚本iot-fc-dingtalk.js
复制代码
- /**
- * package.json 添加依赖:"aliyun-iot-mqtt": "0.0.4"
- */
- const mqtt = require('aliyun-iot-mqtt');
- //设备三元组
- const options = {
- productKey: "产品",
- deviceName: "设备",
- deviceSecret: "秘钥",
- regionId: "cn-shanghai"
- };
- //设备与云 建立连接,设备上线
- const client = mqtt.getAliyunIotMqttClient(options);
- //主题topic
- const topic = `${options.productKey}/${options.deviceName}/data`;
- const data = {
- temperature: Math.floor((Math.random()*20)+10),
- humidity: Math.floor((Math.random()*100)+20),
- };
- //指定topic发布数据到云端
- client.publish(topic, JSON.stringify(data));
- const subTopic = "/" + options.productKey + "/" + options.deviceName + "/control";
- //订阅topic
- client.subscribe(subTopic)
- //添加topic处理函数
- client.on('message', function (topic, message){
- console.log(topic + "," + message.toString())
- })
复制代码
- $node iot-fc-dingtalk.js
4.2 真实开发板开发
创建文件夹 mkdir ali-iot-client
进入文件夹 cd ali-iot-client
创建工程 rap init
添加硬件和驱动 rap device add humirature
设备型号 DHT11
在package.json中增加iot的sdk包 aliyun-iot-device-mqtt
复制代码
- "ruff": {
- "dependencies": {
- "aliyun-iot-device-mqtt": "^0.0.5",
- },
- "version": 1
- }
安装依赖 rap install
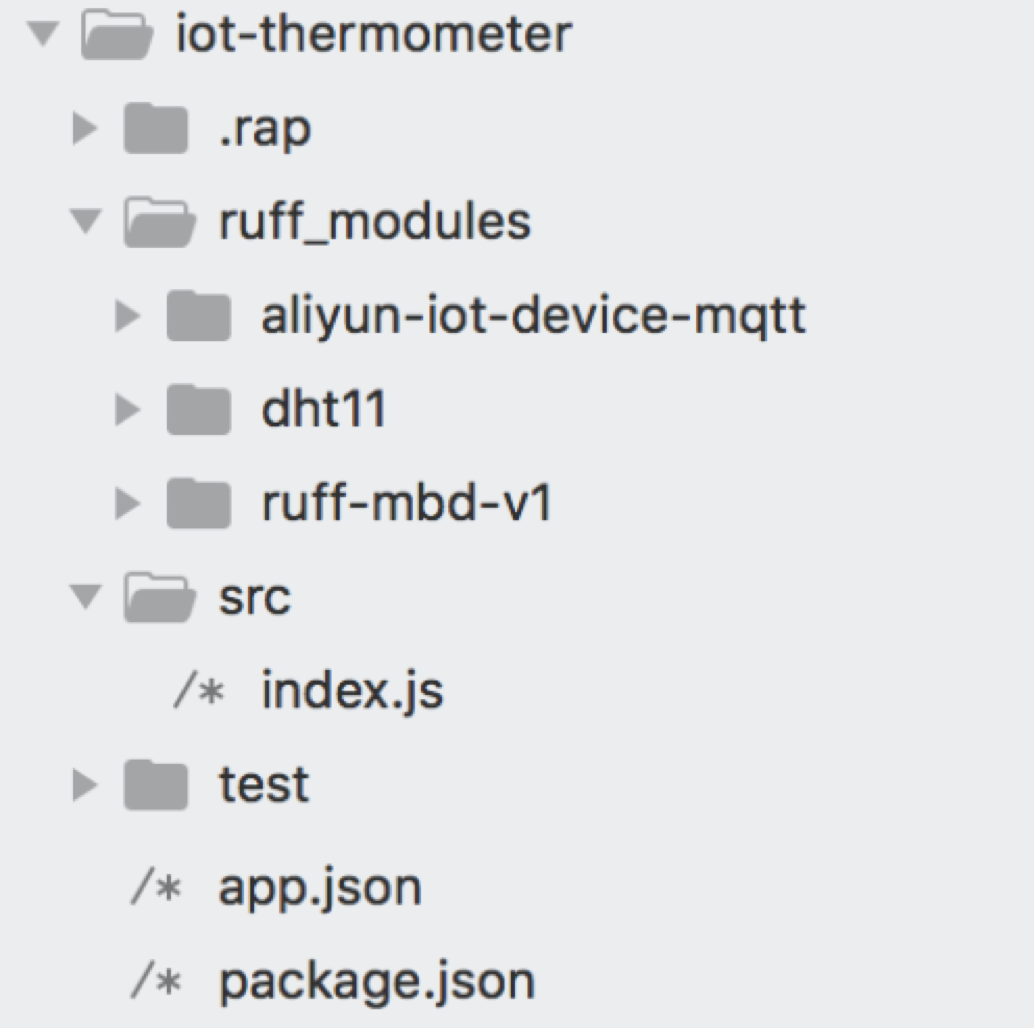
安装完目录结构如下:
编写业务逻辑 /src/index.js
复制代码
- // 引入aliyun-iot-sdk
- var MQTT = require('aliyun-iot-device-mqtt');
- // 个人账号
- var options = {
- productKey: "",//替换为自己的
- deviceName: "",//替换为自己的
- deviceSecret: "",//替换为自己的
- regionId: "cn-shanghai",//华东2
- };
- // 发布/订阅 topic
- var pubTopic = "/" + options.productKey + "/" + options.deviceName + "/data";
- var subTopic = "/" + options.productKey + "/" + options.deviceName + "/control";
- // 建立连接
- var client = MQTT.createAliyunIotMqttClient(options);
- $.ready(function(error) {
- if (error) {
- console.log(error);
- return;
- }
- //10s上报一次
- setInterval(publishData, 15 * 1000);
- //订阅topic
- client.subscribe(subTopic)
- //添加topic处理函数
- client.on('message', doHandler)
- });
- //上报温湿度
- function publishData() {
- $('#humirature').getTemperature(function(error, temperature) {
- if (error) {
- console.error(error);
- return;
- }
- $('#humirature').getRelativeHumidity(function(error, humidity) {
- if (error) {
- console.error(error);
- return;
- }
- var data = {
- "temperature": temperature,//温度
- "humidity": humidity //湿度
- };
- console.log(JSON.stringify(data))
- //发布topic,上报数据
- client.publish(pubTopic, JSON.stringify(data));
- });
- });
- }
- //接收topic,处理下行指令
- function doHandler(topic, message) {
- console.log(topic + "," + message.toString())
- if (topic === subTopic) {
- var msgJson = JSON.parse(message.toString());
- //state为on,那么打开led-r灯
- if (msgJson.state === 'on') {
- $('#led-r').turnOn();
- } else {
- $('#led-r').turnOff();
- }
- }
- }
5. 钉钉群收到推送
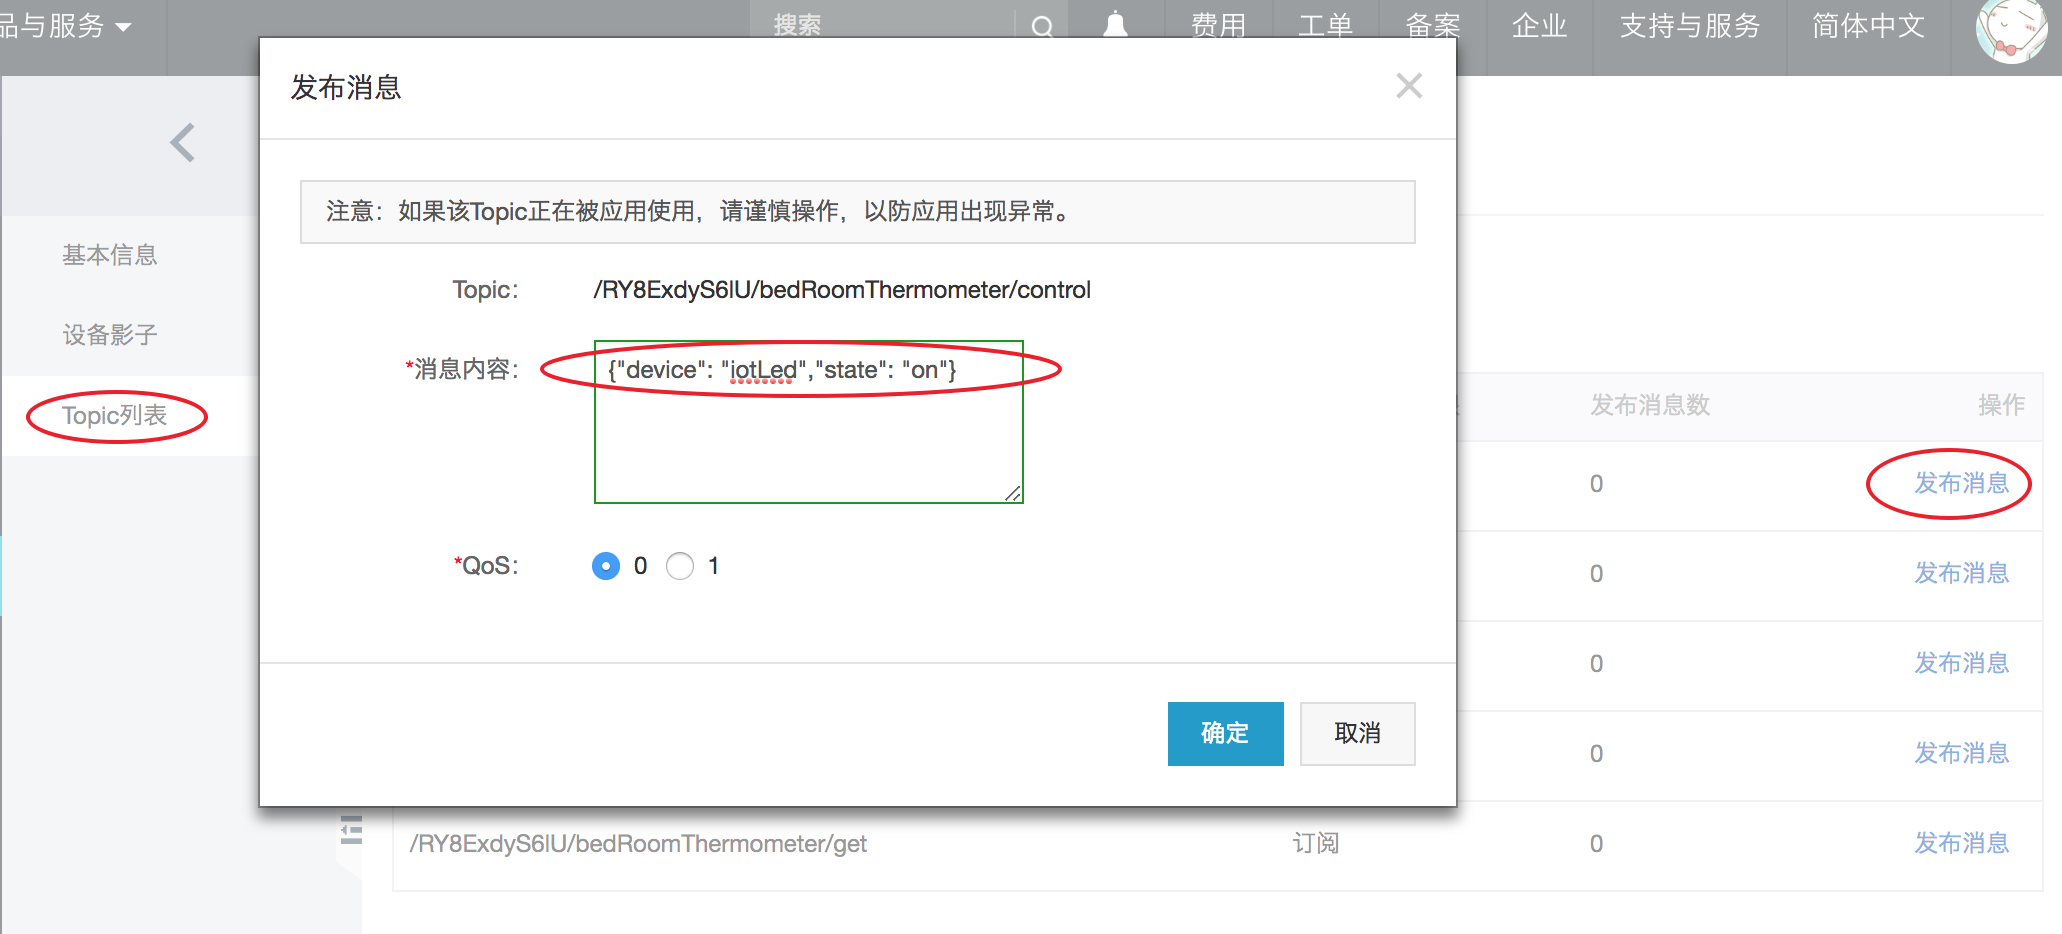
6.下发指令
通过IoT套件控制台下发指令 /{productKey}/+/control
复制代码
- //on开灯
- {"device": "iotLed","state": "on"}
- //off关灯
- {"device": "iotLed","state": "off"}
设备管理 》设备》Topic列表