

原文:http://www.vogella.com/tutorials/AndroidBuild/article.html
Gradle for building Android applications 构建Android应用的gradle
Using Gradle for Android apps Android应用使用gradle
By default, Android projects are handled by the Gradle build system. If you create a new project in Android studio, the Gradle build scripts are automatically created. Android studio provides the Gradle runtime, hence no additional installation is required.
默认,Android工程使用gradle来构建。如果使用Android studio创建一个新的工程,gradle 的构建脚本也会自动创建。因为Android sdudio 已经提供gradle的运行环境,因此您不需要额外的安装。
If you press the run button in Android Studio, it triggers the corresponding Gradle task and starts the application.
如果你按下Android studio中的run按钮,将会触发相对应的gradle任务,从而启动应用。
You can also run Gradle via the command line. To avoid unnecessary local installation, Gradle provides a wrapper script which allows you to run Gradle without any local installation.
你也可以通过命令行运行gradle。为了省去本地安装gradle的麻烦,gradle提供了一个打包好的脚本(wrapper script ),这样就可以不用安装gradle运行运行环境,直接运行gradle。
You find the available versions of the Android Gradle plug-in under the following URL: jcenter.bintray.com/com/android…
可以在下面的连接中找到Android 的gradle插件:https://jcenter.bintray.com/com/android/tools/build/gradle/
Conversion process from source code to Android application 从源码到Android应用的转化过程
The Java source files are converted to Java class files by the Java compiler. The Android SDK contains a tool called dxwhich converts Java class files into a .dex (Dalvik Executable) file. All class files of the application are placed in this .dexfile. During this conversion process redundant information in the class files are optimized in the .dex file. For example, if the same String is found in different class files, the .dex file contains only one reference of this String.
java编译器将java源文件转化成class文件。Android SDK中有一个工具叫dx,他可以将java文件转化成 .dex (Dalvik 可执行的文件)文件。应用的所有文件都会被集中到这个.dex文件中。在这个处理过程中,.dex 文件中的多余信息会被精简。例如,如果发现有多个文件中包含相同的字符串,最终.dex文件只保留一个.
These .dex files are therefore much smaller in size than the corresponding class files.
因此.dex 文件要比相对应的class文件要小。
The .dex file and other resources, e.g., the images and XML files, are packed into an .apk (Android Package) file. The program aapt (Android Asset Packaging Tool) performs this step.
.dex 文件和其他资源,例如图片和xml文件将会被打包进一个.apk(Android 包)文件。这个工作是由aapt工具完成
The resulting .apk file contains all necessary data to run the Android application and can be deployed to an Android device via the adb tool.
最终的.apk文件包含所有运行app所需要的所有资源,而且可以通过adb工具部署到Android设备上。
As of Android 5.0 the Android RunTime (ART) is used as runtime for all Android applications. ART uses a combination of Ahead Of Time and _Just In Time _ compilation. During the installation of an application on an Android device, the application code is translated into machine code.
从Android 5.0 之后,ART 作为了Android 的运行环境。ART 结合了AOT和JIT。当将应用安装到设备时,会将应用代码转化成机器码。
The dex2oat tool takes the .dex file created by the Android tool chain and compiles that into an Executable and Linkable Format (ELF file). This file contains the dex code, compiled native code and meta-data. Keeping the .dex code allows that existing tools still work.
dex2oat 工具使用.dex文件将转化成可运行、可连接的文件。这个文件包括dex代码,机器码,元数据。为了兼容已经存在的工具,保留了dex代码。
命令行的gradle
The Gradle build system is designed to support complex scenarios in creating Android applications:
gradle构建工具支持在构建Android应用的复杂场景。
- Multi-distribution: the same application must be customized for several clients or companies
- 多渠道:同一个应用可以为不同的设别和企业定制
- Multi-apk: supporting the creation of multiple apk for different device types while reusing parts of the code
- 多个apk:可以为不同类型的设备创建多个apk,同时复用一部分代码
You can start your Gradle build via the command line. Here is an overview of the important Android Gradle tasks:
你可以通过命令行开始你的gradle构建。下面是一些重要的Android gradle 任务。
| 命令 | 描述 |
|---|---|
./gradlew build |
build project, runs both the assemble and check task 构建工程,执行assemble 和 check任务 |
./gradlew clean build |
build project complete from scratch 从头构建工程 |
./gradlew clean build |
build project complete from scratch 从头构建工程 |
./gradlew test |
Run the tests 执行单元测试 |
./gradlew connectedAndroidTest |
Run the instrumentation tests 执行性能测试 |
To see all available tasks, use the gradlew wrapper command.
gradlew wrapper 命令可以查看所有任务。
gradle build
# alternatively speedup second grandle build by holding it in memory
# gradle build --daemon
This command creates in the build folder the output of the Gradle build. By default, the Gradle build creates two .apkfiles in the build/outputs/apk folder.
这个命令会将构建的结构输出到build文件夹中。默认,gradle会在build/outputs/apk 文件夹中创建两个.apk文件。
To build and start your unit tests on the JVM use the following command.
使用如下命令,执行单元测试
gradle test
To build and start your instrumented tests on your Android device use the following command.
使用如下命令,执行性能测试
gradle connectedCheck
Removing unused resources and Java classes via resource shrinking 通过资源裁剪,删除没用的资源和java类
The Gradle build system for Android supports resource shrinking at build time. This automatically removes resources that are unused from the packaged application. In addition to that, this also removes unnecessary resources from libraries you are depending on. This can hugely reduce the size of your application.
gradle会在编译时对Android资源文件进行精简。自动删除应用不需要的资源。除此之外,也将删除第三方包中无用的资。这样会大大降低应用的大小。
To enable resource shrinking, update your build file similar to the following snippet.
更新您的构建文件如下,开启资源精简功能。
android {
    ...

    buildTypes {
        release {
            minifyEnabled true
            shrinkResources true
            proguardFiles getDefaultProguardFile('proguard-android.txt'), 'proguard-rules.pro'
        }
    }
}
Defining dependencies and keeping the version external 定义依赖和版本号外置
A good practice is to define the version of your library dependencies outside the dependencies closure for better maintenance.
为了维护的方便,最好将第三方包的版本信息保存在dependencies闭包的外面,这是一个好的做法。
ext {
    // App dependencies
    junitVersion = '4.12'
    mockitoVersion = '1.10.19'
    powerMockito = '1.6.2'
    hamcrestVersion = '1.3'
}

dependencies {
    // Dependencies for local unit tests
    testCompile "junit:junit:$junitVersion"
    testCompile "org.mockito:mockito-all:$mockitoVersion"
    testCompile "org.hamcrest:hamcrest-all:$hamcrestVersion"
    testCompile "org.powermock:powermock-module-junit4:$powerMockito"
    testCompile "org.powermock:powermock-api-mockito:$ext.powerMockito"
}
If you put the ext closure into the root build file, you can access its properties for example with '$rootProject.ext.junitVersion'.
如果你将ext闭包放在根目录的构建文件中,你可以通过如下方式获取:'$rootProject.ext.junitVersion'
构建不同风味的Android应用
构建类型和构建风味
Android uses by default two build types: debug and release. For these build types you can create different flavors in you Gradle build.
默认,Android使用两种构建类型:debug和release。对于这些构建类型,可以创建不同的风味
The Gradle build system is also able to manage different flavors of an application. A product flavor defines a customized version of the application. This allows that some parts of the codebase or the resources can be different for variations of the app.
gradle 能够管理应用的不同风味。一个产品风味定义一个自定义的应用。这就允许资源和代码在不同的变体中有所不同。
For instance, you can define different build variants for certain device categories, like phone or tablet. Another use case might be a paid or a free version of your app. Or you want to use different resources or classes during a test run.
例如,你可以定义不同的变体为不同的设别类型,例如手机或者平板。另外,例如应用的付费和免费版本。或者你想在单元测试运行时,使用不同的资源和类。
Defining product flavors in your Gradle build file 在gradle构建文件中定义不同的风味
You can use the productFlavors closure of you app/build.gradle file to define different variants of your product.
可以使用在app/build.gradle文件中的productFlavors定义不同的变体。
productFlavors {
    prod {
        applicationId = "com.vogella.android.gradlebuildflavors.prod"
        versionName = "1.0-paid"
    }

    mock {
        applicationId = "com.vogella.android.gradlebuildflavors.mock"
        versionName = "1.0-free"
    }
}
The whole build.gradle file might look like the following:
整个个build.gradle 文件如下所示:
apply plugin: 'com.android.application'

android {
    // as before....

    productFlavors {
        prod {
            applicationId = "com.vogella.android.gradlebuildflavors.prod"
            versionName = "1.0-paid"
        }

        mock {
            applicationId = "com.vogella.android.gradlebuildflavors.mock"
            versionName = "1.0-free"
        }
    }
}

// as before
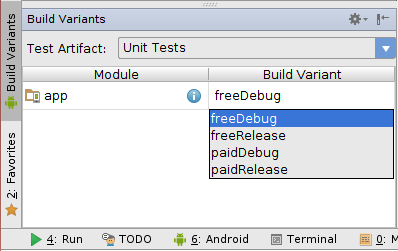
After defining these flavors you can select them in the Build Variants view in Android Studio.
定义完风味之后,你就可以在Android studio构建变体视图中选择他们了。
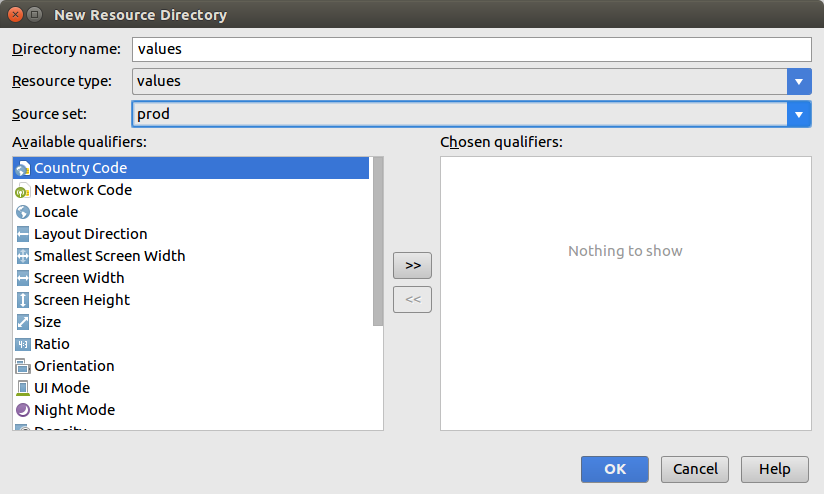
为不同风味提供不同的资源
In order to define a different behavior for a certain flavor, you need to create suitable folders for the defined flavors under app/src/.
为了为某个风味定义不同的行为,你需要为定义的风味在app/src/文件夹下提供相应的文件夹,
Flavor specific resources override the main resources. For example, if you provide a different application icon in a flavor the Android build system picks up the flavor specific one.
风味特有的资源将覆盖默认资源,例如,风味提供了应用icon,gradle 将选择风味提供的。
Providing different source sets for the product flavors 为风味提供不同的源集
The directories in the src/ folder are called source sets. Every product flavor can define its own source set.
src/ 文件被称为源集。每个产品风味可以定义自己的源集。
Code files are not replaced as resources, they are combined. For example, you cannot have acom.example.MainActivity activity in your app/main/java/ folder and a different implementation in another flavor. If you try this, you receive an error message about duplicate class definitions.
源代码文件是不能被替换的,而是结合。例如,你不能提供一个不同的com.example.MainActivity 不同的现在另一个风味中。如果你试图这样,你将接受一个重复定义类的消息。
You can still provide different implementations by avoiding the creation of the class in your main source folder and instead create a class in each flavor.
通过不在默认的源集中提供实现,而是在每个风味中提供。
Optional exercise: Using different product flavors for apps 练习
In this exercise you create an Android application with two different project flavors, called prod and mock.
在这个练习中,你创建一个有两个风味的Android应用,分为叫prod和mock
The mock version defines different resources than the prod version. In this first sample the strings.xml file of the main folder/project is overridden. Which variant is build is defined via the Build Variants view.
mock版本和prod版本有不同的资源。第一个例子,主文件夹下的strings.xml文件将被覆盖。通过构建变体视图可以定义变体的构建。
Creating a new Android application 创建新的Android应用
Create a new Project with the Empty Activity template and the top level package com.vogella.android.gradlebuildflavors.
创建一个empty Activity 模板的Android新工程,设置顶层的报名为:com.vogella.android.gradlebuildflavors
Define two additional product flavors in the app/build.gradle file called "prod" and "mock".
在app/build.gradle文件中定义两个风味:prod和mock。
apply plugin: 'com.android.application'

android {
    // as before....

    productFlavors {
        prod {
            applicationId = "com.vogella.android.gradlebuildflavors.prod"
            versionName = "1.0-paid"
        }

        mock {
            applicationId = "com.vogella.android.gradlebuildflavors.mock"
            versionName = "1.0-free"
        }
    }
}

// as before
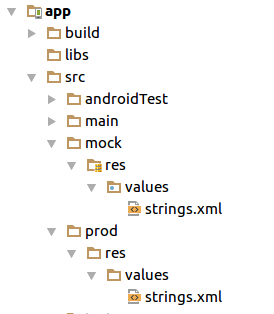
Create the desired folder structure for prod and mock flavors.
为prod和mock风味创建对应的文件结构。
Copy the strings.xml from the main folder to the appropriate folder of the flavor.
拷贝strings.xml文件从main文件夹到风味相对应的文件夹中
Change the hello_world string of the strings.xml to Mock World! and Prod World! accordingly.
依次修改strings.xml文件中的hello wold字符串为Mock World 和 Prod World
<resources>
    <string name="app_name">Flavor</string>
    <string name="hello_world">Mock World! </string>
</resources>
<resources>
    <string name="app_name">Flavor</string>
    <string name="hello_world">Prod World! </string>
</resources>
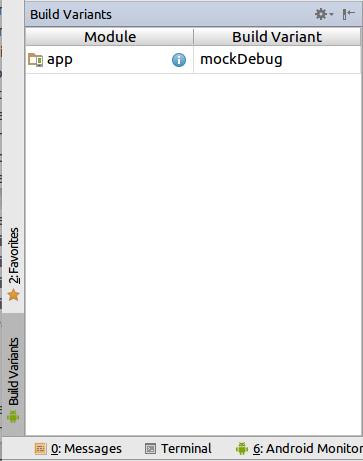
Validate
Select mockDebug as Build Variant in the Build Variants view of Android Studio and run your app.
在Android studio的构建变体视图中选择mockDebug,运行。
If you start you application you should see the string from the mock flavor. Select now you prod flavor and start it, you should see the other string.
加入你启动你的应用,你应该看到来自mock风味的字符串。现在选择prod风味,启动应用,你应该看到另一个字符串。
Build via Gradle command line 通过命令行构建
Use the ./gradlew build command to build all your product flavors.
使用./gradlew build命令构建所有的产品风味。
Prepare your application for testing with Gradle flavors
Create a class ShareIntentBuilder which starts an activity via the “share intent” via a static method with the following code.
import android.content.Context;
import android.content.Intent;

public class ShareIntentBuilder {

    public static void startSendActivity(Context context, String title, String body) {
        Intent intent = new Intent();
        intent.setAction(Intent.ACTION_SEND);
        intent.putExtra(Intent.EXTRA_TITLE, title);
        intent.putExtra(Intent.EXTRA_TEXT, body);
        intent.setType("text/plain");
        Intent chooserIntent = Intent.createChooser(intent, context.getResources().getText(R.string.share));
        chooserIntent.addFlags(Intent.FLAG_ACTIVITY_NEW_TASK);
        context.startActivity(chooserIntent);
    }
Implement different MainActivity versions for your flavors
Allow the activity which triggers this intent to be replaced in your “mock” flavor. If in a flavor “mock” is selected, start a second activity in your application which displays the send data. If the flavor "prod" is selected send the shared intent.
进一步的解释,在不同的风味中配置不同的class。
Customize Gradle build 自定义gradle 构建
Rename the output apk
重命名apk
apply plugin: 'com.android.application'

android {
    // more
    buildTypes {
        release {
            minifyEnabled false
            proguardFiles getDefaultProguardFile('proguard-android.txt'), 'proguard-rules.pro'
        }
       applicationVariants.all { variant ->
           variant.outputs.each { output ->
               def file = output.outputFile
               def filename = file.name.replace("app", "lars")
               output.outputFile = new File(file.parent, filename)

           }
       }
// more
}
Specify a different keystore for your debug build debug构建配置不同的keystore
You can define a keystore in your build.gradle file. See tools.android.com/tech-docs/n…for details.
你可以在build.gradle中定义keystore。
For example, you can redefine the keystore for the debug variant:
例如,你可以为debug变体重定义keystore。
android {
    signingConfigs {
        debug {
            storeFile file("your.keystore")
        }
    }
}
Migrating an Android project created with Eclipse to Gradle
省略
