

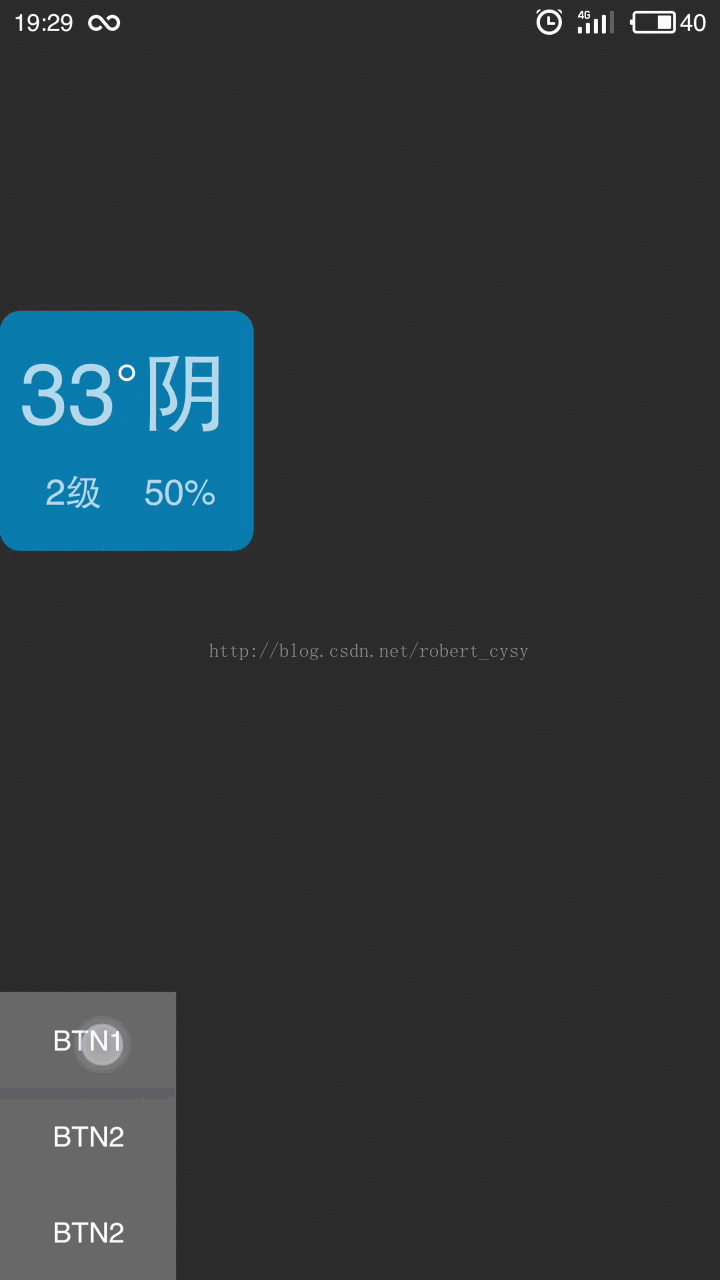
先上效果图:
一. 制作此控件的起源
项目需要一个可以拖动的控件,在网上可以找到很多例子,有图片拖动控件,有textview拖动控件。但是项目中需要控件同时可以动态通过手指调整尺寸,并且控件的内容不固定,需要自定义内容,即可以添加任意内容到拖动控件内。因此,编写此控件。
二. 根据需求做技术分析
1. 可拖动+调整尺寸:view的(scrollTo、scrollBy),设置LayoutParams,覆盖layout方法
2. 自定义内容:需要自定义的控件内存放其他控件,则需要自定义控件继承ViewGroup(LinearLayout、ReletiveLayout)
三. Android自定义控件所需基础知识
a 位置坐标:
屏幕左上角是坐标原点(0,0),原点向右延伸是x正轴方向,原点向下延伸是y轴正方向
自定义控件的坐标位置是相对于父控件的:getTop()、getBottom(),getLeft(),getRight(),这几个函数用于获取自定义view在父布局坐标系的位置。
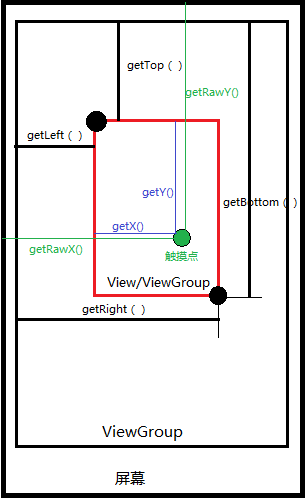
b 触摸感知
继承onTouchEvent,获取用户对自定义控件的触摸事件(down,move,up)
根据触摸的位置event.getX(),event.getY(),以及其他位置,判断要执行的的操作。包括根据位移移动,根据位移缩放。根据位移判断是否到达边界。
c 自定义控件父类选择
由于需求中控件里面的内容不定,即可以动态添加任意类型的Android控件到自定义的控件里面,因此这个自定义控件不能通过继承View实现,需要继承ViewGroup来实现,为了使用一些布局功能,最后项目选定继承ViewGroup的子类RelativeLayout,以实现动态添加任意多个任意类型的View控件。
c 移动控件
上文提到移动控件的三个方法:view的(scrollTo、scrollBy), 设置LayoutParams,覆盖layout方法。
Layout:我测试过layout移动控件,是可以达到移动控件的目的,但是破坏了控件尺寸计算路径,(本来是onmeasure之后,onlayout,由于我是自定义viewGroup现在是直接改动了layout,导致控件尺寸错乱,最后造成ViewGroup里面的内容显示不完整),layout介入了view/ViewGroup的地层绘制过程,造成混乱。
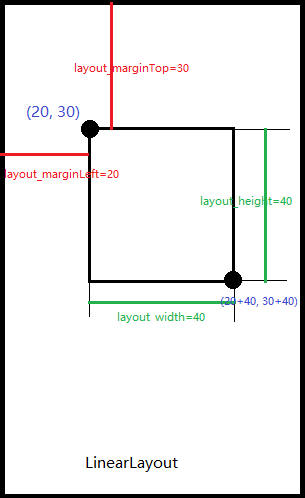
LayoutParams:这个参数一般是用于Android的xml布局文件里面,比如:layoutout_height=”” , layout_width=”” ,layout_marginLeft=””,layout_marginTop=””
假定在一个LinearLayout里面放一个imageView,通过修改ImageView的这几个参数就可以让ImageView在LinearLayout里面自由的移动位置:如图:
对自定义控件的位置设置转化为:(marginLeft,marginTop,width,height)
其中,marginLeft和marginTop负责确定控件的位置,width和height确定控件的大小,(可以看着图按自己的方式理解),总之是,通过这几参数的修改,可以使得控件在LinearLayout或RelativeLayout布局内自由的移动并且变换大小。
四. 可移动控件代码编写
原理都写清楚了,开始编写代码,定义一个类继承RelativeLayout,覆盖,onTouchEvent,然后编写逻辑代码:核心代码如下(都粘贴上看着心累):
[java] view plain copy print?- public class MoveLayout extends RelativeLayout {
- @Override
- public boolean onTouchEvent(MotionEvent event) {
- int action = event.getAction();
- switch (action) {
- case MotionEvent.ACTION_DOWN:
- oriLeft = getLeft();
- oriRight = getRight();
- oriTop = getTop();
- oriBottom = getBottom();
- lastY = (int) event.getRawY();
- lastX = (int) event.getRawX();
- dragDirection = getDirection((int) event.getX(), ( int) event.getY());
- break;
- case MotionEvent.ACTION_UP:
- break;
- case MotionEvent.ACTION_MOVE:
- int tempRawX = (int)event.getRawX();
- int tempRawY = (int)event.getRawY();
- int dx = tempRawX - lastX;
- int dy = tempRawY - lastY;
- lastX = tempRawX;
- lastY = tempRawY;
- switch (dragDirection) {
- case LEFT:
- left( dx);
- break;
- case RIGHT:
- right( dx);
- break;
- case BOTTOM:
- bottom(dy);
- break;
- case TOP:
- top( dy);
- break;
- case CENTER:
- center( dx, dy);
- break;
- }
- //把新的位置 oriLeft, oriTop, oriRight, oriBottom设置到控件,实现位置移动和大小变化。
- RelativeLayout.LayoutParams lp = new RelativeLayout.LayoutParams(oriRight - oriLeft, oriBottom - oriTop);
- lp.setMargins(oriLeft,oriTop,0,0);
- setLayoutParams(lp);
- break;
- }
- return super.onTouchEvent(event);
- }
- /**
- * 触摸点为中心->>移动
- */
- private void center(int dx, int dy) {
- int left = getLeft() + dx;
- int top = getTop() + dy;
- int right = getRight() + dx;
- int bottom = getBottom() + dy;
- if (left < 0) {
- left = 0;
- right = left + getWidth();
- }
- if (right > screenWidth ) {
- right = screenWidth ;
- left = right - getWidth();
- }
- if (top < 0) {
- top = 0;
- bottom = top + getHeight();
- }
- if (bottom > screenHeight ) {
- bottom = screenHeight ;
- top = bottom - getHeight();
- }
- oriLeft = left;
- oriTop = top;
- oriRight = right;
- oriBottom = bottom;
- }
- }
public class MoveLayout extends RelativeLayout {

@Override
    public boolean onTouchEvent(MotionEvent event) {
        int action = event.getAction();
        switch (action) {
            case MotionEvent.ACTION_DOWN:
                oriLeft = getLeft();
                oriRight = getRight();
                oriTop = getTop();
                oriBottom = getBottom();

                lastY = (int) event.getRawY();
                lastX = (int) event.getRawX();
                dragDirection = getDirection((int) event.getX(), (int) event.getY());
                break;
            case MotionEvent.ACTION_UP:
                             break;
            case MotionEvent.ACTION_MOVE:
                int tempRawX = (int)event.getRawX();
                int tempRawY = (int)event.getRawY();

                int dx = tempRawX - lastX;
                int dy = tempRawY - lastY;
                lastX = tempRawX;
                lastY = tempRawY;

                switch (dragDirection) {
                    case LEFT:
                        left( dx);
                        break;
                    case RIGHT:
                        right( dx);
                        break;
                    case BOTTOM:
                        bottom(dy);
                        break;
                    case TOP:
                        top( dy);
                        break;
                    case CENTER:
                        center( dx, dy);
                        break;
                }

                //把新的位置 oriLeft, oriTop, oriRight, oriBottom设置到控件,实现位置移动和大小变化。
                RelativeLayout.LayoutParams lp = new RelativeLayout.LayoutParams(oriRight - oriLeft, oriBottom - oriTop);
                lp.setMargins(oriLeft,oriTop,0,0);
                setLayoutParams(lp);
                           break;
        }
        return super.onTouchEvent(event);
    }
/**
 * 触摸点为中心->>移动
 */
private void center(int dx, int dy) {
    int left = getLeft() + dx;
    int top = getTop() + dy;
    int right = getRight() + dx;
    int bottom = getBottom() + dy;

    if (left < 0) {
        left = 0;
        right = left + getWidth();
    }
    if (right > screenWidth ) {
        right = screenWidth ;
        left = right - getWidth();
    }
    if (top < 0) {
        top = 0;
        bottom = top + getHeight();
    }
    if (bottom > screenHeight ) {
        bottom = screenHeight ;
        top = bottom - getHeight();
    }

    oriLeft = left;
    oriTop = top;
    oriRight = right;
    oriBottom = bottom;
}
}
五. 控件管理代码
以上实现了一个拖动和改变大小的控件,其实就是实现了一个定制的RelativeLayout,定制的RelativeLayout可以被拖动,和改变大小。因此可以在MoveLayout内添加任意view实现自己的显示效果。
现在为了能在一个布局上动态的增加很多个可移动的控件,并且对这些控件做管理功能,(动态增加、动态删除)
为了实现这个功能,又自定义了一个RelativeLayout来放置多个MoveLayout,动态增加,删除。新自定义的RelativeLayout叫做:DragView:简略代码如下:
[java] view plain copy print?- public class DragView extends RelativeLayout implements MoveLayout.DeleteMoveLayout{
- public DragView(Context context) {
- super(context);
- init(context, this);
- }
- private void init(Context c, DragView thisp) {
- mContext = c;
- mMoveLayoutList = new ArrayList<>();
- }
- /*
- *通过ondraw获取DragView的实际大小,然后告诉所有被管理的MoveLayout
- */
- @Override
- protected void onDraw(Canvas canvas) {
- super.onDraw(canvas);
- // Log.e(TAG, "onDraw: height=" + getHeight());
- mSelfViewWidth = getWidth();
- mSelfViewHeight = getHeight();
- if (mMoveLayoutList != null) {
- int count = mMoveLayoutList.size();
- for (int a = 0; a < count; a ++) {
- mMoveLayoutList.get(a).setViewWidthHeight(mSelfViewWidth, mSelfViewHeight);
- mMoveLayoutList.get(a).setDeleteWidthHeight(DELETE_AREA_WIDTH, DELETE_AREA_HEIGHT);
- }
- }
- }
- //添加新的MoveLayout,并在里面放置自己的控件selfView,同时制定位置和尺寸
- public void addDragView(View selfView, int left, int top ,int right, int bottom, boolean isFixedSize, boolean whitebg) {
- MoveLayout moveLayout = new MoveLayout(mContext);
- moveLayout.setClickable(true);
- moveLayout.setMinHeight(mMinHeight);
- moveLayout.setMinWidth(mMinWidth);
- int tempWidth = right - left;
- int tempHeight = bottom - top;
- if (tempWidth < mMinWidth) tempWidth = mMinWidth;
- if (tempHeight < mMinHeight) tempHeight = mMinHeight;
- //set postion
- RelativeLayout.LayoutParams lp = new RelativeLayout.LayoutParams(tempWidth, tempHeight);
- lp.setMargins(left,top,0,0);
- moveLayout.setLayoutParams(lp);
- //add sub view (has click indicator)
- LayoutInflater inflater = LayoutInflater.from(mContext);
- View dragSubView = inflater.inflate(R.layout.drag_sub_view, null);
- LinearLayout addYourViewHere = (LinearLayout) dragSubView.findViewById(R.id.add_your_view_here);
- LinearLayout.LayoutParams lv = new LinearLayout.LayoutParams(ViewGroup.LayoutParams.MATCH_PARENT, ViewGroup.LayoutParams.MATCH_PARENT);
- addYourViewHere.addView(selfView, lv);
- moveLayout.addView(dragSubView);
- //set fixed size
- moveLayout.setFixedSize(isFixedSize);
- addView(moveLayout);
- mMoveLayoutList.add(moveLayout);
- }
- //添加新的MoveLayout,并在里面放置自己的控件selfView,同时制定位置和尺寸
- public void addDragView(int resId, int left, int top ,int right, int bottom, boolean isFixedSize, boolean whitebg) {
- LayoutInflater inflater2 = LayoutInflater.from(mContext);
- View selfView = inflater2.inflate(resId, null);
- addDragView(selfView, left, top , right, bottom, isFixedSize, whitebg);
- }
- @Override
- public void onDeleteMoveLayout(int identity) {
- int count = mMoveLayoutList.size();
- for (int a = 0; a < count; a ++) {
- if (mMoveLayoutList.get(a).getIdentity() == identity) {
- //delete
- removeView(mMoveLayoutList.get(a));
- }
- }
- }
- }
public class DragView extends RelativeLayout implements MoveLayout.DeleteMoveLayout{

    public DragView(Context context) {
        super(context);
        init(context, this);
    }

    private void init(Context c, DragView thisp) {
        mContext = c;
        mMoveLayoutList = new ArrayList<>();
    }
/*
*通过ondraw获取DragView的实际大小,然后告诉所有被管理的MoveLayout
*/
    @Override
    protected void onDraw(Canvas canvas) {
        super.onDraw(canvas);
      //  Log.e(TAG, "onDraw: height=" + getHeight());
        mSelfViewWidth = getWidth();
        mSelfViewHeight = getHeight();

        if (mMoveLayoutList != null) {
            int count = mMoveLayoutList.size();
            for (int a = 0; a < count; a ++) {
                mMoveLayoutList.get(a).setViewWidthHeight(mSelfViewWidth, mSelfViewHeight);
                mMoveLayoutList.get(a).setDeleteWidthHeight(DELETE_AREA_WIDTH, DELETE_AREA_HEIGHT);
            }
        }
    }

//添加新的MoveLayout,并在里面放置自己的控件selfView,同时制定位置和尺寸
    public void addDragView(View selfView, int left, int top ,int right, int bottom, boolean isFixedSize, boolean whitebg) {
        MoveLayout moveLayout = new MoveLayout(mContext);
        moveLayout.setClickable(true);
        moveLayout.setMinHeight(mMinHeight);
        moveLayout.setMinWidth(mMinWidth);
        int tempWidth = right - left;
        int tempHeight = bottom - top;
        if (tempWidth < mMinWidth) tempWidth = mMinWidth;
        if (tempHeight < mMinHeight) tempHeight = mMinHeight;

        //set postion
        RelativeLayout.LayoutParams lp = new RelativeLayout.LayoutParams(tempWidth, tempHeight);
        lp.setMargins(left,top,0,0);
        moveLayout.setLayoutParams(lp);

        //add sub view (has click indicator)
        LayoutInflater inflater = LayoutInflater.from(mContext);
        View dragSubView = inflater.inflate(R.layout.drag_sub_view, null);
        LinearLayout addYourViewHere = (LinearLayout) dragSubView.findViewById(R.id.add_your_view_here);
        LinearLayout.LayoutParams lv = new LinearLayout.LayoutParams(ViewGroup.LayoutParams.MATCH_PARENT, ViewGroup.LayoutParams.MATCH_PARENT);
        addYourViewHere.addView(selfView, lv);

        moveLayout.addView(dragSubView);
        //set fixed size
        moveLayout.setFixedSize(isFixedSize);

        addView(moveLayout);
        mMoveLayoutList.add(moveLayout);
    }
//添加新的MoveLayout,并在里面放置自己的控件selfView,同时制定位置和尺寸
    public void addDragView(int resId, int left, int top ,int right, int bottom, boolean isFixedSize, boolean whitebg) {
        LayoutInflater inflater2 = LayoutInflater.from(mContext);
        View selfView = inflater2.inflate(resId, null);
        addDragView(selfView, left, top , right, bottom, isFixedSize, whitebg);
    }

    @Override
    public void onDeleteMoveLayout(int identity) {
        int count = mMoveLayoutList.size();
        for (int a = 0; a < count; a ++) {
            if (mMoveLayoutList.get(a).getIdentity() == identity) {
                //delete
                removeView(mMoveLayoutList.get(a));
            }
        }
    }

}
六. 在自己项目里加入方法推荐
本控件实现上非常简单,当然也稳定,并且显示控件定制化要求高,因此建议直接复制类到自己的工程里,并进行个性化的修改,因此这个控件没有做成库文件。整个控件的实现和调用工程。
自定义控件包括:MoveLayout.java,DragView,drag_sub_view.xml,corners_bg.xml,corners_bg2.xml,spot_corners_bg.xml
七. 下载