

3 View绘制流程第二步:递归layout源码分析
在上面的背景介绍就说过,当ViewRootImpl的performTraversals中measure执行完成以后会接着执行mView.layout,具体如下:
private void performTraversals() {
    ......
    mView.layout(0, 0, mView.getMeasuredWidth(), mView.getMeasuredHeight());
    ......
}
可以看见layout方法接收四个参数,这四个参数分别代表相对Parent的左、上、右、下坐标。而且还可以看见左上都为0,右下分别为上面刚刚测量的width和height。
至此又回归到View的layout(int l, int t, int r, int b)方法中去实现具体逻辑了,所以接下来我们开始分析View的layout过程。
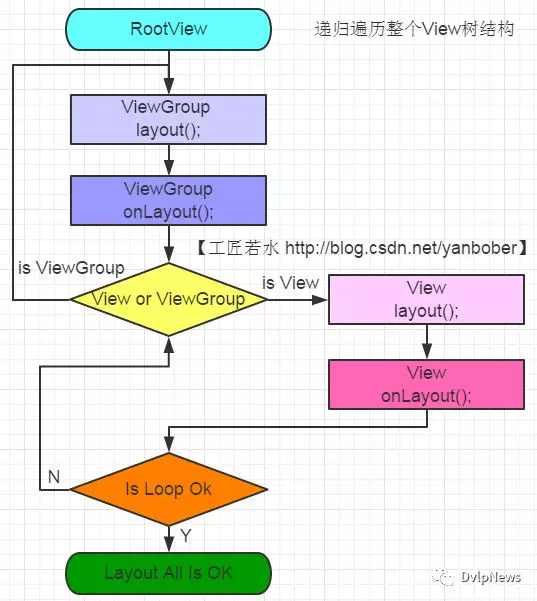
整个View树的layout递归流程图如下:
3-1 layout源码分析
layout既然也是递归结构,那我们先看下ViewGroup的layout方法,如下:
  @Override
    public final void layout(int l, int t, int r, int b) {
        ......
        super.layout(l, t, r, b);
        ......
    }
看着没有?ViewGroup的layout方法实质还是调运了View父类的layout方法,所以我们看下View的layout源码,如下:
 public void layout(int l, int t, int r, int b) {
        ......
        //实质都是调用setFrame方法把参数分别赋值给mLeft、mTop、mRight和mBottom这几个变量
        //判断View的位置是否发生过变化,以确定有没有必要对当前的View进行重新layout
        boolean changed = isLayoutModeOptical(mParent) ?
                setOpticalFrame(l, t, r, b) : setFrame(l, t, r, b);
        //需要重新layout
        if (changed || (mPrivateFlags & PFLAG_LAYOUT_REQUIRED) == PFLAG_LAYOUT_REQUIRED) {
            //回调onLayout
            onLayout(changed, l, t, r, b);
            ......
        }
        ......
    }
看见没有,类似measure过程,lauout调运了onLayout方法。
对比上面View的layout和ViewGroup的layout方法可以发现,View的layout方法是可以在子类重写的,而ViewGroup的layout是不能在子类重写的,言外之意就是说ViewGroup中只能通过重写onLayout方法。那我们接下来看下ViewGroup的onLayout方法,如下:
  @Override
    protected abstract void onLayout(boolean changed,
            int l, int t, int r, int b);
看见没有?ViewGroup的onLayout()方法竟然是一个抽象方法,这就是说所有ViewGroup的子类都必须重写这个方法。所以在自定义ViewGroup控件中,onLayout配合onMeasure方法一起使用可以实现自定义View的复杂布局。自定义View首先调用onMeasure进行测量,然后调用onLayout方法动态获取子View和子View的测量大小,然后进行layout布局。重载onLayout的目的就是安排其children在父View的具体位置,重载onLayout通常做法就是写一个for循环调用每一个子视图的layout(l, t, r, b)函数,传入不同的参数l, t, r, b来确定每个子视图在父视图中的显示位置。
再看下View的onLayout方法源码,如下:
   protected void onLayout(boolean changed, int left, int top, int right, int bottom) {
    }
我勒个去!是一个空方法,没啥可看的。
既然这样那我们只能分析一个现有的继承ViewGroup的控件了,就拿LinearLayout来说吧,如下是LinearLayout中onLayout的一些代码:
public class LinearLayout extends ViewGroup {
    @Override
    protected void onLayout(boolean changed, int l, int t, int r, int b) {
        if (mOrientation == VERTICAL) {
            layoutVertical(l, t, r, b);
        } else {
            layoutHorizontal(l, t, r, b);
        }
    }
}
看见没有,LinearLayout的layout过程是分Vertical和Horizontal的,这个就是xml布局的orientation属性设置的,我们为例说明ViewGroup的onLayout重写一般步骤就拿这里的VERTICAL模式来解释吧,如下是layoutVertical方法源码:
void layoutVertical(int left, int top, int right, int bottom) {
        final int paddingLeft = mPaddingLeft;
        int childTop;
        int childLeft;
        // Where right end of child should go
        //计算父窗口推荐的子View宽度
        final int width = right - left;
        //计算父窗口推荐的子View右侧位置
        int childRight = width - mPaddingRight;
        // Space available for child
        //child可使用空间大小
        int childSpace = width - paddingLeft - mPaddingRight;
        //通过ViewGroup的getChildCount方法获取ViewGroup的子View个数
        final int count = getVirtualChildCount();
        //获取Gravity属性设置
        final int majorGravity = mGravity & Gravity.VERTICAL_GRAVITY_MASK;
        final int minorGravity = mGravity & Gravity.RELATIVE_HORIZONTAL_GRAVITY_MASK;
        //依据majorGravity计算childTop的位置值
        switch (majorGravity) {
           case Gravity.BOTTOM:
               // mTotalLength contains the padding already
               childTop = mPaddingTop + bottom - top - mTotalLength;
               break;
               // mTotalLength contains the padding already
           case Gravity.CENTER_VERTICAL:
               childTop = mPaddingTop + (bottom - top - mTotalLength) / 2;
               break;
           case Gravity.TOP:
           default:
               childTop = mPaddingTop;
               break;
        }
        //重点!!!开始遍历
        for (int i = 0; i < count; i++) {
            final View child = getVirtualChildAt(i);
            if (child == null) {
                childTop += measureNullChild(i);
            } else if (child.getVisibility() != GONE) {
                //LinearLayout中其子视图显示的宽和高由measure过程来决定的,因此measure过程的意义就是为layout过程提供视图显示范围的参考值
                final int childWidth = child.getMeasuredWidth();
                final int childHeight = child.getMeasuredHeight();
                //获取子View的LayoutParams
                final LinearLayout.LayoutParams lp =
                        (LinearLayout.LayoutParams) child.getLayoutParams();
                int gravity = lp.gravity;
                if (gravity < 0) {
                    gravity = minorGravity;
                }
                final int layoutDirection = getLayoutDirection();
                final int absoluteGravity = Gravity.getAbsoluteGravity(gravity, layoutDirection);
                //依据不同的absoluteGravity计算childLeft位置
                switch (absoluteGravity & Gravity.HORIZONTAL_GRAVITY_MASK) {
                    case Gravity.CENTER_HORIZONTAL:
                        childLeft = paddingLeft + ((childSpace - childWidth) / 2)
                                + lp.leftMargin - lp.rightMargin;
                        break;
                    case Gravity.RIGHT:
                        childLeft = childRight - childWidth - lp.rightMargin;
                        break;
                    case Gravity.LEFT:
                    default:
                        childLeft = paddingLeft + lp.leftMargin;
                        break;
                }
                if (hasDividerBeforeChildAt(i)) {
                    childTop += mDividerHeight;
                }
                childTop += lp.topMargin;
                //通过垂直排列计算调运child的layout设置child的位置
                setChildFrame(child, childLeft, childTop + getLocationOffset(child),
                        childWidth, childHeight);
                childTop += childHeight + lp.bottomMargin + getNextLocationOffset(child);
                i += getChildrenSkipCount(child, i);
            }
        }
    }
从上面分析的ViewGroup子类LinearLayout的onLayout实现代码可以看出,一般情况下layout过程会参考measure过程中计算得到的mMeasuredWidth和mMeasuredHeight来安排子View在父View中显示的位置,但这不是必须的,measure过程得到的结果可能完全没有实际用处,特别是对于一些自定义的ViewGroup,其子View的个数、位置和大小都是固定的,这时候我们可以忽略整个measure过程,只在layout函数中传入的4个参数来安排每个子View的具体位置。
到这里就不得不提getWidth()、getHeight()和getMeasuredWidth()、getMeasuredHeight()这两对方法之间的区别(上面分析measure过程已经说过getMeasuredWidth()、getMeasuredHeight()必须在onMeasure之后使用才有效)。可以看出来getWidth()与getHeight()方法必须在layout(int l, int t, int r, int b)执行之后才有效。那我们看下View源码中这些方法的实现吧,如下:
 public final int getMeasuredWidth() {
        return mMeasuredWidth & MEASURED_SIZE_MASK;
    }
    public final int getMeasuredHeight() {
        return mMeasuredHeight & MEASURED_SIZE_MASK;
    }
    public final int getWidth() {
        return mRight - mLeft;
    }
    public final int getHeight() {
        return mBottom - mTop;
    }
    public final int getLeft() {
        return mLeft;
    }
    public final int getRight() {
        return mRight;
    }
    public final int getTop() {
        return mTop;
    }
    public final int getBottom() {
        return mBottom;
    }
这也解释了为什么有些情况下getWidth()和getMeasuredWidth()以及getHeight()和getMeasuredHeight()会得到不同的值,所以这里不做过多解释。
到此整个View的layout过程分析就算结束了,接下来进行一些总结工作。
3-2 layout原理总结
整个layout过程比较容易理解,从上面分析可以看出layout也是从顶层父View向子View的递归调用view.layout方法的过程,即父View根据上一步measure子View所得到的布局大小和布局参数,将子View放在合适的位置上。具体layout核心主要有以下几点:
View.layout方法可被重载,ViewGroup.layout为final的不可重载,ViewGroup.onLayout为abstract的,子类必须重载实现自己的位置逻辑。
measure操作完成后得到的是对每个View经测量过的measuredWidth和measuredHeight,layout操作完成之后得到的是对每个View进行位置分配后的mLeft、mTop、mRight、mBottom,这些值都是相对于父View来说的。
凡是layout_XXX的布局属性基本都针对的是包含子View的ViewGroup的,当对一个没有父容器的View设置相关layout_XXX属性是没有任何意义的(前面《Android应用setContentView与LayoutInflater加载解析机制源码分析》也有提到过)。
使用View的getWidth()和getHeight()方法来获取View测量的宽高,必须保证这两个方法在onLayout流程之后被调用才能返回有效值。

关注『DvlpNews』
把握前沿技术脉搏
