

组件
全局注册组件
- Vue.extend(选项对象)创建组件构造器
- Vue.component( id, [definition] )注册组件
- 使用组件
//扩展组件构造器
let Custom = Vue.extend({
  template: '<div>我是全局组件</div>'
})
//注册组件
Vue.component('custom-component', Custom)
//简写方式,自动调用 Vue.extend
Vue.component('custom-component', {
  template: '<div>我是全局组件</div>'
})
//使用组件
<div id="app">
  <custom-component></custom-component>
</div>
局部注册组件
- 选项对象的components属性注册局部组件,只能在所注册的作用域模板中使用
{
  components:{
    组件id:实例构造器 | 对象
  }
}
new Vue({
  el:'#app',
  components: {
    'custom-component': {
      template: `<div>我是局部注册的组件</div>`
    }
  }
})
组件命名约定和模板
注册组件命名:
- kebab-case (短横线分隔命名)
- camelCase (驼峰式命名)
- PascalCase (单词首字母大写命名)
使用组件命名:
- kebab-case (短横线分隔命名)
父子组件之间的通信
<div id="app">
  <parent></parent>
</div>

Vue.component('parent', {
  data(){
    return {
      name: 'parent'
    }
  },
  template: `<div>
              {{name}}
              <child></child>
            </div>`,
  components: {
    child: {
      data(){
        return {
          name: 'child'
        }
      },
      template: `<div>{{name}}</div>`
    }
  }
})

new Vue({
  el: '#app'
})
- 父组件传递参数
- 在child组件上添加属性,如果是动态属性用v-bind
- child组件使用props接受参数,可以验证参数
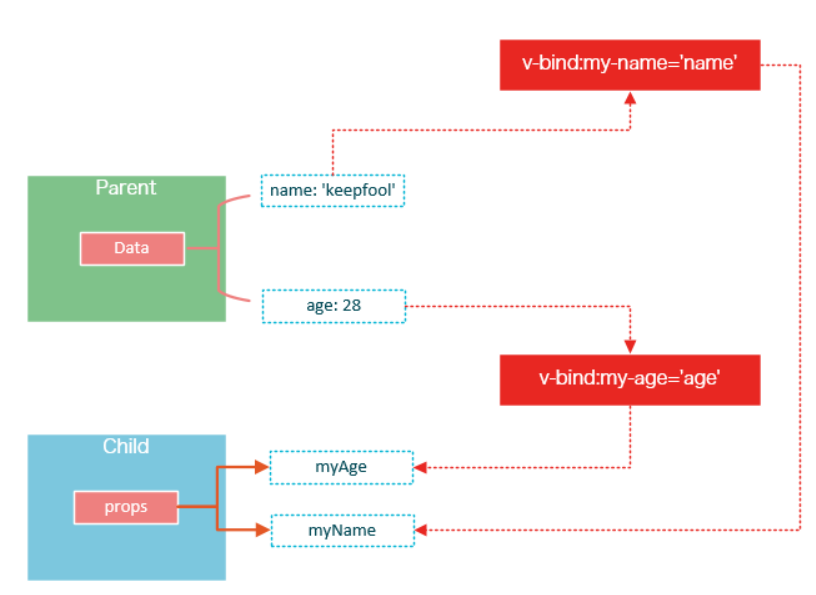
在child组件上绑定动态属性msg,把parent组件的msg值传给child组件
{
  data(){
    return {
      name: 'parent',
      msg: '你是谁'
    }
  },
  template: `<div>
              {{name}}
              <child :msg="msg"></child>
            </div>`,
  components: {
    child: {
      data(){
        return {
          name: 'child'
        }
      },
      template: `<div>{{name}}</div>`
    }
  }
}
child组件接受参数
{
  child: {
    props: ['msg'],
    data(){
      return {
        name: 'child'
      }
    },
    template: `<div>
      <p>我是:{{name}}</p>
      <p>{{msg}}</p>
    </div>`
  }
}
child参数验证
{
  props: {
    msg: {
      //类型
      type: String,
      //是否必须
      required: true,
      //默认值
      default: '',
      //验证
      validator(value) {
        return value
      }
    }
  }
}
完整示例
Vue.component('parent', {
  data(){
    return {
      name: 'parent',
      msg: '你是谁'
    }
  },
  template: `<div>
              {{name}}
              <child :msg="msg"></child>
            </div>`,
  components: {
    child: {
      props: {
        msg: {
          type: String,
          required: true,
          default: ''
        }
      },
      data(){
        return {
          name: 'child'
        }
      },
      template: `<div>
                  <p>我是:{{name}}</p>
                  <p>{{msg}}</p>
                </div>`
    }
  }
})
-
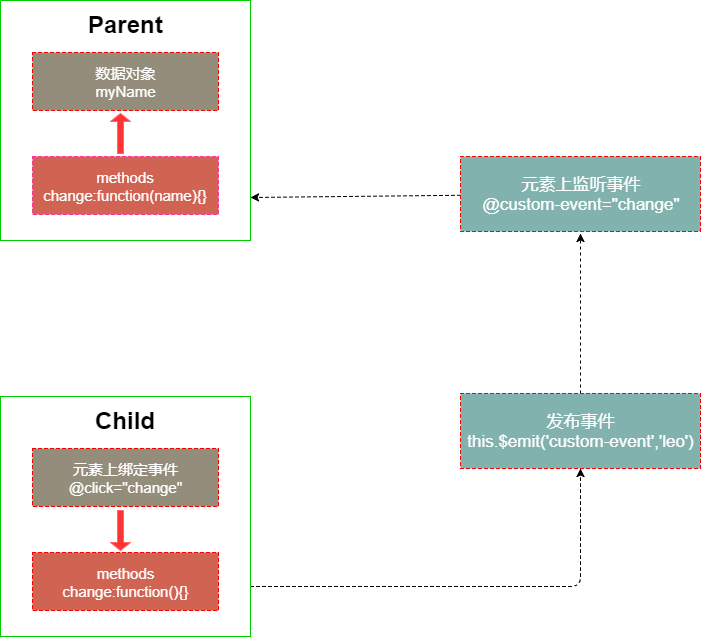
子组件发布事件
- child组件使用$emit发布事件
- 在parent组件监听事件
Vue.component('parent', {
  ...
  template: `<div>
              {{name}}
              <child @change-msg="changeMsgHandle" :msg="msg"></child>
            </div>`,
  methods: {
    changeMsgHandle(val){
      this.msg = val;
    }
  },
  components: {
    child: {
      ...
      methods: {
        changeMsg(){
          this.$emit('change-msg','我是child组件');
        }
      },
      template: `<div>
                  <p>我是:{{name}}</p>
                  <p>{{msg}}</p>
                  <button @click="changeMsg" type="button">改变msg</button>
                </div>`
    }
  }
})
完整示例
Vue.component('parent', {
  data(){
    return {
      name: 'parent',
      msg: '你是谁'
    }
  },
  template: `<div>
              {{name}}
              <child @change-msg="changeMsgHandle" :msg="msg"></child>
            </div>`,
  methods: {
    changeMsgHandle(val){
      this.msg = val;
    }
  },
  components: {
    child: {
      props: {
        msg: {
          type: String,
          required: true,
          default: ''
        }
      },
      data(){
        return {
          name: 'child'
        }
      },
      methods: {
        changeMsg(){
          this.$emit('change-msg','我是child组件');
        }
      },
      template: `<div>
                  <p>我是:{{name}}</p>
                  <p>{{msg}}</p>
                  <button @click="changeMsg" type="button">改变msg</button>
                </div>`
    }
  }
})
使用插槽分发内容
-
编译作用域
- 父组件模板的内容在父组件作用域内编译;
- 子组件模板的内容在子组件作用域内编译。
-
插槽的作用
- 将父组件中写在子组件一对标签内的结构混合在子组件模板中,这个过程称之为内容分发。使用特殊的 元素作为原始内容的插槽
-
单个插槽
- 如果子组件中没有一对slot标签,写在子组件标签对的内容会被丢弃 子组件中有slot标签,子组件标签对的内容会整体替换在slot标签位置 slot标签内的内容被视作备用内容
-
具名插槽
- 可以使用name来配置如何分发内容
- 没有name的slot被视为默认插槽
组件的双向绑定
v-modal作用在组件上,建立双向绑定
- 接收value这个prop
- 有值变化时,发布input事件
<div id="app">
  <custom v-model="message"></custom>
  <!--v-model就是下面写法的语法糖-->
  <custom :value="message" @input="value=>message=value"></custom>
</div>

Vue.component('custom', {
  props:{
    value:{
      type: String
    }
  },
  template: `<div>
              <h2>{{value}}</h2>
              <button @click="changeTitle">改变</button>
            </div>`,
  methods: {
    changeTitle(){
      this.$emit('input','子组件改了')
    }
  }
});

new Vue({
  el: '#app',
  data:{
    message: '父级的数据'
  }
});
- v-model定制 prop 和 event
<div id="app">
  <custom v-model="message" value='hello'></custom>
</div>

Vue.component('custom', {
  model: {
    prop: 'propName',
    event: 'eventName'
  },
  props:{
    propName: {
      type: String
    },
    value:{
      type: String
    }
  },
  template: `<div>
              <h2>{{value}}</h2>
              <h2>{{propName}}</h2>
              <button @click="changeTitle">改变</button>
            </div>`,
  methods: {
    changeTitle(){
      this.$emit('eventName','子组件改了')
    }
  }
});

new Vue({
  el: '#app',
  data:{
    message: '父级的数据'
  }
});
.sync 修饰符
- 语法糖,会扩展成一个更新父组件绑定值的 v-on 侦听器
<div id="app">
  <custom :title.sync="message"></custom>
</div>

Vue.component('custom', {
  props:{
    title: {
      type: String,
      default: 'hello'
    }
  },
  template: `<div>
              <h2>{{title}}</h2>
              <button @click="changeTitle">改变</button>
            </div>`,
  methods: {
    changeTitle(){
      this.$emit('update:title',"改变了")
    }
  }
});

new Vue({
  el:'#app',
  data:{
    message: 'vuejs'
  }
});
注册全局自定义指令
-
钩子函数
- bind:只调用一次,指令第一次绑定到元素时调用
- inserted:被绑定元素插入父节点时调用
- update:更新时调用
- componentUpdated: 更新完毕调用
- unbind:只调用一次,指令与元素解绑时调用。
Vue.directive('my-directive', {
  bind: function () {},
  inserted: function () {},
  update: function () {},
  componentUpdated: function () {},
  unbind: function () {}
})
封装model组件
- 样式
<style>
p,h4{
  margin:0;
}
.modal{
  width: 500px;
  background-color: #fff;
  border: 1px solid rgba(0,0,0,.2);
  border-radius: 6px;
  box-shadow: 0 3px 9px rgba(0,0,0,.5);
  position: absolute;
  left: 50%;
  top: 50%;
  transform: translate(-50%,-50%);
  z-index: 111;
}
.modal-header {
  padding: 15px;
  border-bottom: 1px solid #e5e5e5;
}
.modal-content {
  padding: 20px;
}
.modal-footer {
  padding: 15px;
  text-align: right;
  border-top: 1px solid #e5e5e5;
}
.btn {
  padding: 5px 15px;

}
.mask {
  position: fixed;
  top: 0;
  bottom: 0;
  left: 0;
  right: 0;
  background-color: rgba(55,55,55,.6);
  height: 100%;
  z-index: 100;
}
</style>
- 结构
<div id="app">
  <Modal></Modal>
</div>
- modal主体结构
<div class="modal">
  <div class="modal-header"></div>
  <div class="modal-content"></div>
  <div class="modal-footer"></div>
</div>
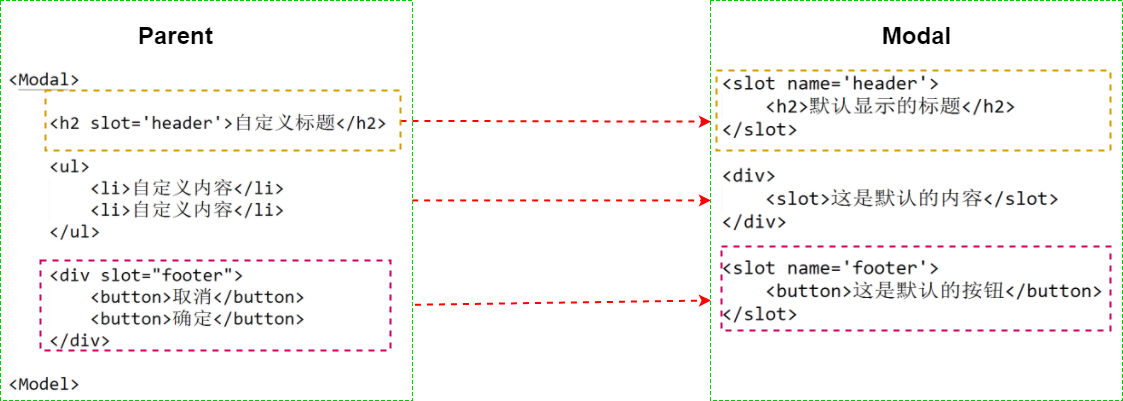
- modal的头部,内容,底部都可能定制内容
- 每部分都添加一个slot
- 点击按钮需要发布事件
<div class="modal-header">
  <slot name='header'>
    <h4>{{title}}</h4>
  </slot>
</div>

<div class="modal-content">
  <slot name="content">在这里添加内容</slot>
</div>

<div class="modal-footer">
  <slot name="footer">
    <input
      @click="okHandle"
      class="btn"
      type="button"
      :value="okValue"
    />
    <input
      @click="cancelHandle"
      class="btn"
      type="button"
      :value="cancelValue"
    />
  </slot>
</div>
- 组件完整结构
<script type="text/x-template" id="modal-temp">
  <div v-transform-body v-show="value" class="modal-example">
    <div class="mask"></div>
    <div class="modal">
      <div class="modal-header">
        <slot name='header'>
          <h4>{{title}}</h4>
        </slot>
      </div>
      <div class="modal-content">
        <slot name="content">在这里添加内容</slot>
      </div>
      <div class="modal-footer">
        <slot name="footer">
          <input
            @click="okHandle"
            class="btn"
            type="button"
            :value="okValue"
          />
          <input
            @click="cancelHandle"
            class="btn"
            type="button"
            :value="cancelValue"
          />
        </slot>
      </div>
    </div>
  </div>
</script>
- 注册Modal组件
- 使用props接受参数,并验证
- 添加监听事件
Vue.component('Modal',{
  props:{
    value:{
      type: Boolean,
      default: false
    },
    title:{
      type: String,
      default: '默认标题'
    },
    okValue:{
      type: String,
      default: '确定'
    },
    cancelValue:{
      type: String,
      default: '取消'
    }
  },
  template: '#modal-temp',
  methods: {
    okHandle () {
      this.$emit('ok-click');
      this.$emit('input',false);
    },
    cancelHandle () {
      this.$emit('cancel-click');
      this.$emit('input',false);
    }
  }
})
- 自定义插入节点到body指令
Vue.directive('transform-body',{
  inserted(el){
    document.body.appendChild(el);
  }
});
<div id="app">
  <button @click="showModal" type="button">显示modal</button>
  <Modal v-model="show" @ok-click="okHandle" @cancel-click="cancelHandle"></Modal>
</div>

new Vue({
  el:'#app',
  data:{
    show: true
  },
  methods: {
    showModal(){
      this.show = true;
    },
    okHandle(){
      console.log('点击了确定按钮')
    },
    cancelHandle(){
      console.log('点击了取消按钮')
    }
  }
});
生命周期函数
-
beforeCreate:数据劫持之前被调用,无法访问methods,data,computed上的方法或数据
-
created:实例已经创建完成之后被调用。但挂载阶段还没开始,$el 属性目前不可见。常用于ajax发送请求获取数据
-
beforeMounted:在挂载开始之前被调用
-
mounted:vue实例已经挂载到页面中,可以获取到el中的DOM元素,进行DOM操作
-
beforeUpdated:更新数据之前调用
-
updated:组件 DOM 已经更新
-
beforeDestroy:实例销毁之前调用。在这一步,实例仍然完全可用。
-
destroyed:Vue 实例销毁后调用
-
activated:keep-alive 组件激活时调用
-
deactivated:keep-alive 组件停用时调用
限制元素&动态组件
is
Vue 只有在浏览器解析、规范化模板之后才能获取其内容。
像 <ul>、<ol>、<table>、<select> 这样的元素里允许包含的元素有限制,而另一些像 <option> 这样的元素只能出现在某些特定元素的内部。
<div id="app">
  <table>
    <custom></custom>
  </table>

  <table>
    <tr is='custom'></tr>
  </table>
</div>

Vue.component('custom',{
  template: `<tr><td>hello</td></tr>`
});

new Vue({
  el: '#app'
});
- 通过使用保留的 <component> 元素,并对其 is 特性进行动态绑定
var vm = new Vue({
  el: '#example',
  data: {
    currentView: 'home'
  },
  components: {
    home: { /* ... */ },
    posts: { /* ... */ },
    archive: { /* ... */ }
  }
})

<component v-bind:is="currentView">
  <!-- 组件在 vm.currentview 变化时改变! -->
</component>
keep-alive
- 把切换出去的组件保留在内存中,可以保留它的状态或避免重新渲染
- include - 字符串或正则表达式。只有匹配的组件会被缓存。
- exclude - 字符串或正则表达式。任何匹配的组件都不会被缓存
<!-- 基本 -->
<keep-alive>
  <component :is="view"></component>
</keep-alive>

<!-- 多个条件判断的子组件 -->
<keep-alive>
  <comp-a v-if="a > 1"></comp-a>
  <comp-b v-else></comp-b>
</keep-alive>

<!-- 和 `<transition>` 一起使用 -->
<transition>
  <keep-alive>
    <component :is="view"></component>
  </keep-alive>
</transition>
