

- 可写流实现
- 初始化参数
- write()
- 流程图
- 注意事项
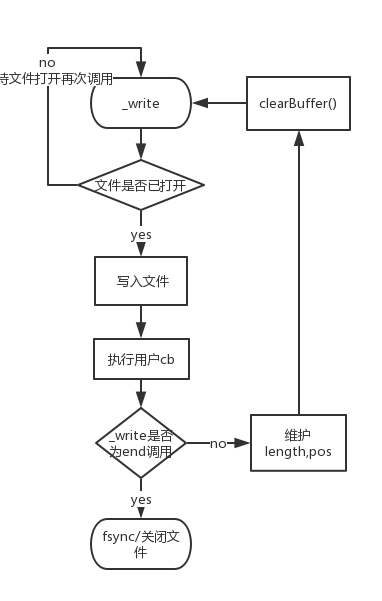
- _write()
- 流程图
- 注意事项
- end()
- 可读流实现
- 初始化参数
- 流动模式和暂停模式
- 流动模式
- 暂停模式
- case1
- case2
- 流程图
- 实现难点
- howMuchToRead
- pipe
- 源码
pre-notify
可读可写流的简明实现,以求加深对可读流可写流的印象与理解。
本文用流程图概括了整个源码的实现,着重讲述了比较重要以及难实现的点,推荐打开尾巴处的仓库地址,对照实际的代码来阅读。
(づ ̄ 3 ̄)づ Let`s go!
可写流实现
初始化参数
哼,这才不是骗字数呢,默认参数不重要吗?你记了那么多遍记住了吗?嗯。。
class WriteStream extends EventEmitter{
	constructor(path,options){
    	this.path = path;
        this.flags = options.flags||'w';
        this.encoding = options.encoding||'utf8';
        this.highWaterMark = options.highWaterMark||16*1024;
        this.mode = options.mode||0o666;
        this.autoClose = options.autoClose||true;
        this.fd = options.fd||null;

        // 之所以需要pos,是因为还可以将flags设置成a 追加嘛
        this.pos = options.start||0;

        // 用来标识是否正在真正写入文件
        this.writing = false;

        // 用于缓存正在写入时write进的东东
        this.buffers = [];

        // 用来标识缓存区的大小
        this.leng = 0;

        // 用来标识写入文件完毕后是否需要触发drain事件
        this.needDrain = false;

        // 用来标识是否已经调用过end()方法
        this.isEnd = false;

        // --- --- ---

        this.open();  // 打开文件,缓存fd
    }
}
write()
流程图
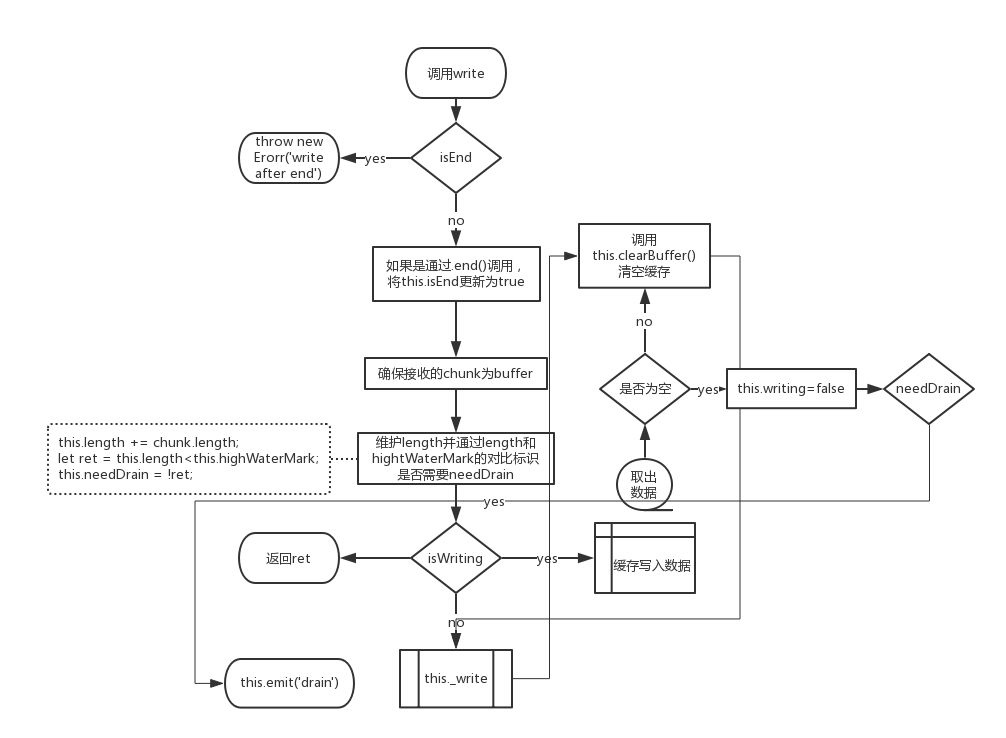
_write部分没有详细注释,其中有一点需要格外注意的是,如果此次write方法是通过调用end间接调用的,那么在_write写入文件完毕后会关闭文件。
注意事项
- 写入的必须是
buffer或则字符串,数字是不行的
let flag = ws.write(1+'','utf8',()=>{
    console.log('ok');
});
- 只有当攒存的数据大于
hightWaterMark且 缓存的数据被清空时,才会触发drain事件。 needDrain和isEnd都是针对于整个写入对象来说的。
_write()
流程图
注意事项
- 这里判断是否为
end()方法调用并不是依靠isEnd而是依据调用_write方法时的第三个参数end,因为 isEnd 的改变是在本轮执行时就改变了,而我们要关闭文件的话必须确保的是在调用完 end 以后。
// write 方法中
...
else{ // isWriting
    this.push({
    	chunk
        ,end
        ,callback
    });
}
...
// --- --- ---

// clearBuffer 方法中
...
if(buf){
  this._write(buf.chunk,()=>{
    buf.callback();
    this.clearBuffer();
  },buf.end);
  ...
end()
end(chunk,encoding=this.encoding,callback=()=>{}){
    this.write(chunk,encoding,callback,true);
}
第三个参数为内部使用,用来标识是通过end调用的write方法,调用之后不再允许使用write继续写入,并且在end实际写入文件后关闭文件
可读流实现
初始化参数
class ReadStream extends EventEmitter{
	constructor(path,options){
    	this.path = path;
        this.flags = options.flags||'r';
        this.highWaterMark = options.highWaterMark||64*1024;
        this.encoding = options.encoding||null;
        this.mode = options.mode||0o666;
        this.autoClose = options.autoClose||true;
        this.fd = options.fd||null;

        this.pos = options.start||0;
        this.end = options.end||null;

        // 标识可读流此刻的模式 流动||暂停
        this.flowing = false;

        // 每一次读取的buffer的大小
        this.buffer = Buffer.alloc(this.highWaterMark);

        // 用于暂停模式时缓存读取的数据
        this.buffers = [];

        // 相当于rs._readableState.length
        this.length = 0;

        // 是否需要发射readable事件
        // 只有缓存区被读取干净时才会发射事件
        this.emittedReadable = false;

        // --- --- ---

        this.open();

        this.on('newListener',(eventName)=>{  // 切换为流动模式读取
        	if(eventName === 'data'){
            	this.flowing = true;
                this.read();
            }
            if(eventName === 'readable'){  // 切换为暂停模式读取
            	this.flowing = false;
                this.read();
            }
        });
    }
}
流动模式和暂停模式
从上面的参数初始化可知,可读流可以通过监听两种不同的事件来获取数据。
流动模式
监听的第一种 data 事件被称之为可读流的 流动模式 读取,监听之后它会框框的不停发射它所读取到的data,每次读取到的data大小取决于 highWaterMark 。另外我们可以在data的回调中通过.pause() 方法暂停文件的读取和data的发射,什么时候想恢复了还可以通过 .resume() 来恢复文件的读取和data的发射。
暂停模式
监听的第二种 readable 事件被称之为可读流的 暂停模式 读取。
不同于流动模式的读取,暂停模式下,首先当我们一旦监听readable事件,它会先去读取 highWaterMark 个字节到缓存中并且会触发一次 readable 事件来通知我们,而我们想要拿到这些缓存中的数据需要通过 read(n) 。
并且这个模式下,它很智能,只要我们从缓存中拿取了数据且剩下的数据小于 highWaterMark 时,它就会自动续杯,往缓冲区再填充 highWaterMark 这么多字节的数据。
注意: 它每次填充的数据都是刚好
hightWaterMark这么多,不会多也不会少。
那,readable 事件除了刚开始那一次触发,什么时候会再触发呢?
答案是当缓存区被抽干,嗯。。。完全抽干再续上杯的时候就会再一次触发的 readable 事件。
注意: 续杯并不一定等于会触发readable,只有缓冲区被抽干,并且还续了杯,才会触发readable
case1
让我们看如下这么个栗子
// 假设hightWaterMark为3

rs.on('readable',()=>{
    let result = rs.read(1);
    console.log(result);
    result = rs.read(1);
    console.log(result);
    result = rs.read(1);
    console.log(result);
})

<<<
会一直打印,直到整个文件被读取完
之所以产生这样的结果,就是因为我们在readable回调了刚好读取了 highWaterMark 这么多字节的数据,每一次刚好把缓冲区读完,这意味着它续杯的时候就会再一次触发 readable,这样就形成了递归,不断触发readable。
case2
还有一种情况会不断触发 readable
rs.on('readable',()=>{
	let result = rs.read();  // 什么都不填
    console.log(result);
})

<<<
每次会打印hightWaterMark个字节
实际上这个栗子是上面栗子的简写形式,rs.read() 就相当于 rs.read(rs.highWaterMark)
流程图
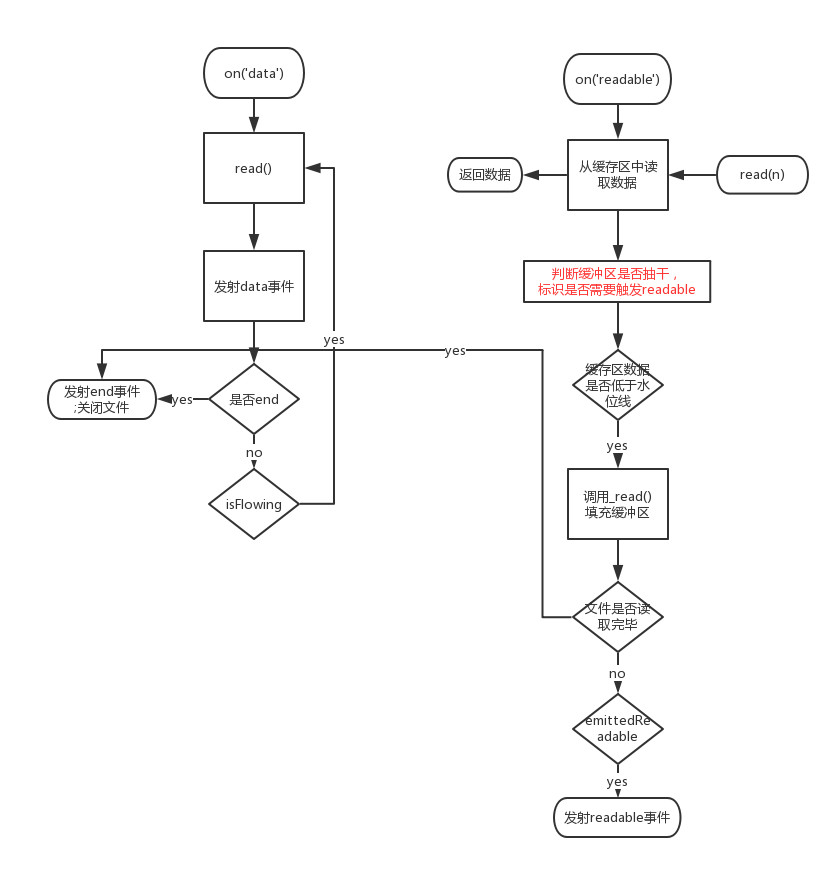
上面的流程图中有一点是没有详细注释的,就是当要读取的字节数大于缓冲区中存储的字节数时,Node.js源码中是会将 hightWaterMark 先扩充(扩充的大小是按照2的N次方的方式来扩充的),再去读取数据。嗯。。。读一个比你设置的hightWaterMark还大的,有虾米意义?早知如此,当初就该把highWaterMark设置大点不就好咯?我们这里的实现略过这种情况。
实现难点
howMuchToRead
读不像写,读的时候不仅可以设置 start 还能设置 end。
So,当我们设置了 end 时,我们每次读取的大小可能就不再是 highWaterMark 个了,准确来说我们最后一次读取的量应该是 this.end-this.pos+1 这么多个。
注意: 之所以要+1,是因为流的API是全Node中最奇葩的,它的索引位置是包前又包后的!
所以每次读取前,我们需要先计算先读取的字节数
let howMuchToRead = this.end?Math.min(this.highWaterMark,this.end-this.pos+1):this.hightWaterMark;
pipe
pipe实现就很简单咯,就是利用可写流的 flag 和 可读流的流动模式 以及 pause 和 resume 方法。
pipe(ws){
    this.on('data',(data)=>{
    	let flag = ws.write(data);
        if(!flag)this.pause();
    });

    ws.on('drain',()=>{
    	this.resume();
    });

    this.on('end',()=>{
    	ws.end();
    });
}
源码
仓库地址: 点我点我!
