

简介
学习使用OpenCV画几何图形,主要的函数为:cv2.line(),cv2.circle(),cv2.rectangle(),cv2.ellipse(),cv2.putText等。
相关说明
上述几个函数具有如下的相同类型的参数:
- img: 背景图像
- color: 形状的颜色。格式为BGR,是一个元组,如(255,0,0)表示蓝色。如果是灰度图像则只需要传入灰度值。
- thickness:厚度,默认值为1,如果对封闭图形传入-1,则会填充整个图形。
- lineType: 线的类型,默认是8-连通,传入cv2.LINE_AA则是反锯齿,反锯齿在画曲线时看起来会更平滑。
画线
画线需要指定起点和终点。
画矩形
画矩形需要指定左上点和右下点。
画园
画园需要指定圆心与半径
画椭圆
画椭圆需要的参数比较多:
中心点(x,y),轴长(长轴,短轴),椭圆的逆时针方向旋转角,起始角,终止角
起止角和终止角(顺时针方向)决定了椭圆的扇形。 img = cv2.ellipse(img,(256,256),(100,50),0,0,180,255,-1)
画多边形
画多边形需要提供各个顶点的坐标。示例代码如下:
pts = np.array([[10,5],[20,30],[70,20],[50,10]], np.int32)
pts = pts.reshape((-1,1,2))
img = cv2.polylines(img,[pts],True,(0,255,255))
- 1
- 2
- 3
第3个参数为True表示连成封闭图形,否则只是依次连接各个点。
添加文本
相关代码如下:
font = cv2.FONT_HERSHEY_SIMPLEX
cv2.putText(img,'Hello,OpenCV',(10,500), font, 1,(255,255,255),2,cv2.LINE_AA)
- 1
- 2
主要参数有:
文本内容,起点坐标,字体,字体大小,颜色,线宽,线类型。
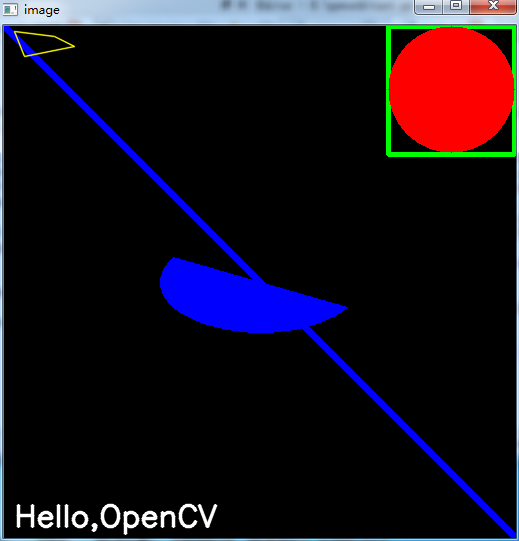
完整代码
import numpy as np
import cv2

# Create a black image
img = np.zeros((512,512,3), np.uint8)

# Draw a diagonal blue line with thickness of 5 px
img = cv2.line(img,(0,0),(511,511),(255,0,0),5)
img = cv2.rectangle(img,(384,0),(510,128),(0,255,0),3)
img = cv2.circle(img,(447,63), 63, (0,0,255), -1)
#img = cv2.ellipse(img,(256,256),(100,50),0,0,180,255,-1)
img = cv2.ellipse(img,(256,256),(100,50),0,30,210,255,-1)
pts = np.array([[10,5],[20,30],[70,20],[50,10]], np.int32)
pts = pts.reshape((-1,1,2))
img = cv2.polylines(img,[pts],True,(0,255,255),1,cv2.LINE_AA)

font = cv2.FONT_HERSHEY_SIMPLEX
cv2.putText(img,'Hello,OpenCV',(10,500), font, 1,(255,255,255),2,cv2.LINE_AA)

cv2.imshow('image',img)

cv2.waitKey(0)
cv2.destroyAllWindows()
- 1
- 2
- 3
- 4
- 5
- 6
- 7
- 8
- 9
- 10
- 11
- 12
- 13
- 14
- 15
- 16
- 17
- 18
- 19
- 20
- 21
- 22
- 23
from: http://blog.csdn.net/lkiller_hust/article/details/52949020
