

 2018-03-06-13-40-42.jpg
深入理解自定义View - paint(二)
上一章
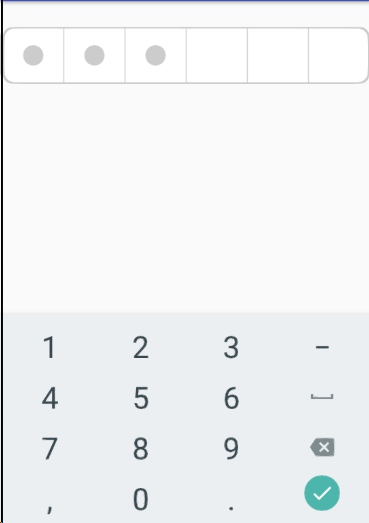
效果预览
 2018-03-06-13-40-42.jpg
用实例来证明
接下来给大家讲解一下如何用自定义View 来完成上面图片的样式
一、创建自定义的View
首先我们应该创建CustonView类来继承EditText
这里说说一下为什么集成EditText,因为EditText继承的是TextView,而TextView又继承的是View,所以我们可以吧EditText看成是子类,而我们创建的CustonView也是EditText的子类。
在继承EditText后,我们要复写下面的方法
public CustonView(Context context, AttributeSet attrs) {

super(context, attrs);

}
先把我所用到了一些参数列出来,大家自行观看
private static final int defaultContMargin = 5;

private static final int defaultSplitLineWidth = 3;

private int borderColor = 0xFFCCCCCC;//颜色

private float borderWidth = 5;//宽度

private float borderRadius = 3;//半径

private int passwordLength = 6;

private int passwordColor = 0xFFCCCCCC;

private float passwordWidth = 8;

private float passwordRadius = 3;

private Paint passwordPaint = new Paint(Paint.ANTI_ALIAS_FLAG);

private Paint borderPaint = new Paint(Paint.ANTI_ALIAS_FLAG);

private int textLength;
复写方法之后,我们开始复写OnDraw方法,这个方法就是可以算出宽高的方法
@Override

protected void onDraw(Canvas canvas) {

super.onDraw(canvas);

int width = getWidth();

int height = getHeight();

//外边框

RectF rect = new RectF(0,0,width,height);

borderPaint.setColor(borderColor);

canvas.drawRoundRect(rect,borderRadius,borderRadius,borderPaint);

//内容区

RectF rectIn = new RectF(rect.left + defaultContMargin, rect.top + defaultContMargin,

rect.right - defaultContMargin, rect.bottom - defaultContMargin);

borderPaint.setColor(Color.WHITE);

canvas.drawRoundRect(rectIn, borderRadius, borderRadius, borderPaint);

// 分割线

borderPaint.setColor(borderColor);

borderPaint.setStrokeWidth(defaultSplitLineWidth);

for (int i = 1; i < passwordLength; i++) {

float x = width * i / passwordLength;

canvas.drawLine(x, 0, x, height, borderPaint);

}

//密码

float cx,cy = height/2;

float half = width/passwordLength/2;

for (int i = 0;i<textLength;i++){

cx = width * i / passwordLength +half;

canvas.drawCircle(cx,cy,passwordWidth,passwordPaint);

}

}
随后,当我们获取了宽高,和设置了一些方法之后,我们开始进行初始化操作,并且想要画的样式画入画布中
public CustonView(Context context, AttributeSet attrs) {

super(context, attrs);

DisplayMetrics dm = getResources().getDisplayMetrics();

borderWidth = TypedValue.applyDimension(TypedValue.COMPLEX_UNIT_SP, borderWidth, dm);

borderRadius = TypedValue.applyDimension(TypedValue.COMPLEX_UNIT_SP, borderRadius, dm);

passwordLength = (int) TypedValue.applyDimension(TypedValue.COMPLEX_UNIT_SP, passwordLength, dm);

passwordWidth = TypedValue.applyDimension(TypedValue.COMPLEX_UNIT_SP, passwordWidth, dm);

passwordRadius = TypedValue.applyDimension(TypedValue.COMPLEX_UNIT_SP, passwordRadius, dm);

TypedArray array = context.getTheme().obtainStyledAttributes(attrs, R.styleable.PasswordInputView, 0, 0);

borderColor = array.getColor(R.styleable.PasswordInputView_pivBorderColor, borderColor);

borderWidth = array.getDimension(R.styleable.PasswordInputView_pivBorderWidth, borderWidth);

borderRadius = array.getDimension(R.styleable.PasswordInputView_pivBorderRadius, borderRadius);

passwordLength = array.getInt(R.styleable.PasswordInputView_pivPasswordLength, passwordLength);

passwordColor = array.getColor(R.styleable.PasswordInputView_pivPasswordColor, passwordColor);

passwordWidth = array.getDimension(R.styleable.PasswordInputView_pivPasswordWidth, passwordWidth);

passwordRadius = array.getDimension(R.styleable.PasswordInputView_pivPasswordRadius, passwordRadius);

array.recycle();

borderPaint.setStrokeWidth(borderWidth);

borderPaint.setColor(borderColor);

passwordPaint.setStrokeWidth(passwordWidth);

passwordPaint.setColor(passwordColor);

passwordPaint.setStyle(Paint.Style.FILL);

}
可能在上面的代码中大家有很多不理解的,不过没关系随后我会给大家讲解清楚,那么先给大家说明R.styleable.PasswordInputView_pivBorderColor此处的代码是什么,在哪里?我们需要创建一个resources
 14-07-17.jpg
<resources>

<declare-styleable name="PasswordInputView">

<attr name="pivBorderColor" format="color" />

<attr name="pivBorderWidth" format="dimension" />

<attr name="pivBorderRadius" format="dimension" />

<attr name="pivPasswordColor" format="color" />

<attr name="pivPasswordWidth" format="dimension" />

<attr name="pivPasswordRadius" format="dimension" />

<attr name="pivPasswordLength" format="integer" />

</declare-styleable>

</resources>
接下来 ,我把 自定义View 中的所有代码全部给大家展示出来
public class CustonView extends EditText {

private static final int defaultContMargin = 5;

private static final int defaultSplitLineWidth = 3;

private int borderColor = 0xFFCCCCCC;

private float borderWidth = 5;

private float borderRadius = 3;//半径

private int passwordLength = 6;

private int passwordColor = 0xFFCCCCCC;

private float passwordWidth = 8;

private float passwordRadius = 3;

private Paint passwordPaint = new Paint(Paint.ANTI_ALIAS_FLAG);

private Paint borderPaint = new Paint(Paint.ANTI_ALIAS_FLAG);

private int textLength;

public CustonView(Context context, AttributeSet attrs) {

super(context, attrs);

DisplayMetrics dm = getResources().getDisplayMetrics();

borderWidth = TypedValue.applyDimension(TypedValue.COMPLEX_UNIT_SP, borderWidth, dm);

borderRadius = TypedValue.applyDimension(TypedValue.COMPLEX_UNIT_SP, borderRadius, dm);

passwordLength = (int) TypedValue.applyDimension(TypedValue.COMPLEX_UNIT_SP, passwordLength, dm);

passwordWidth = TypedValue.applyDimension(TypedValue.COMPLEX_UNIT_SP, passwordWidth, dm);

passwordRadius = TypedValue.applyDimension(TypedValue.COMPLEX_UNIT_SP, passwordRadius, dm);

TypedArray array = context.getTheme().obtainStyledAttributes(attrs, R.styleable.PasswordInputView, 0, 0);

borderColor = array.getColor(R.styleable.PasswordInputView_pivBorderColor, borderColor);

borderWidth = array.getDimension(R.styleable.PasswordInputView_pivBorderWidth, borderWidth);

borderRadius = array.getDimension(R.styleable.PasswordInputView_pivBorderRadius, borderRadius);

passwordLength = array.getInt(R.styleable.PasswordInputView_pivPasswordLength, passwordLength);

passwordColor = array.getColor(R.styleable.PasswordInputView_pivPasswordColor, passwordColor);

passwordWidth = array.getDimension(R.styleable.PasswordInputView_pivPasswordWidth, passwordWidth);

passwordRadius = array.getDimension(R.styleable.PasswordInputView_pivPasswordRadius, passwordRadius);

array.recycle();

borderPaint.setStrokeWidth(borderWidth);

borderPaint.setColor(borderColor);

passwordPaint.setStrokeWidth(passwordWidth);

passwordPaint.setColor(passwordColor);

passwordPaint.setStyle(Paint.Style.FILL);

}

@Override

protected void onDraw(Canvas canvas) {

super.onDraw(canvas);

int width = getWidth();

int height = getHeight();

//外边框

RectF rect = new RectF(0,0,width,height);

borderPaint.setColor(borderColor);

canvas.drawRoundRect(rect,borderRadius,borderRadius,borderPaint);

//内容区

RectF rectIn = new RectF(rect.left + defaultContMargin, rect.top + defaultContMargin,

rect.right - defaultContMargin, rect.bottom - defaultContMargin);

borderPaint.setColor(Color.WHITE);

canvas.drawRoundRect(rectIn, borderRadius, borderRadius, borderPaint);

// 分割线

borderPaint.setColor(borderColor);

borderPaint.setStrokeWidth(defaultSplitLineWidth);

for (int i = 1; i < passwordLength; i++) {

float x = width * i / passwordLength;

canvas.drawLine(x, 0, x, height, borderPaint);

}

//密码

float cx,cy = height/2;

float half = width/passwordLength/2;

for (int i = 0;i<textLength;i++){

cx = width * i / passwordLength +half;

canvas.drawCircle(cx,cy,passwordWidth,passwordPaint);

}

}

@Override

protected void onTextChanged(CharSequence text, int start, int lengthBefore, int lengthAfter) {

super.onTextChanged(text, start, lengthBefore, lengthAfter);

this.textLength = text.toString().length();

invalidate();

}

public int getBorderColor() {

return borderColor;

}

public void setBorderColor(int borderColor) {

this.borderColor = borderColor;

}

public float getBorderRadius() {

return borderRadius;

}

public void setBorderRadius(float borderRadius) {

this.borderRadius = borderRadius;

}

public int getPasswordLength() {

return passwordLength;

}

public void setPasswordLength(int passwordLength) {

this.passwordLength = passwordLength;

}

public int getPasswordColor() {

return passwordColor;

}

public void setPasswordColor(int passwordColor) {

this.passwordColor = passwordColor;

}

public float getPasswordWidth() {

return passwordWidth;

}

public void setPasswordWidth(float passwordWidth) {

this.passwordWidth = passwordWidth;

}

public float getPasswordRadius() {

return passwordRadius;

}

public void setPasswordRadius(float passwordRadius) {

this.passwordRadius = passwordRadius;

}

}
二、自定义View创建完成后,开始在XML视图文件中写入就可以了
首先在这里给大家讲一下,在第一步中,我把所有的代码都给展示了后,可能大家看见了
get Or set 方法,相信大家都知道这是干什么用的,
那么为什么要在这里这样写呢?一会在XML文档中就有答案
下面是XML文档
<com.desinpro.okhttp.okhttp.CustonView

android:id="@+id/CustonView"

android:layout_width="match_parent"

android:layout_height="56dp"

android:layout_marginTop="25dp"

android:cursorVisible="false"

android:inputType="number"

android:maxLength="6"

app:pivBorderColor="#cccccc"

app:pivBorderRadius="10dp"

app:pivBorderWidth="10dp"

app:pivPasswordColor="#cccccc"

app:pivPasswordLength="6"

app:pivPasswordWidth="10dp" />
大家看见app:后面的名字,看过第一步的可能都会比较熟悉,没错,就是在第一步中我们设置的参数,我们用get Or set 方法 可以吧这些参数进行传递,那么效果样式应该就是第一个图片了
最后
给大家讲一下Paint(画笔)中的作用,在上述文章中我们用设置了画笔的宽度,颜色,以及在EditText上的基础上用画笔来画出来,这就是自定义View。其实画笔还有很多的方法,
