书接上回,上回书说了 vuex 的安装、以及 store 构造函数,下面我们来讲后面部分

收集 modules
vuex 允许我们自定义多个模块,防止应用的所有状态会集中到一个比较大的对象,导致 store 就变的臃肿了。
const moduleA = {
  state: { ... },
  mutations: { ... },
  actions: { ... },
  getters: { ... }
}

const moduleB = {
  state: { ... },
  mutations: { ... },
  actions: { ... }
}

const store = new Vuex.Store({
  modules: {
    a: moduleA,
    b: moduleB
  }
})

store.state.a // -> moduleA 的状态
store.state.b // -> moduleB 的状态
这是如何实现的呢?

在store的构造函数里面有这样一段代码:this._modules = new ModuleCollection(options),他就是用来收集用户自定义的 modules,该函数位于 module/module-collection.js 下
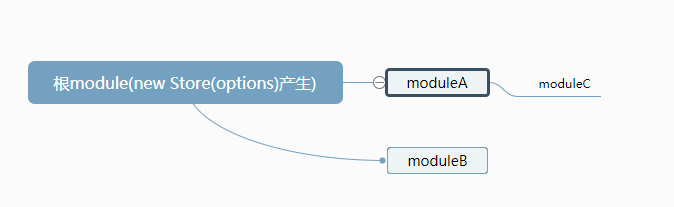
现在假设我们的 modules 做如下设置:
store = {
  modules: {
    moduleA: {
      state: {},

      modules: {
        moduleC: {
          state: {},
          actions: {}
        }
      }

    },

    modulesB: {
      state: {},
      mutations: {
        // xxx
      }
    }

  }
}
模块关系图如下:
来到 ModuleCollection 的构造函数,很简单,调用其 register 方法,并传入三个参数
register(path, rawModule, runtime = true) {
    if (process.env.NODE_ENV !== 'production') {
      assertRawModule(path, rawModule)
    }

    const newModule = new Module(rawModule, runtime)
    if (path.length === 0) {
      // 整个传入store 里的 option 为一个大的 module ,
      // 再对option 里的 modules 属性进行递归注册为 module
      this.root = newModule
    } else {
      const parent = this.get(path.slice(0, -1))
      parent.addChild(path[path.length - 1], newModule)
    }

    // register nested modules
    if (rawModule.modules) {
      forEachValue(rawModule.modules, (rawChildModule, key) => {
        // 这里的 concat 并不改变原来的数组,所以如果是同级的 module ,那么他还是有着相同的父级
        this.register(path.concat(key), rawChildModule, runtime)
      })
    }
  }
现在我们一步一步来分析。
先讲一下 register 里的对传入模块结构的断言,调用 assertRawModule(path, rawModule) 以确保 getters/mutations/actions 依次符合 函数/函数/(对象或者函数) 的结构,这部分代码并不难,但是作者的这种编码习惯非常值得学习,详见 assertRawModule

回到正题
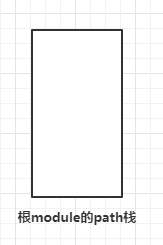
第一次 调用 this.register([], rawRootModule, false)
此时传入 register 函数的 path 为 空数组,rawModule 为最外层的 store 对象,即可以理解为 根module,runtime 为 false
接着调用 new Module(rawModule, runtime) 实例化这个 根module
constructor (rawModule, runtime) {
    this.runtime = runtime
    // 存储子 modules
    this._children = Object.create(null)
    // Store the origin module object which passed by programmer
    // 存储原始的这个传进来的 module
    this._rawModule = rawModule
    const rawState = rawModule.state  // 获取模块的 state

    // Store the origin module's state
    this.state = (typeof rawState === 'function' ? rawState() : rawState) || {} // state 最终是一个对象
  }
回到 register 函数,如果此时的 path 为 空数组,那么就将此模块设置为 整个状态树的 根模块,即this.root= 根 module,这里我们的 path=[],所以它是 根 module,不走 else
来到后面,判断该模块是否有 modules属性,即有子模块,有则继续循环注册子模块,我们这里有 moduleA 和 moduleB ,所以继续注册
// util.js
function forEachValue (obj, fn) {
    Object.keys(obj).forEach(key => fn(obj[key], key))
  }
第二次调用 this.register(path.concat(key), rawChildModule, runtime)
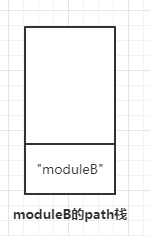
此时传入 register 函数的 path 为 path.concat(key),即 path =['moduleA'] ,rawModule 为 moduleA 对象,runtime 为 false
注:
path.concat(key)并不改变原始的path,它返回一个新的数组,所以根module的path栈还是空,这一点很重要
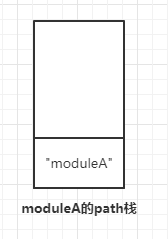
继续重复第一步的步骤,不同的是,实例化完 moduleA 后,由于此时的 path =['moduleA'],所以它走 else
else {
      const parent = this.get(path.slice(0, -1))
      parent.addChild(path[path.length - 1], newModule)
    }
path.slice(0, -1) 返回 path 数组以外的其他元素,不改变原始数组,所以等价于 this.get([])
// 作用:获取当前的模块的父模块
// 传入的 path 是从根模块到父模块的一条链路
get(path) {
    return path.reduce((module, key) => {
      return module.getChild(key)
    }, this.root)
  }
this.root为前面的 根 module,而 path 是空,所以 parent=根 module ,然后执行 parent.addChild(path[path.length - 1], newModule),此时获取 path 栈顶元素("moduleA")作为 key ,和 实例 moduleA 作为 value ,加入到 父模块(根 module)的子元素对象中
由于 moduleA 还有子模块,所以继续递归 子模块
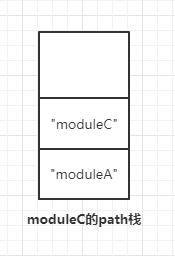
第三次调用 this.register(path.concat(key), rawChildModule, runtime)
此时传入 register 函数的 path 为 path.concat(key),即 path =['moduleA'] ,rawModule 为 moduleA 对象,runtime 为 false
继续上面步骤
来到 this.get,这是传入的参数是 ['moduleA'],即 moduleC 的父模块 moduleA。由于 根module 保存了 moduleA,所以通过这种类似于链的方式来获取 父模块,同理将 moduleC 加入 moduleA 的子模块对象中
至此,第一条链就讲完了,
返回到 根module 的 forEachValue 循环中,这里我们讲到,他的 path 还是空,这就体现了 使用 concat 方法的好处与机智。 所以与处理 moduleA 的过程一模一样
第四次调用 this.register(path.concat(key), rawChildModule, runtime)
此时传入 register 函数的 path 为 path.concat(key),即 path =['moduleB'] ,rawModule 为 moduleB 对象,runtime 为 false
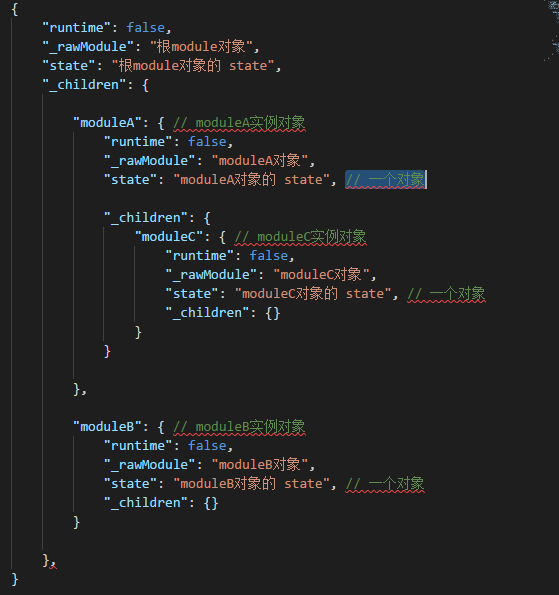
终于将 this._modules = new ModuleCollection(options) 的过程分析完毕了
最终的 this._modules.root(不包括方法) 如下图所示
总的看下来挺佩服作者的思维以及处理方式的

看着挺长的了,其实就是多了几个循环过程的讲解,所以要不要再翻篇呢?呢?呢?????


回到 store.js 的构造函数,
const state = this._modules.root.state // 将 "根模块对象的 state" (即最外层store的state对象)赋予 state ,
installModule(this, state, [], this._modules.root)
初始化根模块,并且递归注册子模块,并且收集所有模块的 getters
function installModule(store, rootState, path, module, hot) {
// hot 当动态改变 modules 或者热更新的时候为 true.
  const isRoot = !path.length // 判断是否是根模块
  const namespace = store._modules.getNamespace(path)  // 获取s使用的命名空间

  // register in namespace map
  if (module.namespaced) {
    // 如果命名空间存在,就在store 对象中建立 namespace 到模块的映射
    store._modulesNamespaceMap[namespace] = module
  }

  // set state
  if (!isRoot && !hot) { // 如果不是根模块以及 hot = false,这里我们是根模块,所以我们先放一放,跳到下一步
    const parentState = getNestedState(rootState, path.slice(0, -1))
    const moduleName = path[path.length - 1]
    store._withCommit(() => {
      Vue.set(parentState, moduleName, module.state)
    })
  }

  // 跳到下面先看看makeLocalContext,
  // 又跳!!!放心,,不用跳多远,也就是下一个 issue,,,抠鼻.gif
  const local = module.context = makeLocalContext(store, namespace, path)

  // 注册各个模块的 mutaations 方法到 store._mutations 中,每个type对应一个数组
  module.forEachMutation((mutation, key) => {
    const namespacedType = namespace + key
    registerMutation(store, namespacedType, mutation, local)
  })

  // 注册各个模块的 actions 到store._actions
  module.forEachAction((action, key) => {
    const type = action.root ? key : namespace + key
    const handler = action.handler || action
    registerAction(store, type, handler, local)
  })

  // 注册各个模块的 getters 到store._wrappedGetters
  module.forEachGetter((getter, key) => {
    const namespacedType = namespace + key
    registerGetter(store, namespacedType, getter, local)
  })


  module.forEachChild((child, key) => { // 递归子模块
    installModule(store, rootState, path.concat(key), child, hot)
  })
}
上面出现的有关函数由于排版以及篇幅原因,我放到了 我看Vue(三) 中。
总结下,installModule 都干了些神马:
- 获取命名空间
- 获取本模块的 context 属性,里面包含了本模块的
dispatch/commit/getter/state等属性或方法 - 将 各个模块按照命名空间将
mutations/getters/actions加入到全局的_mutations /_wrappedGetters/_actions里
接下来我们简单讲讲 在组件里面调用 dispatch、commit 的过程
dispatch/commit
commit(_type, _payload, _options) {
    // check object-style commit
    // 这里就是获取正确的 type / payload /options
    const {
      type,
      payload,
      options
    } = unifyObjectStyle(_type, _payload, _options)

    const mutation = {
      type,
      payload
    }

    // 获取触发的type  对应的 mutation
    const entry = this._mutations[type]
    if (!entry) {  // 如果不存在,给出警告
      if (process.env.NODE_ENV !== 'production') {
        console.error(`[vuex] unknown mutation type: ${type}`)
      }
      return
    }
    this._withCommit(() => {  // 由于entry是一个数组,所以逐个执行,并传入负载
      entry.forEach(function commitIterator(handler) {
        handler(payload)
      })
    })

    // 触发 订阅函数
    this._subscribers.forEach(sub => sub(mutation, this.state))

    if (
      process.env.NODE_ENV !== 'production' &&
      options && options.silent
    ) {
      console.warn(
        `[vuex] mutation type: ${type}. Silent option has been removed. ` +
        'Use the filter functionality in the vue-devtools'
      )
    }
  }

dispatch(_type, _payload) {  // 基本和commit 一样
// xxx
  }
看完上面的代码,我有些疑问,这个 store.state 和 store.getter 是哪来的?

resetStoreVM(this, state)
function resetStoreVM(store, state, hot) {
  const oldVm = store._vm // 之前的 vue 实例

  // bind store public getters
  store.getters = {}  // 终于找到你
  const wrappedGetters = store._wrappedGetters  // 前面说过的各个模块的 getters 集合
  const computed = {}
  forEachValue(wrappedGetters, (fn, key) => {
    // use computed to leverage its lazy-caching mechanism
    computed[key] = () => fn(store)    // 收集各个 getter,等会传入 computed ,以此做到响应式
    Object.defineProperty(store.getters, key, {
      get: () => store._vm[key],  // 因为利用了计算属性,所以各个 getter 就变成了 vue 实例的属性
      enumerable: true // for local getters
    })
  })

  // use a Vue instance to store the state tree
  // suppress warnings just in case the user has added
  // some funky global mixins
  const silent = Vue.config.silent //// 是否取消Vue 所有的日志与警告
  Vue.config.silent = true

  // 重新 new
  store._vm = new Vue({
    data: {
      ?state: state  // 这里虽然是 ?state,但是利用store.state时获取的就是它
    },
    computed
  })

  /* get state() {
        return this._vm._data.?state
  }*/

  Vue.config.silent = silent

  // enable strict mode for new vm
  if (store.strict) {
    enableStrictMode(store)
  }

  if (oldVm) {
    if (hot) {
     // 解除旧vm的state的引用,以及销毁旧的Vue对象
      // dispatch changes in all subscribed watchers
      // to force getter re-evaluation for hot reloading.
      store._withCommit(() => {
        oldVm._data.?state = null
      })
    }

    Vue.nextTick(() => oldVm.$destroy())
  }
}
解决了 store.getter了,那么 store.state是如何来的呢?
还记不记得第一次让你跳的地方,没错就是 installModule
 if (!isRoot && !hot) { // 如果不是根模块以及 hot = false,这里我们是根模块,所以我们先放一放,跳到下一步
    const parentState = getNestedState(rootState, path.slice(0, -1))
    const moduleName = path[path.length - 1]
    store._withCommit(() => {
      Vue.set(parentState, moduleName, module.state)
    })
  }
这里我们就来看 Vue.set(parentState, moduleName, module.state)。 它的作用是在父模块的state 属性上添加上本模块的state,还是按照一开始我们那种依赖关系来看:
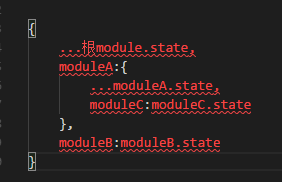
这样我们就不难理解 getNestState 里面为什么可以如此获取 state 了
好了,vuex 核心大致的内容就是这些,后面在 我看Vuex(三)
中我会解释下其他一些函数的作用
原文地址: 我看Vuex(二)
如有不当,欢迎指出交流,谢谢 ^_^