

上次我们看完了自定义组件渲染的表层逻辑。这个过程虽然看似很像简单组件对应的逻辑,但也包含一些其特有的处理:1)一个额外的ReactCompositeComponent 需要被实例化来代表这个自定义的组件(App);2)App.render()会触发很多个React.createElement()来创建ReactElement 树。
这次我们来探索里层逻辑的更多分支,这些分支被用来将上文提到的ReactElement 树转换成对应的ReactDOMComponent,最后则变成实际的DOM对象。
本篇涉及的文件:
renderers/dom/shared/ReactDOMComponent.js: 提供本文重点关注的两个函数 mountChildren() 和 _createInitialChildren
renderers/dom/client/utils/setTextContent.js: DOM操作, 设置文字
renderers/dom/client/utils/DOMLazyTree.js: DOM操作, 添加子节点
renderers/shared/stack/reconciler/ReactMultiChild.js: 包含过渡到 traverseAllChildren 的函数
shared/utils/traverseAllChildren.js: 遍历所有下一层的ReactElement 然后实例化它们对应的ReactDOMComponent
调用栈里用到的标签
↻ 函数调用
? 条件
如果本篇涉及的函数和代码在之前详细讨论过,我会用{}来做引用
本篇讨论的逻辑都包含在ReactDOMComponent[6].mountComponent()里。这个函数的主要的任务是从ReactDOMComponent[6] 里派生出DOM对象{第三篇}。我们先把这个步骤叫 0)方便后面讨论。
在本篇中,我们会详细解释上次略过的一个函数_createInitialChildren() 。这个函数是用来处理自定义组件的子树(ReactElements)。 在{第三篇 *7}中这个函数仅仅点亮了其中的一个小分支用来处理字符串子节点。这个小分支,以及其整个函数会在本篇中被解析完成。
_createInitialChildren是我的这次的主角;如果想了解它在简单组件渲染中的角色,请在 第三篇搜索 *7。另外一个{第三篇 *7}略过的函数_updateDOMProperties会在以后详细讨论
更具体点,这个函数1)将ReactElement们转换成对应的ReactDOMComonent;2)(递归)调用ReactDOMComponent[*].mountComponent()创建DOM对象;3)将这些DOM对象插入到步骤0)创建的根DOM节点 。
我们先来简单回顾一下步骤0)
ReactDOMComponent[6].mountComponent() ( _createInitialChildren 之前的逻辑)—创建 DOM element[6]
提示:我保留这段仅仅为本篇的完整性,其实这个ReactDOMComponent 已经详细在 {第三篇}完整讨论过
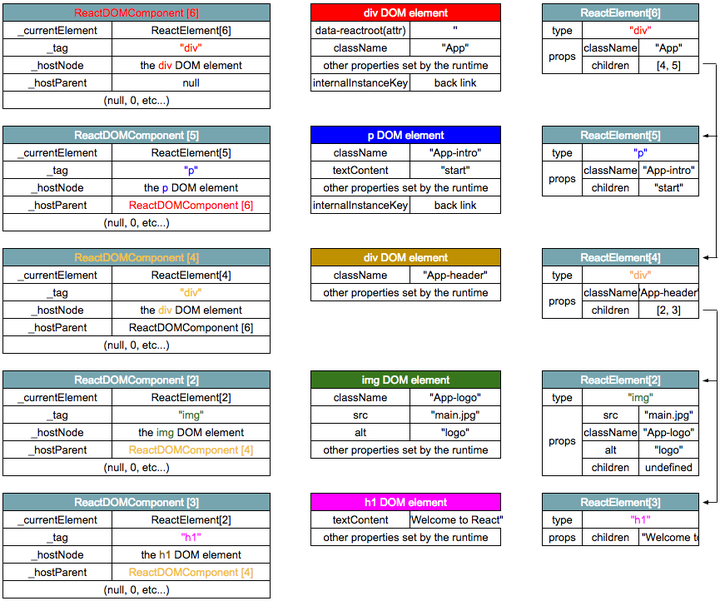
目标数据结构:

调用栈:
...
|~mountComponentIntoNode()                                    |
  |-ReactReconciler.mountComponent()                          |
    |-ReactCompositeComponent[T].mountComponent()             |
      |-ReactCompositeComponent[T].performInitialMount()  upper half
        |-ReactReconciler.mountComponent()                    |
          |-ReactCompositeComponent[ins].mountComponent()     |
            |-this.performInitialMount()                      |
              |-this._renderValidatedComponent()              |
              |-instantiateReactComponent()                  _|_
                (we are here)                                 |
              |-ReactDOMComponent[6].mountComponent(          |
                  transaction, // scr: -----> not of interest |
                  hostParent,  // scr: -----> null            |
                  hostContainerInfo,// scr:---------------------> ReactDOMContainerInfo[ins]                                lower half
                  context      // scr: -----> not of interest |
                )                                             |
...
这一步会使用ReactDOMComponent[6]来创建DOM对象,并给它的各属性赋值。
概括一下:1)初始化ReactDOMComponent[6] 的各属性;2)用document.createElement()创建div DOM元素;3)创建ReactDOMComponent[6]和DOM对象的双向链接;4)和5)设置新建DOM对象的各属性;然后6)将DOM对象封装进DOMLazyTree[1] 。
mountComponent: function (
  transaction,
  hostParent,
  hostContainerInfo,
  context
) {

// scr: --------------------------------------------------------> 1)
  this._rootNodeID = globalIdCounter++;
  this._domID = hostContainerInfo._idCounter++;
  this._hostParent = hostParent;
  this._hostContainerInfo = hostContainerInfo; // scr: ------------> ReactDOMContainerInfo[ins]

  var props = this._currentElement.props;

  switch (this._tag) { // scr: ---> no condition is met here
...
  }

... // scr: -----> sanity check

// We create tags in the namespace of their parent container, except HTML
// tags get no namespace.
  var namespaceURI;
  var parentTag;

  if (hostParent != null) { // scr: -----> it is null
...
  } else if (hostContainerInfo._tag) {
    namespaceURI = hostContainerInfo._namespaceURI; // scr: -------> "http://www.w3.org/1999/xhtml"
    parentTag = hostContainerInfo._tag;        // scr: ------> "div"
  }
  if (namespaceURI == null ||
      namespaceURI === DOMNamespaces.svg &&
      parentTag === 'foreignobject'
  ) { // scr: -----> no
...
  }

  if (namespaceURI === DOMNamespaces.html) {
    if (this._tag === 'svg') {               // scr: -----> no
...
    } else if (this._tag === 'math') {       // scr: -----> no
...
    }
  }

  this._namespaceURI = namespaceURI;  // scr: ---------------------> "http://www.w3.org/1999/xhtml"

... // scr: ------> DEV code

  var mountImage;

  if (transaction.useCreateElement) { // scr: ---------------------> transaction related logic, we assume it is true
    var ownerDocument = hostContainerInfo._ownerDocument;
    var el;

    if (namespaceURI === DOMNamespaces.html) {
      if (this._tag === 'script') {         // scr: -----> no
...
      } else if (props.is) {                // scr: -----> no
...
      } else {
        // Separate else branch instead of using `props.is || undefined` above becuase of a Firefox bug.
        // See discussion in https://github.com/facebook/react/pull/6896
        // and discussion in https://bugzilla.mozilla.org/show_bug.cgi?id=1276240

// scr: --------------------------------------------------------> 2)
        // scr: ---------> HTML DOM API
        el = ownerDocument.createElement(this._currentElement.type);
      }
    } else { // scr: ------> no
...
    }

// scr: --------------------------------------------------------> 3)
    ReactDOMComponentTree.precacheNode(this, el); // scr: --------> doubly link (._hostNode & .internalInstanceKey)
    this._flags |= Flags.hasCachedChildNodes; // scr: ------------>
bit wise its flags

// scr: --------------------------------------------------------> 4)
    if (!this._hostParent) { // scr: ------> it is the root element
      DOMPropertyOperations.setAttributeForRoot(el); // scr: -----> data-reactroot
    }

// scr: --------------------------------------------------------> 5)
    this._updateDOMProperties( //*6
      null,
      props,
      transaction
    ); // scr: --------------------------> style:{ “color”: “blue” }

// scr: --------------------------------------------------------> 6)
    var lazyTree = DOMLazyTree(el); // scr: ------> DOMLazyTree[ins]
    this._createInitialChildren(transaction, props, context, lazyTree);
...
  } // if (transaction.useCreateElement)

  return mountImage;
}

ReactDOMComponent@renderers/dom/shared/ReactDOMComponent.js
ReactDOMComponent[6]._createInitialChildren() —创建 DOM 元素[2-5]
目标数据结构:
上文中提到,这个方法被用于创建字符串的子节点(‘hello world’){第三篇}。本篇中我们也会用到这个分支逻辑来创建类似的节点([3] 和 [5]),我们先把这个分支逻辑命名为{1}。
当绘制自定义组件到达这一步, _createInitialChildren()第一次被访问时则会进入分支逻辑{2}。这个分支就是用来处理ReactElement树的。上面提到,它1)将ReactElement们转换成对应的ReactDOMComponent(a),然后用这些ReactDOMComponent来创建对应的DOM节点 (b),然后2)将DOM节点插入到(由ReactDOMComponent[6]创建的)根节点中。
_createInitialChildren: function (
  transaction, // scr: not of interest
  props,       // scr: -------------------> ReactElement[6].props
  context,     // scr: not of interest
  lazyTree     // scr: -------------------> DOMLazyTree[ins]
)
{
  // Intentional use of != to avoid catching zero/false.
  // scr: it is named as 'dangerous', let's avoid touching it
  var innerHTML = props.dangerouslySetInnerHTML;
  if (innerHTML != null) { // scr: so no innerHTML
...
  } else {
    var contentToUse = CONTENT_TYPES[typeof props.children] ? props.children : null;

    var childrenToUse = contentToUse != null ? null : props.children;
    // scr: some comments
    if (contentToUse != null) {
      // scr: some comments
      if (contentToUse !== '') { // scr: ----------------> route {1}
...// scr: DEV code
        DOMLazyTree.queueText(lazyTree, contentToUse);
      }
    } else if (childrenToUse != null) { // scr: ---------> route {2}
      var mountImages = this.mountChildren(childrenToUse, transaction, context);  // scr: --------------------------------> 1)
      for (var i = 0; i < mountImages.length; i++) { scr: ------> 2)
        DOMLazyTree.queueChild(lazyTree, mountImages[i]);
      }
    }
  }
},

ReactDOMComponent@renderers/dom/shared/ReactDOMComponent.js
接下来的调用层级,和遍历方式会比较复杂,所以这次我们变一下策略,先构建一个大体的逻辑框架,再来钻细节。
静态调用关系:
...                                            (outer recursion)
ReactDOMComponent[6].mountComponent()    <-------------------------|
    (we are here)                                                  |
  |-this._createInitialChildren()                                  |
  ?{1}                                                             |
    |-DOMLazyTree.queueText()                                      |
  ?{2}                                                             |
    |-this.mountChildren()        // scr: ---------------> 1)(a)   |
      |-this._reconcilerInstantiateChildren()                      |
        |-ReactChildReconciler.instantiateChildren()               |
          |-traverseAllChildren()                                  |
            |-traverseAllChildrenImpl()  <------|inner             |
              |↻traverseAllChildrenImpl() ------|recursion         |
                |-instantiateChild()                               |
                  |-instantiateReactComponent()                    |
      |↻ReactDOMComponent.mountComponent()      // scr: -> 1)(b)---|
    |↻DOMLazyTree.queueChild()    // scr: ---------------> 2)
...
我们先来看这个复杂调用关系的栈底。了解了这套逻辑的终极目的,心里也能踏实点。
DOMLazyTree.queueText() and DOMLazyTree.queueChild()
在本次调用中DOMLazyTree.queueText()只有一行有效代码:
function queueText(tree, text) {
  if (enableLazy) { // scr: NO, I mean, false
...
  } else {
    setTextContent(tree.node, text);
  }
}

queueText@renderers/dom/client/utils/DOMLazyTree.js

var setTextContent = function (node, text) {
  if (text) {
    var firstChild = node.firstChild;

  if (firstChild && firstChild === node.lastChild && firstChild.nodeType === 3) { // scr: false
...
    }
  }
  node.textContent = text; // scr: the only effective line
};

setTextContent@renderers/dom/client/utils/setTextContent.js
Node.textContent 是标注的DOM属性,用来代表节点的字符串内容。显然,这个就是分支逻辑{1}的最终目标。
DOMLazyTree.queueChild()也只有一行有效代码:
function queueChild(parentTree, childTree) {
  if (enableLazy) { // scr: again, false
...
  } else {
    parentTree.node.appendChild(childTree.node);
  }
}

queueChild@renderers/dom/client/utils/DOMLazyTree.js
这里Node.appendChild()是另一个DOM的标准API,用来给一个DOM节点插入一个子节点。显然,这个函数就是分支逻辑{2}的终点。
现在我们可以把这两个函数替换成它们对应的关键行代码。
 ...                                          (outer recursion)
ReactDOMComponent[6].mountComponent()    <-------------------------|
  |-this._createInitialChildren()                                  |
  ?{1}                                                             |
    |-node.textContent = text;                                     |
  ?{2}                                                             |
    |-this.mountChildren()        // scr: ---------------> 1)(a)   |
      |-this._reconcilerInstantiateChildren()                      |
        |-ReactChildReconciler.instantiateChildren()               |
          |-traverseAllChildren()                                  |
            |-traverseAllChildrenImpl()  <------|inner             |
              |↻traverseAllChildrenImpl() ------|recursion         |
                |-instantiateChild()                               |
                  |-instantiateReactComponent()                    |
      |↻ReactDOMComponent.mountComponent() // scr: ------> 1)(b)---|
    |↻node.appendChild()                   // scr: ------> 2)
...
推导总体逻辑
我们从认识的函数开始。
第一个我们知道的函数是instantiateReactComponent(),它是用来从ReactElement实例化ReactDOMComponent的,这个函数也是嵌套非常深的静态调用栈的末端。{第二篇}
第二个认识的函数是ReactDOMComponent.mountComponent(),它是用来初始化上一步实例化的ReactDOMComponent,然后从中派生出DOM节点的。 {第三篇} 和 {本文开头}
我们把以上两个操作想象成一个{OG} (操作集合 operation group),就比较容易归纳出ReactElement树具体是怎么被处理的了。
- 当外循环(outer recursion)调用, 调用方(ReactDOMComponent)是一个非叶子节点时,分支{2}被触发,然后{OG}会作用在每一个调用方ReactDOMComponent的子节点上;
- 当外循环(outer recursion)调用, 调用方(ReactDOMComponent)是一个叶子节点时,并且这个叶子节点包含字符串,分支{1}会被触发,然后直接设置该节点的node.textContent;
- 当外循环(outer recursion)调用, 调用方(ReactDOMComponent)是一个叶子节点时,并且这个叶子节点并不包含字符串,_createInitialChildren()函数根本就不会被调用。
这里要注意在上述过程中ReactDOMComponent.mountComponent()会被反复用于创建ReactDOMComponent对应的DOM节点,所以最好回顾一下本文开头这个函数的实现以便更好的理解。
现在可以画调用栈了:
...
ReactDOMComponent[6].mountComponent()
  |-this._createInitialChildren()
    |-this.mountChildren()
...           |↻instantiateReactComponent()[4,5]
      |-ReactDOMComponent[5].mountComponent()
        |-this._createInitialChildren()
          |-node.textContent = text; // scr: [5] done
      |-ReactDOMComponent[4].mountComponent()
        |-this._createInitialChildren()
          |-this.mountChildren()
...                 |↻instantiateReactComponent()[2,3]
          |-ReactDOMComponent[2].mountComponent() // scr: [2] done
          |-ReactDOMComponent[3].mountComponent()
            |-this._createInitialChildren()
              |-node.textContent = text; // scr: [3] done
        |↻node[4].appendChild()[2,3] // scr: [4] done

    |↻node[6].appendChild()[4,5] // scr: [6] done
...
在这个调用栈中,我故意忽略了用于实例化ReactDOMComponent的那个深层嵌套,因为下段马上会讲。
深层循环调用instantiateReactComponent()
这里我们注意一下这个包含递归和回调的入参和出参。
从ReactDOMComponent._createInitialChildren的函数体开始:
...
var mountImages = this.mountChildren(
  childrenToUse, // scr:----------> ReactElement[6].props.children
  transaction,   // scr: not of interest
  context        // scr: not of interest
);
...
下一步我们来看ReactDOMComponent.mountChildren()的函数实现。上面提到,它1)实例化ReactDOMComponent的所有子节点;2)调用ReactDOMComponent.mountComponent()来初始化这些子节点 。
mountChildren: function (
  nestedChildren, // scr:----------> ReactElement[6].props.children
  transaction,    // scr: not of interest
  context         // scr: not of interest
) {

  // scr: ------------------------------------------------------> 1)
  var children = this._reconcilerInstantiateChildren(nestedChildren, transaction, context);

  this._renderedChildren = children;

  var mountImages = [];
  var index = 0;
  for (var name in children) {
    if (children.hasOwnProperty(name)) {
      var child = children[name];
      var selfDebugID = 0;
...// scr: DEV code
                           (outer recursion)
      // scr: --------------------------------------------------> 2)
      var mountImage = ReactReconciler.mountComponent(child, transaction, this, this._hostContainerInfo, context, selfDebugID);

      child._mountIndex = index++;
      mountImages.push(mountImage);
    }
  }

...// scr: DEV code

  return mountImages;
},

ReactDOMComponent@renderers/dom/shared/ReactDOMComponent.js
2) 在前面被称为外循环调用我们已经介绍过的ReactReconciler.mountComponent(){第二篇},所以我们关注1)就好了
_reconcilerInstantiateChildren: function (
  nestedChildren, // scr:----------> ReactElement[6].props.children
  transaction,    // scr: not of interest
  context         // scr: not of interest
) {
...// scr: DEV code
  return ReactChildReconciler.instantiateChildren(nestedChildren, transaction, context);
},

ReactMultiChild@renderers/shared/stack/reconciler/ReactMultiChild.js
直接调用了
instantiateChildren: function (
  nestedChildNodes, // scr: --------> ReactElement[6].props.children
  transaction,      // scr: not of interest
  context,          // scr: not of interest
  selfDebugID
) // 0 in production and for roots {
  if (nestedChildNodes == null) {
    return null;
  }
  var childInstances = {};

  if (process.env.NODE_ENV !== 'production') {
...// scr: DEV code
  } else {
    traverseAllChildren(nestedChildNodes, instantiateChild, childInstances);
  }

  return childInstances;
},

instantiateChildren@renderers/shared/stack/reconciler/ReactChildReconciler.js
再次直接调用了traverseAllChildren(),这里要注意回调函数instantiateChild会被用于处理子节点。
 function instantiateChild(
  childInstances, // scr: ---> the output parameter childInstances is passed all the way down here
  child,      // scr: --> a ReactElement
  name,       // scr: --> unique name for indexing in childInstances
  selfDebugID // scr: --> undefined
) {
... // scr: DEV code
  }
  if (child != null && keyUnique) {
    childInstances[name] = instantiateReactComponent(child, true);
  }
}

instantiateChild@renderers/shared/stack/reconciler/ReactChildReconciler.js
这个函数仅仅调用了instantiateReactComponent(){第一篇} 。
所以我们继续看traverseAllChildren()
function traverseAllChildren(
  children, // scr: ---------> ReactElement[6].props.children
  callback, // scr: ---------> instantiateChild
  traverseContext // scr: ---> output parameter, initialized as {}
) {
  if (children == null) {
    return 0;
  }

  return traverseAllChildrenImpl(children, '', callback, traverseContext);
}

traverseAllChildren@shared/utils/traverseAllChildren.js
又是一个单行调用traverseAllChildrenImpl
function traverseAllChildrenImpl(
  children,  // scr: ---------> ReactElement[6].props.children
  nameSoFar, // scr: ---------> ''
  callback,  // scr: ---------> instantiateChild
  traverseContext // scr: ---> output parameter, initialized as {}
) {
  var type = typeof children;

  if (type === 'undefined' || type === 'boolean') {
    // All of the above are perceived as null.
    children = null;
  }

// scr: -------------------------------------------------------> {a}
  if (children === null || type === 'string' || type === 'number' || type === 'object' && children.?typeof === REACT_ELEMENT_TYPE) {
    callback(traverseContext, children,
    // If it's the only child, treat the name as if it was wrapped in an array
    // so that it's consistent if the number of children grows.
    nameSoFar === '' ? SEPARATOR + getComponentKey(children, 0) : nameSoFar);
    return 1;
  }

  var child;
  var nextName;
  var subtreeCount = 0; // Count of children found in the current subtree.
  var nextNamePrefix = nameSoFar === '' ? SEPARATOR : nameSoFar + SUBSEPARATOR;

// scr: -------------------------------------------------------> {b}

  if (Array.isArray(children)) {
    for (var i = 0; i < children.length; i++) {
      child = children[i];
      nextName = nextNamePrefix + getComponentKey(child, i);
      subtreeCount += traverseAllChildrenImpl(child, nextName, callback, traverseContext);
    }
  } else {
... // scr: this branch will not be called here
  }

  return subtreeCount;
}

traverseAllChildrenImpl@shared/utils/traverseAllChildren.js
经过大部分中间函数,traverseAllChildrenImpl()是便利子节点的核心函数。我们之前将这个函数称为内循环(inner recursion)。
这个函数逻辑比较简单:当它第一次被调用时(这时参数children的类型是array),它会对这个数组中所有的ReactElement再递归调一次自己;当它被后续调用时(参数children是ReactElement),它会调用前面提到的回调函数。这个回调函数内部再调用instantiateReactComponent(){ 第一篇}
来把这些ReactElement实例化为未初始化的ReactDOMComonent。
注意内循环仅仅作用于直接子节点,而外循环则会遍历整棵ReactElement树结构
当所有的ReactElement被转换成ReactDOMComonent后,结果则被一路返回到ReactDOMComponent.mountChildren(),至此完成闭环。
要理解整个闭环可能需要来回参照各个处理模块,比如文章开头的ReactDOMComponent.mountComponent(),定义了栈底的两个DOM操作(Node.appendChild, Node.textContent),对总体逻辑的推导和讨论以及本小节。
最后,正如 {第三篇} 最后所介绍的,整个逻辑返回到ReactReconciler.mountComponent()然后新生成的DOM树被插入到指定的div容器中。
...
|~mountComponentIntoNode()                                    |
  |-ReactReconciler.mountComponent()                          |
    |-ReactCompositeComponent[T].mountComponent()             |
      |-ReactCompositeComponent[T].performInitialMount()  upper half
        |-ReactReconciler.mountComponent()                    |
          |-ReactCompositeComponent[ins].mountComponent()     |
            |-this.performInitialMount()                      |
              |-this._renderValidatedComponent()              |
              |-instantiateReactComponent()                  _|_
              |-ReactDOMComponent[6].mountComponent(          |
                  transaction, // scr: -----> not of interest |
                  hostParent,  // scr: -----> null            |
                  hostContainerInfo,// scr:---------------------> ReactDOMContainerInfo[ins]                                    |
                  context      // scr: -----> not of interest |
                )                                             |
                                                              |
... // the content of this section                        lower half
        |-_mountImageIntoNode()                  (HTML DOM specific)
            markup,    // scr: --> DOMLazyTree[ins]           |
            container, // scr: --> document.getElementById(‘root’)
            wrapperInstance, // scr:----> same                |
            shouldReuseMarkup, // scr:--> same                |
            transaction, // scr: -------> same                |
          )                                                  _|_
今天先写到这。如果您觉得这篇不错,可以点赞或关注这个专栏。
感谢阅读!👋
Originally published at
Understanding The React Source Code - Initial Rendering (Simple Component) Iholmeshe.me